編輯:關於Android編程
在最近的兩篇Qt on Android中學習了怎麼使用基礎的JNI以及如何使用外部IDE來管理Qt應用的Java部分。這章呢,我們繼續前進,關注如何擴展我們的Qt on Android應用的Java部分以及怎樣安全地使用JNI來交互。
這部分我們准備實現一個SD卡監聽器。對於那些想使用SD卡來存儲數據的應用來講,這是很有用的一個例子,因為如果應用在收到通知後不立即關閉打開的文件,它就會被Android系統干掉。
正如我們在Episode 5中看到的那樣,從C/C++代碼裡調用Java方法或者從Java代碼裡調用C/C++方法都是相當簡單的,但不是所有情況都管用。為什麼?
為了理解為什麼不行,首先我們需要理解Qt on Android架構。

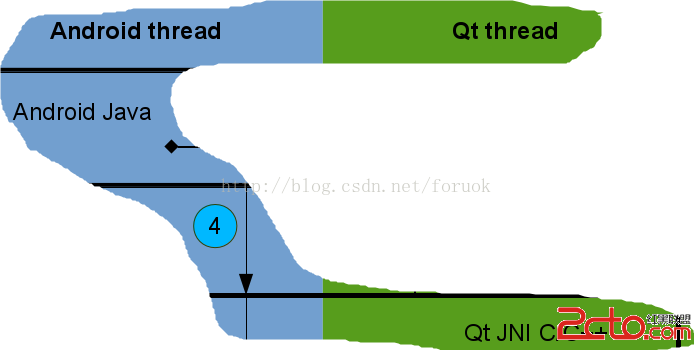
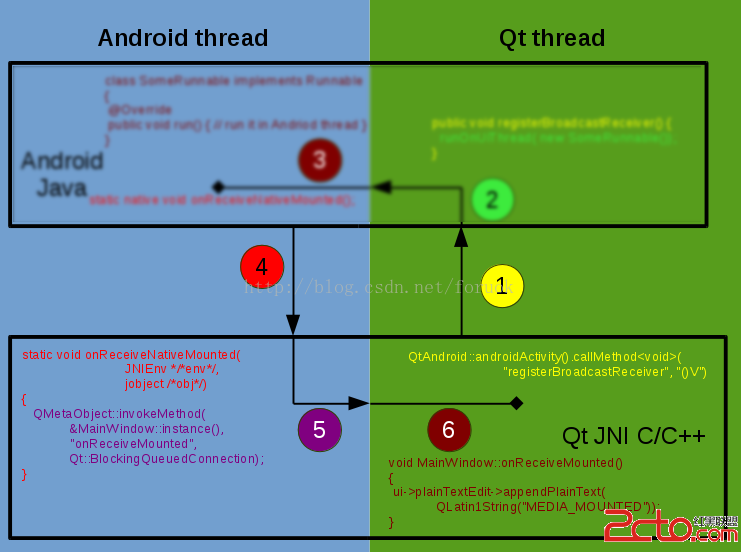
關於架構圖的幾句話:
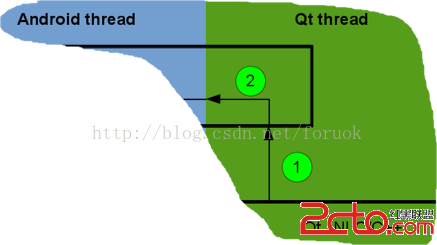
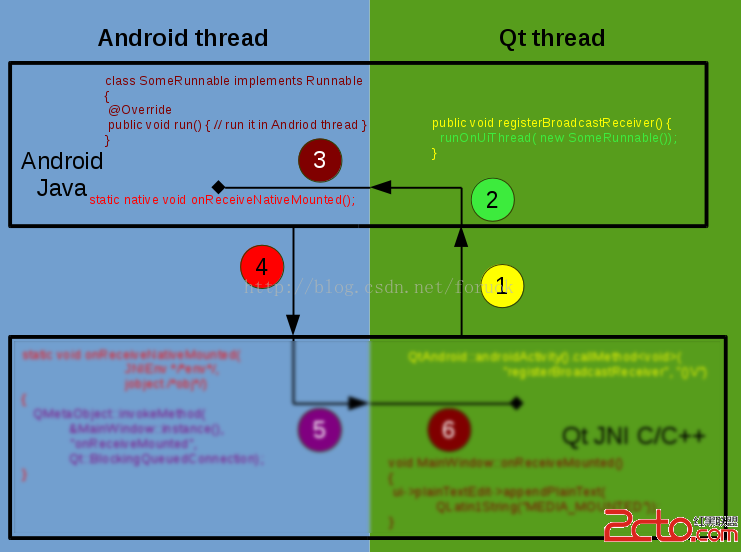
左邊的藍色矩形代表Android UI線程 右邊的綠色矩形代表Qt的主線程(Qt主事件循環運行在其中)。如果你想了解Android UI和Qt線程的更多信息請閱讀Episode 1。 頂部的黑色矩形是你應用中的Java部分。如你所見,它大部分運行在Android UI線程中。 Java部分運行在Qt線程中的唯一情況,是我們在Qt線程裡從C/C++代碼裡調用它(這也是大部分JNI調用發生的地方)。 底部的黑色矩形是你應用的C/C++(Qt)部分。如你所見,它大部分運行在Qt線程中。C/C++部分運行在Android UI線程的唯一情況,是我們在Android UI線程裡的Java部分調用它(大部分的Java回調發生在這裡)。好啦……那麼,問題是什麼?嗯,問題是,有一部分Android API必須在Android UI線程中調用,而當我們在C/C++代碼裡調用Java方法時實際上是在Qt線程裡做這件事。這就是說,我們需要有一種方法讓這些代碼運行在Android UI線程中而不是Qt線程中。為了從C/C++ Qt線程到Java Android UI線程實現這樣的調用,我們需要三個步驟:
從C/C++ Qt線程裡調用一個Java方法。這個方法會在Qt線程裡執行,因此我們需要一種方法,能在Android UI線程裡訪問Android API。 我們的Java方法使用Activity.runOnUiThread來投遞一個Runnable到Android UI線程裡。Android事件循環會在Android UI線程裡執行這個Runnable。 Runnable對象在Android UI線程裡訪問Android API。當Java代碼調用C/C++函數時也存在類似的問題,因為Java會在Android UI線程裡調用我們的C/C++函數,因此我們需要一種方法在Qt線程裡傳遞那些通知。也有三個步驟:
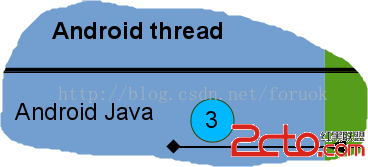
在 Android UI線程裡調用一個C/C++函數. 使用QMetaObject::invokeMethod向Qt事件循環投遞一個方法調用。 Qt時間循環在Qt線程裡執行那個函數。在你開始之前,最好讀一讀Episode 6,因為你需要它來方便地管理Java文件。
第一步是創建一個定制的Activity,繼承自QtActivity,並且定義一個用來投遞我們的Runnable的方法。
// src/com/kdab/training/MyActivity.java
package com.kdab.training;

import org.qtproject.qt5.android.bindings.QtActivity;

public class MyActivity extends QtActivity
{
    // this method is called by C++ to register the BroadcastReceiver.
    public void registerBroadcastReceiver() {
        // Qt is running on a different thread than Android.
        // In order to register the receiver we need to execute it in the Android UI thread
        runOnUiThread(new RegisterReceiverRunnable(this));
    }
}
接下來要改變AndroidManifest.xml的默認Activity,從這樣:
改成這樣:
我們這麼做是為了確保應用啟動時會實例化我們定制的Activity。
第三步是定義我們的RegisterReceiverRunnable類:這個類的run方法會在Android UI線程裡被調用。在run方法裡我們注冊我們的SDCardReceiver監聽器。
// src/com/kdab/training/RegisterReceiverRunnable.java
package com.kdab.training;

import android.app.Activity;
import android.content.Intent;
import android.content.IntentFilter;

public class RegisterReceiverRunnable implements Runnable
{
    private Activity m_activity;
    public RegisterReceiverRunnable(Activity activity) {
        m_activity = activity;
    }
    // this method is called on Android Ui Thread
    @Override
    public void run() {
        IntentFilter filter = new IntentFilter();
        filter.addAction(Intent.ACTION_MEDIA_MOUNTED);
        filter.addAction(Intent.ACTION_MEDIA_UNMOUNTED);
        filter.addDataScheme(file);

        // this method must be called on Android Ui Thread
        m_activity.registerReceiver(new SDCardReceiver(), filter);
    }
}
讓我們看看類的樣子:
// src/com/kdab/training/SDCardReceiver.java
package com.kdab.training;

import android.content.BroadcastReceiver;
import android.content.Context;
import android.content.Intent;

public class SDCardReceiver extends BroadcastReceiver {
    @Override
    public void onReceive(Context context, Intent intent) {
        // call the native method when it receives a new notificatio**SDCardReceiver**n
        if (intent.getAction().equals(Intent.ACTION_MEDIA_MOUNTED))
            NativeFunctions.onReceiveNativeMounted();
        else if (intent.getAction().equals(Intent.ACTION_MEDIA_UNMOUNTED))
            NativeFunctions.onReceiveNativeUnmounted();
    }
}
SDCardReceiver重寫了onReceive方法,然後它使用聲明的原生方法向C/C++代碼發送通知。
最後一步是聲明在SDCardReceiver裡用到的原生函數:
// src/com/kdab/training/NativeFunctions.java
package com.kdab.training;

public class NativeFunctions {
    // define the native function
    // these functions are called by the BroadcastReceiver object
    // when it receives a new notification
    public static native void onReceiveNativeMounted();
    public static native void onReceiveNativeUnmounted();
}
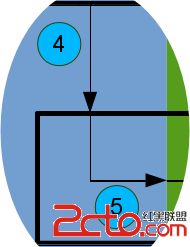
讓我們結合結構圖看看Java部分的調用總結:
現在我們來看看怎麼擴展C/C++部分。為了演示怎麼做,我使用一個簡單的基於QWidget的應用。
首先我們需要做的是調用registerBroadcastReceiver方法。
// main.cpp
#include mainwindow.h
#include
#include

int main(int argc, char *argv[])
{
    QApplication a(argc, argv);

    // call registerBroadcastReceiver to register the broadcast receiver
    QtAndroid::androidActivity().callMethod(registerBroadcastReceiver, ()V);

    MainWindow::instance().show();
    return a.exec();
}
!
// native.cpp
#include

#include

#include mainwindow.h

// define our native static functions
// these are the functions that Java part will call directly from Android UI thread
static void onReceiveNativeMounted(JNIEnv * /*env*/, jobject /*obj*/)
{
    // call MainWindow::onReceiveMounted from Qt thread
    QMetaObject::invokeMethod(&MainWindow::instance(), onReceiveMounted
                              , Qt::QueuedConnection);
}

static void onReceiveNativeUnmounted(JNIEnv * /*env*/, jobject /*obj*/)
{
    // call MainWindow::onReceiveUnmounted from Qt thread, we wait until the called function finishes
    // in this function the application should close all its opened files, otherwise it will be killed
    QMetaObject::invokeMethod(&MainWindow::instance(), onReceiveUnmounted
                              , Qt::BlockingQueuedConnection);
}

//create a vector with all our JNINativeMethod(s)
static JNINativeMethod methods[] = {
    {onReceiveNativeMounted, ()V, (void *)onReceiveNativeMounted},
    {onReceiveNativeUnmounted, ()V, (void *)onReceiveNativeUnmounted},
};

// this method is called automatically by Java after the .so file is loaded
JNIEXPORT jint JNI_OnLoad(JavaVM* vm, void* /*reserved*/)
{
    JNIEnv* env;
    // get the JNIEnv pointer.
    if (vm->GetEnv(reinterpret_cast(&env), JNI_VERSION_1_6) != JNI_OK)
      return JNI_ERR;

    // search for Java class which declares the native methods
    jclass javaClass = env->FindClass(com/kdab/training/NativeFunctions);
    if (!javaClass)
      return JNI_ERR;

    // register our native methods
    if (env->RegisterNatives(javaClass, methods,
                          sizeof(methods) / sizeof(methods[0])) < 0) {
      return JNI_ERR;
    }

    return JNI_VERSION_1_6;
}
在native.cpp中,我們注冊了原生函數。在我們的靜態原生函數裡我們使用QMetaObject::invokeMethod來向Qt線程投遞一個槽調用。
// mainwindow.h
#ifndef MAINWINDOW_H
#define MAINWINDOW_H

#include

namespace Ui {
class MainWindow;
}
class MainWindow : public QMainWindow
{
    Q_OBJECT

public:
    static MainWindow &instance(QWidget *parent = 0);

public slots:
    void onReceiveMounted();
    void onReceiveUnmounted();

private:
    explicit MainWindow(QWidget *parent = 0);
    ~MainWindow();

private:
    Ui::MainWindow *ui;
};
#endif // MAINWINDOW_H

// mainwindow.cpp
#include mainwindow.h
#include ui_mainwindow.h

MainWindow::MainWindow(QWidget *parent) :
    QMainWindow(parent),
    ui(new Ui::MainWindow)
{
    ui->setupUi(this);
}

MainWindow::~MainWindow()
{
    delete ui;
}

MainWindow &MainWindow::instance(QWidget *parent)
{
    static MainWindow mainWindow(parent);
    return mainWindow;
}

// Step 6
// Callback in Qt thread
void MainWindow::onReceiveMounted()
{
    ui->plainTextEdit->appendPlainText(QLatin1String(MEDIA_MOUNTED));
}

void MainWindow::onReceiveUnmounted()
{
    ui->plainTextEdit->appendPlainText(QLatin1String(MEDIA_UNMOUNTED));
}
MainWindow類僅僅是在收到通知時給我們的plainText控件添加一些文字。在Android線程裡調用這些函數可能大大損害我們應用的健壯性——它可能導致崩潰或不可預知的行為,因此它們必須在Qt線程裡被調用。
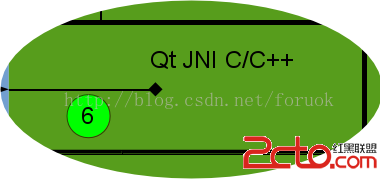
在我們的架構圖上,C/C++部分的調用概要如下:
下面是我們已經完成的C/C++和Java之間的所有調用的架構圖:
示例源碼下載:Click Here。
謝謝你肯花時間讀這篇文章。
(譯者注:BogDan Vatra真是超級nice,提供了這麼多圖,把Java <–> C++之間的相互調用解釋得太清楚了。)
我翻譯的Qt on Android Episode系列文章:
Qt on Android Episode 1 Qt on Android Episode 2 Qt on Android Episode 3 Qt on Android Episode 4 Qt on Android Episode 5 Qt on Android Episode 6
 Android Launcher源碼研究(三) 加載app流程2
接上次的。 首先Launcher實現了LauncherModel.Callbacks接口,APP信息數據加載成功後 ,回調接口把app信息顯示到Launcher的 wor
 谷歌約束控件(ConstraintLayout)扁平化布局入門
序在Google IO大會中不僅僅帶來了Android Studio 2.2預覽版,同時帶給我們一個依賴約束的庫。簡單來說,她是相對布局的升級版本,但是區別與相對布局更加
 將 Android* x86 NDK 用於 Eclipse* 並移植 NDK 示例應用
目標 面向 Eclipse (ADT) 的 Android 插件現在支持基於 NDK 的應用開發。 其可自動生成項目和構件文件以及代碼存根,並可集成到整個 Andro
 機器冰冷 仍有溫情 遠程協助玩轉Android手機
很多年齡較大的長輩和呆萌的MM們在操作Android手機的過程中總會遭遇“卡殼”問題,比如XX軟件不會設置、XX功能無法開啟等。那麼