編輯:關於Android編程
經過多番測試實踐,實現了popupwindow 彈出在指定控件的下方。代碼上有注釋,有需要注意的地方。popupwindow 有自已的布局,裡面控件的監聽實現都有。接下來看代碼實現。
項目資源下載:點擊這裡
TestPopwindow2.class
package com.example.popwindowdemo;

import android.app.ActionBar.LayoutParams;
import android.app.Activity;
import android.content.Context;
import android.graphics.drawable.BitmapDrawable;
import android.view.LayoutInflater;
import android.view.View;
import android.widget.PopupWindow;

public class TestPopwindow2 extends PopupWindow {
	// 根視圖
	private View mRootView;
	// LayoutInflater
	LayoutInflater mInflater;

	public TestPopwindow2(Activity context) {
		super(context);
		mInflater = (LayoutInflater) context
				.getSystemService(Context.LAYOUT_INFLATER_SERVICE);
		mRootView = mInflater.inflate(R.layout.test_popwindow_2, null);
		setContentView(mRootView);

		this.setWidth(LayoutParams.WRAP_CONTENT);
		this.setHeight(LayoutParams.WRAP_CONTENT);

		// 設置PopUpWindow彈出的相關屬性
		setTouchable(true);
		setOutsideTouchable(true);
		setFocusable(true);
		setBackgroundDrawable(new BitmapDrawable(context.getResources()));
		update();

		getContentView().setFocusableInTouchMode(true);
		getContentView().setFocusable(true);
		setAnimationStyle(R.style.AppBaseTheme);
	}
}
MainActivity.class
package com.example.popwindowdemo;

import android.os.Bundle;
import android.app.Activity;
import android.view.Gravity;
import android.view.View;
import android.view.View.OnClickListener;
import android.widget.Button;
import android.widget.PopupWindow.OnDismissListener;
import android.widget.Toast;

public class MainActivity extends Activity implements OnClickListener,
		OnDismissListener {

	private TestPopwindow2 mTestPopwindow2 = null;

	@Override
	protected void onCreate(Bundle savedInstanceState) {
		super.onCreate(savedInstanceState);
		setContentView(R.layout.activity_main);

		InitUI();

	}

	private void InitUI() {
		// 實例化TestPopwindow2
		mTestPopwindow2 = new TestPopwindow2(this);
		// 設置點擊其他位置mTestPopwindow2消失
		mTestPopwindow2.setOnDismissListener(this);

		Button buttonTest2 = (Button) findViewById(R.id.buttonTest2);
		buttonTest2.setOnClickListener(this);
	}

	private void OnPopwindowTest2() {
		if (mTestPopwindow2 == null)
			return;

		// location獲得控件的位置
		int[] location = new int[2];
		View v = findViewById(R.id.buttonTest2);
		if (v != null)
			v.getLocationOnScreen(location);   // 控件在屏幕的位置
		mTestPopwindow2.setAnimationStyle(R.style.AppBaseTheme);

		// mTestPopwindow2彈出在某控件(button)的下面
		mTestPopwindow2.showAtLocation(v, Gravity.TOP | Gravity.LEFT,
				location[0] - v.getWidth(), location[1] + v.getHeight());
	}

	// mTestPopwindow2布局控件的監聽
	public void OnclickTestListener(View view) {
		switch (view.getId()) {
		case R.id.layoutSeclect1:
			Toast.makeText(this, "系統熱門方案", Toast.LENGTH_SHORT).show();
			break;
		case R.id.layoutSeclect2:
			Toast.makeText(this, "個人熱門方案", Toast.LENGTH_SHORT).show();
			break;
		default:
			break;
		}
		if (mTestPopwindow2 != null)
			mTestPopwindow2.dismiss();
	}

	@Override
	public void onClick(View v) {
		switch (v.getId()) {
		case R.id.buttonTest2:
			OnPopwindowTest2();
			break;
		default:
			break;
		}
	}

	// 點擊其他地方消失
	@Override
	public void onDismiss() {
	}
}
test_popwindow_2.xmlactivity_main.xml
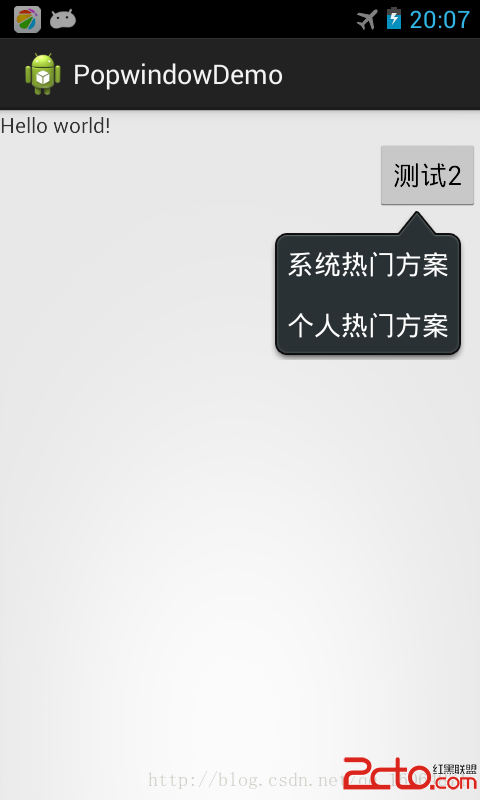
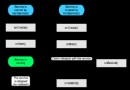
效果圖如下
項目資源下載:點擊這裡
轉載請注明出處的博客網址: http://blog.csdn.net/qq_16064871
如有轉載未注明出處博客網址,或者沒有得到作者的同意。作者持有版權所有權。
 Android項目之HomeHealth基礎學習1:Service
一、 Service簡介 Service是android 系統中的四大組件之一(Activity、Service、BroadcastReceiver、ContentP
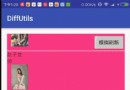 【Android】詳解7.0帶來的新工具類:DiffUtil
一 概述DiffUtil是support-v7:24.2.0中的新工具類,它用來比較兩個數據集,尋找出舊數據集-》新數據集的最小變化量。說到數據集,相信大家知道它是和誰相
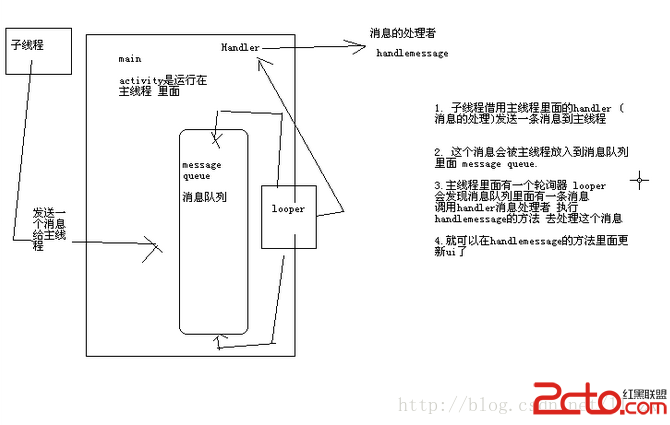 Android中的Handler
當我們在處理下載或是其他需要長時間執行的任務時,如果直接把處理函數放在Activity的OnCreate或是OnStart中,會導致執行過程中整個Activity無響
 RecyclerView詳細介紹&使用
<主菜>RecyclerView簡介RecyclerView是Android 5.0提供的新控件,已經用了很長時間了,但是一直沒有時間去仔細的梳理一下。現在有