編輯:關於Android編程
做過Android開發都會陸續用到這個開源庫EventBus。EventBus是一款針對Android優化的發布/訂閱事件總線。主要功能是替代Intent,Handler,BroadCast在Fragment,Activity,Service,線程之間傳遞消息.優點是開銷小,代碼更優雅。以及將發送者和接收者解耦。下面說說簡單用法。
本文項目資源下載:
一、先定義一個消息實體類MainSendEvent
package com.example.eventbusdemo;

/**
 * 事件消息實體類
 * @author mmxs
 *
 */
public class MainSendEvent {
	protected String mstrMsg;

	public MainSendEvent(String msg) {
	    mstrMsg = msg;
	}

	public String getStringMsgData(){
		return mstrMsg;
	}
}
二、MainActivity
package com.example.eventbusdemo;

import de.greenrobot.event.EventBus;
import android.os.Bundle;
import android.view.View;
import android.view.View.OnClickListener;
import android.widget.Button;
import android.widget.TextView;
import android.widget.Toast;
import android.app.Activity;
import android.content.Intent;

public class MainActivity extends Activity implements OnClickListener{

	@Override
	protected void onCreate(Bundle savedInstanceState) {
		super.onCreate(savedInstanceState);
		setContentView(R.layout.activity_main);
		//事件注冊
		EventBus.getDefault().register(this);
		InitUI();
	}

	private void InitUI() {
		Button button = (Button)findViewById(R.id.button1);
		button.setOnClickListener(this);
	}

	@Override
	public void onClick(View v) {
		switch (v.getId()) {
		case R.id.button1:
			Intent intent = new Intent();
			intent.setClass(MainActivity.this, TwoActivity.class);
			startActivity(intent);
			break;

		default:
			break;
		}

	}

	//事件接受
	public void onEventMainThread(MainSendEvent event){
		if(event != null){
			Toast.makeText(getApplicationContext(),
					MainActivity接受數據 + event.getStringMsgData(),
					Toast.LENGTH_LONG).show();
			TextView textView = (TextView)findViewById(R.id.textView1);
			textView.setText(event.getStringMsgData());
		}
	}

	@Override
	public void onDestroy() {
		//取消注冊
		EventBus.getDefault().unregister(this);
		super.onDestroy();
	}
}
三、TwoActivity
package com.example.eventbusdemo;

import de.greenrobot.event.EventBus;
import android.app.Activity;
import android.os.Bundle;
import android.view.View;
import android.view.View.OnClickListener;
import android.widget.Button;
/**
 * 第二個TwoActivity發送事件
 * @author mmsx
 *
 */
public class TwoActivity extends Activity implements OnClickListener{


	@Override
	protected void onCreate(Bundle savedInstanceState) {
		super.onCreate(savedInstanceState);
		setContentView(R.layout.activity_two);

		Button button = (Button)findViewById(R.id.button1);
		button.setOnClickListener(this);

	}

	@Override
	public void onClick(View v) {
		switch (v.getId()) {
		case R.id.button1:
			//事件發送
			EventBus.getDefault().post(new MainSendEvent(from TwoActivity msg));
			break;
		default:
			break;
		}

	}


}
四、兩個activity的布局
1、activity_main
2、activity_two
在這上面總體上實踐就是在activity間消息傳遞。我們先進去的是MainActivity。然後按button進入第二個activity。在第二個activity按一下button發送數據到MainActivity,用Toat彈出以及settext。返回MainActivity後能看到settext效果。
五、效果圖
六、簡單來說的流程
1、事件注冊或者訂閱
EventBus.getDefault().register(this);2、事件注冊或者訂閱後的接受
public void onEventMainThread(MainSendEvent event){
		if(event != null){
			Toast.makeText(getApplicationContext(),
					MainActivity接受數據 + event.getStringMsgData(),
					Toast.LENGTH_LONG).show();
			TextView textView = (TextView)findViewById(R.id.textView1);
			textView.setText(event.getStringMsgData());
		}
	}
3、事件注冊或者訂閱取消EventBus.getDefault().unregister(this);這上面3點是一起,同一個頁面。
4、事件的發送者
EventBus.getDefault().post(new MainSendEvent(from TwoActivity msg));
 Android 控件的觸摸事件傳遞與處理
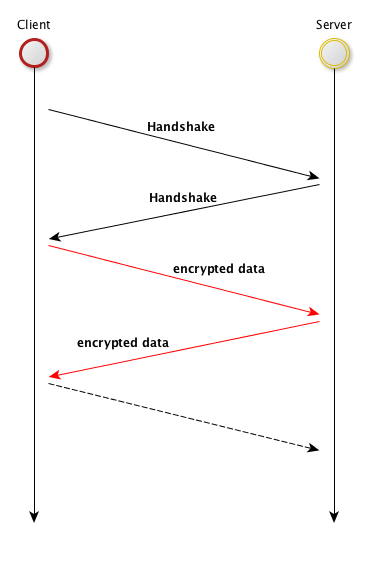
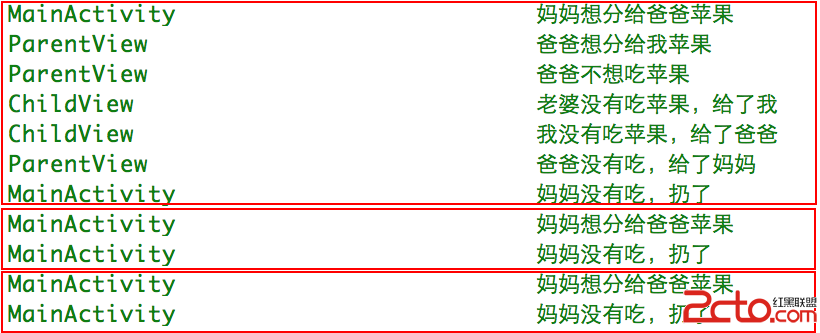
了解Android控件的觸摸事件傳遞與處理對我們日常開發中自定義控件和觸摸事件沖突解決有重大意義。Android控件的觸摸事件傳遞和處理主要有以下幾個方法,下面一一介紹。
 Android Toast的用法總結(五種用法)
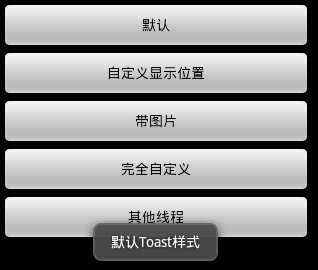
Toast大家都很熟,不多說。直接上圖上代碼。 具體代碼如下:main.xml:<?xml version=1.0 enc
 AnimatedPathView實現自定義圖片標簽
老早用過小紅書app,對於他們客戶端筆記這塊的設計非常喜歡,恰好去年在小紅書的競爭對手公司,公司基於產品的考慮和產品的發展,也需要將app社交化,於是在社區分享這塊多多少
 Android學習筆記(十二)——使用意圖傳遞數據的幾種方式
使用意圖傳遞數據的幾種方式 點此獲取完整代碼 我們除了要從活動返回數據,也常常要傳遞數據給活動。對此我們可以使用Intent對象將這些數據傳遞給目標活動。