編輯:關於Android編程
自動化測試是Android測試的趨勢, 穩定\復用, 最常用的工具就是Espresso.
使用UIAutomatorViewer獲取資源的Id,
位置/android-sdk/tools/uiautomatorviewer, 點擊即可使用.

地址, 加載SVG格式的圖片, 修改顏色屬性.

JSONOnlineViewer, 網絡請求插件, 獲取Json數據, 位置View->JSONViewer.
GsonFormat, 根據Json自動生成類的插件, 在Command+N裡面.
附一張插件的截圖, 其他隨意.

Retrofit升級到beta3版本, 使用了最新Okhttp3, Interceptor的設置方式發生改變.
舊版
OkHttpClient client = new OkHttpClient().Builder();

HttpLoggingInterceptor loggingInterceptor = new HttpLoggingInterceptor();
loggingInterceptor.setLevel(HttpLoggingInterceptor.Level.BASIC);
MarvelSigningInterceptor signingInterceptor = new MarvelSigningInterceptor(
    BuildConfig.MARVEL_PUBLIC_KEY, BuildConfig.MARVEL_PRIVATE_KEY);

client.interceptors().add(signingInterceptor);
client.interceptors().add(loggingInterceptor);
替換, 新版
        HttpLoggingInterceptor loggingInterceptor = new HttpLoggingInterceptor();
        loggingInterceptor.setLevel(HttpLoggingInterceptor.Level.BASIC);

        MarvelSigningInterceptor signingInterceptor = new MarvelSigningInterceptor(
                BuildConfig.MARVEL_PUBLIC_KEY, BuildConfig.MARVEL_PRIVATE_KEY);

        OkHttpClient client = new OkHttpClient.Builder()
                .addInterceptor(signingInterceptor)
                .addInterceptor(loggingInterceptor)
                .build();
否則可能會發生: HTTP 409 Conflict, 未輸入正確的驗證方式, 私鑰錯誤.
參考, 可以輸出log信息, 使用, 當前版本是3.0.1.
compile "com.squareup.okhttp3:logging-interceptor:${libs.okhttp}"
輸出參考:
D/OkHttp: <-- 200 OK http://gateway.marvel.com/v1/public/characters?offset=0&... (1552ms, unknown-length body)
status bar設置成為透明顏色.
頁面的根布局是CollapsingToolbarLayout.
<code class="hljs avrasm"><android.support.design.widget.collapsingtoolbarlayout android:fitssystemwindows="true" android:layout_height="match_parent" android:layout_width="match_parent" xmlns:android="http://schemas.android.com/apk/res/android">

    <imageview android:contentdescription="@null" android:fitssystemwindows="true" android:layout_height="match_parent" android:layout_width="match_parent" android:scaletype="centerCrop" android:src="@drawable/christmas">

</imageview></android.support.design.widget.collapsingtoolbarlayout></code>
效果

位置: File->Other Settings->Default Settings->Editor->Live Templates
熟練之後, 根據簡寫+Tab就可以使用了, 當然也可以自己添加.

自定義模板:
縮寫(Abbreviation), 描述(Description), 內容(Template text), 應用場景, 格式化.

網址, 網站裡面有很多好玩的動畫效果, 而且都是編程實現, 方便移植, 如雪花效果.
Android官方推薦使用RecyclerView代替ListView, 但是很多守舊的人不想這麼做, 那麼, 也需要使用ViewHolder提升加載速度. 參考.
基本用法.
static class ViewHolder() {
    TextView testName;
    TextView testDesc;
}

...

@Override
public View getView(int position, View convertView, ViewGroup parent) {
    View rowView = convertView;

    // 初始化ViewHolder
    if (convertView == null) {
        LayoutInflater inflater = (LayoutInflater) parent.getContext()
            .getSystemService(Context.LAYOUT_INFLATER_SERVICE);
        rowView = inflater.inflate(R.layout.view_test_row, parent, false);
        ViewHolder viewHolder = new ViewHolder();
        viewHolder.testName = (TextView) rowView.findViewById(R.id.test_tv_name);
        viewHolder.testDesc = (TextView) rowView.findViewById(R.id.test_tv_desc);
        rowView.setTag(viewHolder);
    }

    // 使用ViewHolder
    ViewHolder holder = (ViewHolder) rowView.getTag();
    holder.testName.setText("Test: " + position);
    holder.testDesc.setText("This is number " + position + ". ");

    return rowView;
}
OK, that’s all! Enjoy it.
 Android 的Canvas中drawArc方法介紹
public void drawArc(RectF oval, float startAngle, float sweepAngle, boolean useCenter
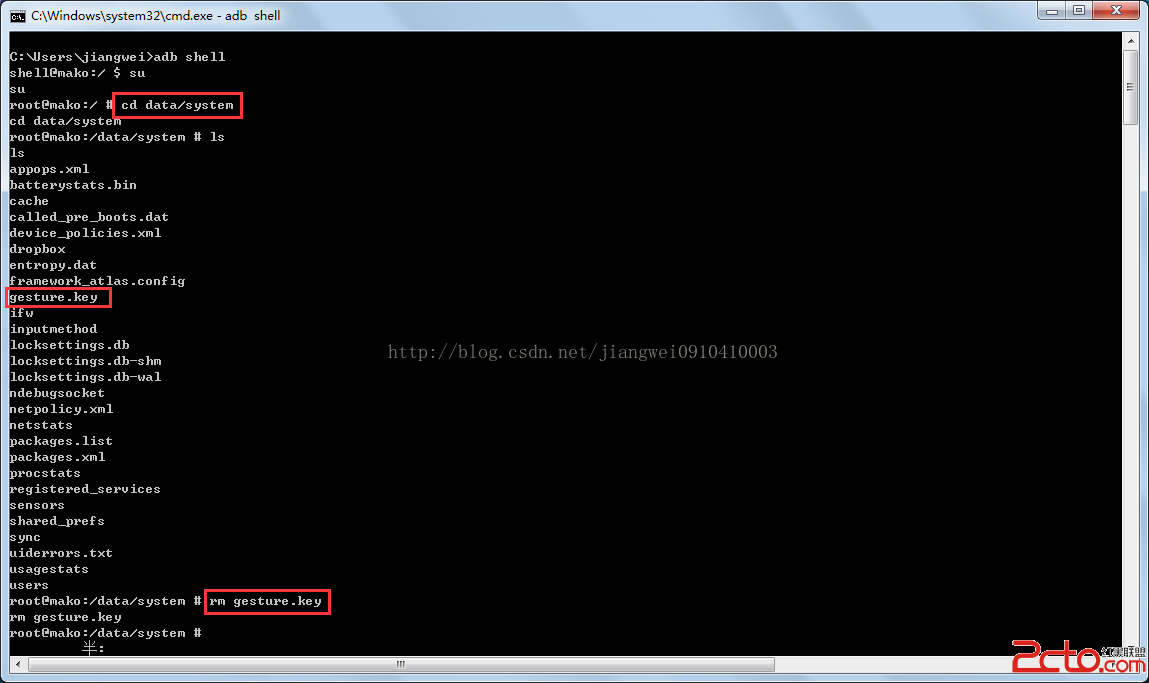 Android中可以做的兩件壞事---破解鎖屏密碼和獲取Wifi密碼
之前的文章一直在介紹OC,最近也是在找急忙慌的學習IOS,所以Android方面的知識分享就有點中斷了,但是我現在還是要靠Android吃飯,所以不能Android的工作
 android應用Theme(一)
android切換Theme主流三種方式來切換Theme,第一種是通過內置的style來切換,一般用於夜間模式/日間模式切換。第二種是通過apk來實現插件化,第三種是通過
 Android開發之簡單的聊天室(客戶端與服務器進行通信)
1.使用ServerSocket創建TCP服務器端 Java中能接收其他通信實體連接請求的類是ServerSocket, ServerSocket對象用於監聽來 自客戶