1、概述
Android提供了幾種動畫類型:View Animation 、Drawable Animation 、Property Animation 。View Animation相當簡單,不過只能支持簡單的縮放、平移、旋轉、透明度基本的動畫,且有一定的局限性。比如:你希望View有一個顏色的切換動畫;你希望可以使用3D旋轉動畫;你希望當動畫停止時,View的位置就是當前的位置;這些View Animation都無法做到。這就是Property Animation產生的原因,本篇博客詳細介紹Property Animation的用法。至於Drawable Animation,嗯,略~
2、相關API
Property Animation故名思議就是通過動畫的方式改變對象的屬性了,我們首先需要了解幾個屬性:
Duration動畫的持續時間,默認300ms。
Time interpolation:時間差值,乍一看不知道是什麼,但是我說LinearInterpolator、AccelerateDecelerateInterpolator,大家一定知道是干嘛的了,定義動畫的變化率。
Repeat count and behavior:重復次數、以及重復模式;可以定義重復多少次;重復時從頭開始,還是反向。
Animator sets: 動畫集合,你可以定義一組動畫,一起執行或者順序執行。
Frame refresh delay:幀刷新延遲,對於你的動畫,多久刷新一次幀;默認為10ms,但最終依賴系統的當前狀態;基本不用管。
相關的類
ObjectAnimator 動畫的執行類,後面詳細介紹
ValueAnimator 動畫的執行類,後面詳細介紹
AnimatorSet 用於控制一組動畫的執行:線性,一起,每個動畫的先後執行等。
AnimatorInflater 用戶加載屬性動畫的xml文件
TypeEvaluator 類型估值,主要用於設置動畫操作屬性的值。
TimeInterpolator 時間插值,上面已經介紹。
總的來說,屬性動畫就是,動畫的執行類來設置動畫操作的對象的屬性、持續時間,開始和結束的屬性值,時間差值等,然後系統會根據設置的參數動態的變化對象的屬性。
3、ObjectAnimator實現動畫
之所以選擇ObjectAnimator為第一個~~是因為,這個實現最簡單~~一行代碼,秒秒鐘實現動畫,下面看個例子:
布局文件:
[html]view plaincopy
-
- android:layout_width="match_parent"
- android:layout_height="match_parent"
- android:id="@+id/id_container">
-
- android:id="@+id/id_ball"
- android:layout_width="wrap_content"
- android:layout_height="wrap_content"
- android:layout_centerInParent="true"
- android:src="@drawable/mv"
- android:scaleType="centerCrop"
- android:onClick="rotateyAnimRun"
- />
-
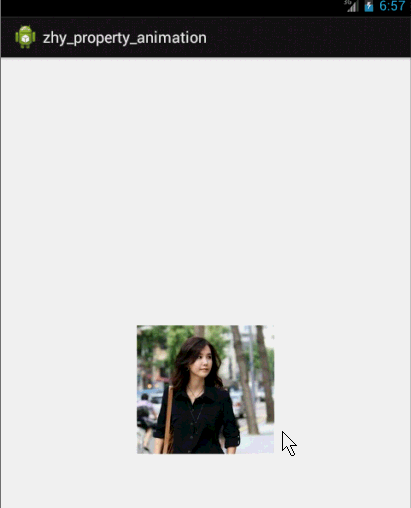
很簡單,就一張妹子圖片~
Activity代碼:
[java]view plaincopy
- packagecom.example.zhy_property_animation;
-
- importandroid.animation.ObjectAnimator;
- importandroid.app.Activity;
- importandroid.os.Bundle;
- importandroid.view.View;
-
- publicclassObjectAnimActivityextendsActivity
- {
- @Override
- protectedvoidonCreate(BundlesavedInstanceState)
- {
- super.onCreate(savedInstanceState);
- setContentView(R.layout.xml_for_anim);
- }
-
- publicvoidrotateyAnimRun(Viewview)
- {
- ObjectAnimator//
- .ofFloat(view,"rotationX",0.0F,360.0F)//
- .setDuration(500)//
- .start();
- }
-
}
效果:
[java]view plaincopy
- anim.addUpdateListener(newAnimatorUpdateListener()
- {
- @Override
- publicvoidonAnimationUpdate(ValueAnimatoranimation)
- {
- //view.postInvalidate();
- //view.invalidate();
- }
- });
3、看了上面的例子,因為設置的操作的屬性只有一個,那麼如果我希望一個動畫能夠讓View既可以縮小、又能夠淡出(3個屬性scaleX,scaleY,alpha),只使用ObjectAnimator咋弄?
- publicvoidrotateyAnimRun(finalViewview)
- {
- ObjectAnimatoranim=ObjectAnimator//
- .ofFloat(view,"zhy",1.0F,0.0F)//
- .setDuration(500);//
- anim.start();
- anim.addUpdateListener(newAnimatorUpdateListener()
- {
- @Override
- publicvoidonAnimationUpdate(ValueAnimatoranimation)
- {
- floatcVal=(Float)animation.getAnimatedValue();
- view.setAlpha(cVal);
- view.setScaleX(cVal);
- view.setScaleY(cVal);
- }
- });
- }
把設置屬性的那個字符串,隨便寫一個該對象沒有的屬性,就是不管~~咱們只需要它按照時間插值和持續時間計算的那個值,我們自己手動調用~
效果:
這個例子就是想說明一下,有時候換個思路不要被API所約束,利用部分API提供的功能也能實現好玩的效果~~~
比如:你想實現拋物線的效果,水平方向100px/s,垂直方向加速度200px/s*s ,咋實現呢~~可以自己用ObjectAnimator試試~
4、其實還有更簡單的方式,實現一個動畫更改多個效果:使用propertyValuesHolder
[java]view plaincopy
- publicvoidpropertyValuesHolder(Viewview)
- {
- PropertyValuesHolderpvhX=PropertyValuesHolder.ofFloat("alpha",1f,
- 0f,1f);
- PropertyValuesHolderpvhY=PropertyValuesHolder.ofFloat("scaleX",1f,
- 0,1f);
- PropertyValuesHolderpvhZ=PropertyValuesHolder.ofFloat("scaleY",1f,
- 0,1f);
- ObjectAnimator.ofPropertyValuesHolder(view,pvhX,pvhY,pvhZ).setDuration(1000).start();
- }
4、ValueAnimator實現動畫
和ObjectAnimator用法很類似,簡單看一下用view垂直移動的動畫代碼:
[java]view plaincopy
- publicvoidverticalRun(Viewview)
- {
- ValueAnimatoranimator=ValueAnimator.ofFloat(0,mScreenHeight
- -mBlueBall.getHeight());
- animator.setTarget(mBlueBall);
- animator.setDuration(1000).start();
- }
給你的感覺是不是,坑爹啊,這和ValueAnimator有毛線區別~但是仔細看,你看會發現,沒有設置操作的屬性~~也就是說,上述代碼是沒有任何效果的,沒有指定屬性~
[html]view plaincopy
-
- android:layout_width="match_parent"
- android:layout_height="match_parent"
- android:id="@+id/id_container"
-
- >
-
- android:id="@+id/id_ball"
- android:layout_width="wrap_content"
- android:layout_height="wrap_content"
- android:src="@drawable/bol_blue"/>
-
- android:layout_width="fill_parent"
- android:layout_height="wrap_content"
- android:layout_alignParentBottom="true"
- android:orientation="horizontal">
-
- android:layout_width="wrap_content"
- android:layout_height="wrap_content"
- android:onClick="verticalRun"
- android:text="垂直"/>
-
- android:layout_width="wrap_content"
- android:layout_height="wrap_content"
- android:onClick="paowuxian"
- android:text="拋物線"/>
-
-
-
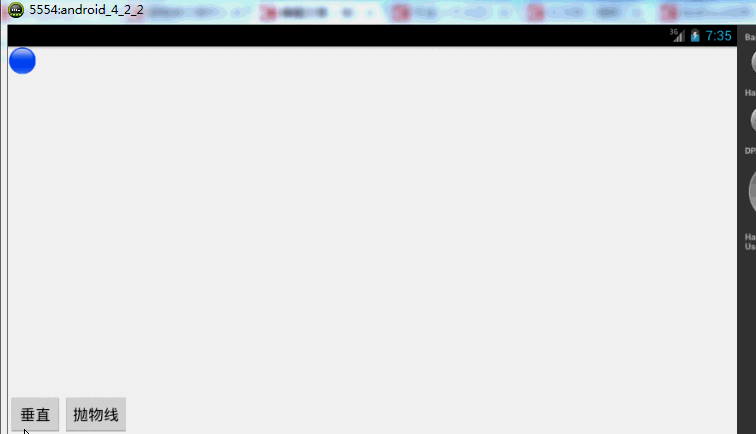
左上角一個小球,底部兩個按鈕~我們先看一個自由落體的代碼:
[java]view plaincopy
- /**
- *自由落體
- *@paramview
- */
- publicvoidverticalRun(Viewview)
- {
- ValueAnimatoranimator=ValueAnimator.ofFloat(0,mScreenHeight
- -mBlueBall.getHeight());
- animator.setTarget(mBlueBall);
- animator.setDuration(1000).start();
- //animator.setInterpolator(value)
- animator.addUpdateListener(newAnimatorUpdateListener()
- {
- @Override
- publicvoidonAnimationUpdate(ValueAnimatoranimation)
- {
- mBlueBall.setTranslationY((Float)animation.getAnimatedValue());
- }
- });
}
與ObjectAnimator不同的就是我們自己設置元素屬性的更新~雖然多了幾行代碼,但是貌似提高靈活性~
下面再來一個例子,如果我希望小球拋物線運動【實現拋物線的效果,水平方向100px/s,垂直方向加速度200px/s*s】,分析一下,貌似只和時間有關系,但是根據時間的變化,橫向和縱向的移動速率是不同的,我們該咋實現呢?此時就要重寫TypeValue的時候了,因為我們在時間變化的同時,需要返回給對象兩個值,x當前位置,y當前位置:
代碼:
[java]view plaincopy
- /**
- *拋物線
- *@paramview
- */
- publicvoidpaowuxian(Viewview)
- {
-
- ValueAnimatorvalueAnimator=newValueAnimator();
- valueAnimator.setDuration(3000);
- valueAnimator.setObjectValues(newPointF(0,0));
- valueAnimator.setInterpolator(newLinearInterpolator());
- valueAnimator.setEvaluator(newTypeEvaluator()
- {
- //fraction=t/duration
- @Override
- publicPointFevaluate(floatfraction,PointFstartValue,
- PointFendValue)
- {
- Log.e(TAG,fraction*3+"");
- //x方向200px/s,則y方向0.5*10*t
- PointFpoint=newPointF();
- point.x=200*fraction*3;
- point.y=0.5f*200*(fraction*3)*(fraction*3);
- returnpoint;
- }
- });
-
- valueAnimator.start();
- valueAnimator.addUpdateListener(newAnimatorUpdateListener()
- {
- @Override
- publicvoidonAnimationUpdate(ValueAnimatoranimation)
- {
- PointFpoint=(PointF)animation.getAnimatedValue();
- mBlueBall.setX(point.x);
- mBlueBall.setY(point.y);
-
- }
- });
- }
可以看到,因為ofInt,ofFloat等無法使用,我們自定義了一個TypeValue,每次根據當前時間返回一個PointF對象,(PointF和Point的區別就是x,y的單位一個是float,一個是int;RectF,Rect也是)PointF中包含了x,y的當前位置~然後我們在監聽器中獲取,動態設置屬性:
效果圖:
有木有兩個鐵球同時落地的感覺~~對,我應該搞兩個球~~ps:物理公式要是錯了,就當沒看見哈
自定義TypeEvaluator傳入的泛型可以根據自己的需求,自己設計個Bean。
好了,我們已經分別講解了ValueAnimator和ObjectAnimator實現動畫;二者區別;如何利用部分API,自己更新屬性實現效果;自定義TypeEvaluator實現我們的需求;但是我們並沒有講如何設計插值,其實我覺得把,這個插值默認的那一串實現類夠用了~~很少,會自己去設計個超級變態的~嗯~所以:略。
5、監聽動畫的事件
對於動畫,一般都是一些輔助效果,比如我要刪除個元素,我可能希望是個淡出的效果,但是最終還是要刪掉,並不是你透明度沒有了,還占著位置,所以我們需要知道動畫如何結束。
所以我們可以添加一個動畫的監聽:
[java]view plaincopy
- publicvoidfadeOut(Viewview)
- {
- ObjectAnimatoranim=ObjectAnimator.ofFloat(mBlueBall,"alpha",0.5f);
-
- anim.addListener(newAnimatorListener()
- {
-
- @Override
- publicvoidonAnimationStart(Animatoranimation)
- {
- Log.e(TAG,"onAnimationStart");
- }
-
- @Override
- publicvoidonAnimationRepeat(Animatoranimation)
- {
- //TODOAuto-generatedmethodstub
- Log.e(TAG,"onAnimationRepeat");
- }
-
- @Override
- publicvoidonAnimationEnd(Animatoranimation)
- {
- Log.e(TAG,"onAnimationEnd");
- ViewGroupparent=(ViewGroup)mBlueBall.getParent();
- if(parent!=null)
- parent.removeView(mBlueBall);
- }
-
- @Override
- publicvoidonAnimationCancel(Animatoranimation)
- {
- //TODOAuto-generatedmethodstub
- Log.e(TAG,"onAnimationCancel");
- }
- });
- anim.start();
- }
這樣就可以監聽動畫的開始、結束、被取消、重復等事件~但是有時候會覺得,我只要知道結束就行了,這麼長的代碼我不能接收,那你可以使用AnimatorListenerAdapter
[java]view plaincopy
- anim.addListener(newAnimatorListenerAdapter()
- {
- @Override
- publicvoidonAnimationEnd(Animatoranimation)
- {
- Log.e(TAG,"onAnimationEnd");
- ViewGroupparent=(ViewGroup)mBlueBall.getParent();
- if(parent!=null)
- parent.removeView(mBlueBall);
- }
});
[html]view plaincopy
-
- android:layout_width="match_parent"
- android:layout_height="match_parent"
- android:id="@+id/id_container"
-
- >
-
- android:id="@+id/id_ball"
- android:layout_width="wrap_content"
- android:layout_height="wrap_content"
- android:layout_centerInParent="true"
- android:src="@drawable/bol_blue"/>
-
- android:layout_width="fill_parent"
- android:layout_height="wrap_content"
- android:layout_alignParentBottom="true"
- android:orientation="horizontal">
-
- android:layout_width="wrap_content"
- android:layout_height="wrap_content"
- android:onClick="togetherRun"
- android:text="簡單的多動畫Together"/>
-
- android:layout_width="wrap_content"
- android:layout_height="wrap_content"
- android:onClick="playWithAfter"
- android:text="多動畫按次序執行"/>
-
-
-
-
繼續玩球~
[java]view plaincopy
- packagecom.example.zhy_property_animation;
-
- importandroid.animation.AnimatorSet;
- importandroid.animation.ObjectAnimator;
- importandroid.app.Activity;
- importandroid.os.Bundle;
- importandroid.view.View;
- importandroid.view.animation.LinearInterpolator;
- importandroid.widget.ImageView;
-
- publicclassAnimatorSetActivityextendsActivity
- {
- privateImageViewmBlueBall;
-
- @Override
- protectedvoidonCreate(BundlesavedInstanceState)
- {
- super.onCreate(savedInstanceState);
- setContentView(R.layout.anim_set);
-
- mBlueBall=(ImageView)findViewById(R.id.id_ball);
-
- }
-
- publicvoidtogetherRun(Viewview)
- {
- ObjectAnimatoranim1=ObjectAnimator.ofFloat(mBlueBall,"scaleX",
- 1.0f,2f);
- ObjectAnimatoranim2=ObjectAnimator.ofFloat(mBlueBall,"scaleY",
- 1.0f,2f);
- AnimatorSetanimSet=newAnimatorSet();
- animSet.setDuration(2000);
- animSet.setInterpolator(newLinearInterpolator());
- //兩個動畫同時執行
- animSet.playTogether(anim1,anim2);
- animSet.start();
- }
-
- publicvoidplayWithAfter(Viewview)
- {
- floatcx=mBlueBall.getX();
-
- ObjectAnimatoranim1=ObjectAnimator.ofFloat(mBlueBall,"scaleX",
- 1.0f,2f);
- ObjectAnimatoranim2=ObjectAnimator.ofFloat(mBlueBall,"scaleY",
- 1.0f,2f);
- ObjectAnimatoranim3=ObjectAnimator.ofFloat(mBlueBall,
- "x",cx,0f);
- ObjectAnimatoranim4=ObjectAnimator.ofFloat(mBlueBall,
- "x",cx);
-
- /**
- *anim1,anim2,anim3同時執行
- *anim4接著執行
- */
- AnimatorSetanimSet=newAnimatorSet();
- animSet.play(anim1).with(anim2);
- animSet.play(anim2).with(anim3);
- animSet.play(anim4).after(anim3);
- animSet.setDuration(1000);
- animSet.start();
- }
- }
寫了兩個效果:
-
想法是不是很不錯,可能會說使用AnimatorSet啊,這一看就是一堆動畫塞一起執行,但是我偏偏要用一個ObjectAnimator實例實現呢~下面看代碼:
[java]view plaincopy
 Material Design系列之Behavior上滑顯示返回頂部按鈕
 Android刮刮卡效果實現代碼
 Mac中Eclipse連不上Android手機的解決方法
 Android JNI/NDK開發之基本姿勢(一)