編輯:關於Android編程
使用實現了單選功能的ListView,不要問為什麼不使用RecyclerView,RecyclerView真的做得不如ListView和GridView完善全面,但是RecyclerView真的是很靈活(目前發現RecyclerView有幾個bug,以後再吐槽),RecyclerView也有自己的優勢,這裡解釋一下我們為啥使用了ListView,ListView加上Fragment,點擊ListView的item來切換Fragment,Fragment是可以保存狀態的,使用了hide和show事務,可以根據下發的數據來創建對面的Fragment,就是創建對應的Fragment類型。下面先看看圖片吧:


ListView可以支持對選和單選:
tabList.setChoiceMode(ListView.CHOICE_MODE_SINGLE);//單選
tabList.setChoiceMode(ListView.CHOICE_MODE_MULTIPLE);//多選
看代碼之前先看一下工程結構:
java代碼:

xml文件:

要實現單選那麼ListView的item的布局ViewGroup需要實現Checkable接口,下面是item_tab_list.xml
需要把CheckedTextView這個選中flag以外的控件設置為android:clickable=”false”
下面是自定義的RelativeLayout,主要是實現了Checkable接口:
package com.example.bottommenudemo;

import android.content.Context;
import android.util.AttributeSet;
import android.widget.Checkable;
import android.widget.RelativeLayout;

/**
 * Created by Danxx on 2016/4/29.
 */
public class CheckableRelativeLayout extends RelativeLayout implements Checkable{

    private static final int CHECKABLE_CHILD_INDEX = 1;
    private Checkable child;

    public CheckableRelativeLayout(Context context, AttributeSet attrs) {
        super(context, attrs);
    }

    @Override
    protected void onFinishInflate() {
        super.onFinishInflate();
        child = (Checkable) getChildAt(CHECKABLE_CHILD_INDEX);
    }

    @Override
    public boolean isChecked() {
        return child.isChecked();
    }

    @Override
    public void setChecked(boolean checked) {
        child.setChecked(checked);
    }

    @Override
    public void toggle() {
        child.toggle();
    }
}
ListView的choiceMode可以在代碼中設置,也可以在xml文件中設置:
 tabList.setChoiceMode(ListView.CHOICE_MODE_SINGLE);//單選(代碼實現)
 android:choiceMode="singleChoice"  //單選(xml中實現)
其余的ListView使用跟一般的ListView使用是一樣的,這個時候我單擊ListView的item就可以實現單選功能了。
Fragment的創建我封裝了一下下,FragmentFactory.java就是用來創建對應的Fragment,需要傳入FragmentBean和與ListView對應的position:
package com.example.bottommenudemo;

import android.os.Bundle;
import android.support.v4.app.Fragment;

import java.util.HashMap;

/**
 * fragment build factory
 * Created by Danxx on 2016/4/28.
 */
public class FragmentFactory {
    /**fragment緩存**/
    private static HashMap fragments = new HashMap();

    public static Fragment buildFragment(FragmentBean data ,int pos){
        Fragment fragment = null;
        String id = data.getID();
        String name = data.getName();
        int position = data.getPosition();
        String url = data.getUrl();

        fragment = fragments.get(String.valueOf(pos));
        if(fragment != null){
            return fragment;
        }

        if(id.equalsIgnoreCase(Common.BACKGROUND)){
            fragment = new FragmentSetBackground();
        }else if(id.equalsIgnoreCase(Common.RECOMMEND)){
            fragment = new FragmentSetRecommend();
        }else if(id.equalsIgnoreCase(Common.SCREENSAVER)){
            fragment = new FragmentSetScreensaver();
        }else if(id.equalsIgnoreCase(Common.ABOUT)){
            fragment = new FragmentSetAbout();
        }

        Bundle bundle = new Bundle();
        bundle.putString("id" ,id);
        bundle.putString("name" ,name);
        bundle.putInt("position", position);
        bundle.putString("url" , url);

        if(fragment != null){
            //傳遞簡單的參數
            fragments.put(String.valueOf(pos), fragment);
            fragment.setArguments(bundle);
        }
        return fragment;

    }

}
直接看MainActivity的代碼:
package com.example.bottommenudemo;

import android.content.Context;
import android.os.Bundle;
import android.support.v4.app.Fragment;
import android.support.v4.app.FragmentTransaction;
import android.support.v7.app.AppCompatActivity;
import android.util.Log;
import android.view.LayoutInflater;
import android.view.View;
import android.view.ViewGroup;
import android.widget.AdapterView;
import android.widget.BaseAdapter;
import android.widget.ListView;
import android.widget.TextView;

import java.util.ArrayList;
import java.util.List;


public class MainActivity extends AppCompatActivity {

    private ListView tabList;
    private List fragmentData = new ArrayList();
    private MyAdapater mAdapter;
    private int lastPosition = -1;

    @Override
    protected void onCreate(Bundle savedInstanceState) {
        super.onCreate(savedInstanceState);
        setContentView(R.layout.activity_2_main);
        Log.d("danxx", "onCreate--->");
        tabList = (ListView) findViewById(R.id.tabList);
        /************************填充假數據,可以根據服務器下發的數據來初始化數據(一定得給出模板類型layout_code)*************************/
        FragmentBean backGround = new FragmentBean(Common.BACKGROUND,0,"背景0","http://www.dusa.com/da/index.jsp");
        fragmentData.add(backGround);
        FragmentBean recommend = new FragmentBean(Common.RECOMMEND,1,"推薦>1","http://www.dusa.com/food/list.jsp");
        fragmentData.add(recommend);
        FragmentBean screensaver = new FragmentBean(Common.SCREENSAVER,2,"背景>2" ,"http://www.meitu.com/pic/con.jsp");
        fragmentData.add(screensaver);
        FragmentBean about = new FragmentBean(Common.ABOUT,3,"關於>3","http://www.alibaba.com/good/index.php");
        fragmentData.add(about);

        FragmentBean backGround2 = new FragmentBean(Common.BACKGROUND,4,"背景>4","http://www.dusa.com/da/index.jsp");
        fragmentData.add(backGround2);
        FragmentBean about2 = new FragmentBean(Common.ABOUT,5,"關於>5","http://www.alibaba.com/good/index.php");
        fragmentData.add(about2);
        FragmentBean recommend2 = new FragmentBean(Common.RECOMMEND,6,"推薦>6","http://www.dusa.com/food/list.jsp");
        fragmentData.add(recommend2);
        FragmentBean screensaver2 = new FragmentBean(Common.SCREENSAVER,7,"背景>7" ,"http://www.meitu.com/pic/con.jsp");
        fragmentData.add(screensaver2);
        FragmentBean about3 = new FragmentBean(Common.ABOUT,8,"關於>8","http://www.alibaba.com/good/index.php");
        fragmentData.add(about3);


        mAdapter = new MyAdapater(this , fragmentData);
        tabList.setAdapter(mAdapter);
        tabList.setChoiceMode(ListView.CHOICE_MODE_SINGLE);
        mAdapter.notifyDataSetChanged();
        /**根據用戶點擊來切換fragment**/
        tabList.setOnItemClickListener(new AdapterView.OnItemClickListener() {
            @Override
            public void onItemClick(AdapterView parent, View view, int position, long id) {
                Log.d("danxx" ,"position-->"+position);
                if(lastPosition == position){
                    return;
                }
                if(lastPosition != -1){
                    Fragment fromFragment = getSupportFragmentManager().findFragmentByTag(String.valueOf(lastPosition));
                    if(fromFragment==null){
                        fromFragment = buildFragment(lastPosition);
                    }
                    Fragment toFragment = getSupportFragmentManager().findFragmentByTag(String.valueOf(position));
                    if(toFragment == null){
                        toFragment = buildFragment(position);
                    }
                    switchContent(fromFragment ,lastPosition ,toFragment ,position);

                }else{
                    /*第一次顯示fragment*/
                    getSupportFragmentManager().beginTransaction().
                        add(R.id.content ,FragmentFactory.buildFragment(mAdapter.getItemData(position) ,position) ,String.valueOf(position)).commit();
                }
                lastPosition = position;
            }
        });
    }

    public Fragment buildFragment(int position){
        /**根據模板類型layout_code的不同來創建對應的fragment**/
        return FragmentFactory.buildFragment(mAdapter.getItemData(position) ,position);
    }

    /**
     * 切換顯示的fragment
     * @param fromFragment
     * @param fromPos
     * @param toFragment
     * @param toPos
     */
    public void switchContent(Fragment fromFragment ,int fromPos, Fragment toFragment ,int toPos) {

        FragmentTransaction transaction = getSupportFragmentManager().beginTransaction();
        if (!toFragment.isAdded()) {    // 先判斷是否被add過
            transaction.hide(fromFragment).add(R.id.content, toFragment ,String.valueOf(toPos)).commit(); // 隱藏當前的fragment,add下一個到Activity中
        } else {
            transaction.hide(fromFragment).show(toFragment).commit(); // 隱藏當前的fragment,顯示下一個
        }
    }

    class MyAdapater extends BaseAdapter{

        private List mData;
        private Context mContext;

        public MyAdapater(Context context , List data){
            this.mContext = context;
            this.mData = data;
        }

        @Override
        public int getCount() {
            return mData.size();
        }
        @Override
        public Object getItem(int position) {
            return mData.get(position);
        }

        public FragmentBean getItemData(int position){
            return mData.get(position);
        }

        @Override
        public long getItemId(int position) {
            return position;
        }

        /**
         * 數據不會很多,所以沒有使用ViewHolder復用
         * @param position
         * @param convertView
         * @param parent
         * @return
         */
        @Override
        public View getView(final int position, View convertView, ViewGroup parent) {
            Log.d("danxx" ,"getView_position-->"+position);
            final View view =  LayoutInflater.from(mContext).inflate(R.layout.item_tab_list , null);

            TextView tabName = (TextView) view.findViewById(R.id.tabName);

            tabName.setText(mData.get(position).getName());

            return view;
        }


    }
}
MainActivity.java需要留意的就是,我們在切換Fragment的時候並沒有把所有的Fragment都找到,然後hide掉,我覺得這樣真的很沒有必要,耗時耗力,還顯得很蠢,我使用了switchContent方法來做這個操作,從一個Fragment切換到另一個Fragment,就直接是hide現在看到的Fragment,show我們需要的Fragment,這樣我們切換Fragment就總是對兩個Fragment做處理,是不是簡潔了很多?
    /**
     * 切換顯示的fragment
     * @param fromFragment
     * @param fromPos
     * @param toFragment
     * @param toPos
     */
    public void switchContent(Fragment fromFragment ,int fromPos, Fragment toFragment ,int toPos) {

        FragmentTransaction transaction = getSupportFragmentManager().beginTransaction();
        if (!toFragment.isAdded()) {    // 先判斷是否被add過
            transaction.hide(fromFragment).add(R.id.content, toFragment ,String.valueOf(toPos)).commit(); // 隱藏當前的fragment,add下一個到Activity中
        } else {
            transaction.hide(fromFragment).show(toFragment).commit(); // 隱藏當前的fragment,顯示下一個
        }
    }
完整的代碼請看GitHub:FragmentSwitchDemo
 Android Mms之:短信發送流程(圖文詳解)
信息的發送,對於Mms應用程序來講主要就是在信息數據庫中創建並維護一條信息記錄,真正的發送過程交由底層(Frameworks層)函數來處理。總體的來講,當信息創建完成後,
 4種必須知道的Android屏幕自適應解決方案
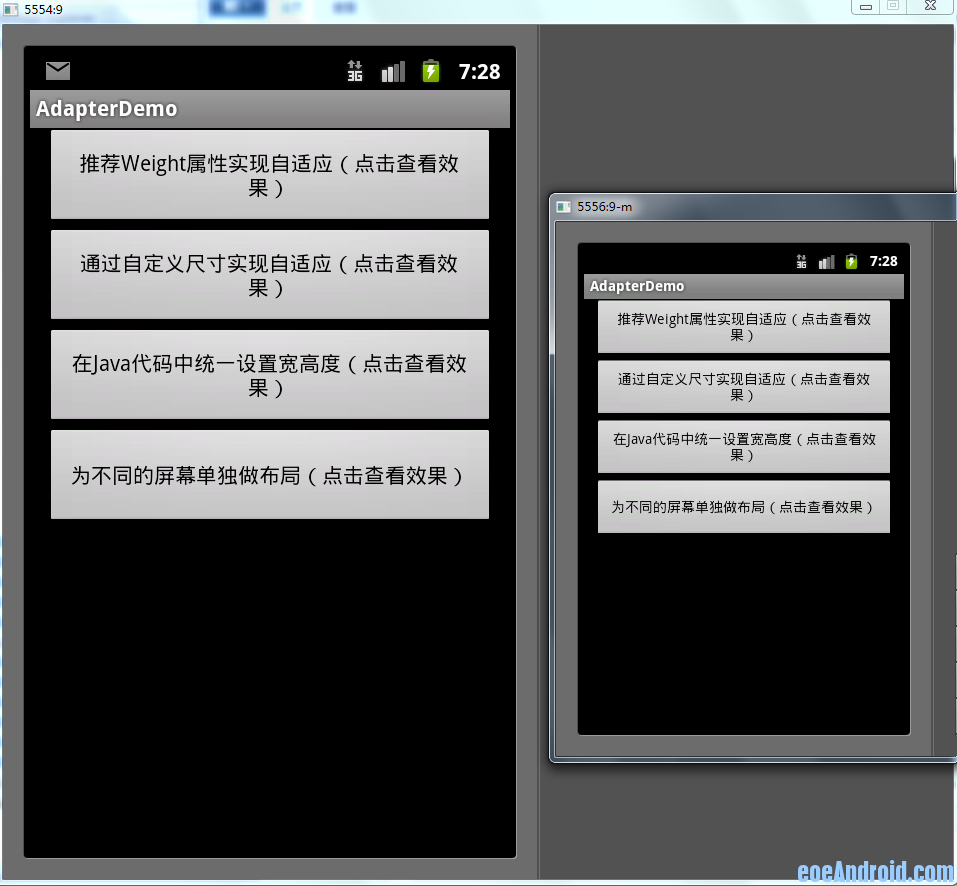
以下是Demo首頁的預覽圖 demo下載:http://www.eoeandroid.com/forum.php?mod=attachment&aid=
 Android 觸摸手勢(來自官方文檔)
Detecting Common Gestures,一般分為兩個階段:一: Gathering data about touch events.(收集數據)二: Inte
 ANDROID L——Material Design詳解(動畫篇)
Android L: Google已經確認Android L就是Android Lollipop(5