編輯:關於Android編程
翻譯難有謬誤,錯誤之處敬請指出。遇到不理解之處請對照官方英文資料。 mock object,mocking framework在前兩篇博文中也多次出現,不知如何翻譯,就翻譯為模仿對象和模仿框架 本篇中test suite有的地方翻譯為測試套件,有的地方直接使用英文 官方原文鏈接 Building Instrumented Unit Tests
設備單元測試是運行在物理設備和模擬器上的測試,他們能夠利用Android Framework APIs和supporting APIs,比如Android Testing Support Library。如果你的測試需要獲取instrumentation信息(比如目標app的context)或者需要Android框架組件(比如Parcelable o或者SharedPreferences 對象)的實際實現,你應當創建設備單元測試。
使用設備單元測試也能夠減少編寫和維護模仿代碼的工作量。你仍然能夠使用模仿框架,如果你選擇如此,來模擬任何依賴關系。
在你的AndroidStudio工程中,你必須存儲設備測試的源文件在路徑 module-name/src/androidTest/java/ 下。在你創建新的工程時這個路徑已經存在,並且包含了一個設備測試的例子。
在你開始之前,你應該下載 Android Testing Support Library Setup ,它提供了允許你對app快速構建和運行設備測試代碼的APIs。Testing Support Library包含了一個JUnit 4 test runner 和功能UI測試的APIs(Espresso 和 UI Automator,鏈接見譯文一)。
你還需要給你的工程配置Android測試依賴,以使用Testing Support Library提供的 test runner 和 規則(rule)。為了簡化測試環境,你應當引入 Hamcrest 庫,它能讓你使用Hamcrest matcher APIs創建更加靈活的assertion。
在App的最高層級 build.gradle 文件中,你需要指定這些庫作為依賴。
import android.os.Parcel;
import android.support.test.runner.AndroidJUnit4;
import android.util.Pair;
import org.junit.Test;
import org.junit.runner.RunWith;
import java.util.List;
import static org.hamcrest.Matchers.is;
import static org.junit.Assert.assertThat;

@RunWith(AndroidJUnit4.class)
@SmallTest
public class LogHistoryAndroidUnitTest {

    public static final String TEST_STRING = "This is a string";
    public static final long TEST_LONG = 12345678L;
    private LogHistory mLogHistory;

    @Before
    public void createLogHistory() {
        mLogHistory = new LogHistory();
    }

    @Test
    public void logHistory_ParcelableWriteRead() {
        // Set up the Parcelable object to send and receive.
        mLogHistory.addEntry(TEST_STRING, TEST_LONG);

        // Write the data.
        Parcel parcel = Parcel.obtain();
        mLogHistory.writeToParcel(parcel, mLogHistory.describeContents());

        // After you're done with writing, you need to reset the parcel for reading.
        parcel.setDataPosition(0);

        // Read the data.
        LogHistory createdFromParcel = LogHistory.CREATOR.createFromParcel(parcel);
        List> createdFromParcelData = createdFromParcel.getData();

        // Verify that the received data is correct.
        assertThat(createdFromParcelData.size(), is(1));
        assertThat(createdFromParcelData.get(0).first, is(TEST_STRING));
        assertThat(createdFromParcelData.get(0).second, is(TEST_LONG));
    }
}
為了組織設備單元測試的執行,你可以在一個test suite類中分組測試類,一起運行這些測試類。
一個test suite包含在一個測試包中,類似於主應用包。按照慣例,test suite的包名經常以 .suite的後綴結尾(比如com.example.android.testing.mysample.suite)。
為單元測試創建test suite,import JUnit的 RunWith和Suite類。在你的test suite中,添加 @RunWith(Suite.class) 和 @Suite.SuitClasses() 注釋。在@Suite.SuitClasses() 中,列出單獨的測試類或者test suite 作為參數。
以下示例展示了你如何實現一個分組並且CalculatorInstrumentationTest 和 CalculatorAddParameterizedTest 測試類一起運行的類名為UnitTestSuite的test suite。
import com.example.android.testing.mysample.CalculatorAddParameterizedTest;
import com.example.android.testing.mysample.CalculatorInstrumentationTest;
import org.junit.runner.RunWith;
import org.junit.runners.Suite;

// Runs all unit tests.
@RunWith(Suite.class)
@Suite.SuiteClasses({CalculatorInstrumentationTest.class,
        CalculatorAddParameterizedTest.class})
public class UnitTestSuite {}
運行設備單元測試,遵循以下步驟。
點擊工具欄的Sync Project ,確保工程和gradle同步。 用以下方式之一運行測試
 測試一個類中的所有方法,右鍵點擊測試文件的一個類或者方法,然後點擊Run 運行一個路徑下的所有測試,右鍵點擊該路徑,然後選擇Run Tests
Android的gradle插件編譯位於缺省路徑(src/androidTest/java/)的設備測試代碼,構建一個測試APK和產物APK(production APK),將兩個APK安裝到連接的設備或者模擬器上,然後運行測試。Android Studio 然後在Run 窗口顯示設備測試執行的結果。
當運行或者debugging設備測試,Android Studio 並不注入 Instant Run需要的額外方法和關閉特性。
使用Firebase Test Lab ,你可以在許多流行設備和設備配置(地區、屏幕方向、屏幕尺寸和平台版本)上同時測試App。這些測試運行在遠端google數據中心的物理和虛擬設備上。你可以通過Android Studio 或者命令行直接部署app到Test Lab。測試結果提供了測試日志,並且包括任何App失敗的詳情。
在你開始使用 Firebase Test Lab之前,你需要依照如下操作,除非你已經有了Google賬戶和一個Firebase 工程。
如果你沒有賬戶,創建一個Google賬戶 。 在Firebase控制台 ,點擊Create new project。PS: 這一部分沒翻譯完,所剩不多,考慮到國內無法使用google服務/收費/我沒這個需求,不在翻譯剩余部分。
 Android camera實時預覽 實時處理,人臉識別示例
Android camera實時預覽 實時處理,面部認證。預覽操作是網友共享的代碼,我在繼承SurfaceView 的CameraSurfaceView 中加入了幀監聽事
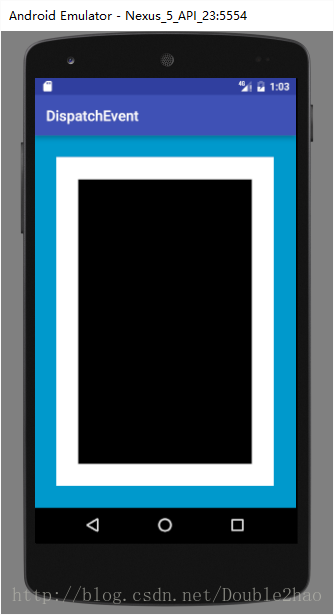 完全理解android事件分發機制
前言現在看來其實更像是一篇知識概括,多處可能未講清楚,於是打算重寫事件分發,用一篇文章大致講清楚。首先,形式上筆者最先思考的是使用源碼,此者能從原理上講解分發機制,比起侃
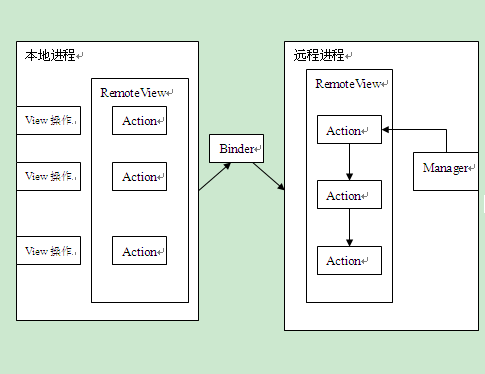 關於RemoteView的一點愚見(RemoteView在AppWidget中的工作流程)
前言由於公司環境惡劣,小菜鳥我本來想畫UML圖來顯示類與類之間的關系,可惜這個念頭無法達成,也只好用Word文檔來完成。待菜鳥我辭職了,再自己畫上UML圖和Gif動態圖,
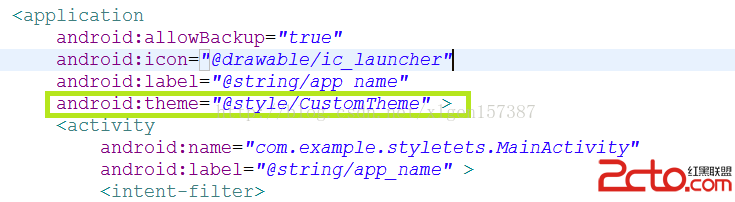 Android學習筆記之Theme主題的修改設置
(1)布局文件 (2)在values中新建xml文件 fill_pare