編輯:關於Android編程
優點:正兒八經的夜間模式,配色看著舒服
缺點:規模較大的應用,需要隨theme變化的屬性會很多,都需要逐一定義,有點麻煩,另外一個缺點是要使得新theme生效,一般需要restartActivity來切換UI,會導致切換主題時界面閃爍
核心思路:自定義一個顏色屬性名 A,A在日間和夜間模式下都有具體的顏色代碼,頁面布局文件只管引用A,至於是日間還是夜間,由後台主題決定。
附上一二中方法的圖
 (原圖)
(原圖)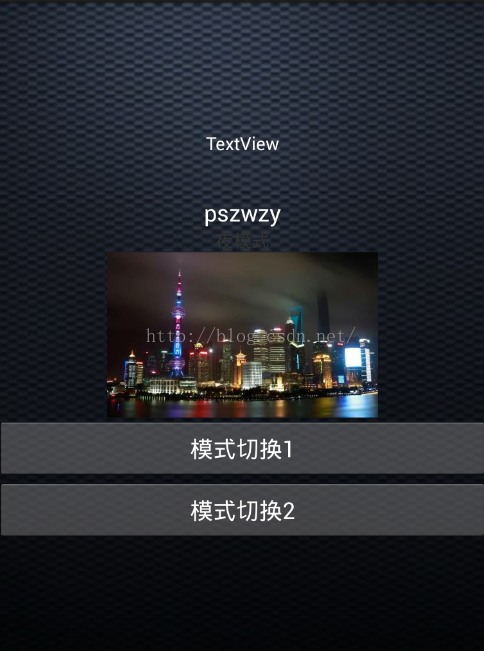 (第一種實現)
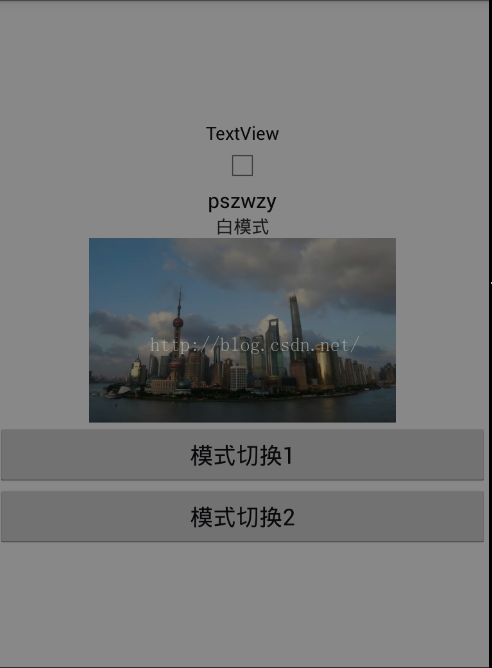 (第二種實現)
好,下面來講講具體的實現步驟,本環節使用的開發環境是Eclipse demo地址http://www.oschina.net/code/snippet_2702417_55892
attrs.xml(聲明屬性的類型,布局xml中用) reference可以使用系統的資源ID,比如R.color.gray; color可以直接使用#ffffff顏色代碼
 <attr name="colorValue" format="color" />
    <attr name="floatValue" format="float" />
    <attr name="integerValue" format="integer" />
    <attr name="booleanValue" format="boolean" />
    <attr name="dimensionValue" format="dimension" />
    <attr name="stringValue" format="string" />
    <attr name="referenceValue" format="color|reference" />
    <attr name="imageValue" format="reference"/>

    <attr name="curVisibility">
        <!-- 相當於View的Visiblity -->
    <enum name="show" value="0" />
    <!-- Not displayed, but taken into account during layout (space is left for it).相當於View的unVisiblity -->
    <enum name="inshow" value="1" />
    <!-- Completely hidden, as if the view had not been added.相當於View的GONE -->
    <enum name="hide" value="2" />
    </attr>
colors.xml(調色板,集中管理顏色hex)遵循優秀格式規范,即調色板模式,避免使用btn1,btn2,fontTitle,fontText之類的顏色名。
<?xml version="1.0" encoding="utf-8"?>
<resources>
   <color name="title">#101115</color>
   <color name="night_title">#FFFFFF</color>
</resources>
string.xml
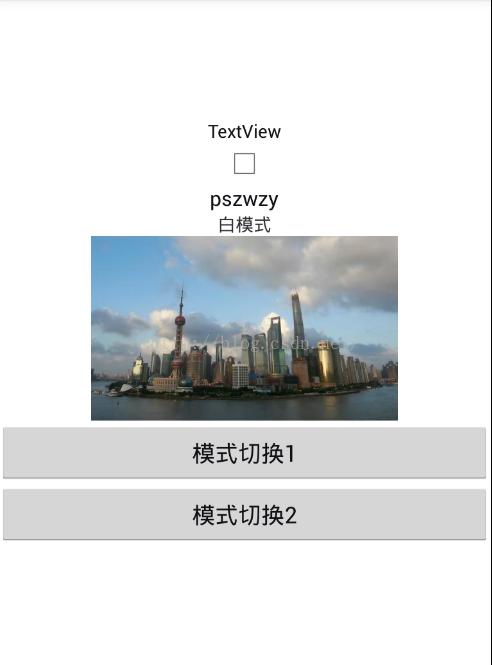
<string name="app_name">dayandNight</string>
   <string name="hello_world">Hello world!</string>
   <string name="action_settings">白模式</string>
   <string name="night_action_settings">夜模式</string>
styles.xml(日間、夜間主題)
<resources>
      <style name="AppBaseTheme" parent="android:Theme.Light">
        <!--
            Theme customizations available in newer API levels can go in
            res/values-vXX/styles.xml, while customizations related to
            backward-compatibility can go here.


        -->
    </style>

    <!-- Application theme. -->
    <style name="AppTheme" parent="AppBaseTheme">
        <!-- All customizations that are NOT specific to a particular API-level can go here. -->
    </style>


    <style name="DayTheme" parent="AppTheme">
        <item name="colorValue">@color/title</item>
        <item name="floatValue">0.35</item>
        <item name="integerValue">33</item>
        <item name="booleanValue">true</item>
        <item name="dimensionValue">16dp</item>
        <!-- 如果string類型不是填的引用而是直接放一個字符串,在布局文件中使用正常,但代碼裡獲取的就有問題 -->
        <item name="stringValue">@string/action_settings</item>
        <item name="referenceValue">@drawable/bg</item>
        <item name="imageValue">@drawable/day</item>
        <item name="curVisibility">show</item>
    </style>

    <style name="NightTheme" parent="AppTheme">
        <item name="colorValue">@color/night_title</item>
        <item name="floatValue">1.44</item>
        <item name="integerValue">55</item>
        <item name="booleanValue">false</item>
        <item name="dimensionValue">18sp</item>
        <item name="stringValue">@string/night_action_settings</item>
        <item name="referenceValue">@drawable/night_bg</item>
        <item name="imageValue">@drawable/night</item>
        <item name="curVisibility">hide</item>
    </style>
</resources>
protected void onCreate(Bundle savedInstanceState) {
		super.onCreate(savedInstanceState);
		if(MyApp.isLightMode()){
            this.setTheme(R.style.NightTheme);
        }else{
            this.setTheme(R.style.DayTheme);
        }
		setContentView(R.layout.activity_one);
	}

	public void onClick(View view){
		MyApp.setIslightMode(!MyApp.isLightMode());
		recreate();
	}
xml的布局:
<?xml version="1.0" encoding="utf-8"?>
<LinearLayout xmlns:android="http://schemas.android.com/apk/res/android"
    android:layout_width="match_parent"
    android:layout_height="match_parent"
    android:background="?attr/referenceValue"
    android:orientation="vertical"
    android:gravity="center" >

    <TextView
        android:id="@+id/setting_Color"
        android:layout_width="wrap_content"
        android:layout_height="wrap_content"
        android:text="TextView"
        android:textColor="?attr/colorValue" />

    <CheckBox
        android:id="@+id/setting_show_answer_switch"
        android:layout_width="wrap_content"
        android:layout_height="wrap_content"
        android:checked="?attr/booleanValue" />

    <TextView
        android:id="@+id/setting_Title"
        android:layout_width="wrap_content"
        android:layout_height="wrap_content"
        android:text="pszwzy"
        android:textColor="?attr/colorValue"
        android:textSize="?attr/dimensionValue" />

    <TextView
        android:id="@+id/setting_Text"
        android:layout_width="wrap_content"
        android:layout_height="wrap_content"
        android:text="?attr/stringValue" />

    <ImageView
        android:id="@+id/setting_Image"
        android:layout_width="wrap_content"
        android:layout_height="wrap_content"
        android:src="?attr/imageValue" />

    <View
        android:id="@+id/setting_line"
        android:layout_width="match_parent"
        android:layout_height="1dp"
        android:visibility="?attr/curVisibility" />
    <Button
        android:onClick="onClick"
        android:layout_width="match_parent"
        android:layout_height="wrap_content"
        android:text="模式切換"
        android:textColor="?attr/colorValue"
        />

</LinearLayout>
注:遇到放回activity閃屏的問題可以
(1)在BaseActivity中創建下面的方法
public static void updateTheme(Activity activity,isNight)
{
  MyApp.setNightMode(isNight);
  activity.recreate();
}
//第二中方式,只是提供一種思路,邏輯沒有去實習
    public void onClickT(View view){
        LayoutParams  mNightViewParam = new LayoutParams(
                    LayoutParams.TYPE_APPLICATION,
                    LayoutParams.FLAG_NOT_TOUCHABLE | LayoutParams.FLAG_NOT_FOCUSABLE,
                    PixelFormat.TRANSPARENT);

        WindowManager   mWindowManager = (WindowManager) getSystemService(Context.WINDOW_SERVICE);
        View   mNightView = new View(this);
        mWindowManager.addView(mNightView, mNightViewParam);
        mNightView.setBackgroundResource(R.color.night_mask);
}
先看下BaseActivity
public abstract class BaseActivity extends Activity {
protected int skin;
public Context mContext;
SharedPreferences sp;


@Override
protected void onCreate(Bundle savedInstanceState) {
<span style="white-space:pre">    </span>setThemeMode(getSkinTypeValue());
<span style="white-space:pre">    </span>super.onCreate(savedInstanceState);
<span style="white-space:pre">    </span>init();
<span style="white-space:pre">    </span>}
<span style="white-space:pre">    </span>public abstract void init();
<span style="white-space:pre">    </span>protected void setThemeMode(SkinType skinType) {
<span style="white-space:pre">    </span>  switch (skinType) {
<span style="white-space:pre">    </span>  case Light:
<span style="white-space:pre">        </span>setTheme(R.style.AppTheme_Light);
<span style="white-space:pre">    </span>  break;
<span style="white-space:pre">    </span> case Night:
<span style="white-space:pre">        </span>setTheme(R.style.AppTheme_Night);
<span style="white-space:pre">    </span> break;
<span style="white-space:pre">    </span> default:
<span style="white-space:pre">        </span>setTheme(R.style.AppTheme_Light);
<span style="white-space:pre">    </span> break;
<span style="white-space:pre">    </span>}
}
//獲取用戶選取的模式
protected SkinType getSkinTypeValue() {
<span style="white-space:pre">    </span>if (sp == null) {
<span style="white-space:pre">    </span>sp = getSharedPreferences("AppSkinType", Context.MODE_PRIVATE);
<span style="white-space:pre">    </span>}
<span style="white-space:pre">    </span>int i = sp.getInt("AppSkinTypeValue", 0);
<span style="white-space:pre">    </span>switch (i) {
<span style="white-space:pre">    </span> case 0:
<span style="white-space:pre">        </span>return SkinType.Light;
      case 1:
<span style="white-space:pre">        </span>return SkinType.Night;
<span style="white-space:pre">    </span> default:
<span style="white-space:pre">    </span> break;
<span style="white-space:pre">    </span>}
<span style="white-space:pre">    </span>return SkinType.Light;
}
//保存用戶是選取的模式
public void saveSkinValue(int skin) {
<span style="white-space:pre">    </span>if (sp == null) {
<span style="white-space:pre">    </span>sp = getSharedPreferences("AppSkinType", Context.MODE_PRIVATE);
<span style="white-space:pre">    </span>}
<span style="white-space:pre">    </span>Editor editor = sp.edit();
<span style="white-space:pre">    </span>editor.putInt("AppSkinTypeValue", skin);
<span style="white-space:pre">    </span>editor.commit();

}
在看下第一個activity的使用的
public class MainActivity extends BaseActivity {
    private CheckBox cbSetting;
    private Button btnForward;
    private TextView tv_title;
    private View llNight;


    @Override
    public void init() {
        setContentView(R.layout.activity_main);
        llNight = findViewById(R.id.ll_night);
        tv_title = (TextView) findViewById(R.id.tv_title);
        btnForward = (Button) findViewById(R.id.forward);
        cbSetting = (CheckBox) findViewById(R.id.cb_setting);
        cbSetting.setOnCheckedChangeListener(new OnCheckedChangeListener() {
            @Override
            public void onCheckedChanged(CompoundButton buttonView, boolean isChecked) {
                if (isChecked) {
                    // 夜間模式
                    saveSkinValue(1);
                    setTheme(R.style.AppTheme_Night);//防止getTheme()取出來的值是創建時候得值
                    initView();
                } else {
                    // 白天模式
                    saveSkinValue(0);
                    setTheme(R.style.AppTheme_Light);//防止getTheme()取出來的值是創建時候得值
                    initView();
                }
            }
        });

        btnForward.setOnClickListener(new View.OnClickListener() {
            @Override
            public void onClick(View v) {
                Intent intent = new Intent(MainActivity.this,SecondActivity.class);
                startActivity(intent);
            }
        });
    }
    //改變模式後手動修改UI,不然出現閃屏
    private void initView(){
        <span style="color:#ff6666;">TypedValue typedValue = new TypedValue();
        Theme theme = getTheme();
        theme.resolveAttribute(R.attr.gray_3_double, typedValue, true);
        btnForward.setTextColor(getResources().getColor(typedValue.resourceId));
        tv_title.setTextColor(getResources().getColor(typedValue.resourceId));
        theme.resolveAttribute(R.attr.source_bg, typedValue, true);
        llNight.setBackgroundDrawable(getResources().getDrawable(typedValue.resourceId));</span>
    }
}
大體就是這樣實現
 Android編程實現ViewPager多頁面滑動切換及動畫效果的方法
本文實例講述了Android編程實現ViewPager多頁面滑動切換及動畫效果的方法。分享給大家供大家參考,具體如下:一、首先,我們來看一下效果圖,這是新浪微博的Tab滑
 自定義AvatarImageView滿足你所有頭像顯示需求
1.PorterDuffXfermode這是由Tomas Proter和 Tom Duff命名的圖像轉換模式,它有16個枚舉值來控制Canvas上 上下兩個圖層的交互(先
 android代碼審查工具---lint工具的使用
轉載請著名出處:http://blog.csdn.net/lijunhuayc 搞了這麼久android我居然不知道lint工具是干啥的,雖然每次在eclip
 android中Context的應用總結
概述作為一名Android開發人員,每天使用最多的類中,恐怕Context可以排的上一號了。因為Context對象在我們的項目中實在是太常見了,我們在加載資源,啟動Act