編輯:關於Android編程
和其他地圖一樣,都要先去官網注冊成為開發者,然後獲取Key。下面直接上代碼。
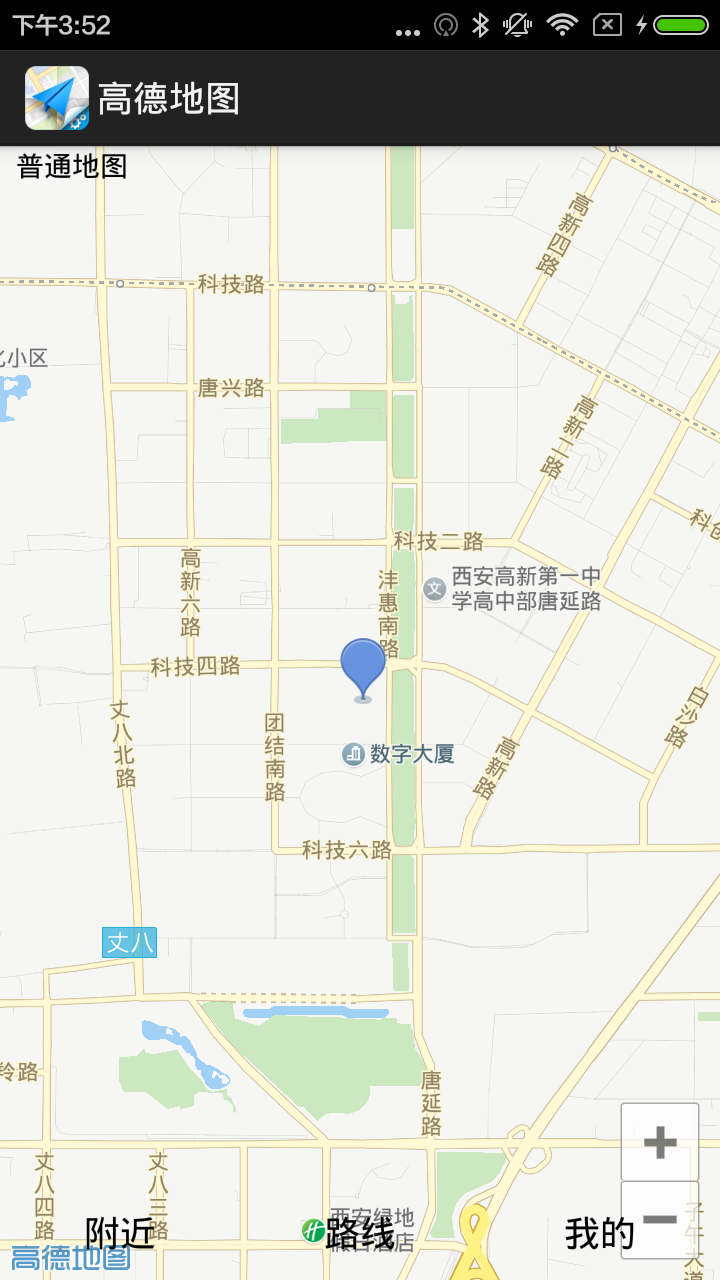
效果圖:
package com.example.gaodemap;


import com.amap.api.maps.AMap;
import com.amap.api.maps.CameraUpdate;
import com.amap.api.maps.CameraUpdateFactory;
import com.amap.api.maps.MapView;
import com.amap.api.maps.model.LatLng;
import com.amap.api.maps.model.Marker;
import com.amap.api.maps.model.MarkerOptions;

import android.app.Activity;
import android.content.Context;
import android.location.Location;
import android.location.LocationListener;
import android.location.LocationManager;
import android.os.Bundle;
import android.widget.CompoundButton;
import android.widget.ToggleButton;

public class MainActivity extends Activity  {

	private MapView mMapView;
	private AMap aMap;
	private MapView mapView;
	private LocationManager locationManager;
	@Override
	protected void onCreate(Bundle savedInstanceState) {
		super.onCreate(savedInstanceState);
		setContentView(R.layout.activity_main);

		locationManager = (LocationManager) getSystemService(Context.LOCATION_SERVICE);

		mMapView = (MapView) findViewById(R.id.map);
		mMapView.onCreate(savedInstanceState);
		init();
		//GPRS提供的定位信息改變
		locationManager.requestLocationUpdates(LocationManager.GPS_PROVIDER, 300, 8, new LocationListener() {

			@Override
			public void onStatusChanged(String provider, int status, Bundle extras) {
				// TODO Auto-generated method stub

			}

			@Override
			public void onProviderEnabled(String provider) {
				// 使用GPRS提供的定位信息來更新位置
				updatePosition(locationManager.getLastKnownLocation(provider));
			}

			@Override
			public void onProviderDisabled(String provider) {
				// TODO Auto-generated method stub

			}

			@Override
			public void onLocationChanged(Location location) {
				// TODO Auto-generated method stub
				updatePosition(location);
			}
		});


		ToggleButton tb = (ToggleButton) findViewById(R.id.tb);
		tb.setOnCheckedChangeListener(new CompoundButton.OnCheckedChangeListener(){

			@Override
			public void onCheckedChanged(CompoundButton buttonView, boolean isChecked) {
				// TODO Auto-generated method stub
				if(isChecked){
					aMap.setMapType(AMap.MAP_TYPE_SATELLITE);
				}else{
					aMap.setMapType(AMap.MAP_TYPE_NORMAL);
				}
			}

		});
	}

	//初始化AMap對象
	private void init(){
		if(aMap == null){
			aMap = mMapView.getMap();
		}
	}
	@Override
	protected void onDestroy() {
		// TODO Auto-generated method stub
		super.onDestroy();
		mMapView.onDestroy();
	}
	@Override
	protected void onPause() {
		// TODO Auto-generated method stub
		super.onPause();
		mMapView.onPause();
	}
	@Override
	protected void onResume() {
		// TODO Auto-generated method stub
		super.onResume();
		mMapView.onResume();
	}
	@Override
	protected void onSaveInstanceState(Bundle outState) {
		// TODO Auto-generated method stub
		super.onSaveInstanceState(outState);
		mMapView.onSaveInstanceState(outState);
	}

	private void updatePosition(Location location){
		LatLng pos = new LatLng(location.getLatitude(), location.getLongitude());
		//創建一個設置經緯度的CameraUpdate
		CameraUpdate cu = CameraUpdateFactory.changeLatLng(pos);
		//更新地圖的顯示區域
		aMap.moveCamera(cu);
		//清除所有的Marker等覆蓋物
		aMap.clear();
		//創建一個MarkerOptions對象
		MarkerOptions markOptions = new MarkerOptions();
		markOptions.position(pos);
		//添加MarkerOptions(實際上是添加Marker)
		Marker marker = aMap.addMarker(markOptions);
	}

}
<framelayout xmlns:android="http://schemas.android.com/apk/res/android" android:layout_width="match_parent" android:layout_height="match_parent">

    <com.amap.api.maps.mapview android:id="@+id/map" android:layout_width="match_parent" android:layout_height="match_parent">
    </com.amap.api.maps.mapview>

    <togglebutton android:id="@+id/tb" android:layout_width="wrap_content" android:layout_height="wrap_content" android:gravity="top|right" android:textoff="普通地圖" android:texton="衛星地圖" android:checked="false" android:background="@android:color/transparent">
    <linearlayout android:layout_width="fill_parent" android:layout_height="wrap_content" android:layout_gravity="bottom" android:orientation="horizontal"><button android:id="@+id/near" android:layout_width="wrap_content" android:layout_height="wrap_content" android:text="附近" android:layout_weight="1" android:background="@android:color/transparent"></button><button android:id="@+id/route" android:layout_width="wrap_content" android:layout_height="wrap_content" android:text="路線" android:background="@android:color/transparent" android:layout_weight="1"></button><button android:id="@+id/my" android:layout_width="wrap_content" android:layout_height="wrap_content" android:text="我的" android:background="@android:color/transparent" android:layout_weight="1"></button></linearlayout></togglebutton></framelayout>
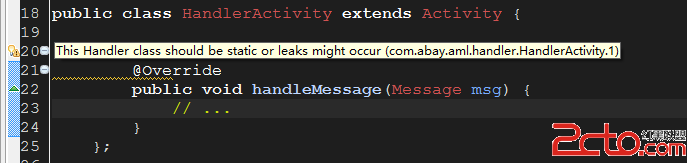 Android App 內存洩露之Handler
Android App 內存洩露之Handler Handler也是造成內存洩露的一個重要的源頭,主要Handler屬於TLS(Thread Local Storage
 Android PagerSlidingTitleIconTabStrip 可以在title旁邊加小圖標的PagerSlidingTabStrip
public class MainFragmentPagerAdapter extends FragmentPagerAdapter implement
 Android NDK開發簡單程序分享(Hello Word!)
在之前的博客中已經為大家介紹了,如何在win環境下配置DNK程序,本篇我將帶大家實現一個簡單的Hello jni程序,讓大家真正感受一下NDK開發的魅力。這裡我們選擇使用
 解決eclipse3.7沒有自動提示代碼方法
把Android SDK升級到了最新版本,但是Eclipse的ADT插件需要Eclipse3.6版本以上才可以安裝,無奈下載了Eclipse3.7版本的。一