編輯:關於Android編程
我們先實現拍照按鈕的圓形效果哈,Android開發中,當然可以找美工人員設計圖片,然後直接拿進來,不過我們可以自己寫代碼實現這個效果哈,最常用的的是用layout-list實現圖片的疊加,我們這個layout命名為btn_take_photo.xml,這是一個自定義的drawable文件,所以按照規范,我們要將它放在drawable文件夾裡。
注意:drawable文件夾一般是來放自定義的drawable文件的,可以將它看成自己寫的背景樣式等等哦
解釋代碼:
layer-list裡面放3個item,先實現一個白色背景的橢圓,屬性android:shape="oval"是實現橢圓的
android:shape=["rectangle" | "oval" | "line" | "ring"]
shape的形狀,默認為矩形,可以設置為矩形(rectangle)、橢圓形(oval)、線性形狀(line)、環形(ring)
然後再放入一個item,這個item是一個左右上下都等長的橢圓
ok,這樣一個等邊的橢圓就做好了
接著再次放入一個一個藍色背景的橢圓
<?xml version="1.0" encoding="utf-8"?>
<layer-list xmlns:android="http://schemas.android.com/apk/res/android">
 <item>
  <shape android:shape="oval">
   <solid android:color="@color/white" />
  </shape>
 </item>
 <item
  android:bottom="6dp"
  android:left="6dp"
  android:right="6dp"
  android:top="6dp">
  <shape android:shape="oval">
   <solid android:color="@color/blue" />
  </shape>
 </item>
 <item>
  <shape android:shape="oval">
   <stroke
    android:width="1dp"
    android:color="@color/blue"
    android:dashWidth="0dp" />
  </shape>
 </item>
</layer-list>

這是一個界面:activity_take_photo.xml
界面的很簡單,這裡只是提供參考學習的,解釋代碼:
SurfaceView是用來拍照用的,注意這個類只要和視頻或者拍照的都需要用到,不過項目裡一般都是自己寫的。
這些代碼只是參考互相學習,功能的話,自己還在做,所以先提供這些學習的...,希望可以幫助學習的人,然後自己寫博客的目的也是對自己學習的技術進行收錄和共享,只是本著互相學習的目的。
<FrameLayout xmlns:android="http://schemas.android.com/apk/res/android"
 android:layout_width="match_parent"
 android:layout_height="match_parent"
 android:background="#ffffff">

 <!-- 顯示預覽圖形 -->

 <SurfaceView
  android:id="@+id/surfaceView"
  android:layout_width="match_parent"
  android:layout_height="match_parent" />

 <RelativeLayout
  android:id="@+id/buttonLayout"
  android:layout_width="match_parent"
  android:layout_height="match_parent"
  android:background="@drawable/pic">

  <RelativeLayout
   android:id="@+id/panel_take_photo"
   android:layout_width="fill_parent"
   android:layout_height="wrap_content"
   android:layout_alignParentBottom="true"
   android:background="@color/white"
   android:gravity="center_vertical"
   android:padding="2dp">


   <Button
    android:id="@+id/btn_take_photo"
    android:layout_width="50dp"
    android:layout_height="50dp"
    android:background="@drawable/btn_take_photo"
    android:layout_centerHorizontal="true"
    android:layout_alignTop="@+id/iv_album" />

   <ImageView
    android:id="@+id/iv_album"
    android:layout_width="40dp"
    android:layout_height="40dp"
    android:layout_alignParentLeft="true"
    android:layout_centerVertical="true"
    android:layout_marginLeft="20dp"
    android:padding="5dp"
    android:src="@drawable/camera_library" />

   <ImageView
    android:id="@+id/title_btn_black"
    android:layout_width="40dp"
    android:layout_height="40dp"
    android:layout_alignParentRight="true"
    android:layout_centerVertical="true"
    android:layout_marginRight="20dp"
    android:padding="5dp"
    android:src="@drawable/camera_back" />
  </RelativeLayout>


  <LinearLayout
   android:id="@+id/photo_area"
   android:layout_width="fill_parent"
   android:layout_height="wrap_content"
   android:layout_above="@id/panel_take_photo"
   android:layout_centerVertical="true"
   android:background="@color/white"
   android:orientation="horizontal"></LinearLayout>

  <!-- 自定義的標題欄-->
  <RelativeLayout
   android:id="@+id/camera_top"
   android:layout_width="fill_parent"
   android:layout_height="40dp"
   android:layout_alignParentTop="true"
   android:background="@color/black">

   <ImageView
    android:id="@+id/btn_black"
    android:layout_width="wrap_content"
    android:layout_height="fill_parent"
    android:layout_alignParentLeft="true"
    android:paddingBottom="10dp"
    android:paddingLeft="10dp"
    android:paddingTop="10dp"
    android:src="@drawable/back" />

   <ImageView
    android:id="@+id/btn_change"
    android:layout_width="wrap_content"
    android:layout_height="fill_parent"
    android:layout_alignParentRight="true"
    android:layout_centerVertical="true"
    android:paddingBottom="10dp"
    android:paddingRight="10dp"
    android:paddingTop="10dp"
    android:src="@drawable/camera_flip" />

  </RelativeLayout>

  <!-- 自定義的CameraGrid-->
  <org.personality.camera.ui.view.CameraGrid
   android:id="@+id/masking"
   android:layout_width="match_parent"
   android:layout_height="match_parent"
   android:layout_above="@id/photo_area"
   android:layout_alignParentTop="true" />

  <View
   android:id="@+id/focus_index"
   android:layout_width="40dp"
   android:layout_height="40dp"
   android:layout_above="@id/photo_area"
   android:background="@drawable/cam_focus"
   android:visibility="invisible" />
 </RelativeLayout>

</FrameLayout>
提供自定義CameraGrid類:
/**
 * 自定義的View
 * 照相機井字線
 *
 */
public class CameraGrid extends View {

 private int topBannerWidth = 0;
 private Paint mPaint;

 public CameraGrid(Context context) {
  this(context,null);
 }

 public CameraGrid(Context context, AttributeSet attrs) {
  super(context, attrs);
  init();
 }

 private void init(){
  mPaint = new Paint();
  mPaint.setColor(Color.WHITE);
  mPaint.setAlpha(120);
  mPaint.setStrokeWidth(1f);
 }


 private boolean showGrid = true;

 public boolean isShowGrid() {
  return showGrid;
 }

 public void setShowGrid(boolean showGrid) {
  this.showGrid = showGrid;
 }

 public int getTopWidth() {
  return topBannerWidth;
 }
}
以上就是本文的全部內容,希望對大家的學習有所幫助,也希望大家多多支持本站。
 Android Https請求的簡單使用(Volley Https請求的示例)
導語官方文檔:https://developer.android.com/training/articles/security-ssl.htmlHttps使用了數字簽名,
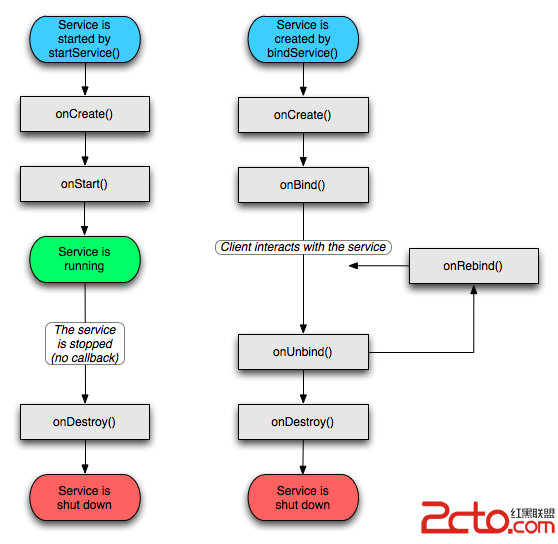 Android:Service的非綁定式的創建和生命周期
Android的Service若使用非綁定式的創建,則創建後將無法再與它取得聯系,即無法傳遞消息參數等; 所以如果希望創建後仍然與其存在聯系,那麼可以參考我的前幾篇博客《
 Android中 服務Service 電話竊聽器
組件—服務後台長期運行的沒有界面的一個activity。 電話竊聽器:需求:1.沒有界面,一般用戶看不到,開機自動啟動2.長期的後台運行,監視當前用
 Android開發之OkHttp的使用
本篇記錄的是Android開發中OkHttp框架的使用,下面介紹OkHttp庫的用法,本篇會給出OkHttp的使用demo,demo中包含了常用的get請求、post請求