編輯:關於Android編程
本篇文章講的是Android自定義View之隨機生成圖片驗證碼,開發中我們會經常需要隨機生成圖片驗證碼,但是這個是其次,主要還是想總結一些自定義View的開發過程以及一些需要注意的地方。
按照慣例先看看效果圖:
一、先總結下自定義View的步驟:
1、自定義View的屬性
2、在View的構造方法中獲得我們自定義的屬性
3、重寫onMesure
4、重寫onDraw
其中onMesure方法不一定要重寫,但大部分情況下還是需要重寫的
二、View 的幾個構造函數
1、public CustomView(Context context)
—>java代碼直接new一個CustomView實例的時候,會調用這個只有一個參數的構造函數;
2、public CustomView(Context context, AttributeSet attrs)
—>在默認的XML布局文件中創建的時候調用這個有兩個參數的構造函數。AttributeSet類型的參數負責把XML布局文件中所自定義的屬性通過AttributeSet帶入到View內;
3、public CustomView(Context context, AttributeSet attrs, int defStyleAttr)
—>構造函數中第三個參數是默認的Style,這裡的默認的Style是指它在當前Application或者Activity所用的Theme中的默認Style,且只有在明確調用的時候才會調用
4、public CustomView(Context context, AttributeSet attrs, int defStyleAttr, int defStyleRes)
—>該構造函數是在API21的時候才添加上的
三、下面我們就開始來看看代碼啦
1、自定義View的屬性,首先在res/values/ 下建立一個attr.xml , 在裡面定義我們的需要用到的屬性以及聲明相對應屬性的取值類型
我們定義了字體,字體顏色,字體大小以及字體的背景顏色4個屬性,format是值該屬性的取值類型,format取值類型總共有10種,包括:string,color,demension,integer,enum,reference,float,boolean,fraction和flag。
2、然後在XML布局中聲明我們的自定義View
一定要引入xmlns:custom=”http://schemas.android.com/apk/res-auto”,Android Studio中我們可以使用res-atuo命名空間,就不用在添加自定義View全類名。
3、在View的構造方法中,獲得我們的自定義的樣式
/**
     * 文本
     */
    private String mText;
    /**
     * 文本的顏色
     */
    private int mTextColor;
    /**
     * 文本的大小
     */
    private int mTextSize;
    /**
     * 文本的背景顏色
     */
    private int mBgCplor;
    private Rect mBound;
    private Paint mPaint;

    public CustomView(Context context) {
        this(context, null);
    }

    public CustomView(Context context, AttributeSet attrs) {
        this(context, attrs, 0);
    }

    public CustomView(Context context, AttributeSet attrs, int defStyleAttr) {
        super(context, attrs, defStyleAttr);
        /**
         * 獲得我們所定義的自定義樣式屬性
         */
        TypedArray a = context.getTheme().obtainStyledAttributes(attrs, R.styleable.CustomView, defStyleAttr, 0);
        for (int i = 0; i < a.getIndexCount(); i++) {
            int attr = a.getIndex(i);
            switch (attr) {
                case R.styleable.CustomView_text:
                    mText = a.getString(attr);
                    break;
                case R.styleable.CustomView_textColor:
                    // 默認文本顏色設置為黑色
                    mTextColor = a.getColor(R.styleable.CustomView_textColor, Color.BLACK);
                    break;
                case R.styleable.CustomView_bgColor:
                    // 默認文本背景顏色設置為藍色
                    mBgCplor = a.getColor(R.styleable.CustomView_bgColor, Color.BLUE);
                    break;
                case R.styleable.CustomView_textSize:
                    // 默認設置為16sp,TypeValue也可以把sp轉化為px
                    mTextSize = a.getDimensionPixelSize(attr, (int) TypedValue.applyDimension(TypedValue.COMPLEX_UNIT_SP, 16, getResources().getDisplayMetrics()));
                    break;
            }
        }
        a.recycle();
        // 獲得繪制文本的寬和高
        mPaint = new Paint();
        mPaint.setTextSize(mTextSize);

        mBound = new Rect();
        mPaint.getTextBounds(mText, 0, mText.length(), mBound);
    }
我們重寫了3個構造方法,在上面的構造方法中說過默認的布局文件調用的是兩個參數的構造方法,所以記得讓所有的構造方法調用三個參數的構造方法,然後在三個參數的構造方法中獲得自定義屬性。
一開始一個參數的構造方法和兩個參數的構造方法是這樣的:
 public CustomView(Context context) {
        super(context);
    }

    public CustomView(Context context, AttributeSet attrs) {
        super(context, attrs);
    }
有一點要注意的是super應該改成this,然後讓一個參數的構造方法引用兩個參數的構造方法,兩個參數的構造方法引用三個參數的構造方法,代碼如下:
 public CustomView(Context context) {
        this(context, null);
    }

    public CustomView(Context context, AttributeSet attrs) {
        this(context, attrs, 0);
    }
4、重寫onDraw,onMesure方法
 @Override
    protected void onMeasure(int widthMeasureSpec, int heightMeasureSpec) {
        super.onMeasure(widthMeasureSpec, heightMeasureSpec);
    }

    @Override
    protected void onDraw(Canvas canvas) {
        super.onDraw(canvas);
        mPaint.setColor(mBgCplor);
        canvas.drawRect(0, 0, getMeasuredWidth(), getMeasuredHeight(), mPaint);

        mPaint.setColor(mTextColor);
        canvas.drawText(mText, getWidth() / 2 - mBound.width() / 2, getHeight() / 2 + mBound.height() / 2, mPaint);
    }
View的繪制流程是從ViewRoot的performTravarsals方法開始的,經過measure、layout和draw三個過程才能最終將一個View繪制出來,其中:
測量——onMeasure():用來測量View的寬和高來決定View的大小 布局——onLayout():用來確定View在父容器ViewGroup中的放置位置繪制——onDraw():負責將View繪制在屏幕上
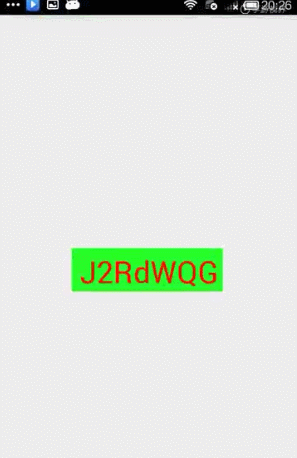
來看下此時的效果圖
細心的朋友會發現,在上面的布局文件中,我們是把寬和高設置為wrap_content的,可是這個效果圖怎麼看都不是我們想要的,這是因為系統幫我們測量的高度和寬度默認是MATCH_PARNET,當我們設置明確的寬度和高度時,系統幫我們測量的結果就是我們設置的結果,這個是對的。但是除了設置明確的寬度和高度,不管我們設置為WRAP_CONTENT還是MATCH_PARENT,系統幫我們測量的結果就是MATCH_PARENT,所以,當我們設置了WRAP_CONTENT時,我們需要自己進行測量,也就是說我們需要重寫onMesure方法
下面是我們重寫onMeasure代碼:
 @Override
    protected void onMeasure(int widthMeasureSpec, int heightMeasureSpec) {
        super.onMeasure(widthMeasureSpec, heightMeasureSpec);
        int widthMode = MeasureSpec.getMode(widthMeasureSpec);
        int widthSize = MeasureSpec.getSize(widthMeasureSpec);
        int heighMode = MeasureSpec.getMode(heightMeasureSpec);
        int heighSize = MeasureSpec.getSize(heightMeasureSpec);
        setMeasuredDimension(widthMode == MeasureSpec.EXACTLY ? widthSize : getPaddingLeft() + getPaddingRight() + mBound.width(), heighMode == MeasureSpec.EXACTLY ? heighSize : getPaddingTop() + getPaddingBottom() + mBound.height());
    }
MeasureSpec封裝了父布局傳遞給子布局的布局要求,MeasureSpec的specMode一共有三種模式:
(1)EXACTLY(完全):一般是設置了明確的值或者是MATCH_PARENT,父元素決定了子元素的大小,子元素將被限定在給定的范圍裡而忽略它本身大小;
(2)AT_MOST(至多):表示子元素至多達到給定的一個最大值,一般為WARP_CONTENT;
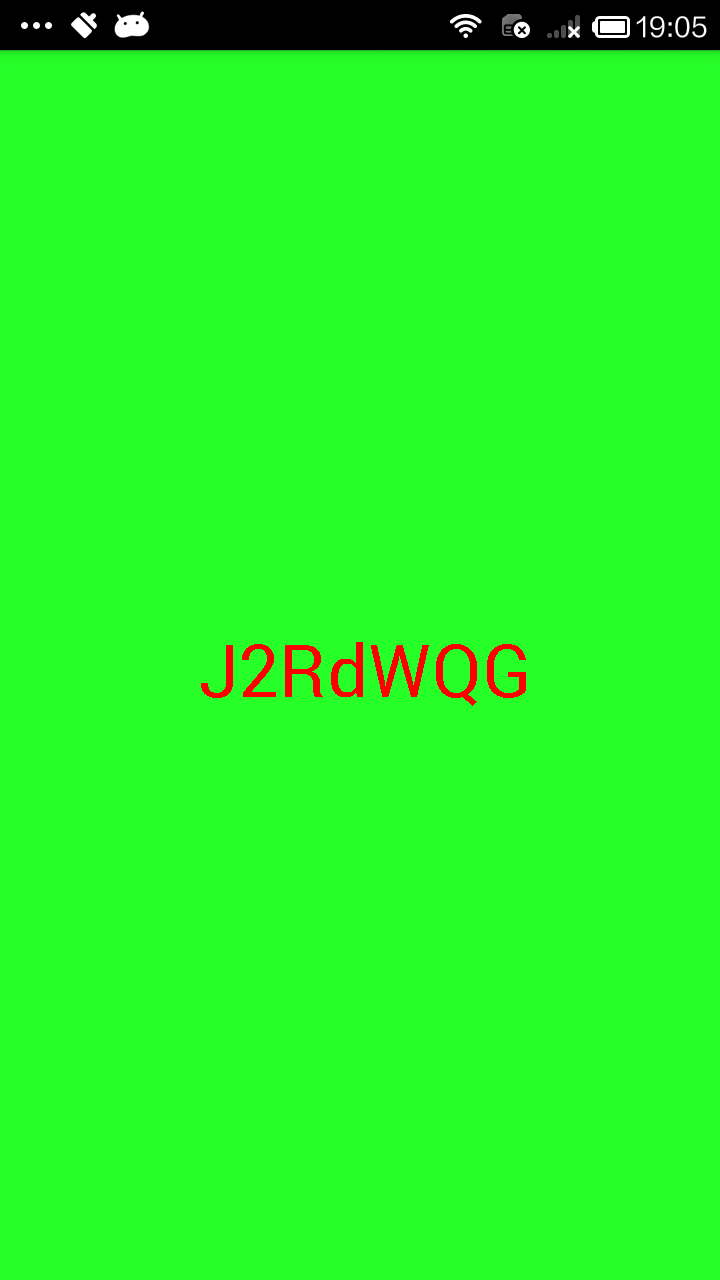
我們再看看效果圖
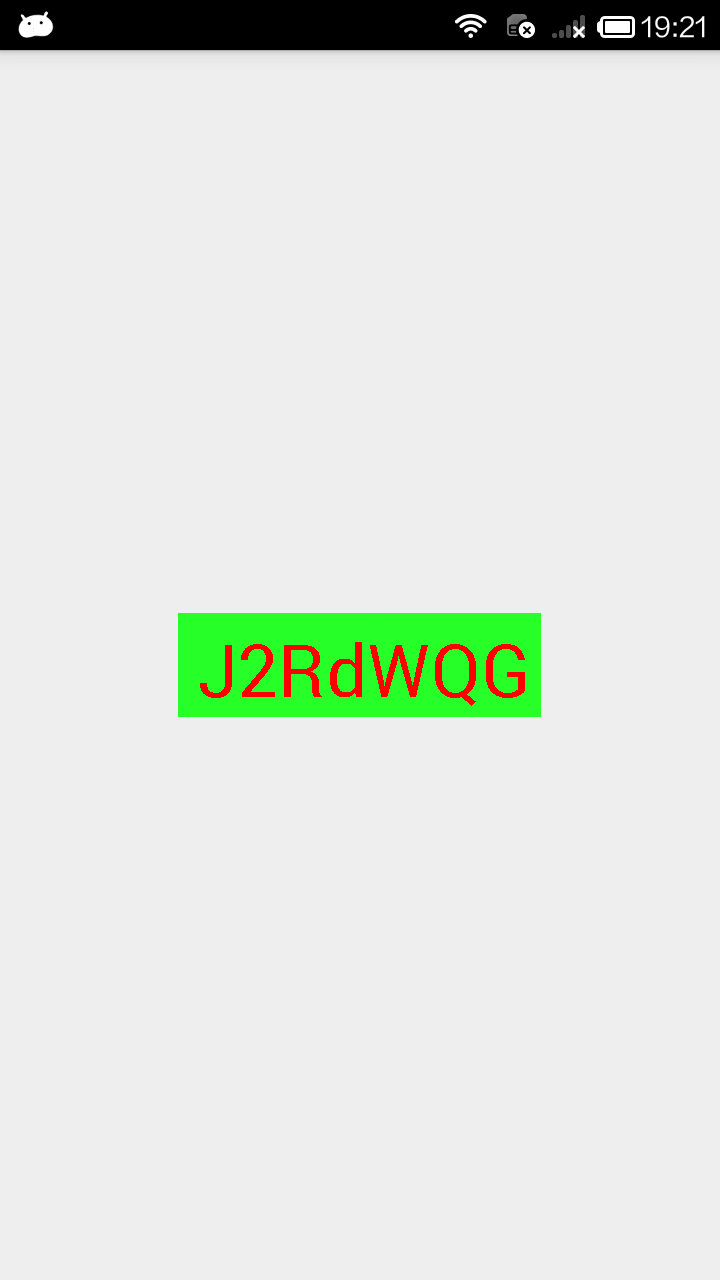
現在這個是我們想要的結果了吧,回歸到主題,今天講的是自定義View之隨機生成圖片驗證碼,現在把自定義View的部分完成了,我把完整的代碼貼出來
package com.per.customview01.view;

import android.content.Context;
import android.content.res.TypedArray;
import android.graphics.Canvas;
import android.graphics.Color;
import android.graphics.Paint;
import android.graphics.Rect;
import android.util.AttributeSet;
import android.util.Log;
import android.util.TypedValue;
import android.view.View;

import com.per.customview01.R;

import java.util.Random;

/**
 * @author: adan
 * @description:
 * @projectName: CustomView01
 * @date: 2016-06-12
 * @time: 10:26
 */
public class CustomView extends View {
    private static final char[] CHARS = {'0', '1', '2', '3', '4', '5', '6',
            '7', '8', '9', 'a', 'b', 'c', 'd', 'e', 'f', 'g', 'h', 'i', 'j',
            'k', 'l', 'm', 'n', 'o', 'p', 'q', 'r', 's', 't', 'u', 'v', 'w',
            'x', 'y', 'z', 'A', 'B', 'C', 'D', 'E', 'F', 'G', 'H', 'I', 'J',
            'K', 'L', 'M', 'N', 'O', 'P', 'Q', 'R', 'S', 'T', 'U', 'V', 'W',
            'X', 'Y', 'Z'};
    /**
     * 初始化生成隨機數的類
     */
    private Random mRandom = new Random();
    /**
     * 初始化可變字符串
     */
    private StringBuffer sb = new StringBuffer();
    /**
     * 文本
     */
    private String mText;
    /**
     * 文本的顏色
     */
    private int mTextColor;
    /**
     * 文本的大小
     */
    private int mTextSize;
    /**
     * 文本的背景顏色
     */
    private int mBgCplor;
    private Rect mBound;
    private Paint mPaint;

    public CustomView(Context context) {
        this(context, null);
    }

    public CustomView(Context context, AttributeSet attrs) {
        this(context, attrs, 0);
    }

    public CustomView(Context context, AttributeSet attrs, int defStyleAttr) {
        super(context, attrs, defStyleAttr);
        /**
         * 獲得我們所定義的自定義樣式屬性
         */
        TypedArray a = context.getTheme().obtainStyledAttributes(attrs, R.styleable.CustomView, defStyleAttr, 0);
        for (int i = 0; i < a.getIndexCount(); i++) {
            int attr = a.getIndex(i);
            switch (attr) {
                case R.styleable.CustomView_text:
                    mText = a.getString(attr);
                    break;
                case R.styleable.CustomView_textColor:
                    // 默認文本顏色設置為黑色
                    mTextColor = a.getColor(R.styleable.CustomView_textColor, Color.BLACK);
                    break;
                case R.styleable.CustomView_bgColor:
                    // 默認文本背景顏色設置為藍色
                    mBgCplor = a.getColor(R.styleable.CustomView_bgColor, Color.BLUE);
                    break;
                case R.styleable.CustomView_textSize:
                    // 默認設置為16sp,TypeValue也可以把sp轉化為px
                    mTextSize = a.getDimensionPixelSize(attr, (int) TypedValue.applyDimension(TypedValue.COMPLEX_UNIT_SP, 16, getResources().getDisplayMetrics()));
                    break;
            }
        }
        a.recycle();
        // 獲得繪制文本的寬和高
        mPaint = new Paint();
        mPaint.setTextSize(mTextSize);

        mBound = new Rect();
        mPaint.getTextBounds(mText, 0, mText.length(), mBound);

        this.setOnClickListener(new OnClickListener() {
            @Override
            public void onClick(View v) {
                mText = createCode();
                mTextColor = randomColor();
                mBgCplor = randomColor();
                //View重新調用一次draw過程,以起到界面刷新的作用
                postInvalidate();
            }
        });
    }

    /**
     * 生成驗證碼
     */
    public String createCode() {
        sb.delete(0, sb.length()); // 使用之前首先清空內容
        for (int i = 0; i < 6; i++) {
            sb.append(CHARS[mRandom.nextInt(CHARS.length)]);
        }
        Log.e("生成驗證碼", sb.toString());
        return sb.toString();
    }

    /**
     * 隨機顏色
     */
    private int randomColor() {
        sb.delete(0, sb.length()); // 使用之前首先清空內容
        String haxString;
        for (int i = 0; i < 3; i++) {
            haxString = Integer.toHexString(mRandom.nextInt(0xFF));
            if (haxString.length() == 1) {
                haxString = "0" + haxString;
            }
            sb.append(haxString);
        }
        Log.e("隨機顏色", "#" + sb.toString());
        return Color.parseColor("#" + sb.toString());
    }

    @Override
    protected void onMeasure(int widthMeasureSpec, int heightMeasureSpec) {
        super.onMeasure(widthMeasureSpec, heightMeasureSpec);
        int widthMode = MeasureSpec.getMode(widthMeasureSpec);
        int widthSize = MeasureSpec.getSize(widthMeasureSpec);
        int heighMode = MeasureSpec.getMode(heightMeasureSpec);
        int heighSize = MeasureSpec.getSize(heightMeasureSpec);
        setMeasuredDimension(widthMode == MeasureSpec.EXACTLY ? widthSize : getPaddingLeft() + getPaddingRight() + mBound.width(), heighMode == MeasureSpec.EXACTLY ? heighSize : getPaddingTop() + getPaddingBottom() + mBound.height());
    }

    @Override
    protected void onDraw(Canvas canvas) {
        super.onDraw(canvas);
        mPaint.setColor(mBgCplor);
        canvas.drawRect(0, 0, getMeasuredWidth(), getMeasuredHeight(), mPaint);

        mPaint.setColor(mTextColor);
        canvas.drawText(mText, getWidth() / 2 - mBound.width() / 2, getHeight() / 2 + mBound.height() / 2, mPaint);
    }
}
我們添加了一個點擊事件,每一次點擊View我都讓它把生成的驗證碼和字體顏色以及字體背景顏色打印出來,如下所示:

 Android 中 ViewFlipper 的簡單實例
main.xml Main.javapackage com.wty.mydemoviewflipper;import android.app.Activity;im
 很贊的引導界面效果Android控件ImageSwitcher實現
本文實例為大家分享了Android控件ImageSwitcher實現引導界面的代碼,供大家參考,具體內容如下效果圖:布局代碼:<?xml version=1
 Android 搜索SD卡文件的開發示例
我們在進行Android開發時往往需要訪問SD卡的內容,而且因為文件很多,希望能夠在SD卡中進行
 一個不是那麼優美的圓形進度條續(基本還原原應用裡面的效果)
之前幫別人寫了一個不是那麼優美的圓形進度條,效果圖大家也看過了。但是後某人不滿意,說原應用是倒計時時間最後5s,才開始顯示數字的,同時轉完一圈需要的時間只能是30s左右。