編輯:關於Android編程
它是android App的四大組件之一,在開發中我們有時需要做一些耗時的但不需要與用戶建立界面交互的操作可以考慮使用service。比如:比如我們需要在後台進行上傳或下載的操作;殺毒或是監控軟件可能希望service常駐後台,並可被Intent來驅動開始進行殺毒;聊天或是社交等即時通訊類應用,需要在後台定時地與服務發送“心跳”,來標識自己的在線狀態等。
需要注意的是:它不是一個單獨的進程,默認不會運行在一個單獨的進程,除非做出明確的定義來實現遠程Service,它作為App的一部分與App運行在相同的進程裡。它也不是一個子線程,它是在主線程裡執行的,這就意味這它不能執行耗時操作。
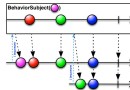
它有兩個主要特點,也就是它的兩種啟動方式:1. 一個是使用Context.startService(),告訴系統有需要在後台執行的任務,請求系統給service安排這些任務。2. 另一個是使用Context.bindService(),這種方式可以通過暴露一些功能給其他client,通過建立一個較長的連接,使service可以和其建立一些通信交互。
下面是兩種啟動方式下,Service的生命周期對比圖:
 vcq9tcTJ+sP81tzG2rbUscgucG5n" title="\">
采用Context.startService()方法啟動服務,訪問者與服務之間沒有產生關連,即使訪問者退出了,服務仍然運行。只能調用Context.stopService()方法結束服務,服務結束時會調用onDestroy()方法,適用於服務和訪問者之間沒有交互的情況。
在服務被創建時調用
onCreate()方法,創建之後重復調用Context.startService(),不會再觸發onCreate()方法,不會多次創建服務,但每次會觸發onStartCommand()方法之後會執行onStart()方法。
采用Context.bindService()方法啟動服務,訪問者與服務綁定在了一起,訪問者一旦退出,服務也就終止,適用於服務和訪問者之間需要方法調用或進行參數傳遞。
在服務未被創建時,系統會先調用服務的
onCreate()方法,接著調用onBind()方法,這個時候訪問者和服務綁定在一起。如果訪問者要與服務進行通信,那麼onBind()方法必須返回Ibinder對象。如果訪問者退出了,系統就會先調用服務onUnbind()方法,接著調用onDestroy()方法。如果在調用bindService()方法前服務已經被綁定,多次調用bindService()方法並不會導致多次創建服務及綁定(也就是說onCreate()和onBind()方法並不會被多次調用)。如果訪問者希望與正在綁定的服務解除綁定,可以調用unbindService()方法,調用該方法也會導致系統調用服務的onUnbind()->onDestroy()方法,如果再次調用unbindService()會發生異常java.lang.IllegalArgumentException: Service not registered,所以如果需要在activity可見時與service交互,應該在activity的onStart()中綁定並在onStop()中解除綁定。如果想讓activity即使在它停止時也能接收回應,那麼可以在onCreate()中綁定並在onDestroy()中解除綁定.注意這意味著activity需要使用在自己整個運行期間使用service(即使位於後台),所以如果service在另一個進程中,那麼你增加了這個進程的負擔而使它變得更容易被系統殺掉。
如果對同一個service分別使用context.startSerivce()和context.bindSerivce(),也只會執行一次onCreate()方法,該service只會被創建一次,而這種情況下,只有執行了unBindService()之後該service才可以被銷毀(調用onDestroy())方法.
client:startSerivce()->bindService()->stopService()/unBindService->unBindService()/stopService()
service:onCreate()->onStartCommand()->onStart()->onBind()->onServiceConnected()->onUnBind()->onDestory()
client:bindService()->startSerivce()->stopService()/unBindService->unBindService()/stopService():
service:onCreate()->onBind()->onServiceConnected()->onStartCommand()->onUnBind()->onDestory()
在上面的調用過程和對應的service生命周期過程中需要注意的:
1.如果先bindService,再startService:
在bind的Activity退出的時候,Service會執行unBind方法而不執行onDestory方法,因為有startService方法調用過,所以Activity與Service解除綁定後會有一個與調用者沒有關連的Service存在
2.如果先bindService,再startService,再調用Context.stopService
Service的onDestory方法不會立刻執行,因為有一個與Service綁定的Activity,但是在Activity退出的時候,會執行onDestory,如果要立刻執行stopService,就得先解除綁定
在
public int onStartCommand (Intent intent, int flags, int startId)方法中:參數flags默認情況下是0,對應的常量名為START_STICKY_COMPATIBILITY。startId是一個唯一的整型,用於表示此次Client執行startService()的請求請求標識,在多次startService()的情況下,呈現0,1,2….遞增。另外,此函數具有一個int型的返回值,具體的可選值及含義如下:
START_NOT_STICKY:當Service因為內存不足而被系統kill後,接下來未來的某個時間內,即使系統內存足夠可用,系統也不會嘗試重新創建此Service。除非程序中Client明確再次調用startService()啟動此Service。
START_STICKY:當Service因為內存不足而被系統kill後,接下來未來的某個時間內,當系統內存足夠可用的情況下,系統將會嘗試重新創建此Service,一旦創建成功後將回調onStartCommand()方法,但其中的Intent將是null,pendingintent除外。
START_REDELIVER_INTENT:與START_STICKY唯一不同的是,回調onStartCommand()方法時,其中的Intent將是非空,將是最後一次調用startService()中的intent。
import android.app.Service;
import android.content.Intent;
import android.app.Notification;
import android.app.NotificationManager;
import android.app.PendingIntent;
import android.os.Binder;
import android.os.IBinder;
import android.support.annotation.Nullable;
import android.util.Log;
public class DemoService extends Service {
     private static final String TAG = "DemoService";
     private static final int NOTIFICATION = 101;
     private NotificationManager mNM;
     private DemoBinder demoBinder = new DemoBinder();
     public class DemoBinder extends Binder {
       public DemoService getService() {
          return DemoService.this;
       }
       public void upload() {
          Log.d(TAG, "upload: ");
       }
     }
//如果允許綁定,需要返回一個IBinder對象供client能夠使用它與service通訊。如果不允許綁定,那麼應返回null。
     @Nullable
     @Override
     public IBinder onBind(Intent intent) {
       Log.d(TAG, "onBind: ");
       return demoBinder;
     }
//在service第一次創建時執行此方法,可以在這裡進行只運行一次的初始化工作。如果service已經運行,這個方法不會被調用.
     @Override
     public void onCreate() {
        super.onCreate();
        Log.d(TAG, "onCreate: ");
        mNM = (NotificationManager)getSystemService(NOTIFICATION_SERVICE);
      //應該告訴用戶你開啟了一個後台服務,這個服務是用來干什麼的提示通知。
        showNotification();
      }
//通過調用startService()請求service啟動時調用這個方法.
//一旦這個方法執行,service就啟動並且在後台長期運行,需要在service完成任務時通過調用stopSelf()或stopService()停止它。(如果只想提供綁定,則不需實現此方法).
     @Override
     public int onStartCommand(Intent intent, int flags, int startId) {
        Log.d(TAG, "onStartCommand: ");
        return super.onStartCommand(intent, flags, startId);
     }
     @Override
     public void onStart(Intent intent, int startId) {
        super.onStart(intent, startId);
        Log.d(TAG, "onStart: ");
     }
//當所有client均從service發布的接口斷開的時候被調用。默認實現不執行任何操作,並返回false。
     @Override
     public boolean onUnbind(Intent intent) {
        Log.d(TAG, "onUnbind: ");
        return super.onUnbind(intent);
      }
//在service不再被使用並要銷毀時調用此方法。應在此方法中釋放資源,比如線程,已注冊的偵聽器,接收器等等。這是service收到的最後一個調用
     @Override
     public void onDestroy() {
        super.onDestroy();
        Log.d(TAG, "onDestroy: ");
        mNM.cancel(NOTIFICATION);
     }
     @Override
      public void onRebind(Intent intent) {
        super.onRebind(intent);
        Log.d(TAG, "onRebind: ");
      }
/** 在Service開始運行時 顯示個通知告訴用戶*/
      private void showNotification() {
      // The PendingIntent to launch our activity if the user selects this notification
        PendingIntent contentIntent = PendingIntent.getActivity(this, 0, new Intent(this, MainActivity.class), 0);
// Set the info for the views that show in the notification panel.
        Notification notification = new Notification.Builder(this)
                   .setSmallIcon(R.mipmap.ic_launcher)  // the status icon
                   .setTicker("Service開啟了")  // the status text
                   .setWhen(System.currentTimeMillis())  // the time stamp
                   .setContentTitle("DemoService正在運行")  // the label of the entry
                   .setContentText("測試Service")  // the contents of the entry
                   .setContentIntent(contentIntent)  // The intent to send when the entry is clicked
                   .getNotification();    // Send the notification.
         mNM.notify(NOTIFICATION, notification);
     }
}
還要在清單文件AndroidManifest.xml中進行注冊:
在 AndroidManifest.xml 裡 Service 元素的常見選項:
訪問者client可以通過context.bindService()方法public boolean bindService (Intent service, ServiceConnection conn, int flags)中的conn來建立與Service的聯系。
public class MainActivity extends AppCompatActivity {
          ... 省略...
     public void clickService(View view) {
          switch (view.getId()) {
          case R.id.btn_bind:
               bindService(new Intent(this, DemoService.class), conn,  BIND_AUTO_CREATE);
          break;
          case R.id.btn_unbind:
               unbindService(conn);
          break;
    }
     private ServiceConnection conn = new ServiceConnection() {
          @Override
          public void onServiceConnected(ComponentName name, IBinder service) {
               Log.d(TAG, "onServiceConnected: ");
              //這個service就是Service類中onBind() 方法中返回的對象
               DemoService.DemoBinder demoBinder = (DemoService.DemoBinder) service;
               demoBinder.upload();
          }
          @Override
          public void onServiceDisconnected(ComponentName name) {
               Log.d(TAG, "onServiceDisconnected: ");
          }
      };
}
實例參見:Bound Services. A way to interact with the Service
2 . 通過 Intent 通信
在啟動service時,將要傳遞的數據放到intent中,在前面提到的兩種啟動方式中,可以分別在onStartCommand()和onBind()方法中獲取相應的intent,進而可以獲取要傳遞的數據和參數,然後可以開啟新的線程執行耗時操作等。要注意的是如果是context.startService()方式啟動,會每次喚起onStartCommand(),而context.bindService()方式,如果已經綁定,只會綁定一次,也就是只會調用一次onBind()方法。
既然在Service裡也要創建一個子線程,那為什麼不直接在Activity裡創建呢?這是因為Activity很難對Thread進行控制,當Activity被銷毀之後,就沒有任何其它的辦法可以再重新獲取到之前創建的子線程的實例。而且在一個Activity中創建的子線程,另一個Activity無法對其進行操作。但是Service就不同了,所有的Activity都可以與Service進行關聯,然後可以很方便地操作其中的方法,即使Activity被銷毀了,之後只要重新與Service建立關聯,就又能夠獲取到原有的Service中Binder的實例。因此,使用Service來處理後台任務,Activity就可以放心地finish,完全不需要擔心無法對後台任務進行控制的情況
3.Remote Messenger通信
如果需要和service進行跨進程的通信,可以使用Messenger而不需要寫一些AIDL文件。下面是一個service使用Messenger作為client接口的例子,當被綁定時將發送Messenger到內部的Handler。
public class MessengerService extends Service {
     private static final String TAG = "MessengerService";
     NotificationManager mNM;
    /**
     * 緩存所有注冊到這個Service的client
     */
     ArrayList mClients = new ArrayList<>();
     /**
     * client發送過來的最新的值
      */
      int mValue = 0;
     /**
      * client發送的注冊到這個service的消息標記
      */
     static final int MSG_REGISTER_CLIENT = 1;
     /**
     * 解除注冊,停止接收來自這個Service的回調。
     * 發送這個消息標記的client必須是上一個發送注冊消息的client。     */
      static final int MSG_UNREGISTER_CLIENT = 2;
     /**
     * 發送一個新的值到service或者是service發送到所有注冊的client的一個新值。
      */
     static final int MSG_SET_VALUE = 3;
      /**
     * 接收來自clients的消息的handler
      */
     class IncomingHandler extends Handler {
      @Override
           public void handleMessage(Message msg) {
                switch (msg.what) {
                     case MSG_REGISTER_CLIENT:
                              mClients.add(msg.replyTo);
                          break;
                     case MSG_UNREGISTER_CLIENT:
                              mClients.remove(msg.replyTo);
                         break;
                     case MSG_SET_VALUE:
                              mValue = msg.arg1;
                               Log.d(TAG, "handleMessage: " + mValue);
                              for (int i = mClients.size() - 1; i >= 0; i--) {
                                    try {
                                             mClients.get(i).send(Message.obtain(null, MSG_SET_VALUE, mValue, 0));
                                         }  catch (RemoteException e) {
                                   //這個client已經關閉或銷毀,把它從client緩存中移除,這個遍歷是從後往前的,所以刪除操作是安全的。
                                   mClients.remove(i);
                                    }
                                }
                           break;
                     default:
                            super.handleMessage(msg);
                }
           }
       }
      /**
       * clients發送消息到IncomingHandler的消息通道
       */
     final Messenger mMessenger = new Messenger(new IncomingHandler());
     @Override
     public void onCreate() {
          mNM = (NotificationManager) getSystemService(NOTIFICATION_SERVICE);
          showNotification();
     }
      /**
      * 當綁定到這個service時,返回一個messenger的接口,client通過它發送消息到service。
      */
     @Override
      public IBinder onBind(Intent intent) {
          return mMessenger.getBinder();
       }
     @Override
     public void onDestroy() {
          mNM.cancel(R.string.remote_service_started);
          // Tell the user we stopped.
          Toast.makeText(this, R.string.remote_service_stopped, Toast.LENGTH_SHORT).show();
      }
     /**
     * Show a notification while this service is running.
       */
      private void showNotification() {
          // In this sample, we'll use the same text for the ticker and the expanded notification
          CharSequence text = getText(R.string.remote_service_started);
          // The PendingIntent to launch our activity if the user selects this notification
          PendingIntent contentIntent = PendingIntent.getActivity(this, 0, new Intent(this, ContentActivity.class), 0);
          // Set the info for the views that show in the notification panel.
          Notification notification = new Notification.Builder(this)
                    .setSmallIcon(R.mipmap.ic_launcher)  // the status icon
                    .setTicker(text)  // the status text
                    .setWhen(System.currentTimeMillis())  // the time stamp
                    .setContentTitle(getText(R.string.local_service_label))  // the label of the entry
                    .setContentText(text)  // the contents of the entry
                    .setContentIntent(contentIntent)  // The intent to send when the entry is clicked
                    .getNotification();        // Send the notification.
                     // We use a string id because it is a unique number.  We use it later to cancel.
           mNM.notify(R.string.remote_service_started, notification);
      }
}
如果想要這個service運行在另一個進程中(它並不是一個標准的apk應用),那麼就在清單文件裡設置它的android:process的屬性:
那麼client可以按下面的方式來與service建立message的通信關系:
---省略---
     /**
     * 與service進行通信的messenger。
     */
     Messenger mService = null;
     /**
     * 標記是否已經綁定到service
     */
     boolean mIsBound;
    /**
      * 處理來自service的消息的handler
     */
    class IncomingHandler extends Handler {
        @Override
        public void handleMessage(Message msg) {
                switch (msg.what) {
                        case  MessengerService.MSG_SET_VALUE:
                              Log.d(TAG, "handleMessage: " + msg.arg1);
                              break;
                        default:
                            super.handleMessage(msg);
                    }
        }
    }
    final Messenger mMessenger = new Messenger(new IncomingHandler());
    private ServiceConnection mConnection = new ServiceConnection() {
            public void onServiceConnected(ComponentName className,  IBinder service) {
            mService = new Messenger(service);
            Log.d(TAG, "onServiceConnected: attached");
         // 只要我們和service建立了連接我們就可以給它發送消息控制它。
         try {
                Message msg = Message.obtain(null, MessengerService.MSG_REGISTER_CLIENT);
                msg.replyTo = mMessenger;
                mService.send(msg);
             // 下面我們發送一個消息給Service
                msg = Message.obtain(null,  MessengerService.MSG_SET_VALUE, 202, 0);
                mService.send(msg);
            } catch (RemoteException e) {
             // There is nothing special we need to do if the service has crashed.
            }
        }
        public void onServiceDisconnected(ComponentName className) {
               mService = null;
               Log.d(TAG, "onServiceDisconnected: disconnected");
            }
        };
    void doBindService() {
        bindService(new Intent(this, MessengerService.class), mConnection, Context.BIND_AUTO_CREATE);
        mIsBound = true;
        Log.d(TAG, "doBindService: ");
    }
    void doUnbindService() {
         if (mIsBound) {
               if (mService != null) {
                    try {
                        Message msg = Message.obtain(null, MessengerService.MSG_UNREGISTER_CLIENT);
                        msg.replyTo = mMessenger;
                       mService.send(msg);
                        } catch (RemoteException e) {
                        // There is nothing special we need to do if the service has crashed.
                       }
              }
             unbindService(mConnection);
             mIsBound = false;
             Log.d(TAG, "doUnbindService: ");
        }
    }
}Foreground Service(意譯為前台服務)並不是工作在前台的Service,實際上始終是工作在後台的。由於Service工作在後台的原因,用戶並不知道它在運行,有時候需要使用者知道某個Service在運行時,就需要實現Foreground Service。其實就是在Service開啟的時候使用通知Notification,這也是Android官方推薦的方式。只要在程序開啟了Service,則使用一個常駐通知欄的Notification表明服務正在運行,比如在後台Service進行音樂播放。 除了自己處理通知的方法外,Google在Android 2.0(SDK level 5)以上的SDK提供了一個直接而簡單的方法,使用Service.startForeground()和Service.stopForeground()進行處理。
/ * 讓service成為Foreground Service,並且產生一個“正在運行”的通知。
 * 默認情況下,service是後台的,這意味著service在系統
 * 回收內存(比如在浏覽器裡顯示大圖片)的時候可以被毫無顧忌的kill掉。
 * 如果你比較在意這個service的掛掉,比如像後台音樂播放器這種突然掛了會影響用戶的情況,就可以使用Foreground Service來提示用戶。
 *
 * 參數
 * id     The identifier for this notification as per NotificationManager.notify(int, Notification).
 * notification     The Notification to be displayed.
 */
public final void startForeground (
               int id, Notification notification)
/**
 * 去掉service的foreground屬性,允許在低內存時被kill掉
 *
 * Parameters
 * removeNotification  If true, the notification previously  provided to
 * startForeground(int, Notification)will be removed. Otherwise it will
 * remain until a later call removes  it (or the service is destroyed).
 */
public final void stopForeground (boolean removeNotification)例如,一個從service播放音樂的音樂播放器,應被設置為前台運行,因為用戶會明確地注意它的運行.在狀態欄中的通知可能會顯示當前的歌曲並且允許用戶啟動一個activity來與音樂播放器交互.
Notification notification = new Notification(R.drawable.icon, getText(R.string.ticker_text),System.currentTimeMillis());
Intent notificationIntent = new Intent(this, MusicActivity.class);
PendingIntent pendingIntent = PendingIntent.getActivity(this, 0, notificationIntent, 0);
notification.setLatestEventInfo(this, getText(R.string.notification_title), getText(R.string.notification_message), pendingIntent);//這些方法都過時了
startForeground(ONGOING_NOTIFICATION, notification);調用stopForeground(),可以從前台移除service,這個方法有boolean型參數,表明是否也從狀態欄刪除對應的通知.這個方法不會停掉service.然而,如果你停止了正在前台運行的service,這個通知也會被刪除。
根據前面的總結,知道Service是運行在主線程,所以是不能直接進行耗時操作的。如果有耗時操作,還是需要放到子線程中,需要手動開啟子線程。在Android 中還提供的一個非常簡便的類 IntentService,這是一個Service的子類,使用一個工作線程來處理所有的啟動請求,一次處理一個。
使用姿勢:繼承IntentService,實現onHandleIntent(),這個方法接收每次啟動請求發來的intent,而且它是在子線程裡執行的哦。
IntentService使用隊列的方式將請求的Intent加入隊列,然後開啟一個worker thread(線程)來處理隊列中的Intent,對於異步的startService請求,IntentService會處理完成一個之後再處理第二個,每一個請求都會在一個單獨的worker thread中處理,不會阻塞應用程序的主線程。這裡就給我們提供了一個思路,如果有耗時的操作與其在Service裡面開啟新線程還不如使用IntentService來處理耗時操作。而在一般的繼承Service裡面如果要進行耗時操作就必須另開線程,但是使用IntentService就可以直接在裡面進行耗時操作,因為默認實現了一個worker thread。對於異步的startService請求,IntentService會處理完成一個之後再處理第二個。
使用 IntentService 需要注意幾點:
不可以直接和UI做交互。為了把它執行的結果體現在UI上,需要把結果返回給Activity。
工作任務隊列是順序執行的,如果一個任務正在IntentService中執行,此時你再發送一個新的任務請求,這個新的任務會一直等待直到前面一個任務執行完畢才開始執行。
正在執行的任務無法打斷。
IntentService源碼分析
IntentService的使用和源碼分析
 Android實戰技巧之四十八:Android上的Java8和kotlin
Java和Android這對搭檔目前也在風雨飄搖中。技術圈子的事,往往被商業利益牽著鼻子走。世事莫過於此。Java8目前Android應用開發已經使用到Java7,但對J
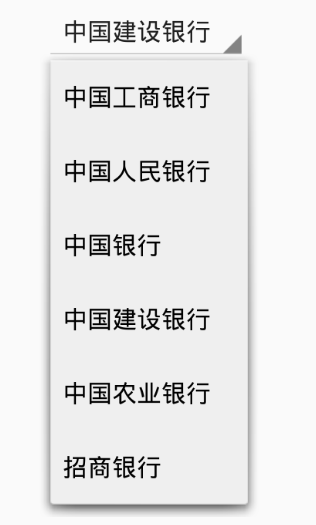 Android Spinner
Android 中下拉列表選擇,提供了控件Spinner,現做一個小總結,以備使用。從1.Spinner屬性2.設置Spinner的adapter說起。1.Spinner
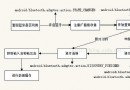 Android適配安卓6.0藍牙通訊實現過程
事先說明:安卓藍牙需要定位權限申請,在安卓6.0需要用戶手動確認權限後才能使用,各位可以自行查詢資料實現,如果嫌麻煩,可以用第三方Bmob集成好的工具類進行實現,詳細可以
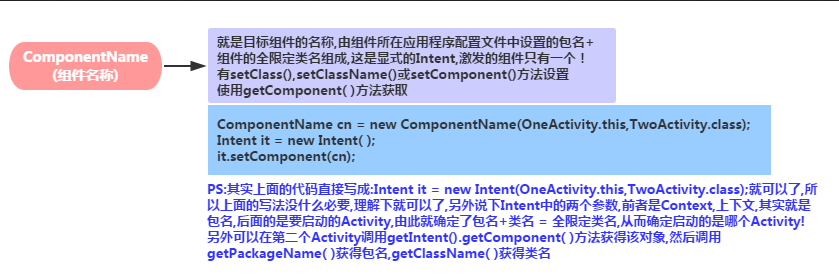 通信組件之Intent的基本使用
(一)概述本節引言:在上一節結束後意味著Android的四大組件我們都已經學習完畢了~,而本節我們要學習的是四大組件間的 樞紐——Intent(意