編輯:關於Android編程
大家應該對ImageLoader這個框架都不陌生吧,一個很強大的圖片加載框架,雖然作者去年的時候已經停止維護了,但裡面的許多東西還是值得我們去學習的。本篇博客講解的內存緩存算法正是基於ImageLoader的實現基礎之上的
也就是當內存緩存達到設定的最大值時將內存緩存中近期最少使用的對象移除,有效的避免了OOM的出現。
(2)Least Frequently Used(LFU)對每個緩存對象計算他們被使用的頻率。把最不常用的緩存對象換走。
(3)、First in First out(FIFO)這是一個低負載的算法,並且對緩存對象的管理要求不高。通過一個隊列去跟蹤所有的緩存對象,最近最常用的緩存對象放在後面,而更早的緩存對象放在前面,當緩存容量滿時,排在前面的緩存對象會被踢走,然後把新的緩存對象加進去。
(4)、Simple time-based通過絕對的時間周期去失效那些緩存對象。對於新增的對象,保存特定的時間。
(5)、LargestLimitedMemoryCache超過指定緩存的話,每次移除棧最大內存的緩存的對象

public abstract class BaseMemoryCache implements MemoryCache {

    /** Stores not strong references to objects */
    private final Map> softMap = Collections.synchronizedMap(new HashMap>());

    @Override
    public Bitmap get(String key) {
        Bitmap result = null;
        Reference reference = softMap.get(key);
        if (reference != null) {
            result = reference.get();
        }
        return result;
    }

    @Override
    public boolean put(String key, Bitmap value) {
        softMap.put(key, createReference(value));
        return true;
    }

    @Override
    public Bitmap remove(String key) {
        Reference bmpRef = softMap.remove(key);
        return bmpRef == null ? null : bmpRef.get();
    }

    @Override
    public Collection keys() {
        synchronized (softMap) {
            return new HashSet(softMap.keySet());
        }
    }

    @Override
    public void clear() {
        softMap.clear();
    }

    /** Creates {@linkplain Reference not strong} reference of value */
    protected abstract Reference createReference(Bitmap value);
}
其實就是保存著一份弱引用而已,而它的父類Memory只是定義了幾個接口方法,統一標准而已
2)接著我們來看LimitedMemoryCache做了什麼?
public abstract class LimitedMemoryCache extends BaseMemoryCache {

    private static final int MAX_NORMAL_CACHE_SIZE_IN_MB = 16;
    private static final int MAX_NORMAL_CACHE_SIZE = MAX_NORMAL_CACHE_SIZE_IN_MB * 1024 * 1024;

    private final int sizeLimit;

    private final AtomicInteger cacheSize;

    /**
     * Contains strong references to stored objects. Each next object is added last. If hard cache size will exceed
     * limit then first object is deleted (but it continue exist at {@link #softMap} and can be collected by GC at any
     * time)
     */
    private final List hardCache = Collections.synchronizedList(
                                                         new LinkedList());

    /** @param sizeLimit Maximum size for cache (in bytes) */
    public LimitedMemoryCache(int sizeLimit) {
        this.sizeLimit = sizeLimit;
        cacheSize = new AtomicInteger();
        if (sizeLimit > MAX_NORMAL_CACHE_SIZE) {
            L.w("You set too large memory cache size (more than %1$d Mb)",
                                                         MAX_NORMAL_CACHE_SIZE_IN_MB);
        }
    }

    @Override
    public boolean put(String key, Bitmap value) {
        boolean putSuccessfully = false;
        // Try to add value to hard cache
        int valueSize = getSize(value);
        int sizeLimit = getSizeLimit();
        int curCacheSize = cacheSize.get();
        if (valueSize < sizeLimit) {
            while (curCacheSize + valueSize > sizeLimit) {
                Bitmap removedValue = removeNext();
                if (hardCache.remove(removedValue)) {
                    curCacheSize = cacheSize.addAndGet(-getSize(removedValue));
                }
            }
            hardCache.add(value);
            cacheSize.addAndGet(valueSize);

            putSuccessfully = true;
        }
        // Add value to soft cache
        super.put(key, value);
        return putSuccessfully;
    }

    @Override
    public Bitmap remove(String key) {
        Bitmap value = super.get(key);
        if (value != null) {
            if (hardCache.remove(value)) {
                cacheSize.addAndGet(-getSize(value));
            }
        }
        return super.remove(key);
    }

    @Override
    public void clear() {
        hardCache.clear();
        cacheSize.set(0);
        super.clear();
    }

    protected int getSizeLimit() {
        return sizeLimit;
    }

    protected abstract int getSize(Bitmap value);

    protected abstract Bitmap removeNext();
}
1) 保存著一份強引用
private final List hardCache = Collections.synchronizedList(
new LinkedList());
2) 其實在我們調用put方法的時候,即我們把bitmap存進內存的時候,他會判斷是否超出我們的最大值,超出我們的最大值就會調用removeNext();來獲得我們將要移除的bitmap對象,最終再調用hardCache.remove(removedValue)去移除它。
3) 注意到removeNext()方法是抽象方法,交給子類自己去實現自己的算法邏輯。結合BaseMemoryCache和LimitedMemoryCache,我們可以知道LimitedMemoryCache的子類,至少保存著兩份引用,一份是強引用,一份是弱引用
//父類BaseMemoryCache的成員變量,並且每次在操作的時候都會把bitmap的弱引用存進去
 private final Map> softMap = Collections.synchronizedMap(
                new HashMap>());

//LimitedMemoryCache的成員變量,緩存的bitmap是強引用
private final List hardCache = Collections.synchronizedList(new LinkedList());
有人可能會有疑問了這些成員變量不是私有的嗎?為什麼說LimitedMemoryCache的子類,至少保存著兩份引用,這點我們可以從他們的put方法中知道
@Override
public boolean put(String key, Bitmap value) {
   boolean putSuccessfully = false;
   // Try to add value to hard cache
   int valueSize = getSize(value);
   int sizeLimit = getSizeLimit();
   int curCacheSize = cacheSize.get();
   if (valueSize < sizeLimit) {
      while (curCacheSize + valueSize > sizeLimit) {
         Bitmap removedValue = removeNext();
         if (hardCache.remove(removedValue)) {
            curCacheSize = cacheSize.addAndGet(-getSize(removedValue));
         }
      }
      hardCache.add(value);
      cacheSize.addAndGet(valueSize);

      putSuccessfully = true;
   }
   // Add value to soft cache
   super.put(key, value);
   return putSuccessfully;
}
同理LimitedMemoryCache的子類put也會調用LimitedMemoryCache的put方法,代碼見下面分析。
同時從上面的分析當中我們可以知道主要關心put和removeNext()這兩個方法就可以了,put()方法其實就是把bitmap對象存進我們的queue隊列中
public class UsingFreqLimitedMemoryCache extends LimitedMemoryCache {
    /**
     * Contains strong references to stored objects (keys) and last object usage date (in milliseconds). If hard cache
     * size will exceed limit then object with the least frequently usage is deleted (but it continue exist at
     * {@link #softMap} and can be collected by GC at any time)
     */
    private final Map usingCounts = Collections.synchronizedMap(new HashMap());

    public UsingFreqLimitedMemoryCache(int sizeLimit) {
        super(sizeLimit);
    }

    @Override
    public boolean put(String key, Bitmap value) {
        if (super.put(key, value)) {
            usingCounts.put(value, 0);
            return true;
        } else {
            return false;
        }
    }

    @Override
    public Bitmap get(String key) {
        Bitmap value = super.get(key);
        // Increment usage count for value if value is contained in hardCahe
        if (value != null) {
            Integer usageCount = usingCounts.get(value);
            if (usageCount != null) {
                usingCounts.put(value, usageCount + 1);
            }
        }
        return value;
    }

    @Override
    public Bitmap remove(String key) {
        Bitmap value = super.get(key);
        if (value != null) {
            usingCounts.remove(value);
        }
        return super.remove(key);
    }

    @Override
    public void clear() {
        usingCounts.clear();
        super.clear();
    }

    @Override
    protected int getSize(Bitmap value) {
        return value.getRowBytes() * value.getHeight();
    }

    @Override
    protected Bitmap removeNext() {
        Integer minUsageCount = null;
        Bitmap leastUsedValue = null;
        Set> entries = usingCounts.entrySet();
        synchronized (usingCounts) {
            for (Entry entry : entries) {
                if (leastUsedValue == null) {
                    leastUsedValue = entry.getKey();
                    minUsageCount = entry.getValue();
                } else {
                    Integer lastValueUsage = entry.getValue();
                    if (lastValueUsage < minUsageCount) {
                        minUsageCount = lastValueUsage;
                        leastUsedValue = entry.getKey();
                    }
                }
            }
        }
        usingCounts.remove(leastUsedValue);
        return leastUsedValue;
    }

    @Override
    protected Reference createReference(Bitmap value) {
        return new WeakReference(value);
    }
}
當我們調用put方法,把bitmap存進內存的時候,他會判斷是否超出我們的最大值,超出我們的最大值就會調用removeNext();來獲得我們將要移除的bitmap對象,最終再調用hardCache.remove(removedValue)去移除它。
@Override
public boolean put(String key, Bitmap value) {
boolean putSuccessfully = false;
// Try to add value to hard cache
int valueSize = getSize(value);
int sizeLimit = getSizeLimit();
int curCacheSize = cacheSize.get();
if (valueSize < sizeLimit) {
  while (curCacheSize + valueSize > sizeLimit) {
     Bitmap removedValue = removeNext();
     if (hardCache.remove(removedValue)) {
        curCacheSize = cacheSize.addAndGet(-getSize(removedValue));
     }
  }
  hardCache.add(value);
  cacheSize.addAndGet(valueSize);

  putSuccessfully = true;
}
// Add value to soft cache
super.put(key, value);
return putSuccessfully;
}

···

* 下面我們來看一下removeNext()是怎樣獲得將要移除的bitmap對象的?

```java
private final Map usingCounts = Collections.
                         synchronizedMap(new HashMap());


@Override
protected Bitmap removeNext() {
Integer minUsageCount = null;
Bitmap leastUsedValue = null;
Set> entries = usingCounts.entrySet();
synchronized (usingCounts) {
  for (Entry entry : entries) {
     if (leastUsedValue == null) {
        leastUsedValue = entry.getKey();
        minUsageCount = entry.getValue();
     } else {
        Integer lastValueUsage = entry.getValue();
        if (lastValueUsage < minUsageCount) {
           minUsageCount = lastValueUsage;
           leastUsedValue = entry.getKey();
        }
     }
  }
}
usingCounts.remove(leastUsedValue);
return leastUsedValue;
}
其實就是將usingCounts中出現次數最少的節點移除掉。
那它實在什麼時候計算bitmap的使用次數的呢?相信大多數人會想到,既然是使用頻率,那肯定是在取圖片的過程中計算的,沒錯,下面讓我們一起來看一下是怎樣實現的?
@Override
public Bitmap get(String key) {
Bitmap value = super.get(key);
// Increment usage count for value if value is contained in hardCahe
if (value != null) {
  Integer usageCount = usingCounts.get(value);
  if (usageCount != null) {
     usingCounts.put(value, usageCount + 1);
  }
}
return value;
}
其實也很簡單,判斷是否存在緩存value,存在的話,使用次數加一
好的,到此UsingFreqLimitedMemoryCache的源碼分析位置
public class FIFOLimitedMemoryCache extends LimitedMemoryCache {

    private final List queue = Collections.synchronizedList(new LinkedList());

    public FIFOLimitedMemoryCache(int sizeLimit) {
        super(sizeLimit);
    }

    @Override
    public boolean put(String key, Bitmap value) {
        if (super.put(key, value)) {
            queue.add(value);
            return true;
        } else {
            return false;
        }
    }

    @Override
    public Bitmap remove(String key) {
        Bitmap value = super.get(key);
        if (value != null) {
            queue.remove(value);
        }
        return super.remove(key);
    }

    @Override
    public void clear() {
        queue.clear();
        super.clear();
    }

    @Override
    protected int getSize(Bitmap value) {
        return value.getRowBytes() * value.getHeight();
    }

    @Override
    protected Bitmap removeNext() {
        return queue.remove(0);
    }

    @Override
    protected Reference createReference(Bitmap value) {
        return new WeakReference(value);
    }
}
1)從上面的分析當中我們可以知道主要關心put和removeNext()這兩個方法就可以了,put()方法其實就是把bitmap對象存進我們的queue隊列中
2)remove方法其實就是一出隊列的第一個bitmap對象,將先進先出,符合我們的FIFO原則
@Override
public Bitmap get(String key) {
Bitmap result = null;
Reference reference = softMap.get(key);
if (reference != null) {
  result = reference.get();
}
return result;
}
public class LargestLimitedMemoryCache extends LimitedMemoryCache {
    /**
     * Contains strong references to stored objects (keys) and sizes of the objects. If hard cache
     * size will exceed limit then object with the largest size is deleted (but it continue exist at
     * {@link #softMap} and can be collected by GC at any time)
     */
    private final Map valueSizes = Collections.synchronizedMap(new HashMap());

    public LargestLimitedMemoryCache(int sizeLimit) {
        super(sizeLimit);
    }

    @Override
    public boolean put(String key, Bitmap value) {
        if (super.put(key, value)) {
            valueSizes.put(value, getSize(value));
            return true;
        } else {
            return false;
        }
    }

    @Override
    public Bitmap remove(String key) {
        Bitmap value = super.get(key);
        if (value != null) {
            valueSizes.remove(value);
        }
        return super.remove(key);
    }


 //這裡我們省略若干個方法,有興趣的話講源碼去,下面有提供源碼下載地址
    @Override
    protected Bitmap removeNext() {
        Integer maxSize = null;
        Bitmap largestValue = null;
        Set> entries = valueSizes.entrySet();
        synchronized (valueSizes) {
            for (Entry entry : entries) {
                if (largestValue == null) {
                    largestValue = entry.getKey();
                    maxSize = entry.getValue();
                } else {
                    Integer size = entry.getValue();
                    if (size > maxSize) {
                        maxSize = size;
                        largestValue = entry.getKey();
                    }
                }
            }
        }
        valueSizes.remove(largestValue);
        return largestValue;
    }

}
同樣我們只關心put方法和removeNext()方法
@Override
public boolean put(String key, Bitmap value) {
    if (super.put(key, value)) {
         valueSizes.put(value, getSize(value));
         return true;
    }else {
         return false;
    }
}

@Override
protected Bitmap removeNext() {
   Integer maxSize = null;
   Bitmap largestValue = null;
   Set> entries = valueSizes.entrySet();
   synchronized (valueSizes) {
      for (Entry entry : entries) {
         if (largestValue == null) {
            largestValue = entry.getKey();
            maxSize = entry.getValue();
         } else {
            Integer size = entry.getValue();
            if (size > maxSize) {
               maxSize = size;
               largestValue = entry.getKey();
            }
         }
      }
   }
   valueSizes.remove(largestValue);
   return largestValue;
}
1)其實就是put方法的時候( valueSizes.put(value, getSize(value));),我們將bitmap做為key,大小作為value,存進valueSizesM集合 2)在超過最大緩存數量的時候,遍歷移除掉valueSizes中最大的bitmap。
源碼我們就不貼出來了
主要邏輯在put方法中
// 存儲bitmap對象,在構造方法裡面初始化
private final LinkedHashMap map;


/** Caches {@code Bitmap} for {@code key}. The Bitmap is moved to the head of the queue. */
@Override
public final boolean put(String key, Bitmap value) {
   if (key == null || value == null) {
      throw new NullPointerException("key == null || value == null");
   }

   synchronized (this) {
      size += sizeOf(key, value);
      Bitmap previous = map.put(key, value);
      if (previous != null) {
         size -= sizeOf(key, previous);
      }
   }

   trimToSize(maxSize);
   return true;
}
當我們把bitmap存進內存的時候,他會trimToSize(maxSize)這個方法去判斷我們是否超過我們規定內存的最大值,超過的話移除掉最先添加進來的那個
private void trimToSize(int maxSize) {
   while (true) {
      String key;
      Bitmap value;
      synchronized (this) {
         if (size < 0 || (map.isEmpty() && size != 0)) {
            throw new IllegalStateException(getClass().getName() + ".sizeOf() is reporting inconsistent results!");
         }

         if (size <= maxSize || map.isEmpty()) {
            break;
         }

         Map.Entry toEvict = map.entrySet().iterator().next();
         if (toEvict == null) {
            break;
         }
         key = toEvict.getKey();
         value = toEvict.getValue();
         map.remove(key);
         size -= sizeOf(key, value);
      }
   }
}
/**
 * Decorator for {@link MemoryCache}. Provides special feature for cache: if some cached object age exceeds defined
 * value then this object will be removed from cache.
 *
 * 采用裝飾著模式,計算對象的最大存活時間
 * 在get方法的時候判斷大於的移除掉
 *
 */
public class LimitedAgeMemoryCache implements MemoryCache {

    private final MemoryCache cache;

    private final long maxAge;
    private final Map loadingDates = Collections.synchronizedMap(new HashMap());

    /**
     * @param cache  Wrapped memory cache
     * @param maxAge Max object age (in seconds). If object age will exceed this value then it'll be removed from
     *               cache on next treatment (and therefore be reloaded).
     */
    public LimitedAgeMemoryCache(MemoryCache cache, long maxAge) {
        this.cache = cache;
        this.maxAge = maxAge * 1000; // to milliseconds
    }

    @Override
    public boolean put(String key, Bitmap value) {
        boolean putSuccesfully = cache.put(key, value);
        if (putSuccesfully) {
            loadingDates.put(key, System.currentTimeMillis());
        }
        return putSuccesfully;
    }

    @Override
    public Bitmap get(String key) {
        Long loadingDate = loadingDates.get(key);
        if (loadingDate != null && System.currentTimeMillis() - loadingDate > maxAge) {
            cache.remove(key);
            loadingDates.remove(key);
        }

        return cache.get(key);
    }

    @Override
    public Bitmap remove(String key) {
        loadingDates.remove(key);
        return cache.remove(key);
    }

    @Override
    public Collection keys() {
        return cache.keys();
    }

    @Override
    public void clear() {
        cache.clear();
        loadingDates.clear();
    }
}
1)這個采用了裝飾者模式,包裝我們的Memory對象,不了解裝飾者模式的,建議先讀我的這一篇博客裝飾者模式及其應用:http://blog.csdn.net/gdutxiaoxu/article/details/51885105
2)主要邏輯在get方法裡面,在我們通過key取bitmap的時候,他會先判斷存活時間是否超出我們規定的maxAge(System.currentTimeMillis() - loadingDate > maxAge),超過的話移除掉
3)那我們是怎樣保存這些的存活時間的呢,其實很簡單?就是用一個loadingDates集合來保存,在我們put的時候,把當前的時間存進去,源碼體現如下
//成員變量,保持存活時間的map集合
private final Map loadingDates = Collections.synchronizedMap(
                                                      new HashMap());

@Override
public boolean put(String key, Bitmap value) {
   boolean putSuccesfully = cache.put(key, value);
   if (putSuccesfully) {
      loadingDates.put(key, System.currentTimeMillis());
   }
   return putSuccesfully;
}
到此ImageLoader內存的緩存算法源碼分析為止,下面我稍微改一下實現方式,內存裡面不再保存著兩份引用了,bitmap的緩存只保存著一份引用。
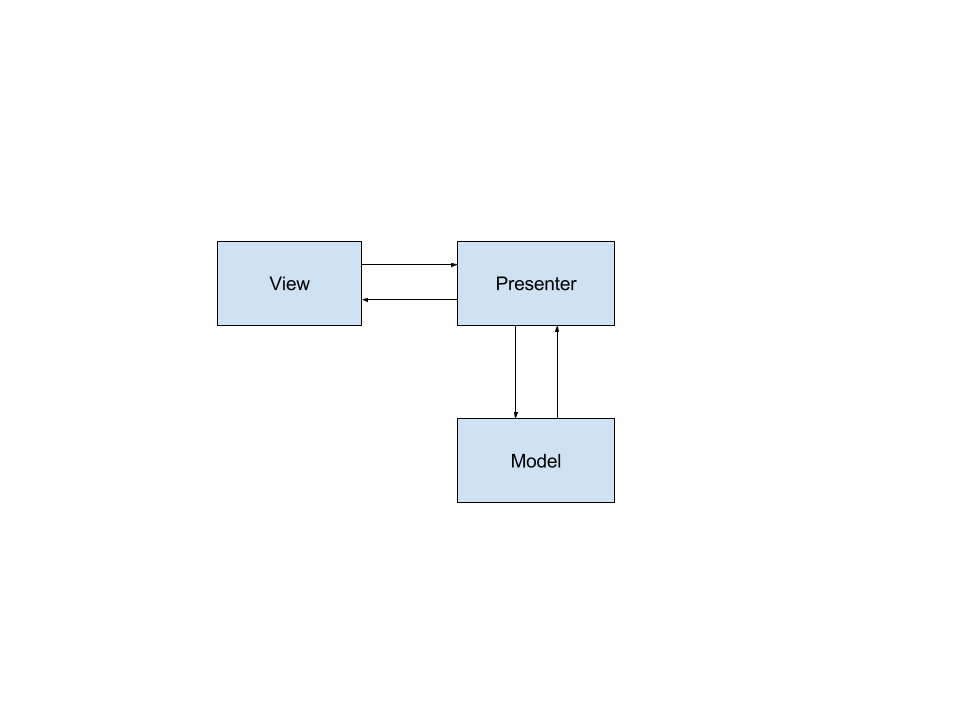
類UML圖

其實跟ImageLoader實現的也沒有多大區別,只是我去除了弱引用,每個實現類裡面不像LimitedMemZ喎?/kf/ware/vc/" target="_blank" class="keylink">vcnlDYWNoZbXEyrXP1sDg0rvR+bPW09DBvbfd0v3Tw7b40tE8L3A+DQo8aDMgaWQ9"首先我們來看一下limitedmemorycache是怎樣實現的">首先我們來看一下LimitedMemoryCache是怎樣實現的
public abstract class LimitedMemoryCache implements MemoryCache {

    private static final int MAX_NORMAL_CACHE_SIZE_IN_MB = 16;
    private static final int MAX_NORMAL_CACHE_SIZE = MAX_NORMAL_CACHE_SIZE_IN_MB * 1024 * 1024;

    private final int sizeLimit;
     public static final String TAG="tag";

    private final AtomicInteger cacheSize;

    private final Map mMap= Collections.synchronizedMap(new LinkedHashMap());


    public LimitedMemoryCache(int sizeLimit) {
        this.sizeLimit = sizeLimit;

        cacheSize = new AtomicInteger();
        if (sizeLimit > MAX_NORMAL_CACHE_SIZE) {
            Log.w(TAG,"You set too large memory cache size (more than %1$d Mb)"+ MAX_NORMAL_CACHE_SIZE_IN_MB);
        }

    }

    @Override
    public boolean put(String key, Bitmap value) {
        boolean putSuccessfully = false;
        // Try to add value to hard cache
        int valueSize = getSize(value);
        int sizeLimit = getSizeLimit();
        int curCacheSize = cacheSize.get();
        if (valueSize < sizeLimit) {
            while (curCacheSize + valueSize > sizeLimit) {
                String removeKey = removeNext();
                if(removeKey==null){
                   break;
                }
                Bitmap bitmap = mMap.remove(key);
                if(bitmap!=null){
                    curCacheSize = cacheSize.addAndGet(-getSize(bitmap));
                }
            }
            mMap.put(key,value);
            cacheSize.addAndGet(valueSize);
            putSuccessfully = true;
        }

        return putSuccessfully;
    }

    @Override
    public Bitmap remove(String key) {
        return  mMap.remove(key);
    }

    @Override
    public Bitmap get(String key) {
        return mMap.get(key);
    }

    @Override
    public void clear() {
        mMap.clear();
        cacheSize.set(0);
    }

    protected int getSizeLimit() {
        return sizeLimit;
    }

    @Override
    public Collection keys() {
        synchronized (mMap) {
            return new HashSet(mMap.keySet());
        }
    }

    protected abstract int getSize(Bitmap value);

    protected abstract String removeNext();
}
//在構造方法裡面初始化
private final Map mMap;
2) 在我們調用put方法的時候,即我們把bitmap存進內存的時候,他會判斷是否超出我們的最大值,超出我們的最大值就會調用removeNext();來獲得我們將要移除的bitmap對象,最終再調用hardCache.remove(removedValue)去移除它。 3) 注意到removeNext()方法是抽象方法,交給子類自己去實現自己的算法邏輯,返回類型是String。
public class UsingFreqLimitedMemoryCache extends LimitedMemoryCache {

    private final Map usingCounts = Collections.synchronizedMap(new HashMap());

//這裡省略了若干個方法
    @Override
    public boolean put(String key, Bitmap value) {
        if (super.put(key, value)) {
            usingCounts.put(key, 0);
            return true;
        } else {
            return false;
        }
    }

    @Override
    public Bitmap get(String key) {
        Bitmap value = super.get(key);
        // Increment usage count for value if value is contained in hardCahe
        if (value != null) {
            Integer usageCount = usingCounts.get(value);
            if (usageCount != null) {
                usingCounts.put(key, usageCount + 1);
            }
        }
        return value;
    }

    @Override
    public Bitmap remove(String key) {
        usingCounts.remove(key);
        return super.remove(key);
    }


    @Override
    protected String removeNext() {
        Integer minUsageCount = null;
        String leastUsedValue = null;
        Set> entries = usingCounts.entrySet();
        synchronized (usingCounts) {
            for (Entry entry : entries) {
                if (leastUsedValue == null) {
                    leastUsedValue = entry.getKey();
                    minUsageCount = entry.getValue();
                } else {
                    Integer lastValueUsage = entry.getValue();
                    if (lastValueUsage < minUsageCount) {
                        minUsageCount = lastValueUsage;
                        leastUsedValue = entry.getKey();
                    }
                }
            }
        }
        usingCounts.remove(leastUsedValue);
        return leastUsedValue;
    }

}
與ImageLoader不同的是,我們是用這個記錄
private final Map usingCounts = Collections.synchronizedMap(new HashMap());
而ImageLoader是用這種類型的記錄,其他的基本大同小異,有興趣的可以去這裡下載源碼。
private final Map usingCounts = Collections.synchronizedMap(new HashMap());
題外話:通過這篇博客,學習了更多的緩存算法,同時你們有沒有發現,很多地方都用到了Collection框架,而要用好這些,個人覺得去了解他們的原理是非常必要的,尤其是map和List集合,不管說是初學者還是大牛,畢竟萬丈高樓也是從平地蓋起的,基礎非常重要
 Android實現網絡加載時的對話框功能
效果預覽簡要說明現在android程序網絡請求操作是必不可少的,然而擁有好的交互體驗的程序對網絡耗時操作的處理尤為重要。代碼說明:dialog_loading.xml&l
 ListView的Adapter使用(綁定數據) 之 自定義每一項的布局去綁定數據
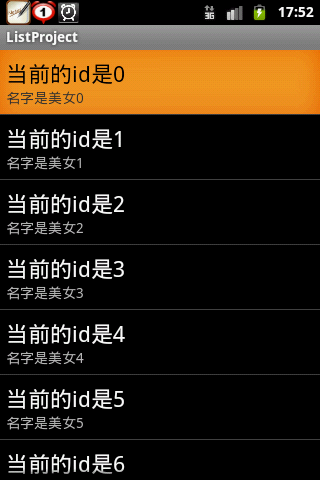
大家先看第一個例子顯示: 這個界面相信大家都看到過的,這次比上一個例子多的是ListView 的每一項綁定的是不再是單純的一個字符串了,ListView 的每一個條目我們
 android的Service的由淺到深(一)
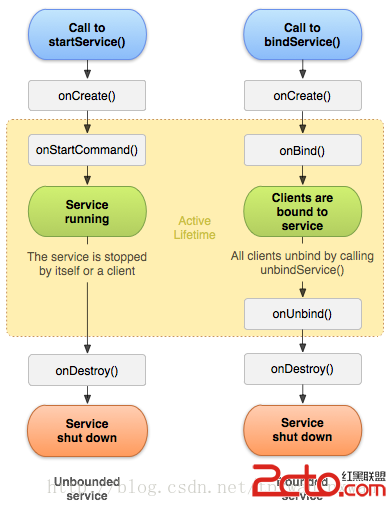
1.說明: Service是Android中四大組件之一,在Android開發中起到非常重要的作用,先來看一下官方對Service的定義: A Service is
 Jenkins 中運行Android lint和monkey
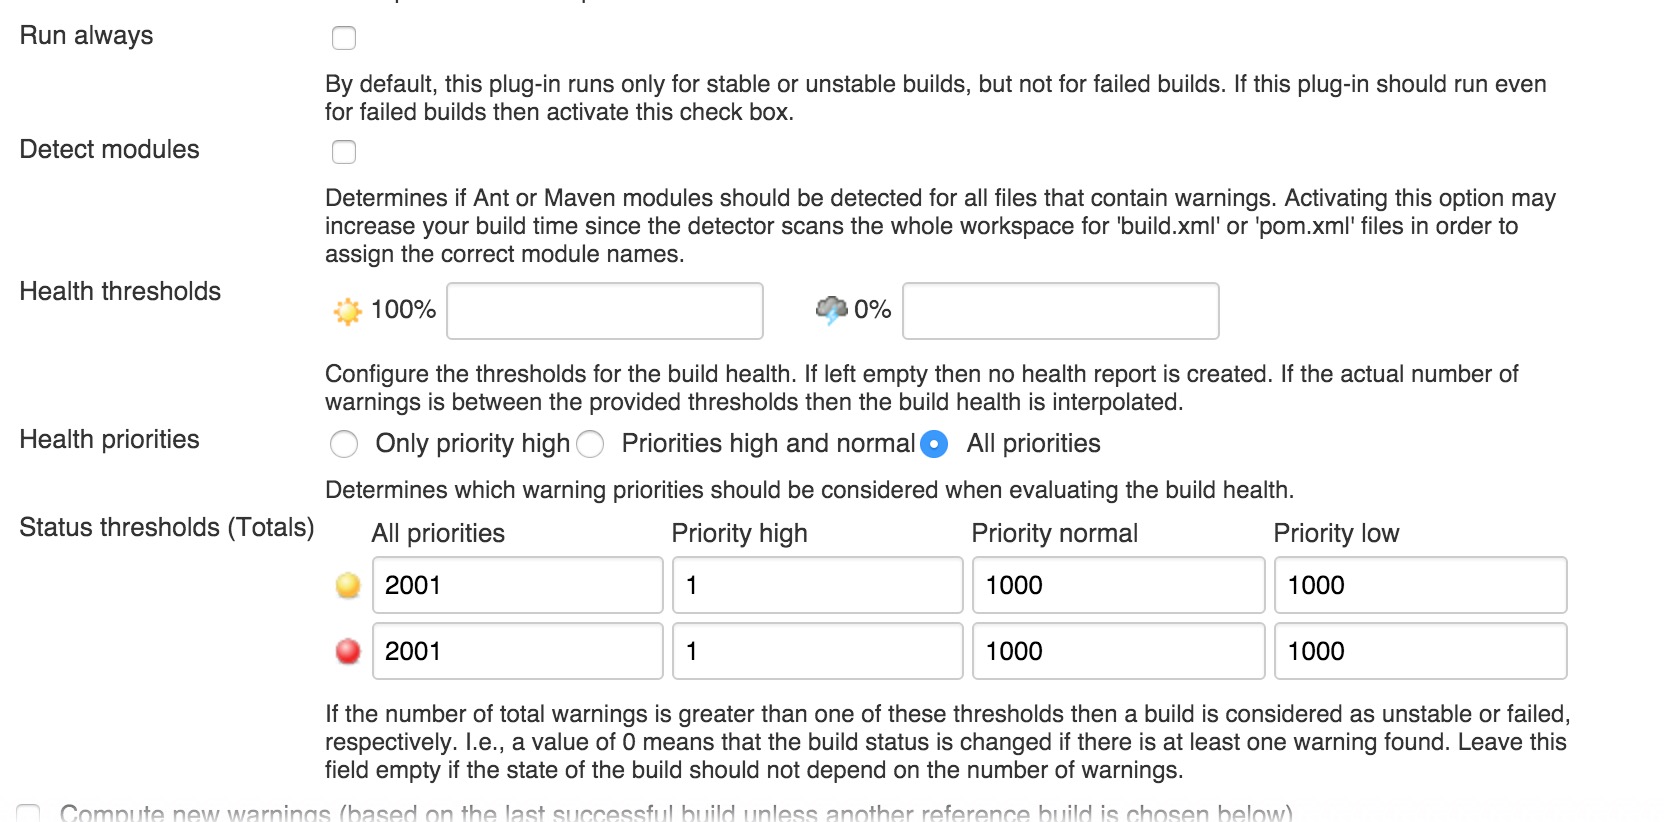
進入到相應job的配置頁面。Lint:1.在增加構建後操作中添加lint2.在高級中添加lint的通過標准monkey1.在跑monkey前需要將此次構建的apk包安裝到