編輯:關於Android編程
Service是Android中四大組件之一,在Android開發中起到非常重要的作用,先來看一下官方對Service的定義:
A Service is an application component that can perform long-running operations in the background and does not provide a user interface. Another application component
can start a service and it will continue to run in the background even if the user switches to another application. Additionally, a component can bind to a service to interact with it and even perform interprocess communication (IPC). For example, a service
might handle network transactions, play music, perform file I/O, or interact with a content provider, all from the background.
翻譯過來就是:Service(服務)是一個沒有用戶界面的在後台運行執行耗時操作的應用組件。其他應用組件能夠啟動Service,並且當用戶切換到另外的應用場景,Service將持續在後台運行。另外,一個組件能夠綁定到一個service與之交互(IPC機制),例如,一個service可能會處理網絡操作,播放音樂,操作文件I/O或者與內容提供者(content provider)交互,所有這些活動都是在後台進行。
Service有兩種狀態,“啟動的”和“綁定”
A service is "bound" when an application component binds to it by calling bindService(). A bound service offers a client-server interface that allows components to interact with the service, send requests, get results, and even do so across processes with interprocess communication (IPC). A bound service runs only as long as another application component is bound to it. Multiple components can bind to the service at once, but when all of them unbind, the service is destroyed.
通過startService()啟動的服務處於“啟動的”狀態,一旦啟動,service就在後台運行,即使啟動它的應用組件已經被銷毀了。通常started狀態的service執行單任務並且不返回任何結果給啟動者。比如當下載或上傳一個文件,當這項操作完成時,service應該停止它本身。
還有一種“綁定”狀態的service,通過調用bindService()來啟動,一個綁定的service提供一個允許組件與service交互的接口,可以發送請求、獲取返回結果,還可以通過誇進程通信來交互(IPC)。綁定的service只有當應用組件綁定後才能運行,多個組件可以綁定一個service,當調用unbind()方法時,這個service就會被銷毀了。
另外,在官方的說明文檔中還有一個警告:
Caution: A service runs in the main thread of its hosting process—the service does not create its own thread and does not run in a separate process (unless you specify otherwise). This means that, if your service is going to do any CPU intensive work or blocking
operations (such as MP3 playback or networking), you should create a new thread within the service to do that work. By using a separate thread, you will reduce the risk of Application Not Responding (ANR) errors and the application's main thread can remain
dedicated to user interaction with your activities.
意思是service與activity一樣都存在與當前進程的主線程中,所以,一些阻塞UI的操作,比如耗時操作不能放在service裡進行,比如另外開啟一個線程來處理諸如網絡請求的耗時操作。如果在service裡進行一些耗CPU和耗時操作,可能會引發ANR警告,這時應用會彈出是強制關閉還是等待的對話框。所以,對service的理解就是和activity平級的,只不過是看不見的,在後台運行的一個組件,這也是為什麼和activity同被說為Android的基本組件。
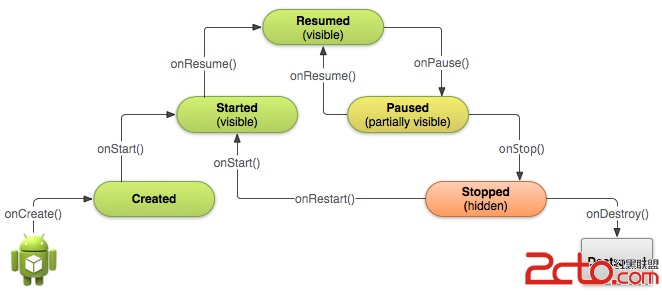
Service生命周期中的一些方法:
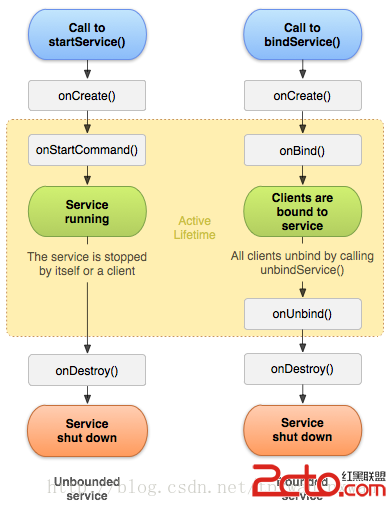
通過這個圖可以看到,兩種啟稓喎?/kf/ware/vc/" target="_blank" class="keylink">vc2VydmljZbXEt73KvdLUvLDL+8PHtcTJ+sP81tzG2qOsYmluZCBzZXJ2aWNltcSyu82s1q60ptTa09q1sbDztqi1xNfpvP7P+rvZuvOjrLbU06a1xHNlcnZpY2XSsr7NsbtraWxswcuho3NlcnZpY2W1xMn5w/fW3Mbaz+CxyNPrYWN0aXZpdHm1xLzytaXBy9DttuCjrNa70qq6w7rDwO294sG91tbG9Lavc2VydmljZbe9yr21xNLszay+zdDQoaM8L3A+CjxwPgo8YnI+CjwvcD4KPHA+CnNlcnZpY2XJ+sP81tzG2tKyyea8sNK70Km72LX3t723qKOs1eLQqbe9t6i2vLK708O199PDuLjA4Le9t6ijrL7fzOXI58/Co7o8L3A+CjxwcmUgY2xhc3M9"brush:java;">public class MyService extends Service {
private int localCount = 0;
class MyIBinder extends Binder implements LocalService {
@Override
public int getCount() {
return localCount;
}
}
@Override
public void onCreate() {
new Thread(new Runnable() {
@Override
public void run() {
try {
while (true) {
Log.i("MyService", "onCreate:" + localCount);
Thread.sleep(1000);
localCount++;
}
} catch (InterruptedException e) {
e.printStackTrace();
}
}
}).start();
super.onCreate();
}
@Override
public void onStart(Intent intent, int startId) {
Log.i("MyService", "onStart");
super.onStart(intent, startId);
}
@Override
public int onStartCommand(Intent intent, int flags, int startId) {
Log.i("MyService", "onStartCommand");
return super.onStartCommand(intent, flags, startId);
}
@Override
public void onDestroy() {
Log.i("MyService", "onDestroy");
super.onDestroy();
}
@Override
public boolean onUnbind(Intent intent) {
Log.i("MyService", "onUnbind");
return super.onUnbind(intent);
}
@Override
public IBinder onBind(Intent arg0) {
Log.i("MyService", "onBind");
return new MyIBinder();
}
}
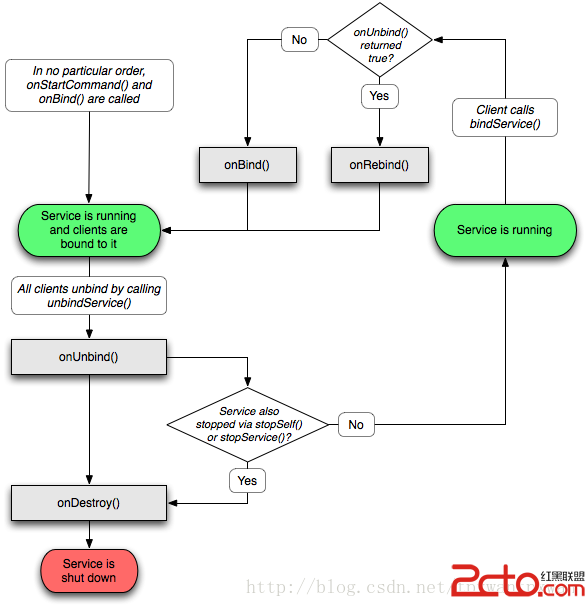
關於Service生命周期還有一張比較易懂的圖(來源於網絡)
3.Service and Thread
1.Service 是android的一種機制,當它運行的時候如果是Local Service,那麼對應的 Service 是運行在主進程的 main 線程上的。如果是Remote Service,那麼對應的 Service 則是運行在獨立進程的 main 線程上,service和調用者之間的通訊都是同步的(不論是遠程service還是本地service),它跟線程一點關系都沒有!
2.Thread 的運行是獨立於 Activity 的,也就是說當一個 Activity 被 finish 之後,如果你沒有主動停止 Thread 或者 Thread 裡的 run 方法沒有執行完畢的話,Thread 也會一直執行。因此這裡會出現一個問題:當 Activity 被 finish 之後,你不再持有該 Thread 的引用,也就是你下次啟動的時候,無法控制之前創建的線程,而service則可以。另一方面,你沒有辦法在不同的 Activity 中對同一 Thread 進行控制。
3.你也可以在 Service 裡注冊 BroadcastReceiver,在其他地方通過發送 broadcast 來控制它,這些是 Thread 做不到的。
另外,這裡要說明Service的一個子類,IntentService,首先看下官方文檔的說明:
IntentService
This is a subclass of Service that uses a worker thread to handle all start requests, one at a time. This is the best option if you don"t require that your service handle multiple requests simultaneously. All you need to do is implement onHandleIntent(), which receives the intent for each start request so you can do the background work.
IntentService使用隊列的方式將請求的Intent加入隊列,然後開啟一個worker thread(線程)來處理隊列中的Intent,對於異步的startService請求,IntentService會處理完成一個之後再處理第二個,每一個請求都會在一個單獨的worker thread中處理,不會阻塞應用程序的主線程,這裡就給我們提供了一個思路,如果有耗時的操作與其在Service裡面開啟新線程還不如使用IntentService來處理耗時操作。而在一般的繼承Service裡面如果要進行耗時操作就必須另開線程,但是使用IntentService就可以直接在裡面進行耗時操作,因為默認實現了一個worker
thread。對於異步的startService請求,IntentService會處理完成一個之後再處理第二個。
看下IntentService的具體實現:
public class HelloIntentService extends IntentService {

  /**
   * A constructor is required, and must call the super IntentService(String)
   * constructor with a name for the worker thread.
   */
  public HelloIntentService() {
      super("HelloIntentService");
  }

  /**
   * The IntentService calls this method from the default worker thread with
   * the intent that started the service. When this method returns, IntentService
   * stops the service, as appropriate.
   */
  @Override
  protected void onHandleIntent(Intent intent) {
      // Normally we would do some work here, like download a file.
      // For our sample, we just sleep for 5 seconds.
      long endTime = System.currentTimeMillis() + 5*1000;
      while (System.currentTimeMillis() < endTime) {
          synchronized (this) {
              try {
                  wait(endTime - System.currentTimeMillis());
              } catch (Exception e) {
              }
          }
      }
  }
}
關於停止Service,如果service是非綁定的,最終當任務完成時,為了節省系統資源,一定要停止service,可 以通過stopSelf()來停止,也可以在其他組件中通過 stopService()來停止,綁定的service可以通過onUnBind() 來停止service。
當在service中啟動了新的線程,在service結束的時候一定要注意是否需要結束線程,否則會造成資源的浪費,並可能會導致業務邏輯錯誤(若是新線程中進行業務邏輯的處理)。
	public void onCreate() {
		new Thread(new Runnable() {
			@Override
			public void run() {
				try {
					while (true) {
						Log.i("MyService", "onCreate:" + localCount);
						Thread.sleep(1000);
						localCount++;
					}
				} catch (InterruptedException e) {
					e.printStackTrace();
				}
			}
		}).start();

		super.onCreate();
	}
在service結束的時候,new Thread仍然會繼續執行。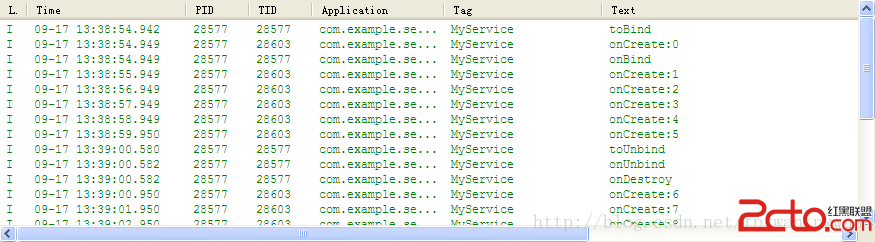
Service與Activity的通訊手段很多,IBinder、BroaderCast,本文將介紹另一種手段:Messenger
官方文檔解釋:它引用了一個Handler對象,以便others(Messenger)能夠向它發送消息(使用mMessenger.
send(Message msg)方法)。該類允許跨進程間基於Message的通信(即兩個進程間可以通過Message進行通信),在服務端使用Handler創建一個Messenger,客戶端持有這個Messenger就可以與服務端通信了。
以前我們使用Handler+Message的方式進行通信,都是在同一個進程中,從線程持有一個主線程的Handler對象,並向主線程發送消息。而Android既然可以使用bindler機制進行跨進行通信,所以我們當然可以將Handler與bindler結合起來進行跨進程發送消息。
查看API就可以發現,Messenger就是這種方式的實現。
一般使用方法如下:
1、遠程通過mMessenger = new Messenger(mHandler) 創建一個信使對象
2、客戶端使用bindlerService請求連接遠程
3、遠程onBind方法返回一個bindler return mMessenger.getBinder();
4.客戶端使用遠程返回的bindler得到一個信使(即得到遠程信使)
public void onServiceConnected(ComponentName name, IBinder service) {
              rMessenger = new Messenger(service);
             ......
 }
這裡雖然是new了一個Messenger,但我們查看它的實現
public class Binding extends Activity implements View.OnClickListener {
	private Messenger mMessenger;
	private Messenger rMessenger;
	private TextView mCallbackText;
	private boolean isBound;

	@Override
	protected void onCreate(Bundle savedInstanceState) {
		super.onCreate(savedInstanceState);
		setContentView(R.layout.activity_main);
		initView();
	}

	private Handler mHandler = new Handler() {
		@Override
		public void handleMessage(Message msg) {
			switch (msg.what) {
			case MessengerService.MSG_SET_VALUE:
				mCallbackText.setText("Received from service: " + msg.arg1);
				break;
			default:
				break;
			}
		}
	};

	private ServiceConnection connection = new ServiceConnection() {
		public void onServiceConnected(ComponentName name, IBinder service) {
			rMessenger = new Messenger(service);
			mMessenger = new Messenger(mHandler);
			sendInitMessage();
		}

		public void onServiceDisconnected(ComponentName name) {
			rMessenger = null;
		}
	};

	/**
	 * 使用服務端的信使向它發送一個消息。
	 */
	private void sendInitMessage() {
		Message message = Message.obtain(null, MessengerService.MSG_SET_VALUE);
		message.replyTo = mMessenger;
		try {
			rMessenger.send(message);
		} catch (RemoteException e) {
			e.printStackTrace();
		}
	}

	public void onClick(View v) {
		Intent intent = new Intent("com.app.messenger_service");
		switch (v.getId()) {
		case R.id.bind:
			if (!isBound) {
				isBound = bindService(intent, connection, BIND_AUTO_CREATE);
			}
			break;
		case R.id.unbind:
			if (isBound) {
				unbindService(connection);
				isBound = false;
			}
			break;
		default:
			break;
		}
	}

	private void initView() {
		findViewById(R.id.bind).setOnClickListener(this);
		findViewById(R.id.unbind).setOnClickListener(this);
		mCallbackText = (TextView) findViewById(R.id.callback);
		mCallbackText.setText("Not attached.");
	}
}
public class MessengerService extends Service {
	private Messenger cMessenger;
	private boolean connecting = false;
	static final int MSG_REGISTER_CLIENT = 1;
	static final int MSG_UNREGISTER_CLIENT = 2;
	static final int MSG_SET_VALUE = 3;

	private Handler mHandler = new Handler() {
		@Override
		public void handleMessage(Message msg) {
			switch (msg.what) {
			case MSG_SET_VALUE:
				try {
					Message message = Message.obtain(null,
							MessengerService.MSG_SET_VALUE);
					message.arg1 = 0;
					cMessenger = msg.replyTo;
					cMessenger.send(message);
				} catch (RemoteException e) {
					e.printStackTrace();
				}
				break;
			default:
				super.handleMessage(msg);
			}
		}
	};
	private Messenger mMessenger = new Messenger(mHandler);

	@Override
	public void onDestroy() {

		super.onDestroy();
	}

	@Override
	public boolean onUnbind(Intent intent) {
		connecting = false;
		return super.onUnbind(intent);
	}

	@Override
	public IBinder onBind(Intent intent) {
		connecting = true;
		new Thread(new Runnable() {
			@Override
			public void run() {
				int i = 0;
				try {
					while (connecting) {
						Message message = Message.obtain(null, MSG_SET_VALUE);
						Thread.sleep(1000);
						message.arg1 = i++;
						cMessenger.send(message);
					}
				} catch (InterruptedException e) {
					e.printStackTrace();
				} catch (RemoteException e) {
					e.printStackTrace();
				}

			}
		}).start();
		return mMessenger.getBinder();
	}

	@Override
	public void onRebind(Intent intent) {
		Toast.makeText(this, "onRebind", Toast.LENGTH_SHORT).show();
	}

}  小米edge什麼時候上市 小米edge發布時間
小米edge什麼時候上市?相信很多米粉對於小米edge手機很是期待和關注,紛紛上網咨詢,下文介紹小米edge上市時間,一起和小編來了解下吧! 小米edge
 Android工程師進階之路 :《Android開發進階:從小工到專家》上市啦!
封面 目錄1 目錄2 為什麼寫這本書寫這本書的念頭由來已久了。也許是從我打算寫《Android源碼設計模式解析與實戰》那時起就萌生了這個念頭,因
 刷機精靈root卡在65怎麼辦?
問題說明:其實這個問題有可能是沒有問題需要多試幾次 解決辦法:重新用手機連接電腦,並且重新打開USB調試模式(部分ROM默認打開的,如果找不到),再次自動
 Android項目-智慧北京:02(三種技術設計主頁面及源碼分析點擊事件傳遞的機制及Json數據傳遞的使用)
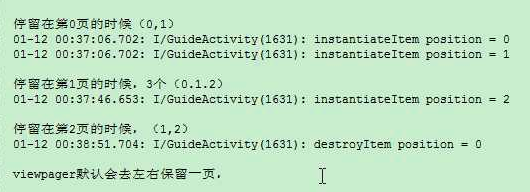
演示ViewPager的預加載功能Android ViewPager 的預加載android新引入的Fragment加入了Viewpager這樣的一個組件。至於該控件的