編輯:關於Android編程
本文將介紹系統接收到來電之後,如何在電話薄中進行匹配聯系人的流程。分析將從另外一篇文章(基於Android6.0的RIL框架層模塊分析)中提到的與本文內容相關的代碼開始。
//packages/service/***/Call.java

public void handleCreateConnectionSuccess(

        CallIdMapper idMapper,

        ParcelableConnection connection) {

    setHandle(connection.getHandle(), connection.getHandlePresentation());//這個函數很重要,會啟動一個查詢

    setCallerDisplayName(connection.getCallerDisplayName(), connection.getCallerDisplayNamePresentation());

    setExtras(connection.getExtras());

    if (mIsIncoming) {

        // We do not handle incoming calls immediately when they are verified by the connection

        // service. We allow the caller-info-query code to execute first so that we can read the

        // direct-to-voicemail property before deciding if we want to show the incoming call to

        // the user or if we want to reject the call.

        mDirectToVoicemailQueryPending = true;

        // Timeout the direct-to-voicemail lookup execution so that we dont wait too long before

        // showing the user the incoming call screen.

        mHandler.postDelayed(mDirectToVoicemailRunnable, Timeouts.getDirectToVoicemailMillis(

                mContext.getContentResolver()));

    }

}
這個setHandle函數如下:
//Call.java

public void setHandle(Uri handle, int presentation) {

        startCallerInfoLookup();

}

private void startCallerInfoLookup() {

    final String number = mHandle == null ? null : mHandle.getSchemeSpecificPart();

    mQueryToken++;  // Updated so that previous queries can no longer set the information.

    mCallerInfo = null;

    if (!TextUtils.isEmpty(number)) {

        mHandler.post(new Runnable() {

            @Override

            public void run() {

                mCallerInfoAsyncQueryFactory.startQuery(mQueryToken,

                        mContext,number,mCallerInfoQueryListener,Call.this);

            }});

    }

}
注意後面post的那個Runnable。這個就是啟動查詢號碼的邏輯了。這個mCallerInfoAsyncQueryFactory的賦值的流程比較曲折。在TelecomService被連接上調用onBind的時候,會調用initializeTelecomSystem函數。那這個TelecomService是在哪裡被啟動的呢?在TelecomLoaderService.java裡面定義了:
private static final ComponentName SERVICE_COMPONENT = new ComponentName(

            "com.android.server.telecom",

            "com.android.server.telecom.components.TelecomService");

private void connectToTelecom() {

    synchronized (mLock) {

        TelecomServiceConnection serviceConnection = new TelecomServiceConnection();

        Intent intent = new Intent(SERVICE_ACTION);

        intent.setComponent(SERVICE_COMPONENT);

        // Bind to Telecom and register the service

        if (mContext.bindServiceAsUser(intent, serviceConnection, flags, UserHandle.OWNER)) {

            mServiceConnection = serviceConnection;

        }    }}

public void onBootPhase(int phase) {//這個在系統啟動階段就會觸發

    if (phase == PHASE_ACTIVITY_MANAGER_READY) {

        connectToTelecom();

    }}
所以從這裡看,在系統啟動階段就會觸發TelecomService這個service,且在成功連接到服務之後,將調用ServiceManager.addService(Context.TELECOM_SERVICE, service),將這個服務添加到系統服務中了。這個類的構造函數中,在調用函數initializeTelecomSystem初始化TelecomSystem時,就實例化了一個內部匿名對象,並且在TelecomSystem的構造函數中初始化一個mCallsManager時將該匿名對象傳入,而在CallsManager的processIncomingCallIntent中會用這個函數初始化一個Call對象。所以這個mCallerInfoAsyncQueryFactory的實際內容見TelecomService中的initializeTelecomSystem:
//TelecomService.java

TelecomSystem.setInstance(

    new TelecomSystem(

        context,

        new MissedCallNotifierImpl(context.getApplicationContext()),

        new CallerInfoAsyncQueryFactory() {

            @Override

            public CallerInfoAsyncQuery startQuery(int token, Context context,

                    String number,CallerInfoAsyncQuery.OnQueryCompleteListener listener,

                    Object cookie) {

                return CallerInfoAsyncQuery.startQuery(token, context, number, listener, cookie);

            }},

        new HeadsetMediaButtonFactory() {},

        new ProximitySensorManagerFactory() {},

        new InCallWakeLockControllerFactory() {},

        new ViceNotifier() {}));
可以看到,通過startQuery來查詢傳入的number的動作。我們來看看CallerInfoAsyncQuery的startQuery函數。
//frameworks/base/telephony/java/com/android/internal/CallerInfoAsyncQuery.java

/**

     * Factory method to start the query based on a number.

     *

     * Note: if the number contains an "@" character we treat it

     * as a SIP address, and look it up directly in the Data table

     * rather than using the PhoneLookup table.

     * TODO: But eventually we should expose two separate methods, one for

     * numbers and one for SIP addresses, and then have

     * PhoneUtils.startGetCallerInfo() decide which one to call based on

     * the phone type of the incoming connection.

     */

    public static CallerInfoAsyncQuery startQuery(int token, Context context, String number,

            OnQueryCompleteListener listener, Object cookie) {

        int subId = SubscriptionManager.getDefaultSubId();

        return startQuery(token, context, number, listener, cookie, subId);

    }

/**

     * Factory method to start the query with a Uri query spec.

     */

public static CallerInfoAsyncQuery startQuery(int token, Context context, Uri contactRef,

            OnQueryCompleteListener listener, Object cookie) {

c.mHandler.startQuery(token,

                              cw,  // cookie
                              contactRef,  // uri,注意這裡的查詢地址
                              null,  // projection
                              null,  // selection
                              null,  // selectionArgs
                              null);  // orderBy
        return c;
}
注意看注釋,該函數還會對SIP號碼(包含@的號碼)進行處理,還有緊急號碼和語音郵箱號碼進行區分。實際上,當對一個號碼進行查詢的時候,這三個startQuery都用到了。注意,上面的startQuery會根據結果對connection的值進行修改。
其中將號碼轉換成uri格式的數據,後續會對這個數據進行查詢:
//frameworks/base/***/CallerInfoAsyncQuery.java
public static CallerInfoAsyncQuery startQuery(int token, Context context, String number, OnQueryCompleteListener listener, Object cookie, int subId) {
    // Construct the URI object and query params, and start the query.
    final Uri contactRef = PhoneLookup.ENTERPRISE_CONTENT_FILTER_URI.buildUpon().appendPath(number)
            .appendQueryParameter(PhoneLookup.QUERY_PARAMETER_SIP_ADDRESS, String.valueOf(PhoneNumberUtils.isUriNumber(number)))
            .build();
    CallerInfoAsyncQuery c = new CallerInfoAsyncQuery();
    c.allocate(context, contactRef);
    //create cookieWrapper, start query
    CookieWrapper cw = new CookieWrapper();
    cw.listener = listener; cw.cookie = cookie;
    cw.number = number; cw.subId = subId;
    // check to see if these are recognized numbers, and use shortcuts if we can.
    if (PhoneNumberUtils.isLocalEmergencyNumber(context, number)) {
        cw.event = EVENT_EMERGENCY_NUMBER;
    } else if (PhoneNumberUtils.isVoiceMailNumber(subId, number)) {
        cw.event = EVENT_VOICEMAIL_NUMBER;
    } else {
        cw.event = EVENT_NEW_QUERY;
    }

    c.mHandler.startQuery(token,
                          cw,  // cookie
                          contactRef,  // uri
                          null,  // projection
                          null,  // selection
                          null,  // selectionArgs
                          null);  // orderBy
    return c;
}
這個函數裡面的contactRef的值應該是“content://com.android.contacts/phone_lookup_enterprise/13678909678/sip?”類似的。
實際上這個query是調用CallerInfoAsyncQueryHandler的startQuery函數,而這個函數是直接調用它的父類AsyncQueryHandler的同名函數。
//AsyncQueryHandler.java
public void startQuery(int token, Object cookie, Uri uri,
        String[] projection, String selection, String[] selectionArgs,
        String orderBy) {
    // Use the token as what so cancelOperations works properly
    Message msg = mWorkerThreadHandler.obtainMessage(token);
    msg.arg1 = EVENT_ARG_QUERY;
    WorkerArgs args = new WorkerArgs();
    args.handler = this;
    args.uri = uri;
    msg.obj = args;
    mWorkerThreadHandler.sendMessage(msg);

}
這個mWorkerThreadHandler是在CallerInfoAsyncQueryHandler函數覆寫父類的createHandler函數中賦值,是CallerInfoWorkerHandler類型。所以後續的處理函數是該類的handleMessage函數。
//AsyncQueryHandler.java
public void handleMessage(Message msg) {
    WorkerArgs args = (WorkerArgs) msg.obj;
    CookieWrapper cw = (CookieWrapper) args.cookie;
    if (cw == null) {
        // Normally, this should never be the case for calls originating
        // from within this code.
        // However, if there is any code that this Handler calls (such as in
        // super.handleMessage) that DOES place unexpected messages on the
        // queue, then we need pass these messages on.
    } else {
        switch (cw.event) {
            case EVENT_NEW_QUERY://它的值跟AsyncQueryHandler的EVENT_ARG_QUERY一樣,都是1
                //start the sql command.
                super.handleMessage(msg);
                break;
            case EVENT_END_OF_QUEUE:
                // query was already completed, so just send the reply.
                // passing the original token value back to the caller
                // on top of the event values in arg1.
                Message reply = args.handler.obtainMessage(msg.what);
                reply.obj = args;
                reply.arg1 = msg.arg1;
                reply.sendToTarget();
                break;
            default:
        }}}}
這個super就是AsyncQueryHandler的內部類WorkerHandler了。
//AsyncQueryHandler.java
protected class WorkerHandler extends Handler {
    @Override
    public void handleMessage(Message msg) {
        final ContentResolver resolver = mResolver.get();
        WorkerArgs args = (WorkerArgs) msg.obj;
        int token = msg.what;
        int event = msg.arg1;
        switch (event) {
            case EVENT_ARG_QUERY:
                Cursor cursor;
                try {
                    cursor = resolver.query(args.uri, args.projection,
                            args.selection, args.selectionArgs,
                            args.orderBy);
                    // Calling getCount() causes the cursor window to be filled,
                    // which will make the first access on the main thread a lot faster.
                    if (cursor != null) {
                        cursor.getCount();
                    }}
                args.result = cursor;
                break;
        }
        // passing the original token value back to the caller
        // on top of the event values in arg1.
        Message reply = args.handler.obtainMessage(token);

        reply.obj = args;
        reply.arg1 = msg.arg1;
        reply.sendToTarget();
    }}
可以看到流程就是簡單的用resolver.query來查詢指定的query URI,然後將返回值通過消息機制發送到AsyncQueryHandler的handleMessage裡面處理,而在這裡會調用CallerInfoAsyncQuery的onQueryComplete函數。注意這個ContentResolver是在uri上查詢結果,而這個uri是由某個ContentProvider來提供的。注意這個地址裡面的authorities裡面的值為”com.android.contacts”,同樣看看ContactsProvider的androidmanifest.xml文件:
所以最後這個查詢是由ContactsProvider來執行的。
我們來看看查詢完成之後,調用CallerInfoAsyncQuery的onQueryComplete函數的具體流程:
protected void onQueryComplete(int token, Object cookie, Cursor cursor) {
        // check the token and if needed, create the callerinfo object.
        if (mCallerInfo == null) {
            if (cw.event == EVENT_EMERGENCY_NUMBER) {
            } else if (cw.event == EVENT_VOICEMAIL_NUMBER) {
            } else {
                mCallerInfo = CallerInfo.getCallerInfo(mContext, mQueryUri, cursor);
                }
            }
        }
        //notify the listener that the query is complete.
        if (cw.listener != null) {
            cw.listener.onQueryComplete(token, cw.cookie, mCallerInfo);
        }
    }
}
注意,上面代碼裡面的CallerInfo.getCallerInfo非常重要。在這裡面會使用查詢處理的cursor結果,並將合適的結果填充到mCallerInfo,將其傳遞到cw.listener.onQueryComplete函數中,作為最終結果進行進一步處理。
//CallerInfo.java
public static CallerInfo getCallerInfo(Context context, Uri contactRef, Cursor cursor) {
    CallerInfo info = new CallerInfo();
    if (cursor != null) {
        if (cursor.moveToFirst()) {
            columnIndex = cursor.getColumnIndex(PhoneLookup.LOOKUP_KEY);
            if (columnIndex != -1) {
                info.lookupKey = cursor.getString(columnIndex);

            }
            info.contactExists = true;
        }
        cursor.close();
        cursor = null;
    }
    info.needUpdate = false;
    info.name = normalize(info.name);
    info.contactRefUri = contactRef;
    return info;
}
系統原生的邏輯是取搜索結果的第一個記錄,並用來實例化。當客戶需求改變,需要匹配不同號碼的時候,就需要修改這個地方的了。最優先是遍歷整個cursor集合,並且根據客戶需求選出適合的結果,賦值給CallerInfo實例。
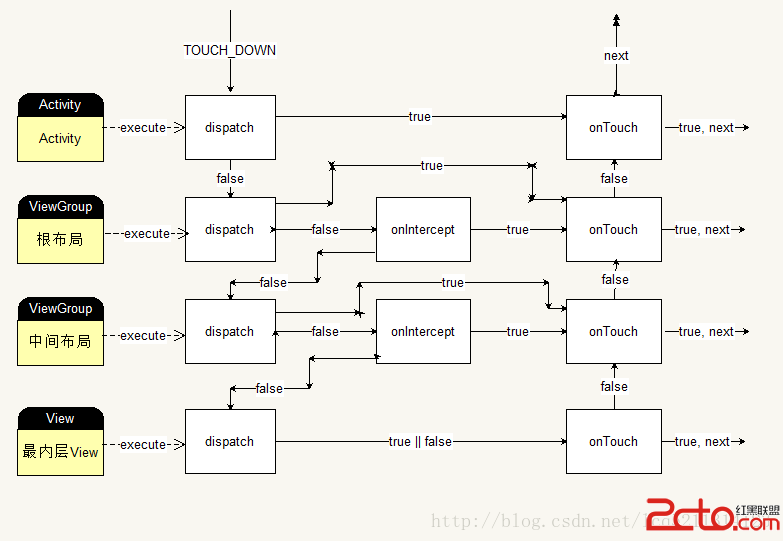
下面是整個號碼匹配的流程圖:

Call.java會將查詢後的結果設置到Call實例裡面,並將其傳送到CallsManager裡面進行後續處理。而這個CallsManager會將這個Call顯示給客戶。
當網絡端來電時,frame層會接收到,並且連接成功之後會觸發Call.java裡面的?handleCreateConnectionSuccess。這個函數邏輯是從數據庫中查詢復合要求的聯系人,並且只取結果集的第一條記錄,用來初始化這個Call裡面的變量。而後將這個Call傳到CallsManager進行處理,顯示給用戶。
 Android自定義控件深入學習 Android生成隨機驗證碼
在上一篇的文章中介紹了自定義控件的屬性,詳情見《詳解Android自定義控件屬性TypedArray以及attrs》。那麼在這基礎上實現隨機驗證碼生成,裡面的代碼是自定義
 ListView實現頂部和底部內容指示器的方法
頂部指示器?這是什麼?好吧,我承認這是我自己想出來的詞,因為我不知道它有什麼學名,究竟是什麼呢?看下這個圖就知道了。這是我們的美工MM畫的,偶的神吶,這雖然很漂亮
 說說Android應用的persistent屬性
1 啟動persistent應用 在Android系統中,有一種永久性應用。它們對應的AndroidManifest.xml文件裡,會將per
 Android定制自己的EditText輕松改變底線顏色
最近做 android 項目遇到這個問題,為了保持 app 風格一致,需要將原生的EditText底線顏色改成橙色。網上搜了一些解決方案,特此記錄總結一下。效果圖默認的E