編輯:關於Android編程
本次實例是將用戶的設置信息,以實體類為媒介,保存到內部存儲或者SD卡的文件裡。再次打開應用時,程序會自動調用文件中實體類,並對設置信息進行設置,使其恢復到用戶最終保存的狀態。
首先,創建一個實體類(這裡要實現 Serializable 接口,即序列化,這樣才能讓類在內存中傳遞):
public class SettingData implements Serializable{
    private boolean titleShow;
    private String textSize;
    private boolean notify;
    private boolean plug;
    private boolean autoRead;
    private boolean transmit;

    public SettingData() {
    }

    public SettingData(boolean titleShow, String textSize, boolean notify, boolean plug, boolean autoRead, boolean transmit) {
        this.titleShow = titleShow;
        this.textSize = textSize;
        this.notify = notify;
        this.plug = plug;
        this.autoRead = autoRead;
        this.transmit = transmit;
    }

    public boolean isTransmit() {
        return transmit;
    }

    public void setTransmit(boolean transmit) {
        this.transmit = transmit;
    }

    public boolean isTitleShow() {
        return titleShow;
    }

    public void setTitleShow(boolean titleShow) {
        this.titleShow = titleShow;
    }

    public String getTextSize() {
        return textSize;
    }

    public void setTextSize(String textSize) {
        this.textSize = textSize;
    }

    public boolean isNotify() {
        return notify;
    }

    public void setNotify(boolean notify) {
        this.notify = notify;
    }

    public boolean isPlug() {
        return plug;
    }

    public void setPlug(boolean plug) {
        this.plug = plug;
    }

    public boolean isAutoRead() {
        return autoRead;
    }

    public void setAutoRead(boolean autoRead) {
        this.autoRead = autoRead;
    }
}
接下裡是Layout布局,這裡楚略地弄了一個設置界面:
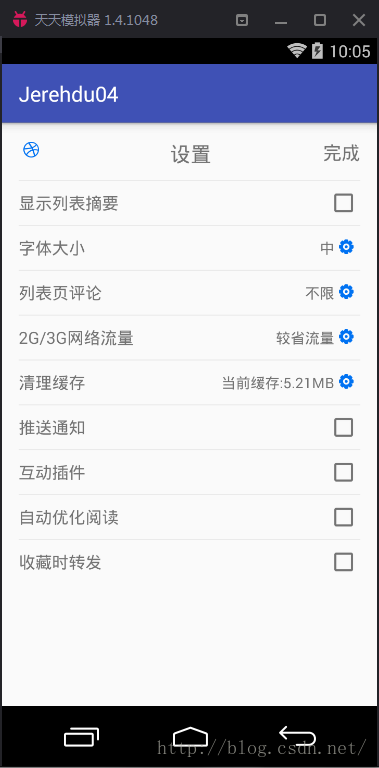
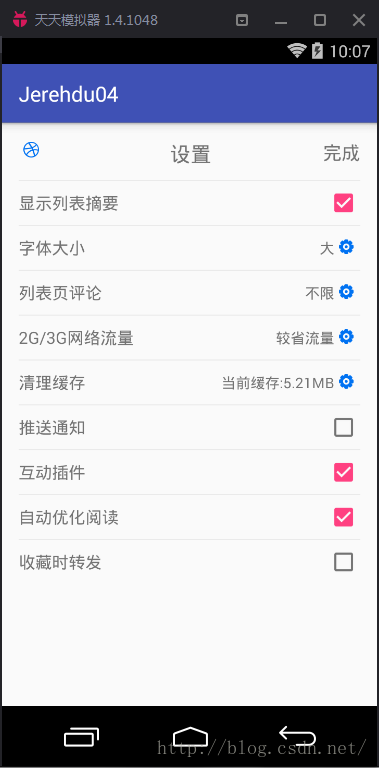
最後,就是Activity啦,其功能實現為設置好後點擊右上角“完成”,即可保存設置內容。
方法一:通過SharedPreferences
,保存設置內容:
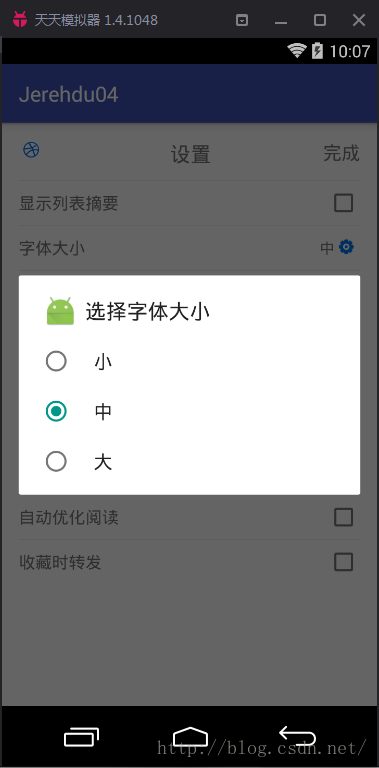
public class Setting2Activity extends AppCompatActivity { private CheckBox titleShow,notify,plug,autoRead,transmit; private TextView setting,textSize; private LinearLayout text; private SharedPreferences sp; @Override protected void onCreate(Bundle savedInstanceState) { super.onCreate(savedInstanceState); setContentView(R.layout.activity_setting2); titleShow = (CheckBox) findViewById(R.id.titleShow); notify = (CheckBox) findViewById(R.id.notify); plug = (CheckBox) findViewById(R.id.plug); autoRead = (CheckBox) findViewById(R.id.autoRead); transmit = (CheckBox) findViewById(R.id.transmit); setting = (TextView) findViewById(R.id.setting); textSize = (TextView) findViewById(R.id.textSize); text = (LinearLayout) findViewById(R.id.text); //開啟設置以保存的設置 settingStart(); //監聽字體大小的改變,選擇方式:對話框 text.setOnClickListener(new View.OnClickListener() { @Override public void onClick(View v) { AlertDialog.Builder builder = new AlertDialog.Builder(Setting2Activity.this); builder.setTitle("選擇字體大小"); builder.setIcon(R.mipmap.ic_launcher); final String[] items = {"小","中","大"}; int i; for(i=0;i
方法二:實體類保存,並將其傳到SD卡文件中:
public class SettingActivity extends AppCompatActivity {

    private CheckBox titleShow,notify,plug,autoRead,transmit;
    private TextView setting,textSize;
    private LinearLayout text;
    private SettingData settingData;
    @Override
    protected void onCreate(Bundle savedInstanceState) {
        super.onCreate(savedInstanceState);
        setContentView(R.layout.activity_scroll1);
        titleShow = (CheckBox) findViewById(R.id.titleShow);
        notify = (CheckBox) findViewById(R.id.notify);
        plug = (CheckBox) findViewById(R.id.plug);
        autoRead = (CheckBox) findViewById(R.id.autoRead);
        transmit = (CheckBox) findViewById(R.id.transmit);
        setting = (TextView) findViewById(R.id.setting);
        textSize = (TextView) findViewById(R.id.textSize);
        text = (LinearLayout) findViewById(R.id.text);

        //開啟設置以保存的設置
        settingStart();

        //監聽字體大小的改變,選擇方式:對話框
        text.setOnClickListener(new View.OnClickListener() {
            @Override
            public void onClick(View v) {
                AlertDialog.Builder builder = new AlertDialog.Builder(SettingActivity.this);
                builder.setTitle("選擇字體大小");
                builder.setIcon(R.mipmap.ic_launcher);
                final String[] items = {"小","中","大"};
                int i;
                for(i=0;i<items.length;i++ ){="" if(items[i].equals(textsize.gettext())){="" break;="" }="" builder.setsinglechoiceitems(items,i,="" new="" dialoginterface.onclicklistener()="" {="" @override="" public="" void="" onclick(dialoginterface="" dialog,="" int="" which)="" toast.maketext(getbasecontext(),items[which].tostring(),toast.length_short).show();="" textsize.settext(items[which].tostring());="" dialog.dismiss();="" });="" builder.setcancelable(true);="" alertdialog="" alertdialog.show();="" 監聽“完成”="" setting.setonclicklistener(new="" view.onclicklistener()="" onclick(view="" v)="" settingdata="new" settingdata(titleshow.ischecked(),="" textsize.gettext().tostring(),notify.ischecked(),="" plug.ischecked(),autoread.ischecked(),transmit.ischecked());="" fileoutputstream="" fos="null;" objectoutputstream="" oos="null;" string="" state="Environment.getExternalStorageState();" if(!state.equals(environment.media_mounted)){="" toast.maketext(getbasecontext(),"請檢查sd卡",toast.length_short).show();="" return;="" file="" try="" myfile="new" file(file.getcanonicalpath(),"="" 設置.txt");="" fileoutputstream(myfile);="" objectoutputstream(fos);="" oos.writeobject(settingdata);="" toast.maketext(getbasecontext(),"設置成功",toast.length_short).show();="" oos.flush();="" oos.close();="" catch="" (ioexception="" e)="" e.printstacktrace();="" finally="" if="" (fos!="null){" fos.flush();="" fos.close();="" settingstart(){="" 開啟軟件設置之前的設置="" objectinputstream="" ois="null;" fileinputstream="" fis="null;" statu="Environment.getExternalStorageState();" if(!statu.equals(environment.media_mounted)){="" toast.maketext(this,"sd卡未就緒",toast.length_short).show();="" root="Environment.getExternalStorageDirectory();" fileinputstream(root+"="" objectinputstream(fis);="" ois.readobject();="" (classnotfoundexception="" titleshow.setchecked(settingdata.istitleshow());="" textsize.settext(settingdata.gettextsize());="" notify.setchecked(settingdata.isnotify());="" plug.setchecked(settingdata.isplug());="" autoread.setchecked(settingdata.isautoread());="" transmit.setchecked(settingdata.istransmit());="" (filenotfoundexception="" toast.maketext(getbasecontext(),"未找到文件",toast.length_short).show();="" (streamcorruptedexception="" if(fis!="null){"
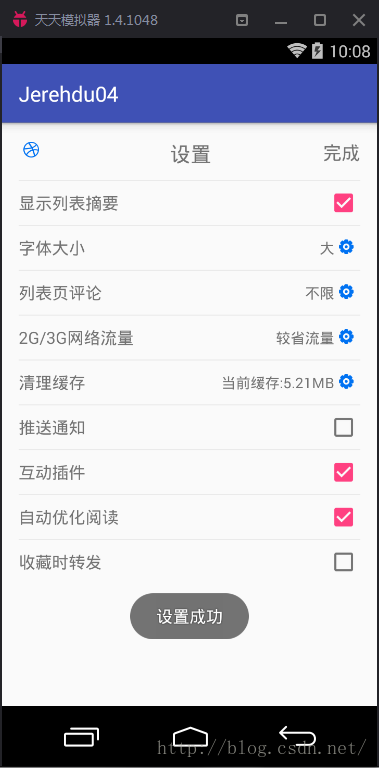
效果圖:
 android反編譯odex文件
關於android的反編譯工具,相信大家並不陌生 如APK-TOOL,dex2jar APK-TOOL 用於反編譯出布局文件 dex2jar 用於將dex
 與其他APP進行交互
來自:https://developer.android.com/training/basics/intents/index.html 前言:我們都知道在APP
 詳解Android開發中Activity的四種launchMode
Activity棧主要用於管理Activity的切換。當使用Intent跳轉至某個目標Activity,需要根據目標Activity的加載模式來加載。Activity一共
 Android事件分發機制總結
理解事件的分發機制,需要對View和ViewGroup事件的分發分別探討。View和ViewGroup的區別,一個View控件是指它裡面不能再包含子控件了,常見的如Tex