編輯:關於Android編程
“我沒有很聰明,也不是那麼努力,我只是有點不服輸”
A notification is a message you can display to the user outside of your application's normal UI. When you tell the system to issue a notification, it first appears as an icon in thenotification area. To see the details of the notification, the user opens thenotification drawer. Both the notification area and the notification drawer are system controlled areas that the user can view at any time.
--引用谷歌關於Notification的描述
Notification是一個將你程序的消息展示在程序之外的UI控件,當你告訴系統去產生一個Notification時,它會在Notification area出現一個圖標,你可以打開Notification drawer去看詳細的信息。Notification are 和Notification drawer都是系統控制的區域,用戶可以隨時看到。
Notification不僅僅用於顯示一則消息,也可以用於和用戶進行交互。比如音樂播放,它的Notification具有音樂控制功能,並且在android7.0(api level 24)上Notification可以直接通過Notification進行回復,比如有一則微信消息,你可以通過下拉框直接回復啦,不用通過點進去再回復了,我想在Android7.0系統上,微信和QQ應該會這麼做。效果圖如圖1.0(引用谷歌官網)。
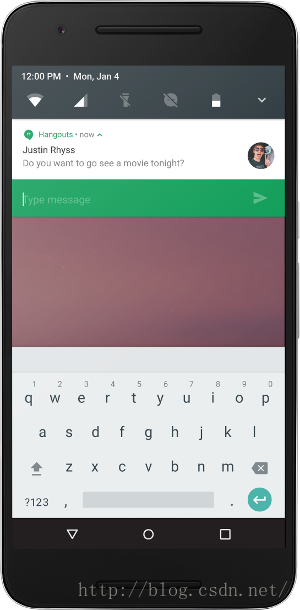
圖1.0
        NotificationCompat.Builder build = new NotificationCompat.Builder(this);//定義一個創建Notification的build
        build.setContentTitle("this is title").setContentText("this is text").setSmallIcon(R.mipmap.ic_launcher);//為Notification設置所需要的屬性
        NotificationManager manager = (NotificationManager) getSystemService(NOTIFICATION_SERVICE);//獲取系統Notification服務
        manager.notify(0, build.build());//顯示
上面這個代碼是用來顯示一個Notification,並且點擊通知後會進入SpecialNotificationActivity這個Activity中。然後按退出呢,就退回原來的界面了。上面是一個最簡單的例子設置一個Notification。僅僅設置了必須的3個屬性。它只能用來通知一則消息。方法notify(int id, Notification notification),是通知系統加載這個Notificantion,一個應用程序中id不同,Notification就會不同。我們就可以通過id更新不同的Notification了。
        NotificationCompat.Builder builder = new NotificationCompat.Builder(this);//創建build對象
        builder.setContentTitle("this is title").setContentText("this is text").setSmallIcon(R.mipmap.ic_launcher);//設置必須的屬性
        Intent notifyIntent =  new Intent(this, SpecialNotificationActivity.class);//創建用於跳轉的Intent
        PendingIntent notifyPendingIntent = PendingIntent.getActivity(  this,
                        0,
                        notifyIntent,
                        PendingIntent.FLAG_UPDATE_CURRENT
                );//獲得可以在別的應用可以用的Intent,別名PendingIntent。
        builder.setContentIntent(notifyPendingIntent);//設置外部應用需要用的PendingIntent
        NotificationManager mNotificationManager =
                (NotificationManager) getSystemService(Context.NOTIFICATION_SERVICE);//獲取系統的Notification服務
        mNotificationManager.notify(0, builder.build());//顯示這個Notification
PendingIntent是在Intent的上面進行進一步的封裝,getActivity(Context context, int requestCode, Intent intent, int flag)可以獲得一個PendingIntent。我們看下具體的參數
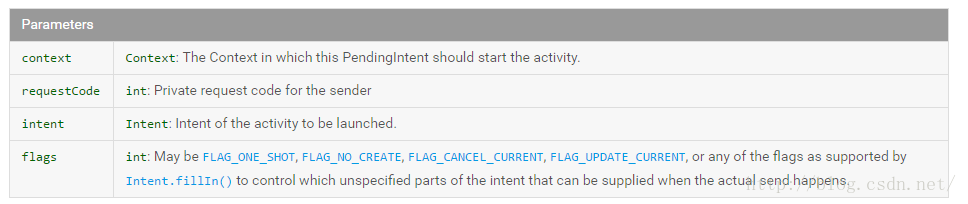 context,intent就不說了,requestCode是和flag配套使用的,requestCode是用來標記PendingIntent是否相同,當flags設成FLAG_UPDATE_CURRENT時,並且賦給一個Notification,它會更新所有和它有相同的requestCode的PendingIntent內容(一個APP情況下),即使Notification擁有不用的ID。比如下面段代碼
        NotificationManager notificationManager =
                (NotificationManager) getSystemService(Context.NOTIFICATION_SERVICE);//獲取系統的Notification服務
        NotificationCompat.Builder builder = new NotificationCompat.Builder(this);
        builder.setContentTitle("this is title1").setContentText("this is special").setSmallIcon(R.mipmap.ic_launcher);//設置必須的屬性
        Intent intent1 = new Intent(this, Activity1.class);
        PendingIntent pendingIntent2 = PendingIntent.getActivity(this, 0, intent1, PendingIntent.FLAG_CANCEL_CURRENT);
        builder.setContentIntent(pendingIntent2);
        notificationManager.notify(1, builder.build());
	//下面我們增加一個Notification,ID不相同,但是生成的PendingIntent的requestCode,並且把Flag設成FLAG_UPDATE_CURRENT.
        Intent intent2 = new Intent(this, Activity2.class);
        PendingIntent pendingIntent = PendingIntent.getActivity(this, 0, intent2, PendingIntent.FLAG_UPDATE_CURRENT);
        builder.setContentTitle("this is title 2");//顯示不同的標題
        builder.setContentIntent(pendingIntent);
        notificationManager.notify(2, builder.build());//ID不同就會顯示兩個Notification
一開始我們為title1設置的是跳轉到Activity1,為title2設置的是跳轉到Activity2。但是實際結果是點擊兩個都會跳轉到Activity2,這就是requestCode和flag共同下的作用,當第二個PendingIntent傳入Notification時,flag設置成FLAG_UPDATE_CURRENT,會更新所有requestCode和它相同的PendingIntent,所以Title1中的也被更新了。有位很詳細的介紹了PendingIntent的requestCode參數戳這查看。
       NotificationCompat.Builder build = new NotificationCompat.Builder(this);//定義一個創建Notification的build
        PendingIntent pi = PendingIntent.getActivity(this, 0, new Intent(this, Main2Activity.class), PendingIntent.FLAG_UPDATE_CURRENT);//獲得PendingIntent
        RemoteViews rm = new RemoteViews(getPackageName(), R.layout.notification_custom);//生成RemoteView
        rm.setOnClickPendingIntent(R.id.press_here_button, pi);//為其中一個按鈕設置點擊事件
        build.setContent(rm);//設置RemoteVIew
        NotificationManager manager = (NotificationManager) getSystemService(NOTIFICATION_SERVICE);//獲取系統Notification服務
        manager.notify(0, build.build());//通知顯示
我們用RemoteViews(String packageName, int layoutId)實例化一個RemoteViews,第一個參數是你App安裝之後的地址,第二個是你布局文件的我id 我們通過setContent(RemoteView)這個方法設置自定義布局,這個時候setContentTitle等方法不會起作用了。setContent接受一個RemoteView這個類從名字也可以看出來,這是用來描述視圖可以用來在別的進程中展示。值得一提PendingIntent和RemoteView都繼承了Parcelable。 設置監聽setOnClickPendingIntent(int, PendingIntent)。我們可以啟動一些app的組件。
 Android自定義星星評分控件
下面為控件的實現歷程: 此控件高效,直接使用ondraw繪制,先亮照: 由於Android自身的星星評分控件樣式可以改,但是他的大小不好調整的缺點,只能用small no
 Android4.1手機開發中遇到的問題
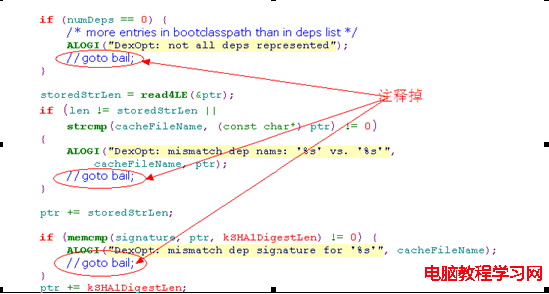
1.只push odex 到手機手機無法運行解決:修改dalvik/vm/analysis/DexPrepare.cpp中的dvmCheckOptHeade
 [Android編譯(二)] 從谷歌官網下載android 6.0源碼、編譯並刷入nexus 6p手機
1 前言經過一周的奮戰,終於從谷歌官網上下載最新的android 6.0.1_r62源碼,編譯成功,並成功的刷入nexus6p,接著root完畢,現寫下這篇博客記錄一下實
 Android開發學習之路--Annotation注解簡化view控件之初體驗
一般我們在寫android Activity的時候總是會在onCreate方法中加上setContentView方法來加載layout,通過findViewById來實現