編輯:關於Android編程
今天是國慶,首先祝大家國慶快樂!漫漫國慶長假,然而我卻只能宅宿捨,但時間總不能這樣白白浪費了,這樣的時候,沒出去浪,那麼,就總結一下前段時間通過Android源碼分析了一遍Activity的啟動流程吧。好了,廢話不多說,直接進入主題。PS:以下分析是針對API 23。
首先,做過Android開發的肯定知道如何啟動一個Activity吧,沒錯,就一個startActivity方法。那麼顯然,我們找到分析的入口了。那麼,問題來了,這個App一開始的第一個Activity是如何被系統啟動起來的呢?也是通過普通的startActivity方法嗎?答案是肯定的。其實大家不必奇怪,你只需要把系統的桌面當成是一個Activity即可。那麼這樣一來,在一個Activity裡面調用startActivity方法大家很熟悉了吧。
通過上面我們知道我們App啟動流程的分析的入口是startActivity,那這個startActivity從哪裡調呢?它是在LauncherActivity這個類中被調用的,代碼如下。
    @Override
    protected void onListItemClick(ListView l, View v, int position, long id) {
        Intent intent = intentForPosition(position);
        startActivity(intent);
    }
這個onListItemClick方法有沒有覺得很熟悉,如果你把桌面的那一排排圖標理解成一個個按鈕,是不是突然明白為啥會在這裡調用了?好,找到入口我們繼續。
接下來我們看看startActivity是如何實現的。
    @Override
    public void startActivity(Intent intent, @Nullable Bundle options) {
        if (options != null) {
            startActivityForResult(intent, -1, options);
        } else {
            // Note we want to go through this call for compatibility with
            // applications that may have overridden the method.
            startActivityForResult(intent, -1);
        }
    }
其實源碼中是重寫了幾個startActivity方法,但最後都會調用到startActivityForResult這個方法,那麼好,點進去往下看。
    @Override
    public void startActivityForResult(
            String who, Intent intent, int requestCode, @Nullable Bundle options) {
        Uri referrer = onProvideReferrer();
        if (referrer != null) {
            intent.putExtra(Intent.EXTRA_REFERRER, referrer);
        }
        Instrumentation.ActivityResult ar =
            mInstrumentation.execStartActivity(
                this, mMainThread.getApplicationThread(), mToken, who,
                intent, requestCode, options);
        if (ar != null) {
            mMainThread.sendActivityResult(
                mToken, who, requestCode,
                ar.getResultCode(), ar.getResultData());
        }
        cancelInputsAndStartExitTransition(options);
    }
嗯,startActivityForResult這個方法的實現就有點長了。沒關系,我們看重點,我們看源碼只需要把握總體思想,對於不是從事系統層開發的同學們,不要總是拘泥與細節。那麼重點在哪呢?看這個方法,execStartActivity。這個方法是通過Instrumentation這個類去調用的,這個類需要熟悉一下,因為,Activity中的很多生命周期的調用,都需要通過這個類。那麼接著往下。進入Instrumentation的execStartActivity方法。
    public ActivityResult execStartActivity(
            Context who, IBinder contextThread, IBinder token, Activity target,
            Intent intent, int requestCode, Bundle options) {

       //這裡省略部分代碼

        try {
            intent.migrateExtraStreamToClipData();
            intent.prepareToLeaveProcess();
            int result = ActivityManagerNative.getDefault()
                .startActivity(whoThread, who.getBasePackageName(), intent,
                        intent.resolveTypeIfNeeded(who.getContentResolver()),
                        token, target != null ? target.mEmbeddedID : null,
                        requestCode, 0, null, options);
            checkStartActivityResult(result, intent);
        } catch (RemoteException e) {
            throw new RuntimeException("Failure from system", e);
        }
        return null;
  }
由於這個方法的源碼比較長,那麼只貼出了重點,在哪,很顯然又出現了
startActivity這個方法。那麼問題來了,這個startActivity方法的調用者ActivityManagerNative.getDefault()是什麼呢?這裡不貼源碼, 我直接說明一下。通過源碼分析getDefault 的定義會發現getDefault 方法返回的是一個IActivityManager類型的對象,但IActivityManager是一個接口,真實返回的其實是一個ActivityManagerService。該類繼承自ActivityManagerNative,而ActivityManagerNative 則實現了IActivityManager 接口,同時還繼承了Binder ,很顯然ActivityManagerService 是一個Binder 對象。了解AIDL的同學一定很熟悉這個類了。這個ActivityManagerService 是系統服務來的,其位於system_Server 這個進程中,很顯然,這裡是使用了IPC了。那麼我們接著進入ActivityManagerService 的startActivity 方法。
進入該方法之後又會調用該類的startActivityAsUser 方法。
    @Override
    public final int startActivityAsUser(IApplicationThread caller, String callingPackage,
            Intent intent, String resolvedType, IBinder resultTo, String resultWho, int requestCode,
            int startFlags, ProfilerInfo profilerInfo, Bundle options, int userId) {
        enforceNotIsolatedCaller("startActivity");
        userId = handleIncomingUser(Binder.getCallingPid(), Binder.getCallingUid(), userId,
                false, ALLOW_FULL_ONLY, "startActivity", null);
        // TODO: Switch to user app stacks here.
        return mStackSupervisor.startActivityMayWait(caller, -1, callingPackage, intent,
                resolvedType, null, null, resultTo, resultWho, requestCode, startFlags,
                profilerInfo, null, null, options, false, userId, null, null);
    }
相信大家都看到了這裡面有一行注釋Switch to user app stacks here. 大概意思是要切換到用戶的APP棧了。接著我門依然關注重點,看startActivityMayWait 這個方法。是通過ActivityStackSupervisor 去調用的。那麼這個裡面的方法也很長,就不貼具體代碼了,感興趣的同學可以自行查看。這裡面還會接著調用到startActivityLocked ,然後這裡面又會調用到startActivityUncheckedLocked ,接著調用到 ActivityStack 的 resumeTopActivitiesLocked方法。然後是resumeTopActivityInnerLocked ,這方法很復雜…一定不要在裡面迷路,這裡直接看到裡面有一句是通過ActivityStackSupervisor 去調用的startSpecificActivityLocked。嗯,進入這個方法後,重點來了。先看源碼。
    void startSpecificActivityLocked(ActivityRecord r,
            boolean andResume, boolean checkConfig) {
        // Is this activity's application already running?
        ProcessRecord app = mService.getProcessRecordLocked(r.processName,
                r.info.applicationInfo.uid, true);

        r.task.stack.setLaunchTime(r);

        if (app != null && app.thread != null) {
            try {
                if ((r.info.flags&ActivityInfo.FLAG_MULTIPROCESS) == 0
                        || !"android".equals(r.info.packageName)) {
                    // Don't add this if it is a platform component that is marked
                    // to run in multiple processes, because this is actually
                    // part of the framework so doesn't make sense to track as a
                    // separate apk in the process.
                    app.addPackage(r.info.packageName, r.info.applicationInfo.versionCode,
                            mService.mProcessStats);
                }
                realStartActivityLocked(r, app, andResume, checkConfig);
                return;
            } catch (RemoteException e) {
                Slog.w(TAG, "Exception when starting activity "
                        + r.intent.getComponent().flattenToShortString(), e);
            }

            // If a dead object exception was thrown -- fall through to
            // restart the application.
        }

        mService.startProcessLocked(r.processName, r.info.applicationInfo, true, 0,
                "activity", r.intent.getComponent(), false, false, true);
從源碼中可以看出,這裡對 ProcessRecord進行了判斷,ProcessRecord就是響應的進程記錄,如果存在相應的進程,就啟動相應的 Activity, 否則將創建進程。創建進程的話則是通過AMS調用startProcessLocked 方法。在裡面會調用Process.start,並且指定了 ActivityThread作為進程的入口,進程啟動後,將調用 ActivityThread 的 main 方法。相信大家對main 方法是很熟悉的。那麼接下來看一下Process.start 這個方法。
    public static final ProcessStartResult start(final String processClass,
                                  final String niceName,
                                  int uid, int gid, int[] gids,
                                  int debugFlags, int mountExternal,
                                  int targetSdkVersion,
                                  String seInfo,
                                  String abi,
                                  String instructionSet,
                                  String appDataDir,
                                  String[] zygoteArgs) {
        try {
            return startViaZygote(processClass, niceName, uid, gid, gids,
                    debugFlags, mountExternal, targetSdkVersion, seInfo,
                    abi, instructionSet, appDataDir, zygoteArgs);
        } catch (ZygoteStartFailedEx ex) {
            Log.e(LOG_TAG,
                    "Starting VM process through Zygote failed");
            throw new RuntimeException(
                    "Starting VM process through Zygote failed", ex);
        }
    }
可以看到,在Process.start 方法中,實際調用的是 startViaZygote方法,在這個方法裡通過 openZygoteSocketIfNeeded打開 Zygote 的 socket,並通過 zygoteSendArgsAndGetResult進行交互。接著繼續往下就會通過JNI調用到系統底層的內核代碼了。這裡不再展開分析,感興趣的同學可以自行查找相關資料。這裡大概說一下:其實在Android裡面的每一個App進程都是通過Zygote 進程fork出來的。而且Zygote是屬於系統進程來的,所以這裡需要建立socket與其進行交互,為App啟動創建新的進程。
通過上面的分析我們知道,接下來新的進程創建了將會進入ActivityThread 的 main 方法,代碼如下:
    public static void main(String[] args) {
        Trace.traceBegin(Trace.TRACE_TAG_ACTIVITY_MANAGER, "ActivityThreadMain");
        SamplingProfilerIntegration.start();

        // CloseGuard defaults to true and can be quite spammy.  We
        // disable it here, but selectively enable it later (via
        // StrictMode) on debug builds, but using DropBox, not logs.
        CloseGuard.setEnabled(false);

        Environment.initForCurrentUser();

        // Set the reporter for event logging in libcore
        EventLogger.setReporter(new EventLoggingReporter());

        AndroidKeyStoreProvider.install();

        // Make sure TrustedCertificateStore looks in the right place for CA certificates
        final File configDir = Environment.getUserConfigDirectory(UserHandle.myUserId());
        TrustedCertificateStore.setDefaultUserDirectory(configDir);

        Process.setArgV0("");

        Looper.prepareMainLooper();

        ActivityThread thread = new ActivityThread();
        thread.attach(false);

        if (sMainThreadHandler == null) {
            sMainThreadHandler = thread.getHandler();
        }

        if (false) {
            Looper.myLooper().setMessageLogging(new
                    LogPrinter(Log.DEBUG, "ActivityThread"));
        }

        // End of event ActivityThreadMain.
        Trace.traceEnd(Trace.TRACE_TAG_ACTIVITY_MANAGER);
        Looper.loop();

        throw new RuntimeException("Main thread loop unexpectedly exited");
    }
嗯,代碼比較長,老規矩,看重點。這裡首先調用Looper.prepareMainLooper 去創建一個主線程的Looper,這個主線程的Looper是很重要的,系統對於App的很多管理都需要通過這個Looper去將消息傳遞到ActivityThread 的 H 裡面去執行。這裡面當然包括了Acticity的工作流程。接著,為整個應用創建了一個ActivityThread 對象。attach 方法之後, 通過thread.getHandler方法去獲取到主線程的Handler,其實就是上面說的那個H ,這裡具體咋樣可以自行查閱源碼。然後就調用Looper.loop() 讓主線程的Looper進入輪詢狀態,等待消息過來處理。至此UI線程啟動完畢。
看到這裡,也許大家懵了,不對啊,這就完事了?貌似少了點什麼啊?Activity的啟動去哪兒了?一開始我也懵逼了。後來經過代碼分析,發現原來疏漏了一些代碼細節。讓我們回到attach 這個方法,這裡調用的時候是傳入了false 的。那麼我們看看其內部。
    private void attach(boolean system) {
        sCurrentActivityThread = this;
        mSystemThread = system;
        if (!system) {
            ViewRootImpl.addFirstDrawHandler(new Runnable() {
                @Override
                public void run() {
                    ensureJitEnabled();
                }
            });
            android.ddm.DdmHandleAppName.setAppName("",
                                                    UserHandle.myUserId());
            RuntimeInit.setApplicationObject(mAppThread.asBinder());
            final IActivityManager mgr = ActivityManagerNative.getDefault();
            try {
                mgr.attachApplication(mAppThread);
            } catch (RemoteException ex) {
                // Ignore
            }
            // Watch for getting close to heap limit.
            BinderInternal.addGcWatcher(new Runnable() {
                @Override public void run() {
                    if (!mSomeActivitiesChanged) {
                        return;
                    }
                    Runtime runtime = Runtime.getRuntime();
                    long dalvikMax = runtime.maxMemory();
                    long dalvikUsed = runtime.totalMemory() - runtime.freeMemory();
                    if (dalvikUsed > ((3*dalvikMax)/4)) {
                        if (DEBUG_MEMORY_TRIM) Slog.d(TAG, "Dalvik max=" + (dalvikMax/1024)
                                + " total=" + (runtime.totalMemory()/1024)
                                + " used=" + (dalvikUsed/1024));
                        mSomeActivitiesChanged = false;
                        try {
                            mgr.releaseSomeActivities(mAppThread);
                        } catch (RemoteException e) {
                        }
                    }
                }
            });
        } else {

        //這裡省略無關代碼

          }
    }
上面已經說過了,調用這個attach 的時候傳入的是false ,那麼接下來肯定會通過ActivityManagerService(AMS) 調用到attachApplication。裡面會調用到attachApplicationLocked,然後就是在這個方法裡面,又通過ApplicationThread 調用了bindApplication 在這裡面。
    public final void bindApplication(String packageName, ApplicationInfo info,
            List providers, ComponentName testName, ProfilerInfo profilerInfo,
            Bundle testArgs, IInstrumentationWatcher testWatcher,
            IUiAutomationConnection uiAutomationConnection, int debugMode,
            boolean openGlTrace, boolean restrictedBackupMode, boolean persistent,
            Configuration config, CompatibilityInfo compatInfo, Map services,
            Bundle coreSettings) throws RemoteException {
        Parcel data = Parcel.obtain();
        data.writeInterfaceToken(IApplicationThread.descriptor);
        data.writeString(packageName);
        info.writeToParcel(data, 0);
        data.writeTypedList(providers);
        if (testName == null) {
            data.writeInt(0);
        } else {
            data.writeInt(1);
            testName.writeToParcel(data, 0);
        }
        if (profilerInfo != null) {
            data.writeInt(1);
            profilerInfo.writeToParcel(data, Parcelable.PARCELABLE_WRITE_RETURN_VALUE);
        } else {
            data.writeInt(0);
        }
        data.writeBundle(testArgs);
        data.writeStrongInterface(testWatcher);
        data.writeStrongInterface(uiAutomationConnection);
        data.writeInt(debugMode);
        data.writeInt(openGlTrace ? 1 : 0);
        data.writeInt(restrictedBackupMode ? 1 : 0);
        data.writeInt(persistent ? 1 : 0);
        config.writeToParcel(data, 0);
        compatInfo.writeToParcel(data, 0);
        data.writeMap(services);
        data.writeBundle(coreSettings);
        mRemote.transact(BIND_APPLICATION_TRANSACTION, data, null,
                IBinder.FLAG_ONEWAY);
        data.recycle();
    }
進去這個方法後大家別懵逼,要知道ApplicationThread 其實是作為AMS在IPC過程中的服務端來的。這裡大家如果熟悉AIDL的用法的話,應該很容易看得懂。當調用到mRemote.transact 的時候,其實是進入到了ApplicationThread 的onTransact ,然後匹配到帶過去的參數BIND_APPLICATION_TRANSACTION ,就會調用到下面的代碼:
        case BIND_APPLICATION_TRANSACTION:
        {
            data.enforceInterface(IApplicationThread.descriptor);
            String packageName = data.readString();
            ApplicationInfo info =
                ApplicationInfo.CREATOR.createFromParcel(data);
            List providers =
                data.createTypedArrayList(ProviderInfo.CREATOR);
            ComponentName testName = (data.readInt() != 0)
                ? new ComponentName(data) : null;
            ProfilerInfo profilerInfo = data.readInt() != 0
                    ? ProfilerInfo.CREATOR.createFromParcel(data) : null;
            Bundle testArgs = data.readBundle();
            IBinder binder = data.readStrongBinder();
            IInstrumentationWatcher testWatcher = IInstrumentationWatcher.Stub.asInterface(binder);
            binder = data.readStrongBinder();
            IUiAutomationConnection uiAutomationConnection =
                    IUiAutomationConnection.Stub.asInterface(binder);
            int testMode = data.readInt();
            boolean openGlTrace = data.readInt() != 0;
            boolean restrictedBackupMode = (data.readInt() != 0);
            boolean persistent = (data.readInt() != 0);
            Configuration config = Configuration.CREATOR.createFromParcel(data);
            CompatibilityInfo compatInfo = CompatibilityInfo.CREATOR.createFromParcel(data);
            HashMap services = data.readHashMap(null);
            Bundle coreSettings = data.readBundle();
            bindApplication(packageName, info, providers, testName, profilerInfo, testArgs,
                    testWatcher, uiAutomationConnection, testMode, openGlTrace,
                    restrictedBackupMode, persistent, config, compatInfo, services, coreSettings);
            return true;
我們直接看到最下面,又調用了bindApplication ,注意,這個 裡面的bindApplication 方法,是直接在ApplicationThread 裡面調用的了,不是剛剛那個AMS裡面調用的,在AMS裡面調用是由於是跨進程調用,會進入到帶方法裡面,而在ApplicationThread裡面調用的話,才是真正的bindApplication的的實現。裡面代碼就不貼了,最好會調用到sendMessage(H.BIND_APPLICATION, data) 。嗯,這條消息一發就進入到了之前提到過的那個H 裡面去處理這條消息,注意,那個H 是運行在UI線程的。然後接下來調用到handleBindApplication,然後就是在handleBindApplication 這個方法裡面,為這個應用創建了唯一的Application對象,和唯一的Instrumentation 對象,還記得前面說過嗎,通過這個類,系統就可以管理Activity的生命周期了。注意,每一個App只有一個該對象,並且每一個Activity裡面都有它的引用。後面也調用了Application 的onCreate方法。到此,Application創建了。我們繼續回到前面的attach 方法,往下走。好戲還在後面。
後面就會通過ActivityStackSupervisor 調用attachApplicationLocked,並且傳入了一個ProcessRecord 對象。裡面會調用realStartActivityLocked 這個方法。然後這個方法裡面又會通過ApplicationThread 調用scheduleLaunchActivity。注意了,這裡又是一次IPC的過程,大致過程和上面創建Application 的時候一樣,最終還是會調用到scheduleLaunchActivity 的真正實現。完了還是老樣子,這個方法裡面最好會發送一條消息到H 裡面去處理:sendMessage(H.LAUNCH_ACTIVITY, r) 。完了裡面會進入到如下分支:
                case LAUNCH_ACTIVITY: {
                    Trace.traceBegin(Trace.TRACE_TAG_ACTIVITY_MANAGER, "activityStart");
                    final ActivityClientRecord r = (ActivityClientRecord) msg.obj;

                    r.packageInfo = getPackageInfoNoCheck(
                            r.activityInfo.applicationInfo, r.compatInfo);
                    handleLaunchActivity(r, null);
                    Trace.traceEnd(Trace.TRACE_TAG_ACTIVITY_MANAGER);
                } break;
嗯,調用了handleLaunchActivity ,進去看看:
        // If we are getting ready to gc after going to the background, well
        // we are back active so skip it.
        unscheduleGcIdler();
        mSomeActivitiesChanged = true;

        if (r.profilerInfo != null) {
            mProfiler.setProfiler(r.profilerInfo);
            mProfiler.startProfiling();
        }

        // Make sure we are running with the most recent config.
        handleConfigurationChanged(null, null);

        if (localLOGV) Slog.v(
            TAG, "Handling launch of " + r);

        // Initialize before creating the activity
        WindowManagerGlobal.initialize();

        Activity a = performLaunchActivity(r, customIntent);

        if (a != null) {
            r.createdConfig = new Configuration(mConfiguration);
            Bundle oldState = r.state;
            handleResumeActivity(r.token, false, r.isForward,
                    !r.activity.mFinished && !r.startsNotResumed);

            if (!r.activity.mFinished && r.startsNotResumed) {
                // The activity manager actually wants this one to start out
                // paused, because it needs to be visible but isn't in the
                // foreground.  We accomplish this by going through the
                // normal startup (because activities expect to go through
                // onResume() the first time they run, before their window
                // is displayed), and then pausing it.  However, in this case
                // we do -not- need to do the full pause cycle (of freezing
                // and such) because the activity manager assumes it can just
                // retain the current state it has.
                try {
                    r.activity.mCalled = false;
                    mInstrumentation.callActivityOnPause(r.activity);
                    // We need to keep around the original state, in case
                    // we need to be created again.  But we only do this
                    // for pre-Honeycomb apps, which always save their state
                    // when pausing, so we can not have them save their state
                    // when restarting from a paused state.  For HC and later,
                    // we want to (and can) let the state be saved as the normal
                    // part of stopping the activity.
                    if (r.isPreHoneycomb()) {
                        r.state = oldState;
                    }
                    if (!r.activity.mCalled) {
                        throw new SuperNotCalledException(
                            "Activity " + r.intent.getComponent().toShortString() +
                            " did not call through to super.onPause()");
                    }

                } catch (SuperNotCalledException e) {
                    throw e;

                } catch (Exception e) {
                    if (!mInstrumentation.onException(r.activity, e)) {
                        throw new RuntimeException(
                                "Unable to pause activity "
                                + r.intent.getComponent().toShortString()
                                + ": " + e.toString(), e);
                    }
                }
                r.paused = true;
            }
        } else {
            // If there was an error, for any reason, tell the activity
            // manager to stop us.
            try {
                ActivityManagerNative.getDefault()
                    .finishActivity(r.token, Activity.RESULT_CANCELED, null, false);
            } catch (RemoteException ex) {
                // Ignore
            }
        }
    }
代碼有點長,但是關鍵出現了。看Activity a = performLaunchActivity(r, customIntent) 吶,經歷了千山萬水,我們熟悉的Activity 終於被創建了。是通過調用performLaunchActivity 方法去創建的。這個方法大家需要熟悉一下。裡面涉及到了很多關鍵操作,例如,裡面調用了Activity 的onCreate 和 onStart 方法。然後繼續往下看,如果Activity 被創建成功的話,會調用handleResumeActivity ,然後會調用到performResumeActivity,然後會調用到Activity 的performResume方法。
    final void performResume() {
        performRestart();

        mFragments.execPendingActions();

        mLastNonConfigurationInstances = null;

        mCalled = false;
        // mResumed is set by the instrumentation
        mInstrumentation.callActivityOnResume(this);
        if (!mCalled) {
            throw new SuperNotCalledException(
                "Activity " + mComponent.toShortString() +
                " did not call through to super.onResume()");
        }

        // invisible activities must be finished before onResume() completes
        if (!mVisibleFromClient && !mFinished) {
            Log.w(TAG, "An activity without a UI must call finish() before onResume() completes");
            if (getApplicationInfo().targetSdkVersion
                    > android.os.Build.VERSION_CODES.LOLLIPOP_MR1) {
                throw new IllegalStateException(
                        "Activity " + mComponent.toShortString() +
                        " did not call finish() prior to onResume() completing");
            }
        }

        // Now really resume, and install the current status bar and menu.
        mCalled = false;

        mFragments.dispatchResume();
        mFragments.execPendingActions();

        onPostResume();
        if (!mCalled) {
            throw new SuperNotCalledException(
                "Activity " + mComponent.toShortString() +
                " did not call through to super.onPostResume()");
        }
    }
我們可以看到,這個方法一開頭調用了performRestart 這個方法一進去就會判斷該Activity 是否有調用過onStop ,如果沒有調用,那麼整個方法相當於沒有調用,如果調用了,那麼會依次調用onRestart 和onStart 方法。吶,之前都是看看谷歌畫的Activity 生命周期圖,今天總算看到了源碼真面目了吧,為啥什麼周期這麼走總算搞懂了吧。嗯,過了performRestart方法,會通過 Instrumentation 去調用callActivityOnResume :
    public void callActivityOnResume(Activity activity) {
        activity.mResumed = true;
        activity.onResume();

        if (mActivityMonitors != null) {
            synchronized (mSync) {
                final int N = mActivityMonitors.size();
                for (int i=0; i<n; activitymonitor="" am="mActivityMonitors.get(i);" final="" pre="">
嗯,終於看到了activity.onResume()了。至此,整個Activity 也啟動了,那麼應用也算是開啟成功了。好了,大功告成。
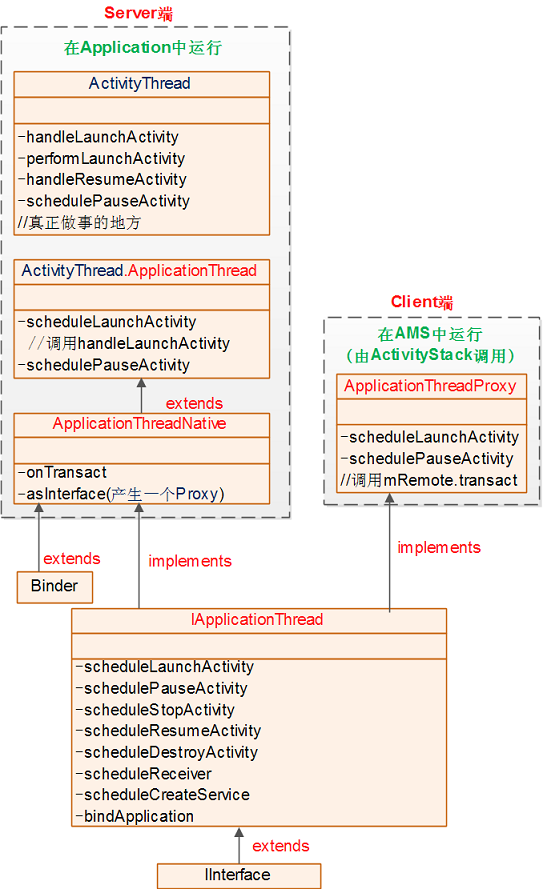
相信很多同學對於整個App得到啟動流程都是看得雲裡霧裡的,特別是多次和AMS之間IPC的過程,那麼這裡就直接獻上某位大神的關於ApplicationThread 和AMS之間IPC得到 結構簡圖,感謝!
該文章一來是作為自己的學習總結和記錄,二來是分享給有需要的開發人員,如有不正之處,望不吝指出。深表感激!
 android使用orm框架ormlite在控制台打印log日志信息
在默認情況下,在android下默認只打印info級別的日志信息,所以在默認情況只能打印ormlite中創建數據庫表的語句,而對於數據的插入和查詢等sql語句是不會打印出
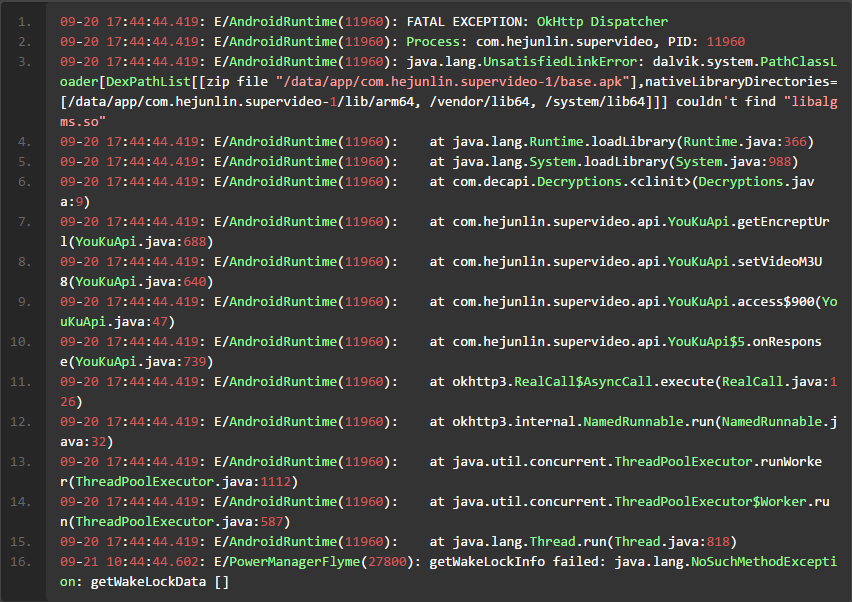 studio碰到問題:java.lang.UnsatisfiedLinkError解決辦法
studio中碰到的jni問題最近在做supervideo,解析youku視頻地址,是加過密處理,須要用對應的key去解析,獲取對應數據,在引用jni時,發現接二連三出問
 android視頻播放的代碼
1.activity_main.xml 2.MainActivity.jav
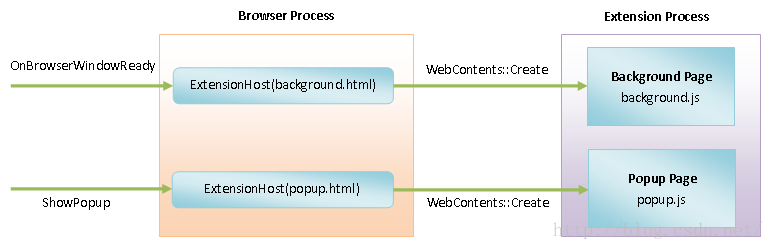 Chromium擴展(Extension)的頁面(Page)加載過程分析
Chromium的Extension Page其實就是網頁,因此它們的加載過程與普通網頁相同。常見的Extension Page有Background Page和Popu