編輯:關於Android編程
在我們進行android開發的時候雖然官方提供了形形色色的控件,但是有的時候根據不同業務需求我們找不到官方的控件支持,那麼這個時候就需要我們自己去定義控件來適應不同的需求了.本篇將和大家一起探討自定義ViewGrop 的相關知識.
先我們先來看看官方文檔是如何進行描述的:

翻譯過來的大體意思就是:一個ViewGroup是一種特殊的視圖可以包含其他視圖(稱為孩子)的視圖組基類的布局和視圖的容器。這個類也定義了viewgroup.layoutparams類作為基類的布局參數。也就是說ViewGroup實際上就是存放一些控件的容器,比如官方自帶的一些Linerlayout,RelativeLayout等等.我們先來講講ViewGroup中兩個重要的方法:onLayout和onMeasure,onLayout是必須重寫實現的.
onmeuse()方法: 測量自己的大小,為正式布局提供建議。(注意,只是建議,至於用不用,要看onLayout); 定義:如果layout_widht和layout_height是match_parent或具體的xxxdp,那就非常簡單了,直接調用setMeasuredDimension()方法,設置ViewGroup的寬高即可.But如果是wrap_content,就比較麻煩了,我們需要遍歷所有的子View,然後對每個子View進行測量,然後根據子View的排列規則,計算出最終ViewGroup的大小.如果不重寫onMeasure()方法,系統則會不知道該默認多大尺寸,就會默認填充整個父布局,所以,重寫onMeasure()方法的目的,就是為了能夠給 View 一個wrap_content屬性下的默認大小。 調用此方法會傳進來的兩個參數:int widthMeasureSpec,int heightMeasureSpec.他們是父類傳遞過來給當前view的一個建議值,即想把當前view的尺寸設置為寬widthMeasureSpec,高heightMeasureSpec雖然表面上看起來他們是int類型的數字,其實他們是由mode+size兩部分組成的。widthMeasureSpec和heightMeasureSpec轉化成二進制數字表示,他們都是30位的。前兩位代表mode(測量模式),後面28位才是他們的實際數值(size)。 MeasureSpec.getMode()獲取模式 MeasureSpec.getSize()獲取尺寸 模式: EXACTLY:表示設置了精確的值,一般當childView設置其寬、高為精確值(也就是我們在布局文件中設定的值如50dp)、match_parent時,ViewGroup會將其設置為EXACTLY;AT_MOST:表示子布局被限制在一個最大值內,一般當childView設置其寬、高為wrap_content時,ViewGroup會將其設置為AT_MOST;
UNSPECIFIED:表示子布局想要多大就多大,一般出現在AadapterView的item的heightMode中、ScrollView的childView的heightMode中;此種模式比較少見。
@Override
protected void onMeasure(int widthMeasureSpec, int heightMeasureSpec){
setMeasureDimension(measureWidth(widthMeasureSpec), measureHeight(heightMeasureSpec));}//可作為模板代碼!private int measureWidth(int measureSpec){ int result = 0; int specMode = MeasureSpec.getMode(measureSpec); int specSize = MeasureSpec.getSize(measureSpec); if(specMode == MeasureSpec.EXACTLY){//精確值模式,指定具體數值 result = specSize; }else{ result = 200;//先設置一個默認大小 //最大值模式,layout_width 或 layout_height 為 wrap_content 時,控件大小隨控件的內容變化而變化,此時控件尺寸只要不超過父控件允許的最大尺寸即可。 if(specMode == MeasureSpec.AT_MOST){ result = Math.min(result, specSize);//取出我們指定的大小和 specSize 中最小的一個來作為最後的測量值 } //MeasureSpec.UNSPECIFIED 不指定其大小,View 想多大就多大 } return result;}
測量子控件相關的方法: getChildCount() 在自定義的ViewGrop中我們可以得到子view的數目,再循環遍歷出子view。 getChildAt(int index). 可以拿到index上的子view。 通過子控件的childView.getMeasuredWidth()和childView.getMeasuredHeight()可以拿到子控件的寬高.但是在是使用這兩個方法的時候需要子控件自己去測量自身的控件的大小,有三種方式去進行測量: measureChild(subView, int wSpec, int hSpec) viewGroup的測量子view的方法針對單個子控件去進行 測量 measureChildren(int wSpec, int hSpec); viewGroup的測量子view的方法針對於所有的子控件去進行測量. subView.measure(int wSpec, int hSpec); 子view自身的測量方法 measureChildWithMargins(subView, intwSpec, int wUsed, int hSpec, int hUsed);//某一個子view,多寬,多高, 內部加上了viewGroup的padding值、margin值和傳入的寬高wUsed、hUsed
@Override
protected void onLayout(boolean changed, int l, int t, int r, int b) {
if (changed) {
int childLeft = 0;
final int childCount = getChildCount(); for (int i = 0; i < childCount; i++) { final View childView = getChildAt(i); if (childView.getVisibility() != View.GONE) { final int childWidth = childView.getMeasuredWidth(); childView.layout(childLeft, 0, childLeft + childWidth, childView.getMeasuredHeight()); childLeft += childWidth; } } } }
注意:如果你要動態添加View到ViewGroup,要把if(changed)這個判斷條件去掉,不去會引起讓人蛋疼的VIew不顯示問題。
例子一枚:
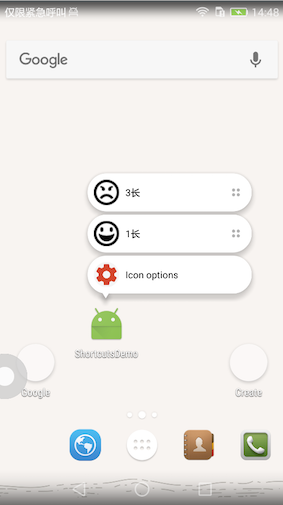
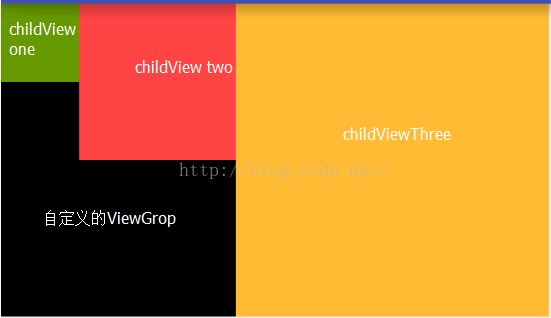
如果我們要實現如下圖所示的效果:我們可以看到我們自定義的viewgrop裡面的三個子控件並排顯示,並且自定義的ViewGrop的高度是和子控件裡面最高的View是一樣高的.ViewGrop的寬度是和所有子控件的寬度相累加的是一樣的.
 自定義ViewGrop
public class MyView extends ViewGroup {
    public MyView(Context context) {
        this(context, null);
    }
    public MyView(Context context, AttributeSet attrs) {
        this(context, attrs, 0);
    }
    public MyView(Context context, AttributeSet attrs, int defStyleAttr) {
        super(context, attrs, defStyleAttr);
    }
    @Override
    protected void onMeasure(int widthMeasureSpec, int heightMeasureSpec) {
        //調用該方法預先對子控件進行測量
        measureChildren(widthMeasureSpec, heightMeasureSpec);
        //設置控件的寬高
        setMeasuredDimension(measureWidth(widthMeasureSpec), measureHeight(heightMeasureSpec));
    }
    /**
     * 返回控件的寬
     *
     * @param widthMeasureSpec
     * @return
     */
    private int measureWidth(int widthMeasureSpec) {
        int specMode = MeasureSpec.getMode(widthMeasureSpec);
        int specSize = MeasureSpec.getSize(widthMeasureSpec);
        int result = 0;
        //判斷是否是包裹內容的模式
        if (specMode == MeasureSpec.AT_MOST) {
            int size = 0;
            //將所有的子控件的寬度進行疊加
            for (int x = 0; x < getChildCount(); x++) {
                View child = getChildAt(x);
                int measuredWidth = child.getMeasuredWidth();
                size += measuredWidth;
            }
            result = size;
        } else {
            result = specSize;
        }
        return result;
    }
    /**
     * 返回控件的高
     *
     * @param heightMeasureSpec
     * @return
     */
    private int measureHeight(int heightMeasureSpec) {
        int heightMode = MeasureSpec.getMode(heightMeasureSpec);
        int heightSize = MeasureSpec.getSize(heightMeasureSpec);
        int result = 0;
        //判斷是否是包裹內容
        if (heightMode == MeasureSpec.AT_MOST) {
            for (int x = 0; x < getChildCount(); x++) {
                View child = getChildAt(x);
                int measuredHeight = child.getMeasuredHeight();
                //取子控件最大的高度
                int min = Math.max(result, measuredHeight);
                result = min;
            }
        } else {
            result = heightSize;
        }
        return result;
    }
    @Override
    protected void onLayout(boolean changed, int l, int t, int r, int b) {
        int childCount = getChildCount();
        int left = 0; //左邊的距離
        View child;
        //遍歷布局子元素
        for (int i = 0; i < childCount; i++) {
            child = getChildAt(i);
            int width = child.getMeasuredWidth();
            child.layout(left, 0, left + width, child.getMeasuredHeight());
            left += width;
        }
    }
}
布局文件:getMeasuredWidth()與getWidth()的區別.
參數 1. AttributeSet attrs xml解析inflate時生成和容器類型匹配的布局LayoutParams
2. ViewGroup.LayoutParams p 傳入viewGroupLayoutParams 然後生成和容器類型匹配的布局LayoutParams
總結:
這個方法主要是用於被子View調用。
生成和此容器類型相匹配的布局參數類。
@Override
	public LayoutParams generateLayoutParams(AttributeSet attrs)
	{
		return new MarginLayoutParams(getContext(), attrs);
	}

	@Override
	protected LayoutParams generateDefaultLayoutParams()
	{

		return new MarginLayoutParams(LayoutParams.MATCH_PARENT,
				LayoutParams.MATCH_PARENT);
	}

	@Override
	protected LayoutParams generateLayoutParams(
			LayoutParams p)
	{

		return new MarginLayoutParams(p);
	}
調用的時候就可以取得相關的參數:
cParams = (MarginLayoutParams) childView.getLayoutParams();
			int bottomMargin = cParams.bottomMargin;
			int topMargin = cParams.topMargin;
			int leftMargin = cParams.leftMargin;
			int rightMargin = cParams.rightMargin;
LayoutParams繼承於Android.View.ViewGroup.LayoutParams. View通過LayoutParams類告訴其父視圖它想要地大小(即,長度和寬度)。 因此,每個View都包含一個ViewGroup.LayoutParams類或者其派生類,View類依賴於ViewGroup.LayoutParams ViewGroup子類可以實現自定義LayoutParams,自定義LayoutParams提供了更好地擴展性。
/**
* 使用自定義LayoutParams必須重寫下面的四個方法
*/
@Override protected boolean checkLayoutParams(ViewGroup.LayoutParams p) { return p instanceof LayoutParams; } @Override protected LayoutParams generateDefaultLayoutParams() { return new LayoutParams(LayoutParams.WRAP_CONTENT, LayoutParams.WRAP_CONTENT); } @Override public LayoutParams generateLayoutParams(AttributeSet attrs) { return new LayoutParams(getContext(), attrs); } @Override protected LayoutParams generateLayoutParams(ViewGroup.LayoutParams p) { return new LayoutParams(p.width, p.height); }
 Android 中實現分享和第三方登陸---以新浪微博為例
第三方登陸和分享功能在目前大部分APP中都有,分享功能可以將自己覺得有意義的東西分享給身邊的朋友,而第三方登陸可以借助已經有巨大用戶基礎的平台(如QQ和新浪
 Android Studio下使用Android Fragment的簡單Demo(1)
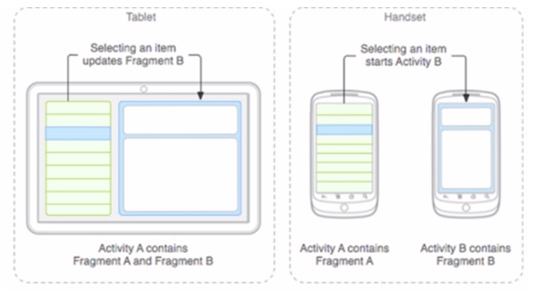
一、Fragment簡介Fragment介紹針對屏幕尺寸的差距,很多情況下,都是先針對手機開發一套app,然後拷貝一份,修改布局以適應什麼超級大屏的。Fragment的初
 Android自定義Spinner下拉列表(使用ArrayAdapter和自定義Adapter實現)
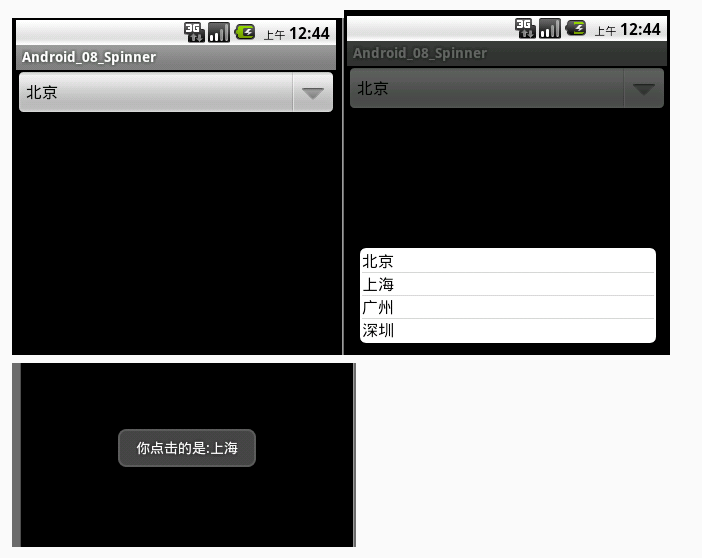
今天學習了Spinner組件的使用,非常好用的一款組件,相當於從下拉列表中選擇項目,今天收獲頗多,下面給大家演示一下Spinner的使用(分別使用ArrayAdapter
 android如何寫一個投票或是表達觀點的界面
先上圖: 把這些表示觀點的view放在一個LinearLayout裡: 每個Item可以這樣來實現: &n