編輯:關於Android編程
最近項目用到了藍牙連接,搜索設備的內容,其中需要搜索過程中出現波紋的動畫效果,在這裡將項目中OC語言編寫的這種動畫效果,轉換成Swift編寫,下面簡單介紹說明一下代碼。
這裡用到了兩種方法實現波紋效果,一種是波紋持續顯示,一種是點擊以後出現一次波紋的效果
首先是第一種,持續顯示波紋
這個內容是重寫繪圖方法,override func drawRect(rect: CGRect){ }
首先需要設置顯示波紋的數量,然後運用for循環進行創建,動畫效果,並且添加到layer上
let pulsingCountT:NSInteger = 4;
let animationDurationN:Double = 4;
let animationLayerR = CALayer.init();
for i in 0 ..< pulsingCountT {
let pulsingLayer = CALayer.init();
pulsingLayer.frame = CGRectMake(0, 0, rect.size.width, rect.size.height);
pulsingLayer.borderColor = UIColor.redColor().CGColor;
pulsingLayer.borderWidth = 1;
pulsingLayer.cornerRadius = rect.size.height/2;

let defaultCurveE = CAMediaTimingFunction.init(name: kCAMediaTimingFunctionDefault);

let animationGroupP = CAAnimationGroup.init();
animationGroupP.fillMode = kCAFillModeBackwards;
animationGroupP.beginTime = CACurrentMediaTime() + Double(i) * animationDurationN / Double(pulsingCountT);
animationGroupP.duration = animationDurationN;
animationGroupP.repeatCount = HUGE;
animationGroupP.timingFunction = defaultCurveE;

let scaleAnimationN = CABasicAnimation.init(keyPath: "transform.scale");
scaleAnimationN.fromValue = 1.4;
scaleAnimationN.toValue = 2.2;

let opacityAnimationN = CAKeyframeAnimation.init(keyPath: "opacity");
opacityAnimationN.values = [1,0.9,0.8,0.7,0.6,0.5,0.4,0.3,0.2,0.1,0];
opacityAnimationN.keyTimes = [0,0.1,0.2,0.3,0.4,0.5,0.6,0.7,0.8,0.9,1];

animationGroupP.animations = [scaleAnimationN,opacityAnimationN];
pulsingLayer.addAnimation(animationGroupP, forKey: "plulsing");
animationLayerR.addSublayer(pulsingLayer);

}
self.layer.addSublayer(animationLayerR);
繪圖完成後,進行添加
//圈視圖
circleV = CircleView.init();
circleV.frame = CGRectMake(100, 60, 100, 100);
circleV.hidden = true;
circleV.backgroundColor = UIColor.clearColor();
self.view.addSubview(circleV);
//類方法的調用,只能類本事調用,與OC中的類方法(加號)形式一樣
CircleView.showLogStr();
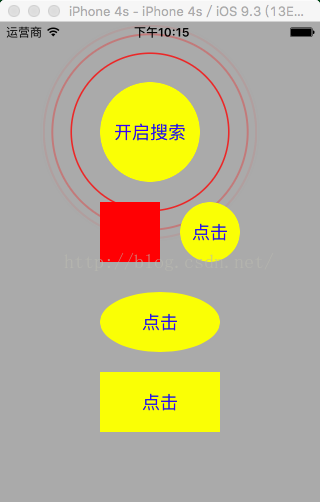
//點擊出現圈視圖,第一種持續擴散的圈
let button1 = UIButton.init(frame: CGRectMake(100, 60, 100, 100));
button1.setTitle("開啟搜索", forState: .Normal);
button1.backgroundColor = UIColor.yellowColor();
button1.layer.cornerRadius = 50;
button1.clipsToBounds = true;
button1.setTitleColor(UIColor.blueColor(), forState: .Normal);
button1.addTarget(self, action: #selector(button1Click), forControlEvents: .TouchUpInside);
self.view.addSubview(button1);
//按鈕的點擊事件
func button1Click(btn:UIButton) {
circleV.hidden = false;
}
然後是實現點擊出現一次波紋的效果
這裡用到了類似於OC中類別category文件的實現,使用extension創建類似於類別文件:extension UIView { }
//創建可點擊出現的圓圈方法,參數一:表示圈的顏色,參數二:表示圈相對於View擴散的比例大小
func showCircleAnimationLayerWithColor(circleColor:UIColor,andScale aScale:CGFloat){
if (self.superview == false) && (circleColor == true) {
return;
}

let pathFrameE = CGRectMake(-CGRectGetMidX(self.bounds), -CGRectGetMidY(self.bounds), self.bounds.size.width, self.bounds.size.height);

let pathH = UIBezierPath.init(roundedRect: pathFrameE, cornerRadius: self.layer.cornerRadius);

let shapePositionN = self.superview?.convertPoint(self.center, fromView: self.superview);

//內圈1
let circleShapeE1 = CAShapeLayer.init();
circleShapeE1.path = pathH.CGPath;
circleShapeE1.position = shapePositionN!;
circleShapeE1.fillColor = UIColor.clearColor().CGColor;
//不透明
circleShapeE1.opacity = 0;
circleShapeE1.strokeColor = circleColor.CGColor;
circleShapeE1.lineWidth = 0.6;
self.superview?.layer.addSublayer(circleShapeE1);

let scaleAnimationN1 = CABasicAnimation.init(keyPath: "transform.scale");
scaleAnimationN1.fromValue = NSValue.init(CATransform3D: CATransform3DIdentity);
scaleAnimationN1.toValue = NSValue.init(CATransform3D: CATransform3DMakeScale(aScale, aScale, 1));
scaleAnimationN1.duration = 2;
scaleAnimationN1.timingFunction = CAMediaTimingFunction.init(name: kCAMediaTimingFunctionLinear);
circleShapeE1.addAnimation(scaleAnimationN1, forKey: nil);

let alphaAnimationN1 = CABasicAnimation.init(keyPath: "opacity");
alphaAnimationN1.fromValue = 1;
alphaAnimationN1.toValue = 0;
alphaAnimationN1.duration = 1.8;
alphaAnimationN1.timingFunction = CAMediaTimingFunction.init(name: kCAMediaTimingFunctionEaseOut);
circleShapeE1.addAnimation(alphaAnimationN1, forKey: nil);

//內圈2
let circleShapeE2 = CAShapeLayer.init();
circleShapeE2.path = pathH.CGPath;
circleShapeE2.position = shapePositionN!;
circleShapeE2.fillColor = circleColor.CGColor;
//不透明
circleShapeE2.opacity = 0;
circleShapeE2.strokeColor = UIColor.clearColor().CGColor;
circleShapeE2.lineWidth = 0;
self.superview?.layer.insertSublayer(circleShapeE2, atIndex: 0);

let scaleAnimationN2 = CABasicAnimation.init(keyPath: "transform.scale");
scaleAnimationN2.fromValue = NSValue.init(CATransform3D: CATransform3DIdentity);
scaleAnimationN2.toValue = NSValue.init(CATransform3D: CATransform3DMakeScale(aScale, aScale, 1));
scaleAnimationN2.duration = 2;
scaleAnimationN2.timingFunction = CAMediaTimingFunction.init(name: kCAMediaTimingFunctionLinear);
circleShapeE2.addAnimation(scaleAnimationN2, forKey: nil);

let alphaAnimationN2 = CABasicAnimation.init(keyPath: "opacity");
alphaAnimationN2.fromValue = 0.8;
alphaAnimationN2.toValue = 0;
alphaAnimationN2.duration = 1.7;
alphaAnimationN2.timingFunction = CAMediaTimingFunction.init(name: kCAMediaTimingFunctionEaseOut);
circleShapeE2.addAnimation(alphaAnimationN2, forKey: nil);

//線程
let timeE:dispatch_time_t = dispatch_time(DISPATCH_TIME_NOW, 2*Int64(NSEC_PER_SEC));
dispatch_after(timeE, dispatch_get_main_queue()) {
circleShapeE1.removeFromSuperlayer();
circleShapeE2.removeFromSuperlayer();
};
}
方法的調用:
//第二種方式,點擊出現一個圈視圖,而不是持續
let button2 = UIButton.init(frame: CGRectMake(100, 270, 120, 60));
//根據width與height,1:2的比例創建一個橢圓視圖
button2.updateMaskToBounds(button2.bounds);
button2.setTitle("點擊", forState: .Normal);
button2.backgroundColor = UIColor.yellowColor();
//button2.layer.cornerRadius = 30;
button2.clipsToBounds = true;
button2.setTitleColor(UIColor.blueColor(), forState: .Normal);
button2.addTarget(self, action: #selector(button2Click), forControlEvents: .TouchUpInside);
self.view.addSubview(button2);
按鈕點擊方法
func button2Click(btn:UIButton) {
btn.showCircleAnimationLayerWithColor(UIColor.whiteColor(), andScale: 3);
}
效果圖:
 Android手機使用上的兩件事兒
iPhone用戶從來不用在意剩余內存的多少,也無需考慮太多的系統安全性問題,因為封閉的iOS從“根兒”上就比開放的Android靠譜
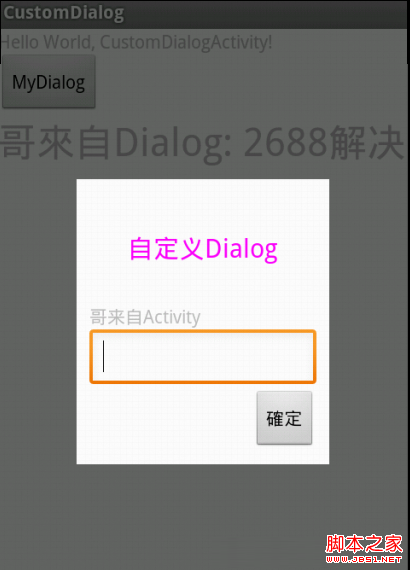 android控件封裝 自己封裝的dialog控件
自定義dialog肯定是用的很多了但是感覺每次做都是很亂 單純完成任務而已,現在封裝了一下 以後用到直接copy 先上圖: 主activity 復制代碼 代碼如下: pa
 Android學習筆記之RadioButton的使用詳解
(1)選用radioGroup的圖標 (2)控制的類是 package com.lc.radiobutt
 android學習八(android碎片fragment的使用)
碎片(Fragment)是一種可以嵌入在活動當中的UI片段,它能讓程序更加合理和充分地利用屏幕的空間。首先建立一個平板的模擬器1034*600,環境使用android4.