編輯:關於Android編程
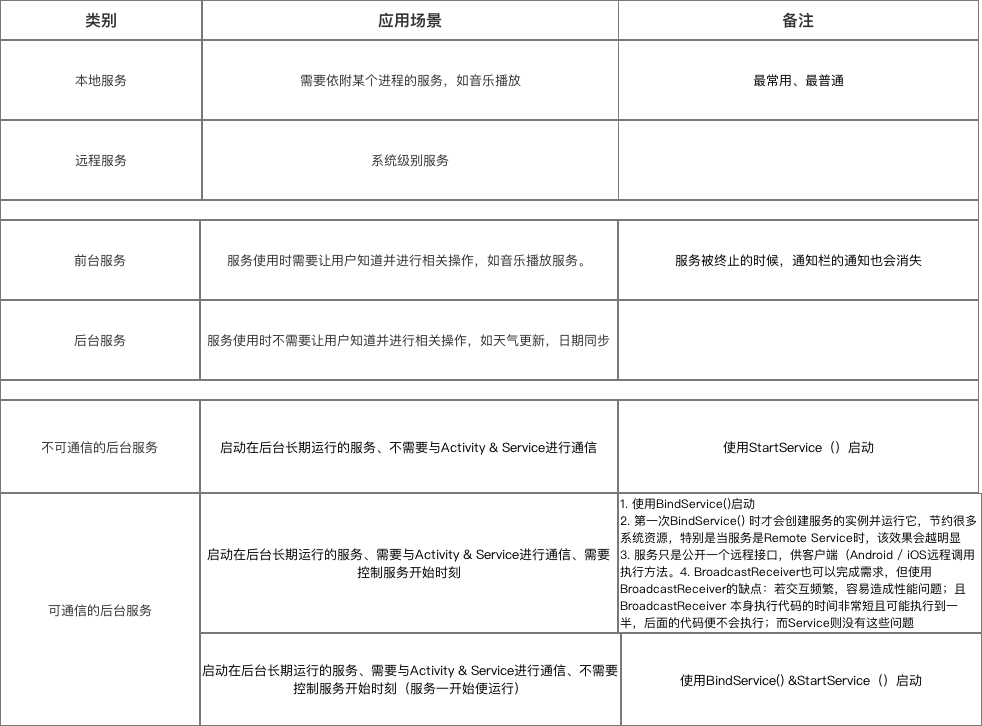
Service作為Android四大組件之一,應用非常廣泛 本文將介紹Service最基礎的知識:Service的生命周期


需重寫父類的onCreate()、onStartCommand()、onDestroy()和onBind()方法步驟2:構建用於啟動Service的Intent對象 步驟3:調用startService()啟動Service、調用stopService()停止服務 步驟4:在AndroidManifest.xml裡注冊Service
步驟1:新建子類繼承Service類建議先下載Demo再進行閱讀:(carson.ho的Github地址)Demo_for_Service
需重寫父類的onCreate()、onStartCommand()、onDestroy()和onBind()
public class MyService extends Service {


//啟動Service之後,就可以在onCreate()或onStartCommand()方法裡去執行一些具體的邏輯
//由於這裡作Demo用,所以只打印一些語句
    @Override
    public void onCreate() {
        super.onCreate();
        System.out.println("執行了onCreat()");
    }

    @Override
    public int onStartCommand(Intent intent, int flags, int startId) {
        System.out.println("執行了onStartCommand()");
        return super.onStartCommand(intent, flags, startId);


    }

    @Override
    public void onDestroy() {
        super.onDestroy();
        System.out.println("執行了onDestory()");
    }

    @Nullable
    @Override
    public IBinder onBind(Intent intent) {
        return null;
    }
}
步驟2:在主布局文件設置兩個Button分別用於啟動和停止Service步驟3:構建Intent對象,並調用startService()啟動Service、stopService停止服務
MainActivity.java
public class MainActivity extends AppCompatActivity implements View.OnClickListener {

    private Button startService;
    private Button stopService;

    @Override
    protected void onCreate(Bundle savedInstanceState) {
        super.onCreate(savedInstanceState);
        setContentView(R.layout.activity_main);

        startService = (Button) findViewById(R.id.startService);
        stopService = (Button) findViewById(R.id.stopService);

        startService.setOnClickListener(this);
        startService.setOnClickListener(this);
    }

    @Override
    public void onClick(View v) {
        switch (v.getId()) {

            //點擊啟動Service Button
            case R.id.startService:
                //構建啟動服務的Intent對象
                Intent startIntent = new Intent(this, MyService.class);
                //調用startService()方法-傳入Intent對象,以此啟動服務
                startService(startIntent);

            //點擊停止Service Button
            case R.id.stopService:
                //構建停止服務的Intent對象
                Intent stopIntent = new Intent(this, MyService.class);
                //調用stopService()方法-傳入Intent對象,以此停止服務
                stopService(stopIntent);

        }
    }
}
步驟4:在AndroidManifest.xml裡注冊Service//注冊Service服務
Androidmanifest裡Service的常見屬性說明

Carson.ho的Github地址:Demo_for_Service
接下來我將用一個實例Demo進行可通信的服務Service說明
步驟1:在新建子類繼承Service類,並新建一個子類繼承自Binder類、寫入與Activity關聯需要的方法、創建實例建議先下載Demo再進行閱讀:[(carson.ho的Github地址)Demo_for_Service](https://github.com/Carson-Ho/Demo_Service/tree/719e3b9ffd5017c334cdfdaf45b6a72776a2066a
)
public class MyService extends Service {

    private MyBinder mBinder = new MyBinder();

    @Override
    public void onCreate() {
        super.onCreate();
        System.out.println("執行了onCreat()");
    }

    @Override
    public int onStartCommand(Intent intent, int flags, int startId) {
        System.out.println("執行了onStartCommand()");
        return super.onStartCommand(intent, flags, startId);


    }

    @Override
    public void onDestroy() {
        super.onDestroy();
        System.out.println("執行了onDestory()");
    }

    @Nullable
    @Override
    public IBinder onBind(Intent intent) {
        System.out.println("執行了onBind()");
        //返回實例
        return mBinder;
    }


    @Override
    public boolean onUnbind(Intent intent) {
        System.out.println("執行了onUnbind()");
        return super.onUnbind(intent);
    }

    //新建一個子類繼承自Binder類
    class MyBinder extends Binder {

        public void service_connect_Activity() {
            System.out.println("Service關聯了Activity,並在Activity執行了Service的方法");

        }
    }
}
步驟2:在主布局文件再設置兩個Button分別用於綁定和解綁Service
步驟3:在Activity通過調用MyBinder類中的public方法來實現Activity與Service的聯系
即實現了Activity指揮Service干什麼Service就去干什麼的功能
public class MainActivity extends AppCompatActivity implements View.OnClickListener {

    private Button startService;
    private Button stopService;
    private Button bindService;
    private Button unbindService;

    private MyService.MyBinder myBinder;


    //創建ServiceConnection的匿名類
    private ServiceConnection connection = new ServiceConnection() {

        //重寫onServiceConnected()方法和onServiceDisconnected()方法
        //在Activity與Service建立關聯和解除關聯的時候調用
        @Override
        public void onServiceDisconnected(ComponentName name) {
        }

        //在Activity與Service解除關聯的時候調用
        @Override
        public void onServiceConnected(ComponentName name, IBinder service) {
            //實例化Service的內部類myBinder
            //通過向下轉型得到了MyBinder的實例
            myBinder = (MyService.MyBinder) service;
            //在Activity調用Service類的方法
            myBinder.service_connect_Activity();
        }
    };

    @Override
    protected void onCreate(Bundle savedInstanceState) {
        super.onCreate(savedInstanceState);
        setContentView(R.layout.activity_main);


        startService = (Button) findViewById(R.id.startService);
        stopService = (Button) findViewById(R.id.stopService);

        startService.setOnClickListener(this);
        stopService.setOnClickListener(this);

        bindService = (Button) findViewById(R.id.bindService);
        unbindService = (Button) findViewById(R.id.unbindService);

        bindService.setOnClickListener(this);
        unbindService.setOnClickListener(this);

    }

    @Override
    public void onClick(View v) {
        switch (v.getId()) {

            //點擊啟動Service
            case R.id.startService:
                //構建啟動服務的Intent對象
                Intent startIntent = new Intent(this, MyService.class);
                //調用startService()方法-傳入Intent對象,以此啟動服務
                startService(startIntent);
                break;

            //點擊停止Service
            case R.id.stopService:
                //構建停止服務的Intent對象
                Intent stopIntent = new Intent(this, MyService.class);
                //調用stopService()方法-傳入Intent對象,以此停止服務
                stopService(stopIntent);
                break;

            //點擊綁定Service
            case R.id.bindService:
                //構建綁定服務的Intent對象
                Intent bindIntent = new Intent(this, MyService.class);
                //調用bindService()方法,以此停止服務

                bindService(bindIntent,connection,BIND_AUTO_CREATE);
                //參數說明
                //第一個參數:Intent對象
                //第二個參數:上面創建的Serviceconnection實例
                //第三個參數:標志位
                //這裡傳入BIND_AUTO_CREATE表示在Activity和Service建立關聯後自動創建Service
                //這會使得MyService中的onCreate()方法得到執行,但onStartCommand()方法不會執行
                break;

            //點擊解綁Service
            case R.id.unbindService:
                //調用unbindService()解綁服務
                //參數是上面創建的Serviceconnection實例
                unbindService(connection);
                break;

                default:
                    break;

        }
    }
}
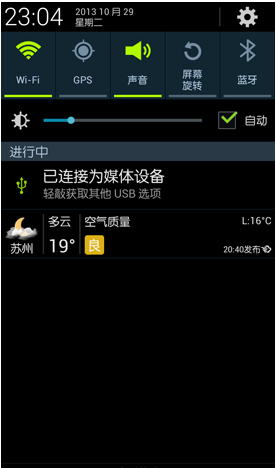
前台Service和後台Service(普通)最大的區別就在於:
- 前台Service在下拉通知欄有顯示通知(如下圖),但後台Service沒有;
 vc+1zaOstbHPtc2zs/bP1sTatOayu9fjx+m/9sqxo6y63NPQv8nE3Lvhsbu72MrVDQo8aDEgaWQ9"231-具體使用">2.3.1 具體使用
用法很簡單,只需要在原有的Service類對onCreate()方法進行稍微修改即可,如下圖:
@Override
    public void onCreate() {
        super.onCreate();
        System.out.println("執行了onCreat()");

        //添加下列代碼將後台Service變成前台Service
        //構建"點擊通知後打開MainActivity"的Intent對象
        Intent notificationIntent = new Intent(this,MainActivity.class);
        PendingIntent pendingIntent = PendingIntent.getActivity(this,0,notificationIntent,0);

        //新建Builer對象
        Notification.Builder builer = new Notification.Builder(this);
        builer.setContentTitle("前台服務通知的標題");//設置通知的標題
        builer.setContentText("前台服務通知的內容");//設置通知的內容
        builer.setSmallIcon(R.mipmap.ic_launcher);//設置通知的圖標
        builer.setContentIntent(pendingIntent);//設置點擊通知後的操作

        Notification notification = builer.getNotification();//將Builder對象轉變成普通的notification
        startForeground(1, notification);//讓Service變成前台Service,並在系統的狀態欄顯示出來

    }
運行後,當點擊Start Service或Bind Service按鈕,Service就會以前台Service的模式啟動(通知欄上有通知),如下圖

具體請看我寫的另外一篇文章:Android:遠程服務Service(含AIDL & IPC講解)
 android中實現指針滑動的動態效果方法
復制代碼 代碼如下:<FrameLayout
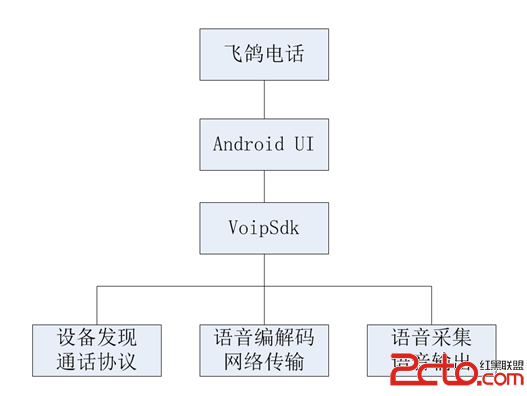 PigeonCall:一款Android VoIP網絡電話App架構的介紹
1.概述 PigeonCall,中文名“飛鴿電話”,是一款Android平台的VoIP網絡電話應用,但只工作於局域網,支持給任意局域網內
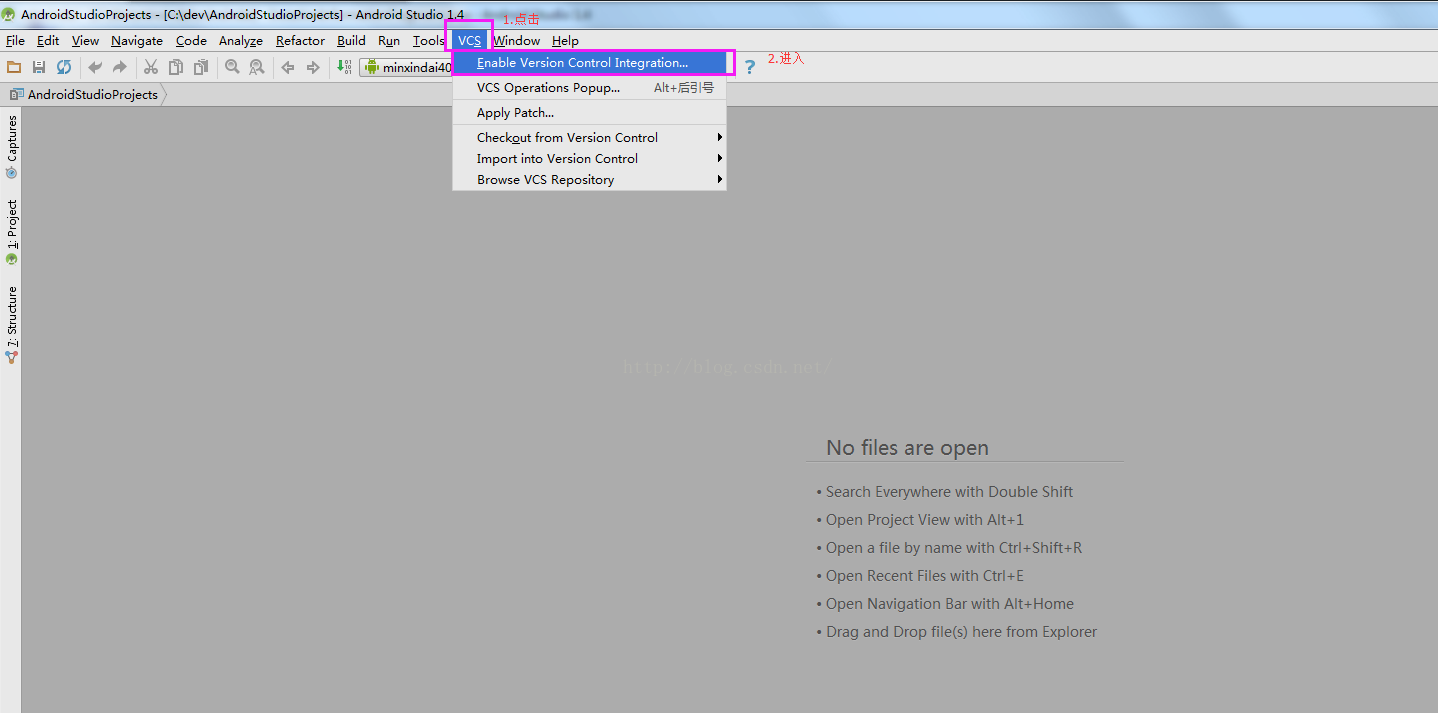 Android開發之Android studio使用git gitlab(二)
1)首先先將gitlab上的開發項目clone到本地(可以使用命令行或者管理工具,具體操作在GitLab中已經涉及,這裡不再贅述),然後導入到AndroidStudio中
 Android初級教程初談自定義view自定義屬性
有些時候,自己要在布局文件中重復書寫大量的代碼來定義一個布局。這是最基本的使用,當然要掌握;但是有些場景都去對應的布局裡面寫對應的屬性,就顯得很無力。會發現,系統自帶的控