編輯:關於Android編程
一般在公司開發客戶端和服務端的編碼要保持一致。
android端的默認編碼是utf-8;
做url請求時需要對參數進行URLEncode編碼.
URL url = new URL("http://192.168.13.83:8080/.../LoginServlet?username=" + URLEncoder.encode(username) + "&pwd=" + URLEncoder.encode(password));
connection.setDoOutput(true);
connection.getOutputStream().write(parmes.getBytes());
2 get方式提交數據亂碼解決
URLEncode
3 httpclient方式提交數據到服務器
HttpClient:
get方式:
    // 使用HttpClient請求服務器將用戶密碼發送服務器驗證
    try{
        String path = "http://192.168.13.83:8080/.../servlet/LoginServlet?username=" + URLEncoder.encode(username,"utf-8") + "&pwd=" + URLEncoder.encode(password,"utf-8");
        // 1.創建一個httpClient對象
        HttpClient httpclient = new DefaultHttpClient();
        // 2.設置請求的方式
        HttpGet httpget = new HttpGet(path);
        // 3.執行一個http請求
        HttpResponse response = httpclient.execute(httpget);
        // 4.獲取請求的狀態碼,
        StatusLine statusLine = response.getStatusLine();
        int code = statusLine.getStatusCode();
        // 5.判斷狀態碼後獲取內容
        if(code == 200){
            HttpEntity entity = response.getEntity();   // 獲取實體內容,中封裝的有http請求返回的流信息
            InputStream inputStream = entity.getContent();
            // 將流信息轉換成字符串
            String result = StreamUtils.streamToString(inputStream);
            Message msg = Message.obtain();
            msg.what = 1;
            msg.obj = result;
            handler.sendMessage(msg);
        }
    } catch (Exception e) {
        e.printStackTrace();
    }
post方式:
    // 使用UrlConncetion請求服務器將用戶密碼發送服務器驗證
    try{
        String path = "http://192.168.13.83:8080/.../servlet/LoginServlet";
        // 1.創建一個httpclient對象
        HttpClient httpclient = new DefaultHttpClient();
        // 2.創建一個請求方式
        HttpPost httppost = new HttpPost(path);
        // 創建集合封裝數據
        ArrayList arrayList = new ArrayList();
        BasicNameValuePair nameValuePair = new BasicNameValuePair("username",username);
        arrayList.add(nameValuePair);
        BasicNameValuePair nameValuePair1 = new BasicNameValuePair("pwd",password);
        arrayList.add(nameValuePair1);
        // 創建一個Entity
        UrlEncodedFormEntity entity = new UrlEncodedFormEntity(arrayList, "utf-8");
        // 設置請求時的內容
        httppost.setEntity(entity);
        // 3.執行一個請求,返回一個response對象
        HttpResponse response = httpclient.execute(httppost);
        // 4.獲取狀態碼
        int code = response.getStatusLine().getStatusCode();
        // 5.判斷並獲取內容
        if(code == 200){
            HttpEntity entity1 = response.getEntity();  // 獲取實體內容,中封裝的有http請求返回的流信息
            InputStream inputStream = entity1.getContent();
            // 將流信息轉換成字符串
            String result = StreamUtils.streamToString(inputStream);
            Message msg = Message.obtain();
            msg.what = 2;
            msg.obj = result;
            handler.sendMessage(msg);
        }
    }catch (Exception e) {
        e.printStackTrace();
    }
4開源項目get post 方式提交 (asyncHttpClient)
get方式:
    public static void requestNetForGetLogin(final Context context,final Handler handler ,final String username, final String password) {
        // 使用HttpClient請求服務器將用戶密碼發送服務器驗證
        try{
            String path = "http://192.168.13.83:8080/.../servlet/LoginServlet?username=" + URLEncoder.encode(username,"utf-8") + "&pwd=" + URLEncoder.encode(password,"utf-8");
            // 創建一個AsyncHttpClient對象
            AsyncHttpClient asyncHttpClient = new AsyncHttpClient();
            asyncHttpClient.get(path, new AsyncHttpResponseHandler() {
                @Override
                public void onSuccess(int statusCode, Header[] headers, byte[] responseBody) {
                    // statusCode:狀態碼  headers:頭信息  responseBody:返回的內容,返回的實體
                    // 判斷狀態碼
                    if(statusCode == 200){
                        //獲取結果
                        try {
                            String result = new String(responseBody,"utf-8");
                            Toast.makeText(context, result, 0).show();
                        } catch (UnsupportedEncodingException e) {
                            // TODO Auto-generated catch block
                            e.printStackTrace();
                        }
                    }
                }
                @Override
                public void onFailure(int statusCode, Header[] headers,byte[] responseBody, Throwable error) {
                    System.out.println("...............onFailure");
                }
            });
        } catch (Exception e) {
            e.printStackTrace();
        }
    }

post方式:
    String path = "http://192.168.13.83:8080/.../servlet/LoginServlet";
    AsyncHttpClient asyncHttpClient = new AsyncHttpClient();
    RequestParams params = new RequestParams();
    params.put("username", username);
    params.put("pwd", password);
    // url:   parmas:請求時攜帶的參數信息   responseHandler:是一個匿名內部類接受成功過失敗
    asyncHttpClient.post(path, params, new AsyncHttpResponseHandler() {

        @Override
        public void onSuccess(int statusCode, Header[] headers, byte[] responseBody) {
            //statusCode:狀態碼    headers:頭信息  responseBody:返回的內容,返回的實體

            //判斷狀態碼
            if(statusCode == 200){
                //獲取結果
                try {
                    String result = new String(responseBody,"utf-8");
                    Toast.makeText(context, result, 0).show();
                } catch (UnsupportedEncodingException e) {
                    // TODO Auto-generated catch block
                    e.printStackTrace();
                }
            }

        }

        @Override
        public void onFailure(int statusCode, Header[] headers,
                byte[] responseBody, Throwable error) {

        }
    });
5 文件上傳的操作
使用第三方utils做文件上傳。
public void fileupload(View v){
    try{
        EditText et_filepath = (EditText) findViewById(R.id.et_filepath);
        // 獲取輸入的文件地址
        String filepath = et_filepath.getText().toString().trim();
        // 使用開源Utils做上傳操作
        AsyncHttpClient asyncHttpClient = new AsyncHttpClient();
        RequestParams params = new RequestParams();
        params.put("filename", new File(filepath));
        //url : 請求服務器的url
        asyncHttpClient.post("http://192.168.13.83:8080/.../servlet/UploaderServlet", params, new AsyncHttpResponseHandler() {
            @Override
            public void onSuccess(int statusCode, Header[] headers, byte[] responseBody) {
                if(statusCode == 200){
                    Toast.makeText(MainActivity.this, "上傳成功", 0).show();
                }
            }
            @Override
            public void onFailure(int statusCode, Header[] headers,
                    byte[] responseBody, Throwable error) {
            }
        });
    }catch (Exception e) {
        e.printStackTrace();
    }
}
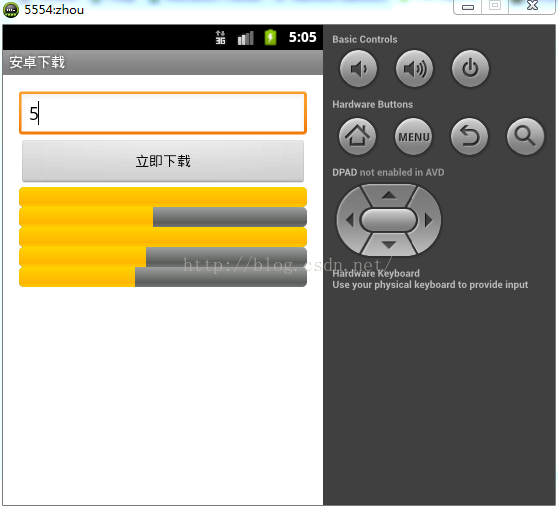
6 多線程加速下載的原理
1.線程越多下載越快? 不是,與本地網絡帶寬、服務器資源的帶寬有關
2.迅雷:3-5個。
多線程下載的步驟:
1.要知道服務端資源的大小。
    通過URLConnection請求服務器url獲取。
    UrlConnection.getContentLength();   // 資源的大小
2.在本地創建一個與服務端資源同樣大小的一個文件(占位)
    //file :  文件; mode:文件的模式,rwd:直接寫到底層設備,硬盤
    RandomAccessFile randomfile =new RandomAccessFile(File file,String mode)
    randomfile.setLength(long size);//創建一個文件和服務器資源一樣大小
3.要分配每個線程下載文件的開始位置和結束位置。
4.開啟線程去執行下載
    通過UrlConnection下載部分資源。
    注意:
     1.需要Range頭,key:Range   value:bytes:0-499
            urlconnection.setRequestPropety("Range","bytes:0-499")
     2.需要設置每個線程在本地文件的保存的開始位置
            RandomAccessFile randomfile =new RandomAccessFile(File file,String mode)
            randomfile.seek(int startPostion);//本次線程下載保存的開始位置。
5.要知道每個線程下載完畢。
7 javase 多線程下載8 多線程斷點續傳實現9 Android版本多線程下載
安智:sdcard沒有判斷。uc
10 開源項目實現多線程下載 (xutils)
public void download(View v){
    EditText et_url = (EditText) findViewById(R.id.et_url);
    String url = et_url.getText().toString().trim();
    // 1.創建httpUtils對象
    HttpUtils httpUtils = new HttpUtils();
    // 2.調用download方法  url:下載的地址  target:下載的目錄   callback:回調
    httpUtils.download(url, "/sdcard/feiqiu/feiq.exe", new RequestCallBack() {
        @Override
        public void onLoading(long total, long current, boolean isUploading) {
            System.out.println("total:"+total+";current:"+current);
            super.onLoading(total, current, isUploading);
        }
        @Override
        public void onSuccess(ResponseInfo responseInfo) {
            System.out.println(responseInfo.result);
        }
        @Override
        public void onFailure(HttpException error, String msg) {
            // TODO Auto-generated method stub

        }
    });
}
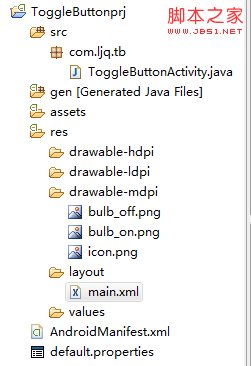 Android控件之ToggleButton的使用方法
ToggleButton的狀態只能是選中和未選中,並且需要為不同的狀態設置不同的顯示文本。以下案例為ToggleButton的用法目錄結構main.xml布局文件復制代碼
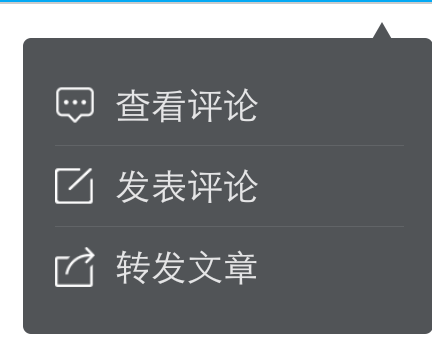 Android中自定義PopupWindow實現彈出框並帶有動畫效果
使用PopupWindow來實現彈出框,並且帶有動畫效果首先自定義PopupWindowpublic class LostPopupWindow extends Popu
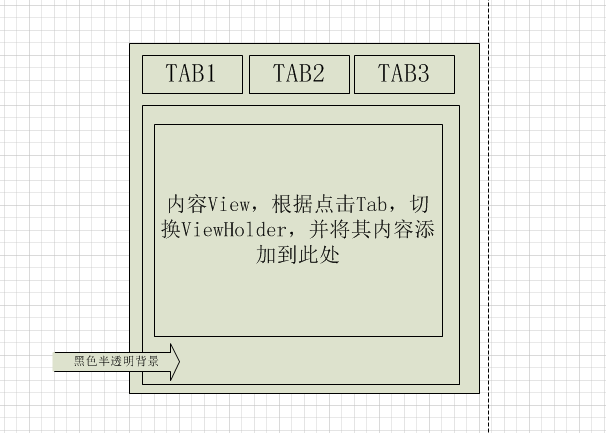 Android自定義控件:仿美團下拉菜單及相關代碼優化
背景最近的項目中用到了類似美團中的下拉多選菜單,在實際開發過程中,也發現了一些問題,主要歸納如下:1.當菜單較為復雜時,如果不能設計好代碼邏輯,將造成控件難於維護2.美團
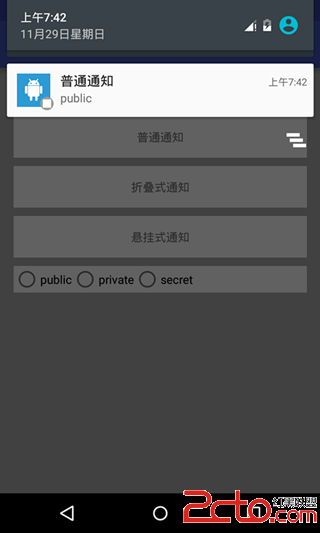 Android5.x Notification應用解析
Notification可以讓我們在獲得消息的時候,在狀態欄,鎖屏界面來顯示相應的信息,很難想象如果沒有Notification,那我們的qq和微信以及其他應用沒法主動通