編輯:關於Android編程
引言
最近在研究Android的變形,Android的2D變形(包括縮放,扭曲,平移,旋轉等)可以通過Matrix來實現,3D變形可以通過Camera來實現。接下來就將我這倆天研究的東西和大家分享下,先來看看Matrix的用法。
效果圖

變形以後


Matrix矩陣
坐標變換矩陣,即一個3*3的矩陣,用來對圖形進行坐標變換。
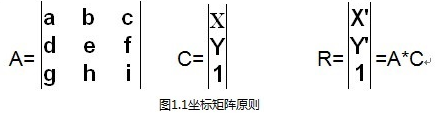
圖1.1 A為坐標矩陣,C為原始矩陣,R是A和C矩陣相乘記過,那麼可以知道:(矩陣知識,大學沒學好的傷不起啊)
x' = a*x + b*y + c
y' = d*x + b*y + f
最後一列很少有資料提到,不過初始值g=h=0,大家可以去改變值試試,變化為3D效果,但是值沒看出規律,那麼i為縮放比例,初始值為1。
初始化坐標矩陣為{1,0,0, 0,1,0, 0,0,1}
上面講到的是基本的算法,那麼具體這個矩陣x行x列的值代表上面呢,不防簡單的來看看
如果A={1,0,100, 0,1,-100, 0,0,2},那麼可以算出來
x' = x + 100;
y' = y - 100;
也即在原始的基礎上右移100,上移100,單位為像素。第三列第三行為2,表示為以前比例的1/2,記住這塊容易弄錯。
下面給出具體坐標對應變形的屬性
|scaleX, skewX, translateX|
|skewY, scaleY, translateY|
|0 ,0 , scale |
實踐
通過代碼來看看具體的用法
復制代碼 代碼如下:
public class MatrixTransformView extends View {
private Matrix mMatrix;
private Paint mPaint = new Paint(Paint.ANTI_ALIAS_FLAG);
private Bitmap mBitmap;
public MatrixTransformView(Context context) {
super(context);
}
public MatrixTransformView(Context context, AttributeSet attrs) {
super(context, attrs);
}
public void setDrawable(int resId) {
mBitmap = BitmapFactory.decodeResource(getContext().getResources(), resId);
}
/*
* 設置矩陣,並重繪
*/
public void setMatrixValues(float[] array) {
if (mMatrix == null) {
mMatrix = new Matrix();
}
mMatrix.reset();
mMatrix.setValues(array);
invalidate();
}
public void resetMatrix() {
if (mMatrix != null) {
mMatrix.reset();
}
invalidate();
}
@Override
protected void onDraw(Canvas canvas) {
if (mMatrix != null) {
Paint paint = mPaint;
canvas.drawBitmap(mBitmap, mMatrix, paint);
}
super.onDraw(canvas);
}
}
通過Matrix的setValues方法,將3*3的矩陣坐標值進行設置即可。
強調的一點是,在調用setMatrixValues的時候需要調用invalidate方法,讓View進行調用onDraw進行重繪。
矩陣的基本用法就是這些,往往在開發過程中,不直接通過矩陣坐標去實現變形,因為如果要實現選擇,那麼就比較復雜了,涉及到三角函數,對於數據早已經忘差不多的人,很是痛苦,當然如果非要用的話,算起來也不難。
那麼為了避免直接使用矩陣坐標來操作變形,Matrix類提供方法來進行變:
set方式:setScale, setSkew, setTranslate, setRotate
post方式:postScale, postSkew, postTranslate, postRotate
pre方式:preScale, preSkew, preTranslate, preRotate
set方式為直接設置,每一次調用set方法都會先重置矩陣。post可以理解成設置多次有效,效果是累加的。pre這裡暫且理解成和post方式完全一樣,後面3D的時候再糾結。
看代碼:
復制代碼 代碼如下:
public class MatrixTransformView extends View {
private Matrix mMatrix;
private Paint mPaint = new Paint(Paint.ANTI_ALIAS_FLAG);
private Bitmap mBitmap;
public MatrixTransformView(Context context) {
super(context);
}
public MatrixTransformView(Context context, AttributeSet attrs) {
super(context, attrs);
}
public void setDrawable(int resId) {
mBitmap = BitmapFactory.decodeResource(getContext().getResources(), resId);
}
/*
* 設置矩陣,並重繪
*/
public void setMatrixValues(float[] array) {
if (mMatrix == null) {
mMatrix = new Matrix();
}
mMatrix.reset();
mMatrix.setValues(array);
invalidate();
}
public void postMatrixScale(float scaleX, float scaleY, float centerX, float centerY) {
if (mMatrix == null) {
mMatrix = new Matrix();
}
mMatrix.preScale(scaleX, scaleY, centerX, centerY);
invalidate();
}
public void postMatrixSkew(float skewX, float skewY, float centerX, float centerY) {
if (mMatrix == null) {
mMatrix = new Matrix();
}
mMatrix.postSkew(skewX, skewY, centerX, centerY);
invalidate();
}
public void postMatrixTranslate(float translateX, float translateY) {
if (mMatrix == null) {
mMatrix = new Matrix();
}
mMatrix.postTranslate(translateX, translateY);
invalidate();
}
public void postMatrixRotate(float degree, float centerX, float centerY) {
if (mMatrix == null) {
mMatrix = new Matrix();
}
mMatrix.postRotate(degree, centerX, centerY);
invalidate();
}
public void resetMatrix() {
if (mMatrix != null) {
mMatrix.reset();
}
invalidate();
}
@Override
protected void onDraw(Canvas canvas) {
if (mMatrix != null) {
Paint paint = mPaint;
canvas.drawBitmap(mBitmap, mMatrix, paint);
}
super.onDraw(canvas);
}
}
Matrix的基本用法就這麼多。
擴展
變形是需要canvas來進行繪制的,canvas的繪制需要bitmap,所以這塊利用一個繼承自View的控件,通過setDrawable方式設置bitmap,那麼選擇目標必須是個bitmap,在文章的demo中,通過參數為int型resource的setDrawable方法進行bitmap獲取,如果想對別的控件進行變形,例如ViewGroup,可以通過如下方式:
復制代碼 代碼如下:
Matrix m = new Matrix();
m.setValues(new float[] {
1, 0, 0,
0, 1, 0,
0, 0, 1
});
Bitmap bp = Bitmap.createBitmap(viewGroup.getWidth(), viewGroup.getHeight(), Bitmap.Config.RGB_565);
Canvas can = new Canvas(bp);
viewGroup.draw(can);
bp = Bitmap.createBitmap(bp, 0, 0, bp.getWidth(), bp.getHeight(), m, true);
img.setImageBitmap(bp);
通過將ViewGroup轉換成Bitmap,然後自定義一個Image來變形,隱藏ViewGroup來達到效果。
疑問
1.如果誰知道post,pre的區別,請告訴我下,看看我的理解是否正確。
2.能否實現ViewGroup直接變形,而非我上面講的那種。
 VLC for Android 基於 Opencv 對 RTSP視頻 實時人臉檢測
最近項目上需要在Android客戶端 通過獲取 RTSP 的視頻進行實時人臉檢測, 要做就就是以下幾點:1、通過VLC 獲取 獲取RTSP2、對VLC中播放的視頻進行實時
 Android程序開發之Listview下拉刷新上拉(滑動分頁)加載更多
最近做的類似於微博的項目中,有個Android功能要使用到listview的向下拉刷新來刷新最新消息,向上拉刷新(滑動分頁)來加載更多。新浪微博就是使用這種方式的典型。當
 AndroidStuio快速發布開源項目到Jcenter/Bintray
前言最近做了兩個開源項目,一個是Android網絡框架NoHttp,和Volley、OkHttp一樣做客戶端請求的,更多相關信息請百度哦;另一個是Android Web服
 Android循環滾動廣告條的完美實現,封裝方便,平滑過渡,從網絡加載圖片,點擊廣告進入對應網址
今天給大家帶來一點干貨,就是橫向循環滾動的廣告條。有點類似淘寶的banner廣告位,可以手勢滑動,也會依據固定時間間隔自動滾動,滑到盡頭時會一直循環。過渡非常