編輯:關於Android編程
Cocos2d-x從2.x版本到上周剛剛才發布的Cocos2d-x 3.0 Final版,其引擎驅動核心依舊是一個單線程的“死循環”,一旦某一幀遇到了“大活兒”,比如Size很大的紋理資源加載或網絡IO或大量計算,畫面將 不可避免出現卡頓以及響應遲緩的現象。從古老的Win32 GUI編程那時起,Guru們就告訴我們:別阻塞主線程(UI線程),讓Worker線程去做那些“大活兒”吧。
手機游戲,即便是休閒類的小游戲,往往也涉及大量紋理資源、音視頻資源、文件讀寫以及網絡通信,處理的稍有不甚就會出現畫面卡頓,交互不暢的情況。雖然引擎在某些方面提供了一些支持,但有些時候還是自己祭出Worker線程這個法寶比較靈活,下面就以Cocos2d-x 3.0 Final版游戲初始化為例(針對Android平台),說說如何進行多線程資源加載。
我們經常看到一些手機游戲,啟動之後首先會顯示一個帶有公司Logo的閃屏畫面(Flash Screen),然後才會進入一個游戲Welcome場景,點擊“開始”才正式進入游戲主場景。而這裡Flash Screen的展示環節往往在後台還會做另外一件事,那就是加載游戲的圖片資源,音樂音效資源以及配置數據讀取,這算是一個“障眼法”吧,目的就是提高用 戶體驗,這樣後續場景渲染以及場景切換直接使用已經cache到內存中的數據即可,無需再行加載。
一、為游戲添加FlashScene
在游戲App初始化時,我們首先創建FlashScene,讓游戲盡快顯示FlashScene畫面:
復制代碼 代碼如下:
// AppDelegate.cpp
bool AppDelegate::applicationDidFinishLaunching() {
… …
FlashScene* scene = FlashScene::create();
pDirector->runWithScene(scene);
return true;
}
在FlashScene init時,我們創建一個Resource Load Thread,我們用一個ResourceLoadIndicator作為渲染線程與Worker線程之間交互的媒介。
復制代碼 代碼如下:
//FlashScene.h
struct ResourceLoadIndicator {
pthread_mutex_t mutex;
bool load_done;
void *context;
};
class FlashScene : public Scene
{
public:
FlashScene(void);
~FlashScene(void);
virtual bool init();
CREATE_FUNC(FlashScene);
bool getResourceLoadIndicator();
void setResourceLoadIndicator(bool flag);
private:
void updateScene(float dt);
private:
ResourceLoadIndicator rli;
};
// FlashScene.cpp
bool FlashScene::init()
{
bool bRet = false;
do {
CC_BREAK_IF(!CCScene::init());
Size winSize = Director::getInstance()->getWinSize();
//FlashScene自己的資源只能同步加載了
Sprite *bg = Sprite::create("FlashSceenBg.png");
CC_BREAK_IF(!bg);
bg->setPosition(ccp(winSize.width/2, winSize.height/2));
this->addChild(bg, 0);
this->schedule(schedule_selector(FlashScene::updateScene)
, 0.01f);
//start the resource loading thread
rli.load_done = false;
rli.context = (void*)this;
pthread_mutex_init(&rli.mutex, NULL);
pthread_attr_t attr;
pthread_attr_init(&attr);
pthread_attr_setdetachstate(&attr, PTHREAD_CREATE_DETACHED);
pthread_t thread;
pthread_create(&thread, &attr,
resource_load_thread_entry, &rli);
bRet=true;
} while(0);
return bRet;
}
static void* resource_load_thread_entry(void* param)
{
AppDelegate *app = (AppDelegate*)Application::getInstance();
ResourceLoadIndicator *rli = (ResourceLoadIndicator*)param;
FlashScene *scene = (FlashScene*)rli->context;
//load music effect resource
… …
//init from config files
… …
//load images data in worker thread
SpriteFrameCache::getInstance()->addSpriteFramesWithFile(
"All-Sprites.plist");
… …
//set loading done
scene->setResourceLoadIndicator(true);
return NULL;
}
bool FlashScene::getResourceLoadIndicator()
{
bool flag;
pthread_mutex_lock(&rli.mutex);
flag = rli.load_done;
pthread_mutex_unlock(&rli.mutex);
return flag;
}
void FlashScene::setResourceLoadIndicator(bool flag)
{
pthread_mutex_lock(&rli.mutex);
rli.load_done = flag;
pthread_mutex_unlock(&rli.mutex);
return;
}
我們在定時器回調函數中對indicator標志位進行檢查,當發現加載ok後,切換到接下來的游戲開始場景:
復制代碼 代碼如下:
void FlashScene::updateScene(float dt)
{
if (getResourceLoadIndicator()) {
Director::getInstance()->replaceScene(
WelcomeScene::create());
}
}
到此,FlashScene的初始設計和實現完成了。Run一下試試吧。
二、解決崩潰問題
在GenyMotion的4.4.2模擬器上,游戲運行的結果並沒有如我期望,FlashScreen顯現後游戲就異常崩潰退出了。
通過monitor分析游戲的運行日志,我們看到了如下一些異常日志:
復制代碼 代碼如下:
threadid=24: thread exiting, not yet detached (count=0)
threadid=24: thread exiting, not yet detached (count=1)
threadid=24: native thread exited without detaching
很是奇怪啊,我們在創建線程時,明明設置了 PTHREAD_CREATE_DETACHED屬性了啊:
復制代碼 代碼如下:pthread_attr_setdetachstate(&attr, PTHREAD_CREATE_DETACHED);
怎麼還會出現這個問題,而且居然有三條日志。翻看了一下引擎內核的代碼TextureCache::addImageAsync,在線程創建以及線程主函數中也沒有發現什麼特別的設置。為何內核可以創建線程,我自己創建就會崩潰呢。Debug多個來回,問題似乎聚焦在resource_load_thread_entry中執行的任務。在我的代碼裡,我利用SimpleAudioEngine加載了音效資源、利用UserDefault讀取了一些持久化的數據,把這兩個任務去掉,游戲就會進入到下一個環節而不會崩潰。
SimpleAudioEngine和UserDefault能有什麼共同點呢?Jni調用。沒錯,這兩個接口底層要適配多個平台,而對於Android 平台,他們都用到了Jni提供的接口去調用Java中的方法。而Jni對多線程是有約束的。Android開發者官網上有這麼一段話:
復制代碼 代碼如下:
All threads are Linux threads, scheduled by the kernel. They're usually started from managed code (using Thread.start), but they can also be created elsewhere and then attached to the JavaVM. For example, a thread started with pthread_create can be attached with the JNI AttachCurrentThread or AttachCurrentThreadAsDaemon functions. Until a thread is attached, it has no JNIEnv, and cannot make JNI calls.
由此看來pthread_create創建的新線程默認情況下是不能進行Jni接口調用的,除非Attach到Vm,獲得一個JniEnv對象,並且在線 程exit前要Detach Vm。好,我們來嘗試一下,Cocos2d-x引擎提供了一些JniHelper方法,可以方便進行Jni相關操作。
復制代碼 代碼如下:
#if (CC_TARGET_PLATFORM == CC_PLATFORM_ANDROID)
#include "platform/android/jni/JniHelper.h"
#include <jni.h>
#endif
static void* resource_load_thread_entry(void* param)
{
… …
JavaVM *vm;
JNIEnv *env;
vm = JniHelper::getJavaVM();
JavaVMAttachArgs thread_args;
thread_args.name = "Resource Load";
thread_args.version = JNI_VERSION_1_4;
thread_args.group = NULL;
vm->AttachCurrentThread(&env, &thread_args);
… …
//Your Jni Calls
… …
vm->DetachCurrentThread();
… …
return NULL;
}
關於什麼是JavaVM,什麼是JniEnv,Android Developer官方文檔中是這樣描述的:
The JavaVM provides the "invocation interface" functions, which allow you to create and destroy a JavaVM. In theory you can have multiple JavaVMs per process, but Android only allows one.
The JNIEnv provides most of the JNI functions. Your native functions all receive a JNIEnv as the first argument.
The JNIEnv is used for thread-local storage. For this reason, you cannot share a JNIEnv between threads.
三、解決黑屏問題
上面的代碼成功解決了線程崩潰的問題,但問題還沒完,因為接下來我們又遇到了“黑屏”事件。所謂的“黑屏”,其實並不是全黑。但進入游戲 WelcomScene時,只有Scene中的LabelTTF實例能顯示出來,其余Sprite都無法顯示。顯然肯定與我們在Worker線程加載紋理 資源有關了:
復制代碼 代碼如下:SpriteFrameCache::getInstance()->addSpriteFramesWithFile("All-Sprites.plist");
我們通過碎圖壓縮到一張大紋理的方式建立SpriteFrame,這是Cocos2d-x推薦的優化手段。但要想找到這個問題的根源,還得看monitor日志。我們的確發現了一些異常日志:
復制代碼 代碼如下:libEGL: call to OpenGL ES API with no current context (logged once per thread)
通過Google得知,只有Renderer Thread才能進行egl調用,因為egl的context是在Renderer Thread創建的,Worker Thread並沒有EGL的context,在進行egl操作時,無法找到context,因此操作都是失敗的,紋理也就無法顯示出來。要解決這個問題就 得查看一下TextureCache::addImageAsync是如何做的了。
TextureCache::addImageAsync只是在worker線程進行了image數據的加載,而紋理對象Texture2D instance則是在addImageAsyncCallBack中創建的。也就是說紋理還是在Renderer線程中創建的,因此不會出現我們上面的 “黑屏”問題。模仿addImageAsync,我們來修改一下代碼:
復制代碼 代碼如下:
static void* resource_load_thread_entry(void* param)
{
… …
allSpritesImage = new Image();
allSpritesImage->initWithImageFile("All-Sprites.png");
… …
}
void FlashScene::updateScene(float dt)
{
if (getResourceLoadIndicator()) {
// construct texture with preloaded images
Texture2D *allSpritesTexture = TextureCache::getInstance()->
addImage(allSpritesImage, "All-Sprites.png");
allSpritesImage->release();
SpriteFrameCache::getInstance()->addSpriteFramesWithFile(
"All-Sprites.plist", allSpritesTexture);
Director::getInstance()->replaceScene(WelcomeScene::create());
}
}
完成這一修改後,游戲畫面就變得一切正常了,多線程資源加載機制正式生效。
 Android動態部署六:如何從插件apk中啟動BroadcastReceiver和ContentProvider
實現Android動態部署的過程中最重要的是從插件apk中啟動四大組件,經過前面幾篇文章的分析,現在只剩下BroadcastReceiver和ContentProvide
 Android自定義View之組合控件 ---- LED數字時鐘
先上圖 LEDView效果如圖所示。 之前看到一篇博客使用兩個TextView實現了該效果,於是我想用自定義控件的方式實現一個LEDView,使用時即可直接使用該控件。
 OpenCV實現SfM(三):多目三維重建
注意:本文中的代碼必須使用OpenCV3.0或以上版本進行編譯,因為很多函數是3.0以後才加入的。 問題簡化終於有時間來填坑了,這次一口氣將雙目重建擴展為多目重建吧。首先
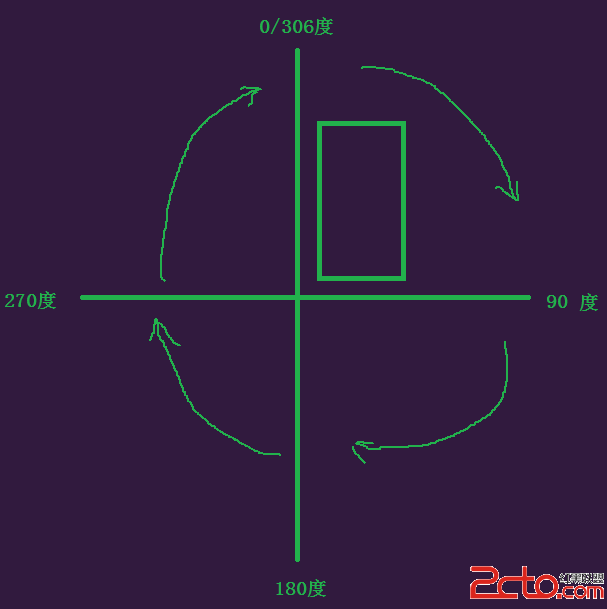 Android時時監測手機的旋轉角度 根據旋轉角度確定在什麼角度加載豎屏布局 在什麼時候加載橫屏布局
一、場景描述:近期開發中遇到個問題,就是我們在做橫豎屏切換的功能時,橫豎屏布局是操作系統去感知的,作為開發員沒法確定Activity在什麼時候加載橫屏布局,在什麼時候加載