編輯:關於Android編程
Android中提供的HttpURLConnection和HttpClient接口可以用來開發HTTP程序。以下是學習中的一些經驗。
1、HttpURLConnection接口
首先需要明確的是,Http通信中的POST和GET請求方式的不同。GET可以獲得靜態頁面,也可以把參數放在URL字符串後面,傳遞給服務器。而POST方法的參數是放在Http請求中。因此,在編程之前,應當首先明確使用的請求方法,然後再根據所使用的方式選擇相應的編程方式。HttpURLConnection是繼承於URLConnection類,二者都是抽象類。其對象主要通過URL的openConnection方法獲得。創建方法如下代碼所示:
復制代碼 代碼如下:
URL url = new URL("http://www.xxx.com/index.jsp?type=231");
HttpURLConnection urlConn=(HttpURLConnection)url.openConnection();
通過以下方法可以對請求的屬性進行一些設置,如下所示:
復制代碼 代碼如下:
//設置輸入和輸出流
urlConn.setDoOutput(true);
urlConn.setDoInput(true);
//設置請求方式為POST
urlConn.setRequestMethod("POST");
//POST請求不能使用緩
urlConn.setUseCaches(false);
urlConn.disConnection();
HttpURLConnection默認使用GET方式,例如下面代碼所示:
復制代碼 代碼如下:
HttpURLConnection urlConn = (HttpURLConnection) url.openConnection();
InputStreamReader in = new InputStreamReader(urlConn.getInputStream());
BufferedReader buffer = new BufferedReader(in);
String inputLine = null;
while (((inputLine = buffer.readLine()) != null)) {
resultData += inputLine + "\n";
}
in.close();
urlConn.disconnect();
如果需要使用POST方式,則需要setRequestMethod設置。代碼如下:
復制代碼 代碼如下:
String httpUrl = "http://www.xxx.com/getUser.jsp";
String resultData = "";
URL url = null;
try {
url = new URL(httpUrl);
} catch (MalformedURLException e) {
Log.e(DEBUG_TAG, "MalformedURLException");
}
if (url != null) {
try {
HttpURLConnection urlConn = (HttpURLConnection) url.openConnection();
//因為這個是post請求,設立需要設置為true
urlConn.setDoOutput(true);
urlConn.setDoInput(true);
urlConn.setRequestMethod("POST"); // 設置以POST方式
urlConn.setUseCaches(false);
urlConn.setInstanceFollowRedirects(true);
urlConn.setRequestProperty("Content-Type","application/x-www-form-urlencoded");
// 這些配置必須要在connect之前完成,
// 要注意的是connection.getOutputStream會隱含的進行connect。
urlConn.connect();
// DataOutputStream流
DataOutputStream out = new DataOutputStream(urlConn.getOutputStream());
String content = "name=" + URLEncoder.encode("張三", "GB2312");
out.writeBytes(content);
out.flush();
out.close();
} catch(Exception e) {
//
}
}
2、HttpClient接口
使用Apache提供的HttpClient接口同樣可以進行HTTP操作。對於GET和POST請求方法的操作有所不同。GET方法的操作代碼示例如下:
復制代碼 代碼如下:
String httpUrl = "http://www.xxx.com/getUser.jsp?par=123";
// HttpGet連接對象
HttpGet httpRequest = new HttpGet(httpUrl);
HttpClient httpclient = new DefaultHttpClient();
HttpResponse httpResponse = httpclient.execute(httpRequest);
// 請求成功
if (httpResponse.getStatusLine().getStatusCode() == HttpStatus.SC_OK) {
// 取得返回的字符串
String strResult = EntityUtils.toString(httpResponse.getEntity());
mTextView.setText(strResult);
} else {
mTextView.setText("請求錯誤!");
}
使用POST方法進行參數傳遞時,需要使用NameValuePair來保存要傳遞的參數。另外,還需要設置所使用的字符集。代碼如下所示:
復制代碼 代碼如下:
String httpUrl = "http://www.xxx.com/getUser.jsp";
HttpPost httpRequest = new HttpPost(httpUrl);
List<NameValuePair> params = new ArrayList<NameValuePair>();
params.add(new BasicNameValuePair("userId", "123"));
HttpEntity httpentity = new UrlEncodedFormEntity(params, "GB2312"); //設置字符集
httpRequest.setEntity(httpentity);
//取得默認的HttpClient
HttpClient httpclient = new DefaultHttpClient();
//取得HttpResponse
HttpResponse httpResponse = httpclient.execute(httpRequest);
//HttpStatus.SC_OK表示連接成功
if (httpResponse.getStatusLine().getStatusCode() == HttpStatus.SC_OK) {
// 取得返回的字符串
String strResult = EntityUtils.toString(httpResponse.getEntity());
mTextView.setText(strResult);
} else {
mTextView.setText("請求錯誤!");
}
HttpClient實際上是對Java提供方法的一些封裝,在HttpURLConnection中的輸入輸出流操作,在這個接口中被統一封裝成了HttpPost(HttpGet)和HttpResponse,這樣,就減少了操作的繁瑣性。
以上所述就是本文的全部內容了,希望大家能夠喜歡。
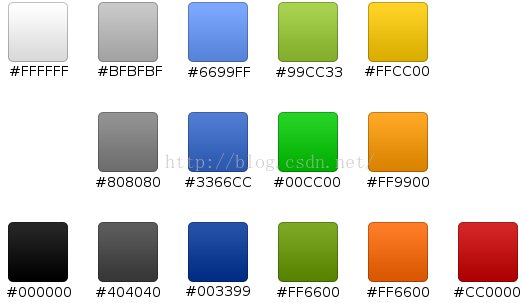 Android進階(二十四)Android UI---界面開發推薦顏色
在Android開發過程中,總要給app添加一些背景,個人認為使用純色調便可以達到優雅的視覺效果。補充一些常用的顏色值:colors.xml #ffffff #f
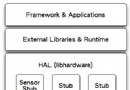 Ubuntu中為Android簡單介紹硬件抽象層(HAL)
Android的硬件抽象層,簡單來說,就是對Linux內核驅
 Android 將Activity及其他類打包成jar包供第三方調用
在開發java工程時,一個項目可能分為多個模塊,為了實現模塊間的解耦和獨立,提高模塊的復用性,通常將項目按模塊分為多個java工程進行開發,最後通過jar包等工
 Android網絡圖片異步加載
前言 其實很幸運,入職一周之後就能跟著兩個師兄做android開發,師兄都是大神,身為小白的我只能多多學習,多多努力。最近一段時間都忙的沒機會總結,今天剛完成了andro