編輯:關於Android編程
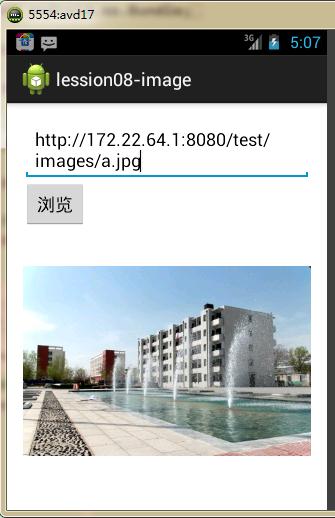
本文實例講述了Android互聯網訪問圖片並在客戶端顯示的方法。分享給大家供大家參考,具體如下:
1、布局界面
<RelativeLayout xmlns:android="http://schemas.android.com/apk/res/android"
 xmlns:tools="http://schemas.android.com/tools"
 android:layout_width="match_parent"
 android:layout_height="match_parent"
 android:paddingBottom="@dimen/activity_vertical_margin"
 android:paddingLeft="@dimen/activity_horizontal_margin"
 android:paddingRight="@dimen/activity_horizontal_margin"
 android:paddingTop="@dimen/activity_vertical_margin"
 tools:context=".MainActivity" >
 <EditText
  android:id="@+id/url_text"
  android:layout_width="wrap_content"
  android:layout_height="wrap_content"
  android:layout_alignParentLeft="true"
  android:layout_alignParentRight="true"
  android:layout_alignParentTop="true"
  android:ems="10"
  android:inputType="textPostalAddress"
  android:text="@string/url_text" >
  <requestFocus />
 </EditText>
 <Button
  android:id="@+id/btn_text"
  android:layout_width="wrap_content"
  android:layout_height="wrap_content"
  android:layout_alignLeft="@+id/url_text"
  android:layout_below="@+id/url_text"
  android:layout_marginTop="32dp"
  android:onClick="sendHttp"
  android:text="@string/btn_text" />
 <ImageView
  android:id="@+id/iv_ie"
  android:layout_width="wrap_content"
  android:layout_height="wrap_content"
  android:layout_alignParentBottom="true"
  android:layout_alignParentLeft="true"
  android:layout_alignRight="@+id/url_text"
  android:layout_below="@+id/btn_text"
  android:src="@drawable/ic_launcher" />
</RelativeLayout>
2、封轉的一些類
URL的封裝:
package com.example.lession08_code.utis;
import java.io.InputStream;
import java.net.HttpURLConnection;
import java.net.URL;
import android.graphics.Bitmap;
import android.graphics.BitmapFactory;
public class HttpUtils {
 public static String sendGet(String path){
  String content=null;
  try{
   //設置訪問的url
   URL url=new URL(path);
   //打開請求
   HttpURLConnection httpURLConnection=(HttpURLConnection) url.openConnection();
   //設置請求的信息
   httpURLConnection.setRequestMethod("GET");
   //設置請求是否超時
   httpURLConnection.setConnectTimeout(5000);
   //判斷服務器是否響應成功
   if(httpURLConnection.getResponseCode()==200){
    //獲取響應的輸入流對象
    InputStream is=httpURLConnection.getInputStream();
    byte data[]=StreamTools.isTodata(is);
    //把轉換成字符串
    content=new String(data);
    //內容編碼方式
    if(content.contains("gb2312")){
     content=new String(data,"gb2312");
    }
   }
   //斷開連接
   httpURLConnection.disconnect();
  }catch(Exception e){
   e.printStackTrace();
  }
  return content;
 }
 public static Bitmap sendGets(String path){
  Bitmap bitmap=null;
  try{
   //設置訪問的url
   URL url=new URL(path);
   //打開請求
   HttpURLConnection httpURLConnection=(HttpURLConnection) url.openConnection();
   //設置請求的信息
   httpURLConnection.setRequestMethod("GET");
   //設置請求是否超時
   httpURLConnection.setConnectTimeout(5000);
   //判斷服務器是否響應成功
   if(httpURLConnection.getResponseCode()==200){
    //獲取響應的輸入流對象
    InputStream is=httpURLConnection.getInputStream();
    //直接把is的流轉換成Bitmap對象
    bitmap=BitmapFactory.decodeStream(is);
   }
   //斷開連接
   httpURLConnection.disconnect();
  }catch(Exception e){
   e.printStackTrace();
  }
  return bitmap;
 }
}
判斷網絡是否連接的封裝類
package com.example.lession08_code.utis;
import android.app.AlertDialog;
import android.content.ComponentName;
import android.content.Context;
import android.content.DialogInterface;
import android.content.Intent;
import android.net.ConnectivityManager;
import android.net.NetworkInfo;
import android.widget.Toast;
public class NetWorkUtils {
 private Context context;
 // 網路鏈接管理對象
 public ConnectivityManager connectivityManager;
 public NetWorkUtils(Context context) {
  this.context = context;
  // 獲取網絡鏈接的對象
  connectivityManager = (ConnectivityManager) context
    .getSystemService(Context.CONNECTIVITY_SERVICE);
 }
 public boolean setActiveNetWork() {
  boolean flag=false;
  // 獲取可用的網絡鏈接對象
  NetworkInfo networkInfo = connectivityManager.getActiveNetworkInfo();
  if (networkInfo == null) {
   new AlertDialog.Builder(context)
     .setTitle("網絡不可用")
     .setMessage("可以設置網絡?")
     .setPositiveButton("確認",
       new DialogInterface.OnClickListener() {
        @Override
        public void onClick(DialogInterface dialog,
          int which) {
         Toast.makeText(context, "點擊確認",
           Toast.LENGTH_LONG).show();
         // 聲明意圖
         Intent intent = new Intent();
         intent.setAction(Intent.ACTION_MAIN);
         intent.addCategory("android.intent.category.LAUNCHER");
         intent.setComponent(new ComponentName(
           "com.android.settings",
           "com.android.settings.Settings"));
         intent.setFlags(0x10200000);
         // 執行意圖
         context.startActivity(intent);
        }
       })
     .setNegativeButton("取消",
       new DialogInterface.OnClickListener() {
        @Override
        public void onClick(DialogInterface dialog,
          int which) {
        }
       }).show();// 必須.show();
  }
  if(networkInfo!=null){
   flag=true;
  }
  return flag;
 }
}
輸出流的封裝類
package com.example.lession08_code.utis;
import java.io.ByteArrayOutputStream;
import java.io.IOException;
import java.io.InputStream;
public class StreamTools {
 public static byte[] isTodata(InputStream is) throws IOException{
  //字節輸出流
  ByteArrayOutputStream bops=new ByteArrayOutputStream();
  //讀取數據的緩沖區
  byte buffer[]=new byte[1024];
  //讀取記錄的長度
  int len=0;
  while((len=is.read(buffer))!=-1){
   bops.write(buffer, 0, len);
  }
  //把讀取的內容轉換成byte數組
  byte data[]=bops.toByteArray();
  return data;
 }
}
注意:在這裡還需要加權限問題
<uses-permission android:name="android.permission.ACCESS_NETWORK_STATE"/>
<uses-permission android:name="android.permission.INTERNET"/>
希望本文所述對大家Android程序設計有所幫助。
 Android繪制一條寬度逐漸變大的路徑
1.介紹先看一下效果圖用過電腦版印象筆記演示功能的應該知道這個效果,現在想在手機上實現一下,當然這個是最終的目標,這篇只是介紹實現過程中的一步 —&mdash
 Android中Notification用法實例總結
本文實例總結了 Android中Notification用法。分享給大家供大家參考,具體如下:我們在用手機的時候,如果來了短信,而我們沒有點擊查看的話,是不是在手機的最上
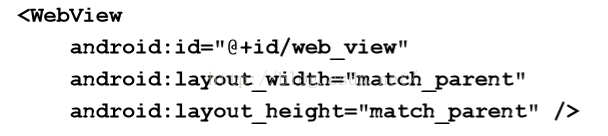 Android 網絡
WebView用法參考:《第一行代碼》布局文件:主體代碼: MainActivity中的代碼也很短,首先使用 findViewById()方法獲取到了 WebV
 用android-sdk工具裡的lint檢查布局的錯誤、警告和合理性
當然現在不用這個工具也可,目前可以直接在布局中非常直觀地觀察到布局當中的錯誤和警告。不過有eclipse難免會報錯的時候,多知道一點沒什麼不好 以前這個工具不叫lint而