編輯:關於Android編程
本文實例講述了Android編程實現仿優酷旋轉菜單效果。分享給大家供大家參考,具體如下:
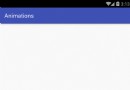
首先,看下效果:
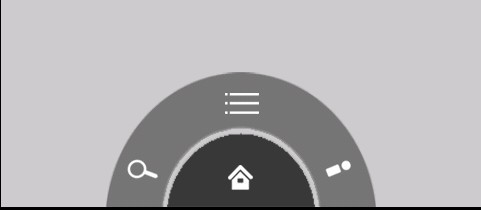

不好意思,不會制作動態圖片,只好上傳靜態的了,如果誰會,請教教我吧。
首先,看下xml文件:
<?xml version="1.0" encoding="utf-8"?>
<RelativeLayout xmlns:android="http://schemas.android.com/apk/res/android"
  android:layout_width="fill_parent"
  android:layout_height="fill_parent"
  android:background="#c9c9c9" >
  <RelativeLayout
    android:id="@+id/relate_level3"
    android:layout_width="280dp"
    android:layout_height="140dp"
    android:layout_alignParentBottom="true"
    android:layout_centerHorizontal="true"
    android:background="@drawable/level3" >
    <ImageButton
     android:id="@+id/c1"
     android:layout_width="wrap_content"
     android:layout_height="wrap_content"
     android:layout_alignParentBottom="true"
     android:layout_marginBottom="6dip"
     android:layout_marginLeft="12dip"
     android:background="@drawable/channel1" />
    <ImageButton
     android:id="@+id/c2"
     android:layout_width="wrap_content"
     android:layout_height="wrap_content"
     android:layout_above="@+id/c1"
     android:layout_marginBottom="12dip"
     android:layout_marginLeft="28dip"
     android:background="@drawable/channel2" />
    <ImageButton
     android:id="@+id/c3"
     android:layout_width="wrap_content"
     android:layout_height="wrap_content"
     android:layout_above="@+id/c2"
     android:layout_marginBottom="8dip"
     android:layout_marginLeft="6dip"
     android:layout_toRightOf="@+id/c2"
     android:background="@drawable/channel3" />
    <ImageButton
     android:id="@+id/c4"
     android:layout_width="wrap_content"
     android:layout_height="wrap_content"
     android:layout_centerHorizontal="true"
     android:layout_margin="6dip"
     android:background="@drawable/channel4" />
    <ImageButton
     android:id="@+id/c5"
     android:layout_width="wrap_content"
     android:layout_height="wrap_content"
     android:layout_above="@+id/c6"
     android:layout_marginBottom="8dip"
     android:layout_marginRight="6dip"
     android:layout_toLeftOf="@+id/c6"
     android:background="@drawable/channel5" />
    <ImageButton
     android:id="@+id/c6"
     android:layout_width="wrap_content"
     android:layout_height="wrap_content"
     android:layout_above="@+id/c7"
     android:layout_alignParentRight="true"
     android:layout_marginBottom="12dip"
     android:layout_marginRight="28dip"
     android:background="@drawable/channel6" />
    <ImageButton
     android:id="@+id/c7"
     android:layout_width="wrap_content"
     android:layout_height="wrap_content"
     android:layout_alignParentBottom="true"
     android:layout_alignParentRight="true"
     android:layout_marginBottom="6dip"
     android:layout_marginRight="12dip"
     android:background="@drawable/channel7" />
  </RelativeLayout>
  <RelativeLayout
    android:id="@+id/relate_level2"
    android:layout_width="180dp"
    android:layout_height="90dp"
    android:layout_alignParentBottom="true"
    android:layout_centerHorizontal="true"
    android:background="@drawable/level2" >
    <ImageButton
     android:id="@+id/menu"
     android:layout_width="wrap_content"
     android:layout_height="wrap_content"
     android:layout_centerHorizontal="true"
     android:layout_margin="6dip"
     android:background="@drawable/icon_menu" />
    <ImageButton
     android:id="@+id/search"
     android:layout_width="wrap_content"
     android:layout_height="wrap_content"
     android:layout_alignParentBottom="true"
     android:layout_margin="10dip"
     android:background="@drawable/icon_search" />
    <ImageButton
     android:id="@+id/myyouku"
     android:layout_width="wrap_content"
     android:layout_height="wrap_content"
     android:layout_alignParentBottom="true"
     android:layout_alignParentRight="true"
     android:layout_margin="10dip"
     android:background="@drawable/icon_myyouku" />
  </RelativeLayout>
  <RelativeLayout
    android:id="@+id/relate_level1"
    android:layout_width="100dp"
    android:layout_height="50dp"
    android:layout_alignParentBottom="true"
    android:layout_centerHorizontal="true"
    android:background="@drawable/level1" >
    <ImageButton
     android:id="@+id/home"
     android:layout_width="wrap_content"
     android:layout_height="wrap_content"
     android:layout_alignParentBottom="true"
     android:layout_centerHorizontal="true"
     android:layout_marginBottom="10dp"
     android:background="@drawable/icon_home" />
  </RelativeLayout>
</RelativeLayout>
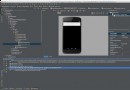
大家看到主要有三個RalativeLayout,就是大家看到的三層,但是關於圖片的傾斜 是怎樣實現的呢?實際上是個假象,圖片是正放的,裡面圖像是傾斜的。如下圖:

這樣大概能明白,下面就是開始動畫效果了,先看下主Activity:
public class TestYoukuActivity extends Activity {
  /** Called when the activity is first created. */
  private boolean areLevel2Showing = true, areLevel3Showing = true;
  private RelativeLayout relate_level2, relate_level3;
  private ImageButton home, menu;
  @Override
  public void onCreate(Bundle savedInstanceState) {
    super.onCreate(savedInstanceState);
    setContentView(R.layout.main);
    findViews();
    setListener();
  }
  private void findViews() {
    relate_level2 = (RelativeLayout) findViewById(R.id.relate_level2);
    relate_level3 = (RelativeLayout) findViewById(R.id.relate_level3);
    home = (ImageButton) findViewById(R.id.home);
    menu = (ImageButton) findViewById(R.id.menu);
  }
  private void setListener() {
    // 給大按鈕設置點擊事件
    home.setOnClickListener(new OnClickListener() {
     @Override
     public void onClick(View v) {
       if (!areLevel2Showing) {
        MyAnimation.startAnimationsIn(relate_level2, 500);
       } else {
        if (areLevel3Showing) {
          MyAnimation.startAnimationsOut(relate_level2, 500, 500);
          MyAnimation.startAnimationsOut(relate_level3, 500, 0);
          areLevel3Showing = !areLevel3Showing;
        } else {
          MyAnimation.startAnimationsOut(relate_level2, 500, 0);
        }
       }
       areLevel2Showing = !areLevel2Showing;
     }
    });
    menu.setOnClickListener(new OnClickListener() {
     @Override
     public void onClick(View v) {
       if (!areLevel3Showing) {
        MyAnimation.startAnimationsIn(relate_level3, 500);
       } else {
        MyAnimation.startAnimationsOut(relate_level3, 500, 0);
       }
       areLevel3Showing = !areLevel3Showing;
     }
    });
  }
}
應該注意到了:
復制代碼 代碼如下:MyAnimation.startAnimationsIn(relate_level2, 500);
看一下這個靜態方法的實現:
public static void startAnimationsIn(ViewGroup viewgroup, int durationMillis) {
    viewgroup.setVisibility(0);
    for (int i = 0; i < viewgroup.getChildCount(); i++) {
     viewgroup.getChildAt(i).setVisibility(0);
     viewgroup.getChildAt(i).setClickable(true);
     viewgroup.getChildAt(i).setFocusable(true);
    }
    Animation animation;
    animation = new RotateAnimation(-180, 0, Animation.RELATIVE_TO_SELF,
       0.5f, Animation.RELATIVE_TO_SELF, 1.0f);
    animation.setFillAfter(true);
    animation.setDuration(durationMillis);
    viewgroup.startAnimation(animation);
}
RotateAnimation是畫面轉移旋轉動畫效果,看一下它的構造方法:
RotateAnimation(Context context, AttributeSet attrs)
Constructor used when a RotateAnimation is loaded from a resource.
RotateAnimation(float fromDegrees, float toDegrees)
Constructor to use when building a RotateAnimation from code.
RotateAnimation(float fromDegrees, float toDegrees, float pivotX, float pivotY)
Constructor to use when building a RotateAnimation from code
RotateAnimation(float fromDegrees, float toDegrees, int pivotXType, float pivotXValue, int pivotYType, float pivotYValue)
Constructor to use when building a RotateAnimation from code
在這裡使用的是第四個構造方法:
fromDegrees:旋轉的開始角度。
toDegrees:旋轉的結束角度。
pivotXType:X軸的伸縮模式,可以取值為ABSOLUTE、RELATIVE_TO_SELF、RELATIVE_TO_PARENT。
pivotXValue:X坐標的伸縮值。
pivotYType:Y軸的伸縮模式,可以取值為ABSOLUTE、RELATIVE_TO_SELF、RELATIVE_TO_PARENT。
pivotYValue:Y坐標的伸縮值。
關於角度問題:
當角度為負數——表示逆時針旋轉
當角度為正數——表示順時針旋轉
(負數from——to正數:順時針旋轉)
(負數from——to負數:逆時針旋轉)
(正數from——to正數:順時針旋轉)
(正數from——to負數:逆時針旋轉)
關於pivotXValue:這一點的X坐標的對象被旋轉,在指定的絕對數字0是左邊邊緣。如果pivotXType數是絕對的這個值可以是一個絕對,另外也可以是百分比(在1.0為100%)。50%是x中點,100%為右邊緣。
同理,pivotYValue:這一點的Y坐標的對象被旋轉,在指定的絕對數字0是頂部邊緣。如果pivotYType數是絕對的這個值可以是一個絕對,另外也可以是百分比(在1.0為100%)。50%是Y中點,100%為下邊緣。
然後再看下調用的其他的方法:
setFillAfter:
If fillAfter is true, the transformation that this animation performed will persist when it is finished. Defaults to false if not set. Note that this applies when using an AnimationSet to chain animations. The transformation is not applied before the AnimationSet itself starts.
如果fillAfter為真,transformation 動畫將一直運行直到它完成。默認設置為假。注意:這適用於當使用一個AnimationSet連鎖動畫。transformation 是不適用AnimationSet本身之前開始。
setDuration:設置動畫時間。
再看一下退出:
// 圖標的動畫(出動畫)
public static void startAnimationsOut(final ViewGroup viewgroup,
     int durationMillis, int startOffset) {
    Animation animation;
    animation = new RotateAnimation(0, -180, Animation.RELATIVE_TO_SELF,
       0.5f, Animation.RELATIVE_TO_SELF, 1.0f);
    animation.setFillAfter(true);
    animation.setDuration(durationMillis);
    animation.setStartOffset(startOffset);
    animation.setAnimationListener(new Animation.AnimationListener() {
     @Override
     public void onAnimationStart(Animation arg0) {}
     @Override
     public void onAnimationRepeat(Animation arg0) {}
     @Override
     public void onAnimationEnd(Animation arg0) {
       viewgroup.setVisibility(8);
       for (int i = 0; i < viewgroup.getChildCount(); i++) {
        viewgroup.getChildAt(i).setVisibility(8);
        viewgroup.getChildAt(i).setClickable(false);
        viewgroup.getChildAt(i).setFocusable(false);
       }
     }
    });
    viewgroup.startAnimation(animation);
}
有一個animation.setStartOffset(startOffset);是設置animation多長時間以後執行。
最後:代碼下載地址:
此處本站下載。
希望本文所述對大家Android程序設計有所幫助。
 Android通過String.format格式化(動態改變)字符串資源的顯示內容
一、實現效果: 最近在項目中需要做類似於上圖顯示的效果,裡面的數字和稱謂是動態獲取的,對於這種顯示效果,有如下兩種解決方案來處理: (1)通過代碼動態設置TextVie
 華為榮耀v8和小米5哪個好 華為榮耀v8和小米5詳細圖文對比
華為榮耀V8和小米5之間的對比,一個是將性價比走到極致的小米5,一個是試圖擺脫互聯網標簽,進軍精工高端的榮耀V8,同為兩千元檔位的熱門機型,兩款手機的各個方
 android:Spinner(下拉框)控件的使用
1.效果圖 2.創建頁面文件(main.xml) 3.創建下拉框的數據源 List list = new A
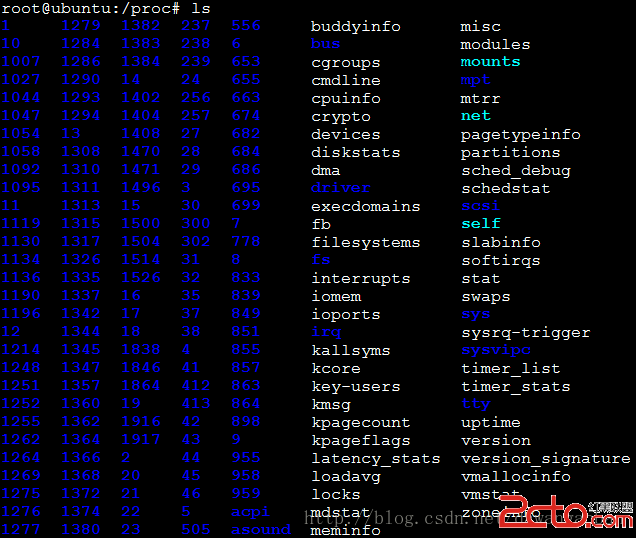 Android系統開發(8)——linx進程基本概念
一、proc文件系統傳統意義上的文件系統是用於塊設備上信息的存儲,/proc這個目錄是一個虛擬文件系統,它放置的數據都是在內存當中,所以這個目錄本身不占用任何硬盤空間。主