編輯:關於Android編程
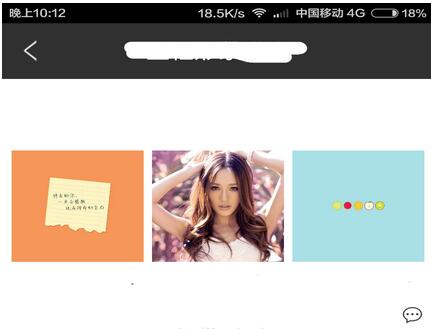
最近項目要求上傳多圖並且多圖顯示,而且要規則的顯示,就像微信朋友圈的圖片顯示一樣。
利用GridView再適合不過了,GridView可以動態加載圖片的數量,而且還比較規律,下面說一下自己的思路:
下面貼上部分源碼並給大家解析一下
一、首先是GridView的item
<com.view.SquareLayout xmlns:android="http://schemas.android.com/apk/res/android"
 android:layout_width="wrap_content"
 android:layout_height="wrap_content"
 android:orientation="vertical" >
 <ImageView
  android:id="@+id/item_grida_image"
  android:layout_width="match_parent"
  android:layout_height="match_parent"
  android:scaleType="fitXY"
  android:layout_margin="@dimen/tinyest_space">
 </ImageView>
</com.view.SquareLayout>
這裡的SquareLayout布局是自定義的下面會給大家詳細講解。
子項中是一個正方形布局裡面嵌套著圖片
二、接下來自定義適配器
因為項目需求不同,自己定義的適配器和平時用的不太一樣,這裡就不貼源碼了。大體上也是將圖片下載到本地,用Imageloader加載,不過我這裡有上傳失敗的和新建的,所以不太一樣。
三、最後在用到的Activity中設置
noScrollgridview = (GridView) findViewById(R.id.noScrollgridview);
  noScrollgridview.setNumColumns(3); //默認設置在3列圖片
  //上傳成功傳值給adapter
  picAdapter = new PictureAdapter(this, 1, appItem_file);
  noScrollgridview.setAdapter(picAdapter);


//根據圖片數量設置圖片的列
  int size = appItemFile.getFiles().split(",").length;
  if (size==1){
   noScrollgridview.setNumColumns(1);
  }
  else if (size==2){
   noScrollgridview.setNumColumns(2);
  }
  else if (size>2){
   noScrollgridview.setNumColumns(3);
  }
  picAdapter.notifyDataSetChanged();
默認設置GridView的列數為3,根據圖片的數量動態設置列數。
最後貼上SquareLayout的源碼解析一下
/**
 * 方形布局
 */
public class SquareLayout extends RelativeLayout {
 public SquareLayout(Context context, AttributeSet attrs, int defStyle) {
  super(context, attrs, defStyle);
 }

 public SquareLayout(Context context, AttributeSet attrs) {
  super(context, attrs);
 }

 public SquareLayout(Context context) {
  super(context);
 }

 @SuppressWarnings("unused")
 @Override
 protected void onMeasure(int widthMeasureSpec, int heightMeasureSpec) {
  // For simple implementation, or internal size is always 0.
  // We depend on the container to specify the layout size of
  // our view. We can't really know what it is since we will be
  // adding and removing different arbitrary views and do not
  // want the layout to change as this happens.
  setMeasuredDimension(getDefaultSize(0, widthMeasureSpec),
    getDefaultSize(0, heightMeasureSpec));

  // Children are just made to fill our space.
  int childWidthSize = getMeasuredWidth();
  int childHeightSize = getMeasuredHeight();
  // 高度和寬度一樣
  heightMeasureSpec = widthMeasureSpec = MeasureSpec.makeMeasureSpec(
    childWidthSize, MeasureSpec.EXACTLY);
  super.onMeasure(widthMeasureSpec, heightMeasureSpec);
 }
}
這裡主要重寫了onMeasure()方法,設置了高寬,需要注意的是在用SquareLayout的時候要設置它的高寬都是match_parent。這樣就可以填滿GridView的每一項了。
接下來貼圖給大家看:
ImgeView的scaleType的屬性如果設置FitXY就會充滿方形布局,如果center就會居中顯示
詳細說一下吧:
1)center:保持原圖的大小,顯示在ImageView的中心。當原圖的size大於ImageView的size,超過部分裁剪處理。
2)centerCrop:以填滿整個ImageView為目的,將原圖的中心對准ImageView的中心,等比例放大原圖,直到填滿ImageView為止(指的是ImageView的寬和高都要填滿),原圖超過ImageView的部分作裁剪處理。
3)centerInside:以原圖完全顯示為目的,將圖片的內容完整居中顯示,通過按比例縮小原圖的size寬(高)等於或小於ImageView的寬(高)。如果原圖的size本身就小於ImageView的size,則原圖的size不作任何處理,居中顯示在ImageView。
4)matrix:不改變原圖的大小,從ImageView的左上角開始繪制原圖,原圖超過ImageView的部分作裁剪處理
5)fitCenter:把原圖按比例擴大或縮小到ImageView的ImageView的高度,居中顯示
6)fitEnd:把原圖按比例擴大(縮小)到ImageView的高度,顯示在ImageView的下部分位置
7)fitStart:把原圖按比例擴大(縮小)到ImageView的高度,顯示在ImageView的上部分位置
8)fitXY:把原圖按照指定的大小在View中顯示,拉伸顯示圖片,不保持原比例,填滿ImageView.
本文已被整理到了《Android微信開發教程匯總》,歡迎大家學習閱讀。
以上就是本文的全部內容,希望對大家的學習有所幫助。
 3D語音天氣球——在Unity中使用Android語音服務
轉載請注明本文出自大苞米的博客(http://blog.csdn.net/a396901990),謝謝支持! 開篇廢話: 這個項目准備分四部
 初識Servlet生命周期及核心API
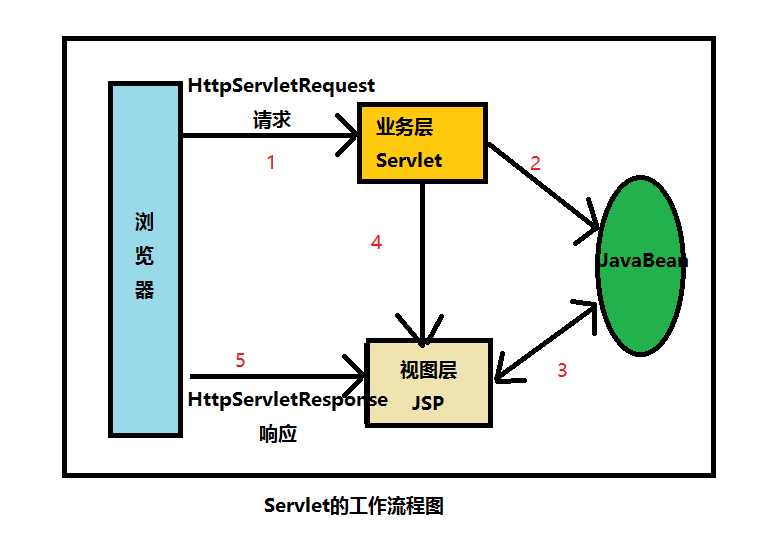
Servlet概述首先得知道,Servlet=Server+Applet,Servlet主要用於處理各種業務邏輯,它比JSP更具有業務邏輯層的意義。最初的JSP開發模式為
 自繪制Android界面核心類圖
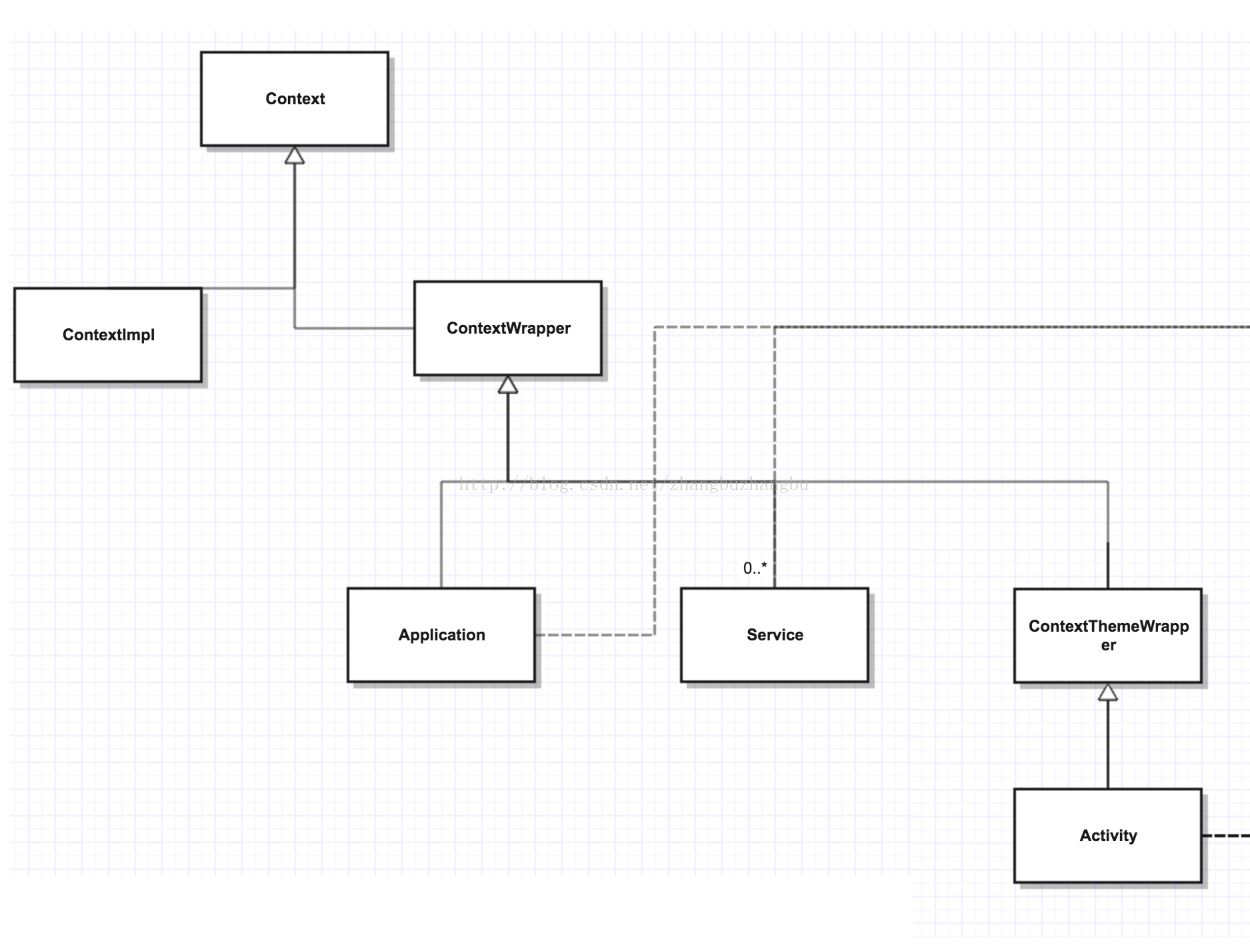
自繪制Android界面核心類圖。入門Android時,會看到過一張系統架構圖,從那張圖可以知道Android系統自上到下被劃分了幾個層次(具體每個層次的職責定義不再概述
 Android基礎入門教程——10.9 WallpaperManager(壁紙管理器)
1.WallpaperManager的基本用法相關方法 設置壁紙的相關方法: - setBitmap(Bitmap bitmap):將壁紙設置為b