編輯:關於Android編程
<?xml version="1.0" encoding="utf-8"?>
<LinearLayout xmlns:android="http://schemas.android.com/apk/res/android"
    android:orientation="horizontal" android:layout_width="fill_parent"
    android:layout_height="fill_parent" android:background="@drawable/rectangle"> <!-- 指定背景,該背景自己畫的 -->

    <Button android:id="@+id/infoAtMeTextView"
        android:textColor="#FF0000" android:layout_width="wrap_content"
        android:layout_height="match_parent" android:layout_weight="1"
        android:gravity="center" android:text="\@我" />
    <Button android:id="@+id/infoCommentTextView"
        android:textColor="#FF0000" android:layout_width="wrap_content"
        android:layout_height="match_parent" android:layout_weight="1"
        android:gravity="center" android:text="評論" />
    <Button android:id="@+id/infoPrivateMsgTextView"
        android:textColor="#FF0000" android:layout_width="wrap_content"
        android:layout_height="match_parent" android:layout_weight="1"
        android:gravity="center" android:text="私信" />
</LinearLayout>
step3、上面布局文件中使用的背景是一個drawable文件,該drawable文件繪制了一個長方形。該文件是/drawable/rectangle.xml
<?xml version="1.0" encoding="utf-8"?>
<!-- 下面定義了一個長方形 -->
<shape xmlns:android="http://schemas.android.com/apk/res/android"
    android:shape="rectangle">
    <gradient android:angle="270" android:endColor="#1DC9CD"
        android:startColor="#A2E0FB" />
    <padding android:left="2dp" android:top="2dp" android:right="2dp"
        android:bottom="2dp" />
</shape>
step4、將自定義標題設置到Activity中,CustomTitleActivity.java
package cn.oyp.title;

import android.app.Activity;
import android.os.Bundle;
import android.view.Window;

public class CustomTitleActivity extends Activity {
    /** Called when the activity is first created. */
    @Override
    public void onCreate(Bundle savedInstanceState) {
        super.onCreate(savedInstanceState);
        //指定使用自定義標題
        requestWindowFeature(Window.FEATURE_CUSTOM_TITLE);
        setContentView(R.layout.main);
        //設置窗口的自定義標題布局文件
        getWindow().setFeatureInt(Window.FEATURE_CUSTOM_TITLE, R.layout.custom_title);

    }
}
===================================== 讀源碼開始 ============================================== 然後運行該應用,發現用戶設置後的自定義layout沒有辦法填充整個標題欄。 通過查看Android源代碼得知Android系統為Activity的title默認設置了一個布局文件,該布局文件是core/res/res/layout/screen_title.xml
<?xml version="1.0" encoding="utf-8"?>
<!-- Copyright (C) 2006 The Android Open Source Project

     Licensed under the Apache License, Version 2.0 (the "License");
     you may not use this file except in compliance with the License.
     You may obtain a copy of the License at

          http://www.apache.org/licenses/LICENSE-2.0

     Unless required by applicable law or agreed to in writing, software
     distributed under the License is distributed on an "AS IS" BASIS,
     WITHOUT WARRANTIES OR CONDITIONS OF ANY KIND, either express or implied.
     See the License for the specific language governing permissions and
     limitations under the License.
-->

<!--
This is an optimized layout for a screen, with the minimum set of features
enabled.
-->

<LinearLayout xmlns:android="http://schemas.android.com/apk/res/android"
    android:orientation="vertical"
    android:fitsSystemWindows="true">
    <FrameLayout
        android:layout_width="match_parent"
        android:layout_height="?android:attr/windowTitleSize"
        style="?android:attr/windowTitleBackgroundStyle">
        <TextView android:id="@android:id/title"
            style="?android:attr/windowTitleStyle"
            android:background="@null"
            android:fadingEdge="horizontal"
            android:gravity="center_vertical"
            android:layout_width="match_parent"
            android:layout_height="match_parent" />
    </FrameLayout>
    <FrameLayout android:id="@android:id/content"
        android:layout_width="match_parent"
        android:layout_height="0dip"
        android:layout_weight="1"
        android:foregroundGravity="fill_horizontal|top"
        android:foreground="?android:attr/windowContentOverlay" />
</LinearLayout>
讀上一段代碼可以發現該布局文件由兩個幀布局構成,而其中的幾個屬性 ?android:attr/windowTitleSize 標題高度 ?android:attr/windowTitleBackgroundStyle 標題背景樣式 ?android:attr/windowContentOverlay 標題前景色 而這幾個屬性的值都是在core/res/res/values/themes.xml文件中被賦值了
<?xml version="1.0" encoding="utf-8"?>
<resources>
    <!-- 該樣式繼承系統的默認樣式 -->
    <style name="customTheme" parent="android:Theme">
        <!-- 設置標題前景色為透明 -->
        <item name="android:windowContentOverlay">@drawable/nocolor</item>
        <!-- 設置標題高度為44dp -->
        <item name="android:windowTitleSize">44dp</item>
        <!-- 設置標題背景色 -->
        <item name="android:windowTitleBackgroundStyle">@style/customBg</item>
    </style>

    <!-- 定義一個背景樣式 -->
    <style name="customBg">
        <item name="android:background">@drawable/rectangle</item>
    </style>
</resources>
===================================== 讀源碼結束 ============================================== step5、自定義樣式 /res/values/style.xml
<?xml version="1.0" encoding="utf-8"?>
<resources>
    <!-- 該樣式繼承系統的默認樣式 -->
    <style name="customTheme" parent="android:Theme">
        <!-- 設置標題前景色為透明 -->
        <item name="android:windowContentOverlay">@drawable/nocolor</item>
        <!-- 設置標題高度為44dp -->
        <item name="android:windowTitleSize">44dp</item>
        <!-- 設置標題背景色 -->
        <item name="android:windowTitleBackgroundStyle">@style/customBg</item>
    </style>

    <!-- 定義一個背景樣式 -->
    <style name="customBg">
        <item name="android:background">@drawable/rectangle</item>
    </style>
</resources>
上面的@drawable/nocolor定義在/res/values/strings.xml文件中
<?xml version="1.0" encoding="utf-8"?>
<resources>
    <string name="hello">該應用的目的是自定義窗口標題!</string>
    <string name="app_name">自定義窗口標題</string>
    <!-- 定義一個透明色 -->
    <drawable name="nocolor">#00000000</drawable>
</resources>
step6、將在自定義的標題樣式應用到窗口中,在描述文件AndroidManifest.xml中
<?xml version="1.0" encoding="utf-8"?>
<manifest xmlns:android="http://schemas.android.com/apk/res/android"
      package="cn.oyp.title"
      android:versionCode="1"
      android:versionName="1.0">
    <uses-sdk android:minSdkVersion="8" />

    <application android:icon="@drawable/icon" android:label="@string/app_name">
        <activity android:name=".CustomTitleActivity"
                android:theme="@style/customTheme"><!-- 使用自定義主題 -->
            <intent-filter>
                <action android:name="android.intent.action.MAIN" />
                <category android:name="android.intent.category.LAUNCHER" />
            </intent-filter>
        </activity>

    </application>
</manifest>
step7:查看該自定義窗口的效果
 AndroidStudio-Eat-Guide—— 3.設置相關
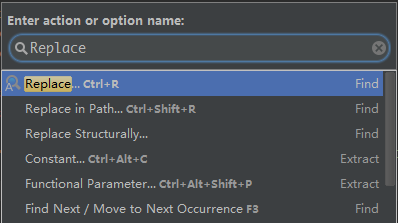
Github地址:https://github.com/coder-pig/AndroidStudio-Eat-Guide1.必須記住的快捷鍵:Ctrl+Shift+A
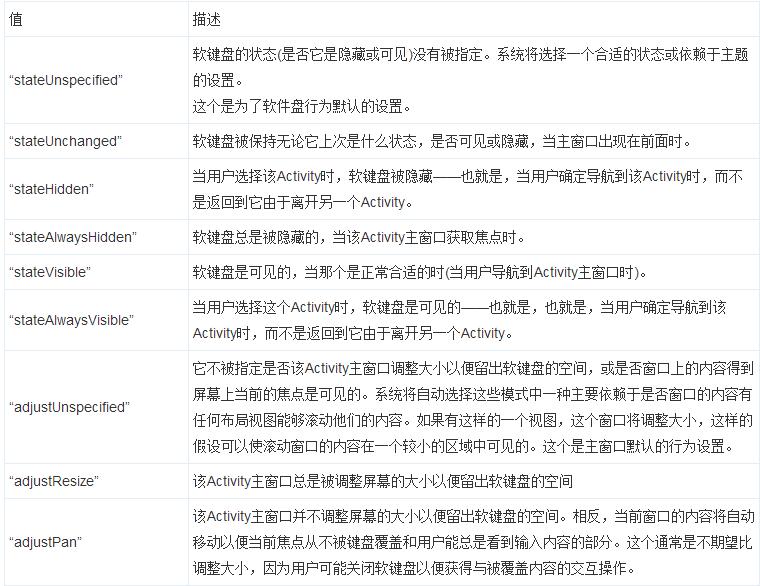 Android 點擊屏幕空白處收起輸入法軟鍵盤(手動打開)
很多時候,我們在使用應用時,會出現輸入法軟鍵盤彈出的問題,通常情況下,我們默認會使用戶點擊返回鍵或者下一步對軟鍵盤進行隱藏。為了更好的體驗,我們可以實現當用戶使用完畢軟鍵
 Retrofit 的使用詳解(下載 多文件上傳)
Retrofit提供了5種內置的注解:GET、POST、PUT、DELETE和HEAD,在注解中指定的資源的相對URLurl與參數小總結@GET("users/
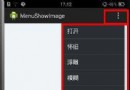 [Android] 通過Menu實現圖片懷舊、浮雕、模糊、光照和素描效果
由於隨手拍項目想做成類似於美圖秀秀那種底部有一排Menu實現不同效果的功能,這裡先簡單介紹如何通過Menu實現打開相冊中的圖片、懷舊效果、浮雕效果、光照效果和素描效果.後