編輯:關於Android編程
前一篇總結了Core Animation的一些基礎知識,這一篇主要是Core Animation 的一些應用,涉及到CAShapeLayer、CAReplicatorLayer等圖層的知識。
先看效果圖:
1、切換圖片:
2、彩票轉盤
3、圖片折疊
4、進度條旋轉
5、粒子效果
一、切換圖片
看起來很復雜的動畫,通過少量的計算和編碼就可以簡單的實現。要做到這一步,必須是需要研究iOS開發中的Core Animation和Core Graphics框架的。日常工作中,對於很多東西不求甚解,只是拿過來用,甚至都不研究、封裝一下別人代碼,這種做法是很不好的。我喜歡自己造輪子,輪子造多了,開發經驗與思維也就提升上去了。
這個動畫實現是比較簡單的,利用了CABasicAnimation、CAKeyframeAnimation和CAAnimationGroup。看似是兩張圖片各自有著自己不同的動畫,實際不過是一個動畫方法,其平移方向與旋轉角度的不同。
我是用了CABasicAnimation設置了view的zPosition值,CAKeyframeAnimation對象設計了圖片的位移與旋轉動畫,然後將之放到CAAnimationGroup對象裡面,開始動畫。
這裡有一個注意點,那就是Core Animation設置的動畫位移、旋轉、縮放都只是一個假象,實際上的view該怎麼還是怎麼樣,並未真正有過變化。所以,在動畫結束後,想要正確的效果,那麼需要設置view的zPosition值,這個值越大,view越在前面(z軸方向上的“前面”)。
代碼:
#import "ViewController.h"
@interface ViewController ()
@property (nonatomic, strong) NSMutableArray *images;
@property (nonatomic, assign) int currentIndex;
@property (weak, nonatomic) IBOutlet UIImageView *currentImageView;
@property (weak, nonatomic) IBOutlet UIImageView *behindImageView;
@end
@implementation ViewController

- (NSMutableArray *)images
{
if (_images == nil) {
_images = [NSMutableArray array];

for (int i = 1; i <= 7; i++) {
UIImage *image = [UIImage imageNamed: [NSString stringWithFormat:@"%d",i]];
[_images addObject:image];
}
}
return _images;
}
- (void)viewDidLoad
{
[super viewDidLoad];

self.currentIndex = 0;
self.currentImageView.image = self.images[_currentIndex];
}
- (void)addAnimateWithPoint:(CGPoint )point angle:(CGFloat)angle fromZ:(CGFloat)fromZ toZ:(CGFloat)toZ view:(UIView *)view
{
CABasicAnimation *zPosition = [[CABasicAnimation alloc] init];
zPosition.keyPath = @"zPosition";
zPosition.fromValue = @(fromZ);
zPosition.toValue = @(toZ);
zPosition.duration = 1.2;
CAKeyframeAnimation *rotation = [[CAKeyframeAnimation alloc] init];
rotation.keyPath = @"transform.rotation";
rotation.values = @[@(0), @(angle), @(0)];
rotation.duration = 2;
rotation.timingFunctions = @[
[CAMediaTimingFunction functionWithName:kCAMediaTimingFunctionEaseInEaseOut],
[CAMediaTimingFunction functionWithName:kCAMediaTimingFunctionEaseInEaseOut]];
CAKeyframeAnimation *position = [[CAKeyframeAnimation alloc] init];
position.keyPath = @"position";
// CGPointMake(110, -20)
position.values = @[
[NSValue valueWithCGPoint:CGPointZero],
[NSValue valueWithCGPoint:point],
[NSValue valueWithCGPoint:CGPointZero]
];
position.timingFunctions = @[
[CAMediaTimingFunction functionWithName:kCAMediaTimingFunctionEaseInEaseOut],
[CAMediaTimingFunction functionWithName:kCAMediaTimingFunctionEaseInEaseOut]
];
position.additive = YES;
position.duration = 1.2;
CAAnimationGroup *animateGroup = [[CAAnimationGroup alloc] init];
animateGroup.animations = @[zPosition, rotation, position];
// animateGroup.beginTime = 0.5;
animateGroup.delegate = self;
animateGroup.duration = 1.2;
[animateGroup setValue:view forKey:@"view"];
[view.layer addAnimation:animateGroup forKey:nil];
view.layer.zPosition = toZ;

}
- (void)animationDidStop:(CAAnimation *)anim finished:(BOOL)flag
{
CAAnimationGroup *group = [anim valueForKey:@"view"];
if (group != nil) {
self.currentImageView.image = self.images[_currentIndex];
self.currentImageView.layer.zPosition = 1;
self.behindImageView.image = nil;
self.behindImageView.layer.zPosition = -1;
}
}
- (IBAction)previous:(id)sender {
self.currentIndex = (self.currentIndex + 1) % self.images.count;
self.behindImageView.image = self.images[_currentIndex];

[self addAnimateWithPoint:CGPointMake(-90, 20) angle:0.15 fromZ:-1 toZ:1 view:self.behindImageView];
[self addAnimateWithPoint:CGPointMake(90, -20) angle:-0.15 fromZ:1 toZ:-1 view:self.currentImageView];
}
- (IBAction)next:(id)sender {
self.currentIndex = (self.currentIndex + 6) % self.images.count;
self.behindImageView.image = self.images[_currentIndex];
[self addAnimateWithPoint:CGPointMake(-90, 20) angle:-0.15 fromZ:-1 toZ:1 view:self.behindImageView];
[self addAnimateWithPoint:CGPointMake(90, -20) angle:0.15 fromZ:1 toZ:-1 view:self.currentImageView];
}
@end
二、彩票轉盤
這個動畫的實現主要難點在於Button的擺放,只要擺放好button,其他就是簡單的添加動畫的一個過程。
12個星座,那麼需要12個button。在擺放它們的時候,我是將一個個button的anchorPoint設置為(0.5, 1),將button的position設置為中心圓的圓心,然後設置transform來旋轉它們,是的達到圍繞一個圓擺放的目的。
需要知道的是,一般來說,控件的anchorPoint就是控件的中心點,所以在我們做旋轉、平移等操作的時候,也就是在圍繞中心點的一系列操作。但是,很多時候,只是圍繞中心點來設置動畫的話,會很復雜,CALayer提供了一個anchorPoint屬性,可以讓我們自由的改變其數值,從而實現比較復雜的動畫。
還有就是button的點擊事件,事實上由於一個扇形區域是上邊大,下邊小,要是不做相應的限制,當用戶點擊下面的區域時,很可能不是選中當前的button,因此要做一定的限制。這裡我是自定義了一個button,在裡面重寫了hitTest: WwthEvent: 方法,這個方法可以設置你所要監聽事件的區域范圍。
代碼:
#import "ZYWheelView.h"
#define ZYImageW 40
#define ZYImageH 46
@interface ZYButton : UIButton
@end
@implementation ZYButton

/**
* 重寫此方法,截取button的點擊
*
*/
- (UIView *)hitTest:(CGPoint)point withEvent:(UIEvent *)event
{
CGFloat btnW = self.bounds.size.width;
CGFloat btnH = self.bounds.size.height;
CGFloat x = 0;
CGFloat y = btnH / 2;
CGFloat w = btnW;
CGFloat h = y;
CGRect rect = CGRectMake(x, y, w, h);
if (CGRectContainsPoint(rect, point)) {
return nil;
}else{
return [super hitTest:point withEvent:event];
}
}
- (CGRect)imageRectForContentRect:(CGRect)contentRect
{
CGFloat imageX = (contentRect.size.width - ZYImageW ) * 0.5;
CGFloat imageY = 18;
return CGRectMake(imageX, imageY, ZYImageW, ZYImageH);
}
- (void)setHighlighted:(BOOL)highlighted
{
}
@end
@interface ZYWheelView ()
@property (weak, nonatomic) IBOutlet UIImageView *wheelView;

@property (nonatomic, weak) UIButton *lastSelectedBtn;

@property (nonatomic, strong) CADisplayLink *timer;
@end
@implementation ZYWheelView
+ (instancetype)wheelView
{
return [[[NSBundle mainBundle] loadNibNamed:@"ZYWheelView" owner:nil options:nil] lastObject];
}
- (void)awakeFromNib
{
self.wheelView.userInteractionEnabled = YES;
CGFloat angle = 2 * M_PI / 12.0;

UIImage *normalImage = [UIImage imageNamed:@"LuckyAstrology"];
UIImage *selectedImage = [UIImage imageNamed:@"LuckyAstrologyPressed"];
for (int bi = 0; bi < 12; bi++) {
ZYButton *btn = [[ZYButton alloc] init];
[btn setBackgroundImage:[UIImage imageNamed:@"LuckyRototeSelected"] forState:UIControlStateSelected];
// 切割圖片,將切割好的圖片設置到按鈕上
// CGImage中rect是當做像素來使用
// UIKit 中是點坐標系
// 坐標系的特點:如果在非retain屏上 1個點等於1個像素
// 在retain屏上1個點等於2個像素
CGFloat imageH = ZYImageH * [UIScreen mainScreen].scale;
CGFloat imageW = ZYImageW * [UIScreen mainScreen].scale;
CGFloat imageY = 0;
CGFloat imageX = bi * imageW;
CGRect rect = CGRectMake(imageX, imageY, imageW, imageH);
CGImageRef normalRef = CGImageCreateWithImageInRect(normalImage.CGImage, rect);
CGImageRef selectedRef = CGImageCreateWithImageInRect(selectedImage.CGImage, rect);
[btn setImage:[UIImage imageWithCGImage:normalRef] forState:UIControlStateNormal];
[btn setImage:[UIImage imageWithCGImage:selectedRef] forState:UIControlStateSelected];
btn.bounds = CGRectMake(0, 0, 58, 143);
btn.layer.anchorPoint = CGPointMake(0.5, 1);
btn.layer.position = CGPointMake(self.frame.size.width * 0.5, self.frame.size.height * 0.5);
btn.transform = CGAffineTransformMakeRotation(angle * bi);
[btn addTarget:self action:@selector(clickBtn:) forControlEvents:UIControlEventTouchUpInside];
[self.wheelView addSubview:btn];
}
[self startRotating];
}
- (void)startRotating
{
if (self.timer) return;
self.timer = [CADisplayLink displayLinkWithTarget:self selector:@selector(updateTimer)];
[self.timer addToRunLoop:[NSRunLoop mainRunLoop] forMode:NSRunLoopCommonModes];
}
- (void)stopRotating
{
[self.timer invalidate];
self.timer = nil;
}
- (void)clickBtn:(UIButton *)btn
{
self.lastSelectedBtn.selected = NO;
btn.selected = YES;
self.lastSelectedBtn = btn;
}
- (IBAction)clickCenterBtn:(id)sender {
self.userInteractionEnabled = NO;
[self stopRotating];
CABasicAnimation *basicAnimation = [CABasicAnimation animationWithKeyPath:@"transform.rotation"];
basicAnimation.toValue = @(M_PI * 2 * 5);
basicAnimation.duration = 2;
basicAnimation.timingFunction = [CAMediaTimingFunction functionWithName:kCAMediaTimingFunctionEaseInEaseOut];
// basicAnimation.removedOnCompletion = NO;
// basicAnimation.fillMode = kCAFillModeForwards;
basicAnimation.delegate = self;
[self.wheelView.layer addAnimation:basicAnimation forKey:nil];
}
- (void)animationDidStop:(CAAnimation *)anim finished:(BOOL)flag
{
self.userInteractionEnabled = YES;
// 根據選中的按鈕獲取旋轉的度數,
// 通過transform獲取角度
CGFloat angle = atan2(self.lastSelectedBtn.transform.b, self.lastSelectedBtn.transform.a);
// 從實際上旋轉轉盤
self.wheelView.transform = CGAffineTransformMakeRotation(-angle);
dispatch_after(dispatch_time(DISPATCH_TIME_NOW, (int64_t)(1 * NSEC_PER_SEC)), dispatch_get_main_queue(), ^{
[self startRotating];
});
}
- (void)updateTimer
{
self.wheelView.transform = CGAffineTransformRotate(self.wheelView.transform, M_PI / 200);
}
- (void)dealloc
{
[self stopRotating];
}
@end
3、圖片折疊
這個效果看起來很炫酷,但實際做起來是比較簡單的。需要三個View,兩個UIImageView,一個接受拖拽action的View。CALayer裡面有個contentRect屬性,它可以設置layer裡面的顯示內容,利用這個屬性,我們可以做在下載圖片時,下載一點展示一點的效果。 在這裡,我用這個屬性來這是兩張UIImageView各自展示一半的圖片,然後將這兩張ImageView拼接在一起,顯示完整的圖片。
在一個覆蓋這張完整圖片的View上添加拖拽手勢,以實現動畫過程。
這裡有一個新的圖層需要學習下,CAGradientLayer,它是用來做顏色漸變的,用法與CALayer的用法相似:
屬性代碼:
CAGradientLayer *gradientLayer = [CAGradientLayer layer];
gradientLayer.frame = self.bottomView.bounds;
gradientLayer.opacity = 0;
gradientLayer.colors = @[(id)[UIColor clearColor].CGColor, (id)[UIColor blackColor].CGColor];
self.gradientLayer = gradientLayer;
[self.bottomView.layer addSublayer:gradientLayer];
// 設置漸變顏色
// gradientL.colors = @[(id)[UIColor redColor].CGColor,(id)[UIColor greenColor].CGColor,(id)[UIColor yellowColor].CGColor];
// 設置漸變定位點
// gradientL.locations = @[@0.1,@0.4,@0.5];
// 設置漸變開始點,取值0~1
// gradientL.startPoint = CGPointMake(0, 1);
設置好之後,在pan手勢的方法裡面不斷改變gradientLayer的opacity即可達到想要的效果。
CATransform3D有個m34屬性,可以設置透視度,一般將這個值設置為- 1 / 500.0,特定需求可以微調這個值。
代碼:
#import "ViewController.h"
@interface ViewController ()
@property (weak, nonatomic) IBOutlet UIImageView *topView;
@property (weak, nonatomic) IBOutlet UIImageView *bottomView;
@property (weak, nonatomic) IBOutlet UIView *containView;
@property (nonatomic, weak) CAGradientLayer *gradientLayer;
@end
@implementation ViewController

- (void)viewDidLoad {
[super viewDidLoad];
// Do any additional setup after loading the view, typically from a nib.
[self setupOtherView];
//設置漸變的陰影
[self setupShadow];
}
- (void)setupOtherView
{
//設置contentsRect用來表示圖片顯示的大小,可以做邊下載邊顯示的UI效果,取值是(0--1)
self.topView.layer.contentsRect = CGRectMake(0, 0, 1, 0.5);
self.topView.layer.anchorPoint = CGPointMake(0.5, 1);
self.bottomView.layer.contentsRect = CGRectMake(0, 0.5, 1, 0.5);
self.bottomView.layer.anchorPoint = CGPointMake(0.5, 0);
UIPanGestureRecognizer *gesture = [[UIPanGestureRecognizer alloc] initWithTarget:self action:@selector(pan:)];
[self.containView addGestureRecognizer:gesture];
}
- (void)setupShadow
{
CAGradientLayer *gradientLayer = [CAGradientLayer layer];
gradientLayer.frame = self.bottomView.bounds;
gradientLayer.opacity = 0;
gradientLayer.colors = @[(id)[UIColor clearColor].CGColor, (id)[UIColor blackColor].CGColor];
self.gradientLayer = gradientLayer;
[self.bottomView.layer addSublayer:gradientLayer];
// 設置漸變顏色
// gradientL.colors = @[(id)[UIColor redColor].CGColor,(id)[UIColor greenColor].CGColor,(id)[UIColor yellowColor].CGColor];
// 設置漸變定位點
// gradientL.locations = @[@0.1,@0.4,@0.5];
// 設置漸變開始點,取值0~1
// gradientL.startPoint = CGPointMake(0, 1);
}
- (void)pan:(UIPanGestureRecognizer *)recognizer
{
CGFloat y = [recognizer translationInView:self.containView].y;
if (y >= 300) y = 300;
if (y <= -300) y = -300;
// 旋轉角度,往下逆時針旋轉
CGFloat angle = -y / 320.0 * M_PI;
self.topView.layer.transform = CATransform3DIdentity;
CATransform3D transfrom = CATransform3DIdentity;
transfrom.m34 = -1 / 500.0;
self.topView.layer.transform = CATransform3DRotate(transfrom, angle, 1, 0, 0);
self.gradientLayer.opacity = y / 300.0;
if (recognizer.state == UIGestureRecognizerStateEnded) {

// 彈簧效果的動畫
// SpringWithDamping:彈性系數,越小,彈簧效果越明顯
[UIView animateWithDuration:0.5 delay:0 usingSpringWithDamping:0.3 initialSpringVelocity:11 options:UIViewAnimationOptionCurveEaseInOut animations:^{
self.topView.layer.transform = CATransform3DIdentity;
self.gradientLayer.opacity = 0;
} completion:nil];
}
}
@end
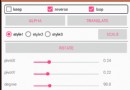
4、旋轉進度條
圓圈旋轉一般都是放在HUD上吧。記得以前我也做過一個類似的功能,那時候還沒現在這樣的知識儲備,只能是用CAKeyframeAnimation做,讓美工做出了一根頂部是一個小白點,除此之外,很長的那部分是為clearColor的小矩形,然後我設置它的anchorPoint,給 CAKeyframeAnimation添加一個圓形的path,然後圍繞這個path旋轉,做是勉強做出來,但是很不好看吧。
現在可以有更好的選擇了,CAReplicatorLayer(復制圖層)。我們可以在復制圖層裡面添加一個instance圖層,如果設置了復制圖層的instanceCount,假如讓instanceCount == 5, 那麼復制圖層會自動幫我們復制5個跟instance圖層一樣的圖層(事實上,我們可以在一開始就給instance圖層設置動畫,那麼在復制的時候,一樣會把動畫也復制過來),除此之外,還可以設置復制圖層裡面的instance圖層的transfrom,從而實現一定的布局。復制圖層裡面還有一個instanceDelay,它表示延遲多少時間開始動畫等等。
這個Demo就是用了上面所說的實現的,代碼:
#import "ViewController.h"
@interface ViewController ()
@property (weak, nonatomic) IBOutlet UIView *containView;
@end
@implementation ViewController
- (void)viewDidLoad {
[super viewDidLoad];
// Do any additional setup after loading the view, typically from a nib.

[self setupReplicatorLayerAndAnimation];
}
- (void)setupReplicatorLayerAndAnimation
{
CAReplicatorLayer *replicatorLayer = [CAReplicatorLayer layer];
replicatorLayer.frame = self.containView.layer.bounds;
[self.containView.layer addSublayer:replicatorLayer];
CALayer *layer = [CALayer layer];
layer.frame = CGRectMake(self.containView.frame.size.width * 0.5, 20, 16, 16);
layer.backgroundColor = [UIColor redColor].CGColor;
layer.cornerRadius = layer.frame.size.width / 2;
//這一句可以將初始過程移除掉
layer.transform = CATransform3DMakeScale(0, 0, 0);
[replicatorLayer addSublayer:layer];
replicatorLayer.instanceCount = 22;
CABasicAnimation *basicAn = [CABasicAnimation animationWithKeyPath:@"transform.scale"];
basicAn.fromValue = @1;
basicAn.toValue = @0;
basicAn.duration = 1;
basicAn.repeatCount = MAXFLOAT;
[layer addAnimation:basicAn forKey:nil];
replicatorLayer.instanceDelay = basicAn.duration / (double)replicatorLayer.instanceCount;
replicatorLayer.instanceTransform = CATransform3DMakeRotation(2 * M_PI / replicatorLayer.instanceCount, 0, 0, 1);
}
@end
5、粒子效果
這個東西就是CAReplicatorLayer(復制圖層)和Core Graphics的結合吧,我是采用UIBezierPath來繪制線條,然後將繪制好的path賦值給小球的animation路徑,然後將小球添加到復制圖層,設置下instanceCount,設置下延遲時間,效果就出來了。
代碼:
#import "ZYDrawView.h"
@interface ZYDrawView ()
@property (nonatomic, strong) UIBezierPath *bezierPath;
@property (nonatomic, weak) CAReplicatorLayer *replicatorLayer;
@property (nonatomic, weak) CALayer *norLayer;
@end
static int _count = 0;
@implementation ZYDrawView
- (UIBezierPath *)bezierPath
{
if (_bezierPath == nil) {
_bezierPath = [[UIBezierPath alloc] init];
}
return _bezierPath;
}
- (void)awakeFromNib
{
CAReplicatorLayer *replicatorLayer = [CAReplicatorLayer layer];
replicatorLayer.frame = self.bounds;
[self.layer addSublayer:replicatorLayer];
CALayer *layer = [CALayer layer];
layer.frame = CGRectMake(0, -200, 10, 10);
layer.cornerRadius = layer.frame.size.width * 0.5;
layer.backgroundColor = [UIColor redColor].CGColor;
[replicatorLayer addSublayer:layer];
self.replicatorLayer = replicatorLayer;
self.norLayer = layer;
}
- (void)touchesBegan:(NSSet<UITouch *> *)touches withEvent:(UIEvent *)event
{
CGPoint curPoint = [[touches anyObject] locationInView:self];
[self.bezierPath moveToPoint:curPoint];

}
- (void)touchesMoved:(NSSet<UITouch *> *)touches withEvent:(UIEvent *)event
{
_count++;
CGPoint curPoint = [[touches anyObject] locationInView:self];
[self.bezierPath addLineToPoint:curPoint];
[self setNeedsDisplay];
}
- (void)startAnimation
{
CAKeyframeAnimation *keyframeAn = [CAKeyframeAnimation animationWithKeyPath:@"position"];
keyframeAn.path = self.bezierPath.CGPath;
keyframeAn.duration = 4;
keyframeAn.repeatCount = MAXFLOAT;
[self.norLayer addAnimation:keyframeAn forKey:nil];
self.replicatorLayer.instanceCount = _count;
self.replicatorLayer.instanceDelay = 0.1;
}
- (void)reDraw
{
_bezierPath = nil;
_count = 1;
[self.norLayer removeAllAnimations];

[self setNeedsDisplay];
}
- (void)drawRect:(CGRect)rect
{
[self.bezierPath stroke];
}
@end
以上內容是小編給大家介紹的Core Animation一些Demo總結 (動態切換圖片、大轉盤、圖片折疊、進度條等動畫效果),希望對大家以上幫助!
 框架模式 MVC 在Android中的使用
算來學習Android開發已有2年的歷史了,在這2年的學習當中,基本掌握了Android的基礎知識。越到後面的學習越感覺困難,一來是自認為android沒啥可學的了(自認
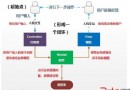
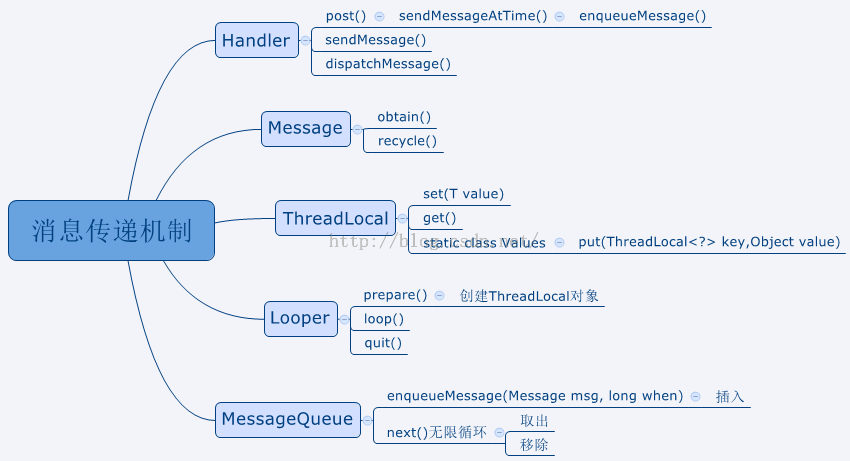 Android 消息機制
從一接觸Android開始,就聽說了消息機制,那時候對消息機制的理解也只是看看別人博客,了解一些概念和相關的類而已,並沒有深入的去了解和探究。直到最近,重新過了一遍消息
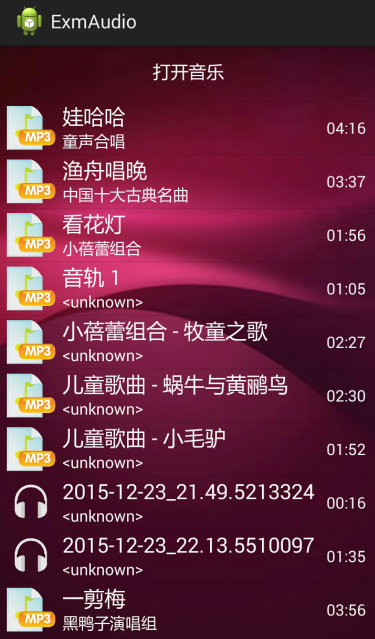 Android開發筆記(一百二十六)自定義音樂播放器
MediaRecorder/MediaPlayer在Android手機上面,音頻的處理比視頻還要復雜,這真是出人意料。在前面的博文《Android開發筆記(五十七)錄像錄
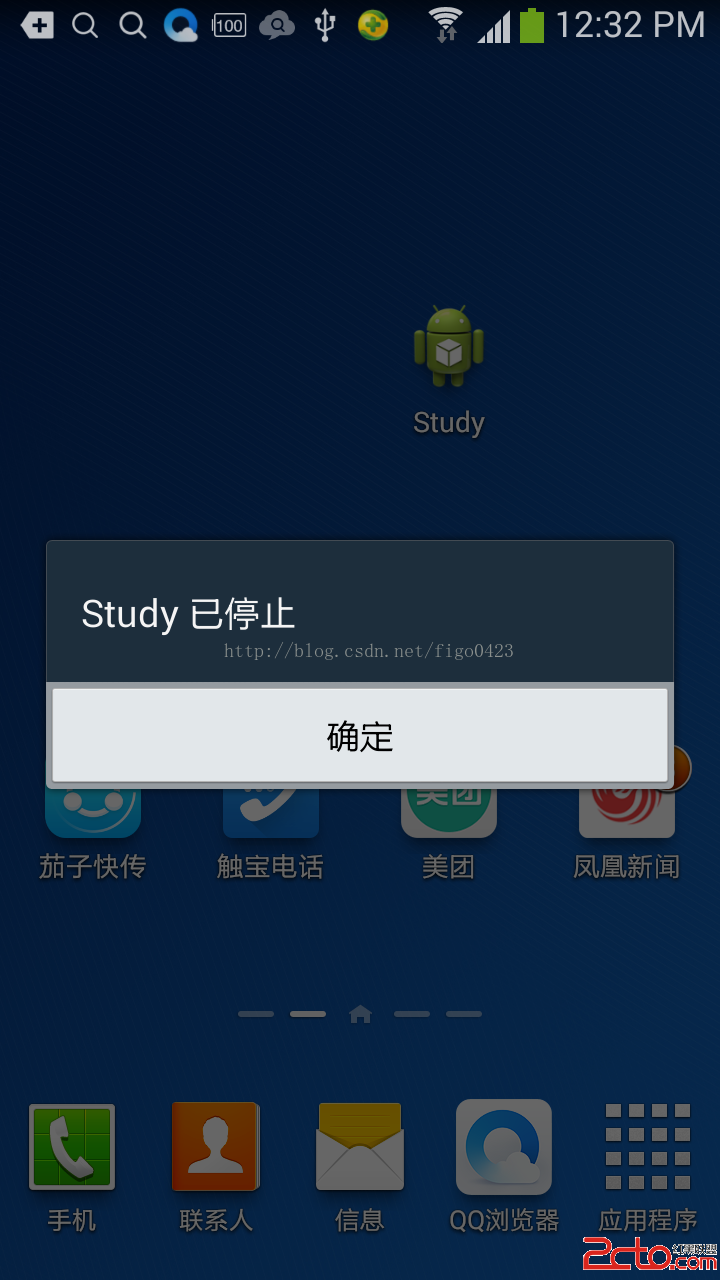 android開發步步為營之57:UncaughtExceptionHandler未捕獲的異常處理器
寫程序的時候,大部分的時候,我們都會知道添加try,catch的代碼塊,比如 try { mRoot = inflater.infl