編輯:關於Android編程
本文實例講述了Android實現Activity、Service與Broadcaster三大組件之間互相調用的方法。分享給大家供大家參考,具體如下:
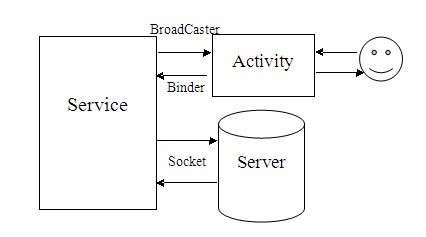
我們研究兩個問題,
1、Service如何通過Broadcaster更改activity的一個TextView。
(研究這個問題,考慮到Service從服務器端獲得消息之後,將msg返回給activity)
2、Activity如何通過Binder調用Service的一個方法。
(研究這個問題,考慮到與服務器端交互的動作,打包至Service,Activity只呈現界面,調用Service的方法)
結構圖見如下:
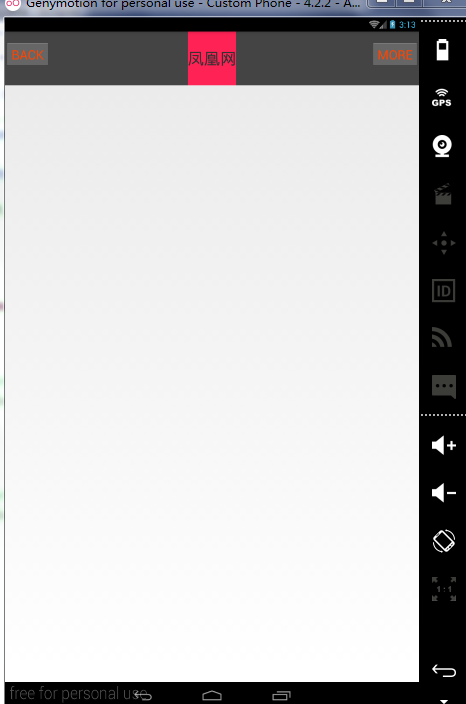
效果圖如下:
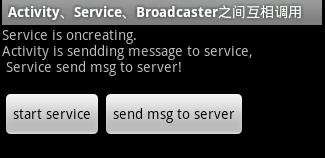
點擊“start service”按鈕,啟動Service,然後更改Activity的UI。
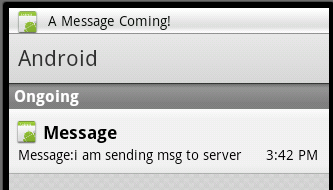
點擊“send msg to server”按鈕調用Service的方法,顯示NotificationBar
代碼:
1、新建一個MyService類,繼承Service
package com.ljq.activity;
import android.app.Notification;
import android.app.NotificationManager;
import android.app.PendingIntent;
import android.app.Service;
import android.content.Context;
import android.content.Intent;
import android.graphics.Color;
import android.os.Binder;
import android.os.IBinder;
public class MyService extends Service {
 private NotificationManager notificationManager = null;
 private final IBinder binder = new LocalBinder();
 @Override
 public void onCreate() {
 sendMsgtoActivty("Service is oncreating.\n");
 }
 @Override
 public IBinder onBind(Intent intent) {
 String msg = "Activity is sendding message to service,\n Service send msg to server!\n";
 sendMsgtoActivty(msg);
 return binder;
 }
 /**
 * 把信息傳遞給activity
 *
 * @param msg
 */
 private void sendMsgtoActivty(String msg) {
 Intent intent = new Intent("com.android.Yao.msg");
 intent.putExtra("msg", msg);
 this.sendBroadcast(intent);
 }
 @Override
 public void onDestroy() {
 super.onDestroy();
 if(notificationManager!=null){
  notificationManager.cancel(0);
  notificationManager=null;
 }
 }
 /**
 * 在狀態欄顯示通知
 *
 * @param msg
 */
 private void showNotification(String msg) {
 notificationManager = (NotificationManager) getSystemService(Context.NOTIFICATION_SERVICE);
 // 定義Notification的各種屬性
 Notification notification =new Notification(R.drawable.icon,
     "A Message Coming!", System.currentTimeMillis());
 //FLAG_AUTO_CANCEL  該通知能被狀態欄的清除按鈕給清除掉
 //FLAG_NO_CLEAR   該通知不能被狀態欄的清除按鈕給清除掉
 //FLAG_ONGOING_EVENT 通知放置在正在運行
 //FLAG_INSISTENT   是否一直進行,比如音樂一直播放,知道用戶響應
 notification.flags |= Notification.FLAG_ONGOING_EVENT; // 將此通知放到通知欄的"Ongoing"即"正在運行"組中
 notification.flags |= Notification.FLAG_NO_CLEAR; // 表明在點擊了通知欄中的"清除通知"後,此通知不清除,經常與FLAG_ONGOING_EVENT一起使用
 notification.flags |= Notification.FLAG_SHOW_LIGHTS;
 //DEFAULT_ALL   使用所有默認值,比如聲音,震動,閃屏等等
 //DEFAULT_LIGHTS 使用默認閃光提示
 //DEFAULT_SOUNDS 使用默認提示聲音
 //DEFAULT_VIBRATE 使用默認手機震動,需加上<uses-permission android:name="android.permission.VIBRATE" />權限
 notification.defaults = Notification.DEFAULT_LIGHTS;
 //疊加效果常量
 //notification.defaults=Notification.DEFAULT_LIGHTS|Notification.DEFAULT_SOUND;
 notification.ledARGB = Color.BLUE;
 notification.ledOnMS =5000; //閃光時間,毫秒
 // 設置通知的事件消息
 //Intent notificationIntent =new Intent(MainActivity.this, MainActivity.class); // 點擊該通知後要跳轉的Activity
 Intent notificationIntent = new Intent(getApplicationContext(), MainActivity.class); // 加載類,如果直接通過類名,會在點擊時重新加載頁面,無法恢復最後頁面狀態。
 notificationIntent.setFlags(Intent.FLAG_ACTIVITY_SINGLE_TOP);
 PendingIntent contentItent = PendingIntent.getActivity(this, 0, notificationIntent, 0);
 notification.setLatestEventInfo(this, "Message", "Message:" + msg, contentItent);
 // 把Notification傳遞給NotificationManager
 notificationManager.notify(0, notification);
 }
 /**
 * 從activity獲取信息
 *
 * @param msg
 */
 public void receiverMsgtoActivity(String msg){
 sendMsgtoActivty("\n receiverMsgtoActivity:"+msg);
 }
 public void sendMsgtoServer(String msg) {
 showNotification(msg);
 }
 public class LocalBinder extends Binder {
 public MyService getService() {
  return MyService.this;
 }
 }
}
2、新建MyBroadcastreceiver類,繼承BroadcastReceiver,用來發送Intent啟動服務
package com.ljq.activity;
import android.content.BroadcastReceiver;
import android.content.Context;
import android.content.Intent;
/**
 * 發送Intent啟動服務
 *
 * @author jiqinlin
 *
 */
public class MyBroadcastreceiver extends BroadcastReceiver {
 @Override
 public void onReceive(Context context, Intent intent) {
 Intent service = new Intent(context, MyService.class);
 context.startService(service);
 }
}
3、新建MainActivity類,其實是一個activity,用來呈現界面
package com.ljq.activity;
import java.util.List;
import android.app.Activity;
import android.app.ActivityManager;
import android.content.BroadcastReceiver;
import android.content.ComponentName;
import android.content.Context;
import android.content.Intent;
import android.content.IntentFilter;
import android.content.ServiceConnection;
import android.os.Bundle;
import android.os.IBinder;
import android.util.Log;
import android.view.View;
import android.widget.TextView;
public class MainActivity extends Activity implements View.OnClickListener {
 private String msg = "";
 private TextView txtMsg;
 private UpdateReceiver receiver;
 private MyService myService;
 private final static String TAG=MainActivity.class.getSimpleName();
 @Override
 public void onCreate(Bundle savedInstanceState) {
 super.onCreate(savedInstanceState);
 setContentView(R.layout.main);
 txtMsg = (TextView) this.findViewById(R.id.txtMsg);
 this.findViewById(R.id.btnStart).setOnClickListener(this);
 this.findViewById(R.id.btnSend).setOnClickListener(this);
 //訂閱廣播Intent
 receiver = new UpdateReceiver();
 IntentFilter filter = new IntentFilter();
 filter.addAction("com.android.Yao.msg");
 this.registerReceiver(receiver, filter);
 //初始化時啟動服務
 //Intent intent = new Intent(MainActivity.this, MyService.class);
 //this.bindService(intent, conn, BIND_AUTO_CREATE);
 }
 @Override
 protected void onDestroy() {
 super.onDestroy();
 //結束服務
 if(conn!=null){
  unbindService(conn);
  myService=null;
 }
 }
 public class UpdateReceiver extends BroadcastReceiver {
 @Override
 public void onReceive(Context context, Intent intent) {
  //獲取service傳過來的信息
  msg = intent.getStringExtra("msg");
  txtMsg.append(msg);
 }
 }
 private ServiceConnection conn = new ServiceConnection() {
 @Override
 public void onServiceConnected(ComponentName name, IBinder service) {
  myService = ((MyService.LocalBinder) service).getService();
  Log.i(TAG, "onServiceConnected myService: "+myService);
 }
 @Override
 public void onServiceDisconnected(ComponentName name) {
  myService = null;
 }
 };
 @Override
 public void onClick(View v) {
 Intent intent = new Intent(MainActivity.this, MyService.class);
 switch (v.getId()) {
 case R.id.btnStart:
  //判斷服務是否啟動
  if(false==isServiceRunning(this, MyService.class.getName())){
  Log.i(TAG, "start "+MyService.class.getSimpleName()+" service");
  this.bindService(intent, conn, BIND_AUTO_CREATE);
  }
  Log.i(TAG, MyService.class.getName()+" run status: "+isServiceRunning(this, MyService.class.getName()));
  break;
 case R.id.btnSend:
  //判斷服務是否啟動
  if(false==isServiceRunning(this, MyService.class.getName())){
  Log.i(TAG, "start "+MyService.class.getSimpleName()+" service");
  this.bindService(intent, conn, BIND_AUTO_CREATE);
  }
  Log.i(TAG, MyService.class.getName()+" run status: "+isServiceRunning(this, MyService.class.getName()));
  Log.i(TAG, "onClick myService: "+myService); //第一次啟動服務時此處為null(小編認為雖然服務已啟動成功,但是還沒全部初始化)
  if(myService!=null){
    myService.sendMsgtoServer("i am sending msg to server");
    //從activity傳遞信息給service
    myService.receiverMsgtoActivity("this is a msg");
   }
  break;
 }
 }
 /**
 * 判斷服務是否正在運行
 *
 * @param context
 * @param className 判斷的服務名字:包名+類名
 * @return true在運行 false 不在運行
 */
 public static boolean isServiceRunning(Context context, String className) {
 boolean isRunning = false;
 ActivityManager activityManager = (ActivityManager) context
  .getSystemService(Context.ACTIVITY_SERVICE);
 //獲取所有的服務
 List<ActivityManager.RunningServiceInfo> services= activityManager.getRunningServices(Integer.MAX_VALUE);
 if(services!=null&&services.size()>0){
  for(ActivityManager.RunningServiceInfo service : services){
  if(className.equals(service.service.getClassName())){
   isRunning=true;
   break;
  }
  }
 }
 return isRunning;
 }
}
4、main.xml布局文件
<?xml version="1.0" encoding="utf-8"?>
<LinearLayout xmlns:android="http://schemas.android.com/apk/res/android"
 android:orientation="vertical" android:layout_width="fill_parent"
 android:layout_height="fill_parent">
 <TextView android:layout_width="fill_parent"
 android:layout_height="wrap_content"
 android:id="@+id/txtMsg" />
 <LinearLayout
 xmlns:android="http://schemas.android.com/apk/res/android"
 android:orientation="horizontal"
 android:layout_width="wrap_content"
 android:layout_height="wrap_content">
 <Button android:layout_width="wrap_content"
  android:layout_height="wrap_content"
  android:text="start service"
  android:id="@+id/btnStart"/>
 <Button android:layout_width="wrap_content"
  android:layout_height="wrap_content"
  android:text="send msg to server"
  android:id="@+id/btnSend"/>
 </LinearLayout>
</LinearLayout>
5、清單文件AndroidManifest.xml,用來配置組件等信息
<?xml version="1.0" encoding="utf-8"?>
<manifest xmlns:android="http://schemas.android.com/apk/res/android"
   package="com.ljq.activity"
   android:versionCode="1"
   android:versionName="1.0">
  <application android:icon="@drawable/icon" android:label="@string/app_name">
    <activity android:name=".MainActivity"
         android:label="@string/app_name">
      <intent-filter>
        <action android:name="android.intent.action.MAIN" />
        <category android:name="android.intent.category.LAUNCHER" />
      </intent-filter>
    </activity>
    <service android:name=".MyService"/>
    <receiver android:name=".MyBroadcastreceiver" />
  </application>
  <uses-sdk android:minSdkVersion="7" />
</manifest>
更多關於Android相關內容感興趣的讀者可查看本站專題:《Android調試技巧與常見問題解決方法匯總》、《Android開發入門與進階教程》、《Android多媒體操作技巧匯總(音頻,視頻,錄音等)》、《Android基本組件用法總結》、《Android視圖View技巧總結》、《Android布局layout技巧總結》及《Android控件用法總結》
希望本文所述對大家Android程序設計有所幫助。
 Android N 的新特性
2016年5月19日,谷歌在美國加州的山景城舉辦了GoogleI/O開發者大會中發布。在系統界面上谷歌或許已經貧乏,這也是手機整體大環境所致,因此谷歌也只好轉向修補方面,
 手把手教你用Android自定義餅狀圖
照例先上效果圖通過該例子,你能學到什麼: 對Paint 深入理解,畫繪制餅圖,矩形,文字等 &nbs
 adnroid仿miui的dialog
先來看下效果圖: 其中show和dismiss的時候有動畫效果。 原先試過使用PopupWindow來做,但是使用的時候不是那麼舒服,畢竟不
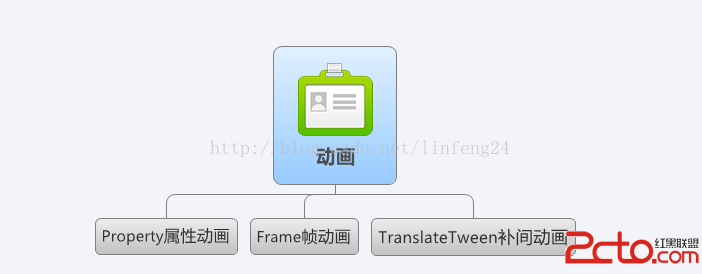 Android筆記之屬性動畫
前言、動畫分類 如下圖所示,Android的動畫主要分為三種: 動畫XML的代碼如下—— 對動畫xml的說明如下: a