編輯:關於Android編程
這方面的知識不是孤立的,其中有關於,Socket編程,多線程的操作,以及I/O流的操作。當然,實現方法不止一種,這只是其中一種,給同是新手一點點思路。如果有什麼推薦的話,歡迎指點!
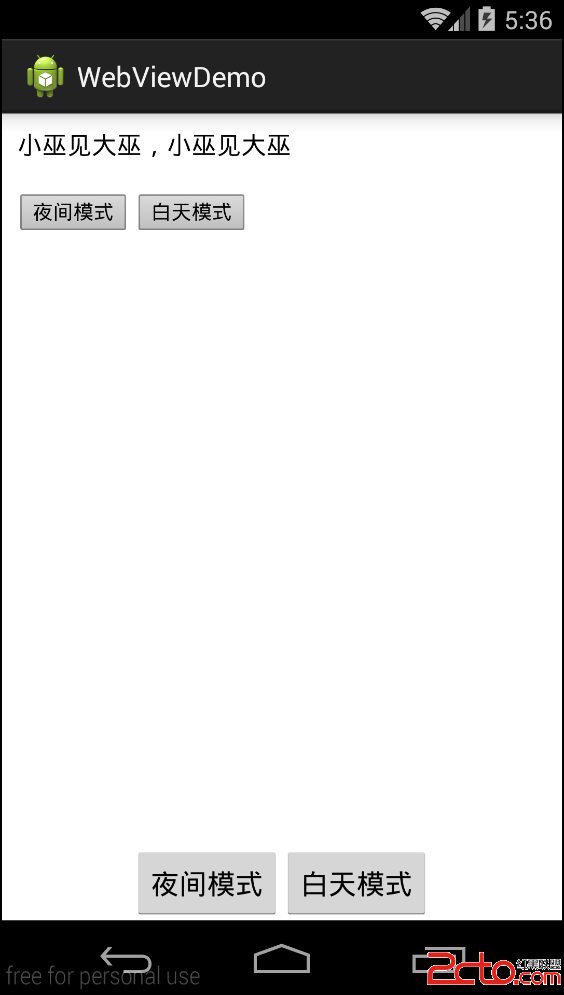
先給大家看一下應用程序的界面,基本就能知道大致的功能了。

activity_main.java
<LinearLayout xmlns:android="http://schemas.android.com/apk/res/android"
 xmlns:tools="http://schemas.android.com/tools"
 android:layout_width="match_parent"
 android:layout_height="match_parent"
 android:orientation="vertical"
 tools:context=".MainActivity">

 <EditText
 android:id="@+id/editText"
 android:layout_width="match_parent"
 android:layout_height="wrap_content"
 android:hint="請輸入要發送的內容"/>

 <Button
 android:id="@+id/button01"
 android:layout_width="match_parent"
 android:layout_height="wrap_content"
 android:text="連接"/>

 <Button
 android:id="@+id/button02"
 android:layout_width="match_parent"
 android:layout_height="wrap_content"
 android:text="發送"/>

 <ScrollView
 android:layout_width="match_parent"
 android:layout_height="wrap_content"
 android:scrollbars="vertical"
 android:fadingEdge="vertical">
 <TextView
  android:id="@+id/textView"
  android:layout_width="match_parent"
  android:layout_height="wrap_content"
  android:text="輸出信息:"/>
 </ScrollView>

</LinearLayout>
界面很是簡單。
下面我們需要一個服務器,和一個客戶端。服務器,我用的是Eclipse寫的Java的服務器;客戶端,我用的是Android Studio寫的。
package com.ryan.socketdemo01;

import android.os.Handler;
import android.os.Message;
import android.support.v7.app.AppCompatActivity;
import android.os.Bundle;
import android.util.Log;
import android.view.Menu;
import android.view.MenuItem;
import android.view.View;
import android.widget.Button;
import android.widget.EditText;
import android.widget.TextView;
import android.widget.Toast;

import java.io.IOException;
import java.io.OutputStream;
import java.io.UnsupportedEncodingException;
import java.net.Socket;

/**
 * 本實例功能: 客戶端發送數據至客戶端(動態輸出數據)
 *
 */
public class MainActivity extends AppCompatActivity implements View.OnClickListener{

 private Button button01 = null;
 private Button button02 = null;
 private EditText editText = null;
 private TextView textView = null;

 private static Socket ClientSocket = null;
 private byte[] msgBuffer = null;
 Handler handler = new Handler();


 private void initView() {
 button01 = (Button) findViewById(R.id.button01);
 button02 = (Button) findViewById(R.id.button02);
 editText = (EditText) findViewById(R.id.editText);
 textView = (TextView) findViewById(R.id.textView);

 button01.setOnClickListener(this);
 button02.setOnClickListener(this);

 button01.setEnabled(true);
 button02.setEnabled(false);
 }


 @Override
 protected void onCreate(Bundle savedInstanceState) {
 super.onCreate(savedInstanceState);
 setContentView(R.layout.activity_main);
 initView();

 }


 @Override
 public void onClick(View v) {
 switch (v.getId()){
  case R.id.button01:
  // TODO: 15-9-4 socket連接線程
  connectThread();
  break;
  case R.id.button02:
  // TODO: 15-9-4 發送數據線程
  sendMsgThread();
  break;
 }
 }

 private void sendMsgThread() {

 final String text = editText.getText().toString();
 try {
  msgBuffer = text.getBytes("UTF-8");
 } catch (UnsupportedEncodingException e) {
  e.printStackTrace();
 }

 new Thread(new Runnable() {
  @Override
  public void run() {
  try {
   OutputStream outputStream;
   //Socket輸出流
   outputStream = ClientSocket.getOutputStream();

   outputStream.write(msgBuffer);
   outputStream.flush();
   outputStream.close();
  } catch (IOException e) {
   e.printStackTrace();
  }
  handler.post(new Runnable() {
   @Override
   public void run() {
   textView.append("發送成功:"+text+"\n");
   }
  });
  }
 }).start();
 }

 private void connectThread() {
 new Thread(new Runnable() {
  @Override
  public void run() {
  try {
   ClientSocket = new Socket("10.0.2.2",9001);
   if (ClientSocket.isConnected()){
   handler.post(new Runnable() {
    @Override
    public void run() {
    textView.append("連接成功!"+"\n");
    button01.setEnabled(false);
    button02.setEnabled(true);
    }
   });
   }else {
   handler.post(new Runnable() {
    @Override
    public void run() {
    textView.append("連接失敗!"+"\n");
    }
   });
   }
  } catch (IOException e) {
   e.printStackTrace();
  }
  }
 }).start();
 }
 @Override
 public boolean onCreateOptionsMenu(Menu menu) {
 // Inflate the menu; this adds items to the action bar if it is present.
 getMenuInflater().inflate(R.menu.menu_main, menu);
 return true;
 }

 @Override
 public boolean onOptionsItemSelected(MenuItem item) {
 // Handle action bar item clicks here. The action bar will
 // automatically handle clicks on the Home/Up button, so long
 // as you specify a parent activity in AndroidManifest.xml.
 int id = item.getItemId();

 //noinspection SimplifiableIfStatement
 if (id == R.id.action_settings) {
  return true;
 }

 return super.onOptionsItemSelected(item);
 }
}
這裡我的線程使用方式是:
new Thread (new Runnable) {
 @Override
 public void run() {
 }
}
網上有人說這個方式很LOW,而且不好,但現在我只會這個,就連asynctask也還在學習中。
還有一點,子線程更新主UI的方法:
我使用的是 Handler.post(); 同樣十分簡單的使用方法。
Handler handler = new Handler();

handler.post(new Runnable() {
   @Override
   public void run() {
   textView.append("發送成功:"+text+"\n");
   }
  });
關於幾種子線程更新主UI的方法,我以後會再寫一篇博客。我現在已經知道了不下4中方法,還沒實地操作。
再來就是關於I/O流操作的方法:
這裡我不做詳細介紹,大家自行Google!什麼你不會Google? 自行找FQ工具吧~~
這裡我說一下我對於I/O的簡單使用方法。
萬物始於最初的,InputStream,OutputStream,他的方法只有reader()和write()。再其之上的,例如什麼使用最多的BufferedReader對象,都是再其之上的升級包裝,穿了個衣服,變得更加華麗而已。他的專業術語就是——裝飾者模式,感興趣的可以去翻翻資料。

最初,我對InputStream和OutputStream的方法不是很明了,經常錯將InputStream用上write()的方法。 不知在哪裡看到這麼一段話,I/O流的操作實質是相對於Socket,ServerSocket連接後產生的數據流管道,reader與write是讀取與寫入的意思,是相對於那個數據流管道進行操作的。即讀取管道裡的信息,寫入信息至管道。不知道這樣大家動不動。
最後就是我們要學習的Socket。
他的使用也很簡單,建立一個Socket對象,設置IP和端口,獲取其I/O流。
ClientSocket = new Socket("10.0.2.2",9001);

outputStream = ClientSocket.getOutputStream();
到這裡基本的使用方法就這麼多。
說說我在這其中遇到的問題:
1.模擬器連接Java服務器連接不上。IP設置不對,我最開始設置的Ip是 127.0.0.1。 解決的連接:
http://stackoverflow.com/questions/8191192/reaching-a-network-device-by-ip-and-port-using-the-android-emulator/8191487#8191487
http://stackoverflow.com/questions/10336637/how-do-i-socket-an-android-program-to-a-localhost-server
2.忘記設置manifest,或者系統提供的android.permission.INTERNET全是大寫的!!說來滑稽,但我就是遇到這樣的問題,系統自動完成的代碼提示,全是大寫的,我以為就是那樣呢,結果明明應該是小寫。
<uses-permission android:name="android.permission.INTERNET" />
忘記貼上java服務器的代碼了,補上。
/**
 * 本實例功能:接受服務器發來的數據
 */
public class Main {

  public static void main(String[] args) {
    // TODO Auto-generated method stub
    new SerVerListener().start();
  }

}
 import java.io.BufferedReader;
import java.io.IOException;
import java.io.InputStream;
import java.io.InputStreamReader;
import java.io.UnsupportedEncodingException;
import java.net.ServerSocket;
import java.net.Socket;

import javax.swing.JOptionPane;


public class SerVerListener extends Thread{

  private Socket clientSocket = null;
  private ServerSocket serverSocket = null;
  private InputStream inputStream = null;
  private byte[] buffer = null;

  @Override
  public void run() {
    // TODO Auto-generated method stub

    try {
      serverSocket = new ServerSocket(9001);
      System.out.println("端口已開啟,等待連接中〜〜");
      //block
      clientSocket = serverSocket.accept();
      System.out.println("已有用戶連接");
      inputStream = clientSocket.getInputStream();

      BufferedReader br = new BufferedReader(new InputStreamReader(inputStream));
      String str;

      while((str = br.readLine())!= null){
        System.out.println(str);
      }

    }catch (IOException e) {
      // TODO Auto-generated catch block
      e.printStackTrace();
    }finally{
      try {
        inputStream.close();
        serverSocket.close();
      } catch (IOException e) {
        // TODO Auto-generated catch block
        e.printStackTrace();
      }
    }


  }

}
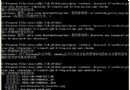
這是服務器端就收到的數據:

OK,基本就這樣。
以上就是本文的全部內容,希望對大家的學習有所幫助。
 Android源碼分析(二):View的事件分發機制探析
Android應用開發時,自定義控件時少不了和View的觸摸點擊事件打交道。針對View的事件分發原理,也看過網上的一些博客,但是看歸看,看了之後時間一長就又忘記了,因此
 Android 給空白包簽名並上傳審核
前言:之前公司app在騰訊開放平台認領應用時,涉及了一個問題:就是給空白包簽名。然後再上傳上去審核。應用能在Android 系統上安裝必須是經過有私有key的證書數據簽名
 Android開發筆記(九十四)圖片的基本加工
位圖管理BitmapAndroid上的圖形使用Drawable類,而位圖管理則使用Bitmap類,java上與之對應的是awt包中的BufferedImage。Andro
 解決雙系統微信的“小問題”
如今微信的熱度已經遠超微博,無論是Android還是WindowsPhone系統,微信永遠是使用頻率最高的APP。下面,我們就來解決困擾上述兩種系統微信玩家