編輯:關於Android編程
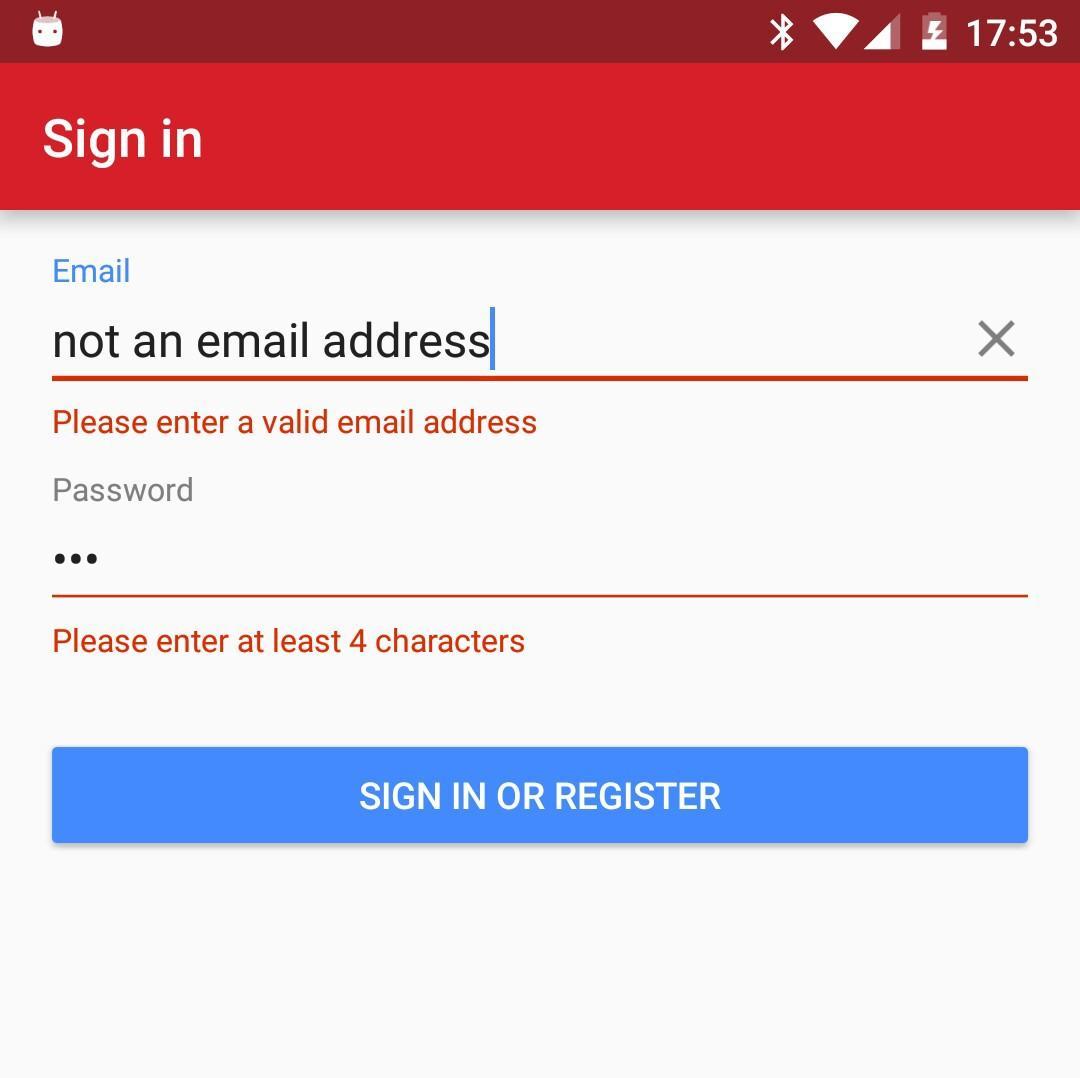
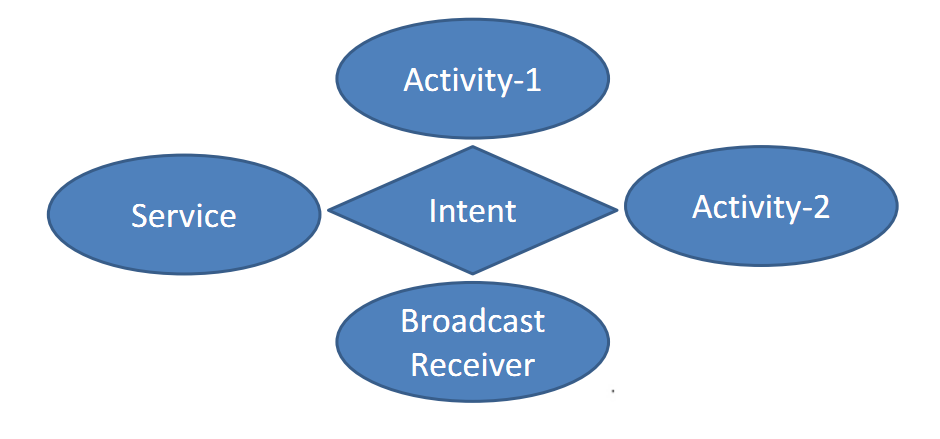
在 Android design support 包中提供了一種在輸入不合適字符時一直顯示的提示方式來顯示,現在已經開始在更多的應用上被使用了;這些 Android app 在顯示他們的錯誤提示時采用的不同的方式常常讓人感覺非常的不和諧。
即這個一直顯示的錯誤消息是在 TextInputLayout 中的 EditText 周圍的。這也是,作為一個獎勵,提供了材料設計風格中,活潑的浮動標簽在一個 APP 的用戶體驗中常常是最無聊的部分。
這裡來討論如何在你的輸入表單上去創建一個通用的、可重用的組件來實現所有的字段驗證。因為你想要在用戶改正了錯誤的輸入時就去隱藏錯誤提示。我們可以通過使用 TextWatchers 來實現驗證。
不幸的是,在最新的support library (23.1)中,一旦你隱藏了錯誤提示,讓它們再顯示的時候,會有一個 bug。所以這個例子是建立在這個 23.0.1 support library 上的。此時我對這個 support library 是又愛又恨的關系——每次一個新版本發布的時候我就像一個小孩在過聖誕節:我沖下樓去看聖誕老人送來的新玩具是什麼,但是發現他帶來新玩具的時候,我的新玩具火車缺少一些零件,他還弄壞了一些我最喜歡的玩具,還把煙囪裡的煙灰踩到了地攤上。
創建我們通用的類
把我的小埋怨放到一邊,讓我們創建一個實現了 TextWatcher 的接口的抽象的 ErrorTextWatcher 類。對於這個簡單的例子,我想說我們的 TextWatcher 總是帶有 TextInputLayout,而且它可以顯示一個簡單的錯誤消息。你的用戶體驗設計團隊可能想要顯示不同的錯誤——如:“密碼不能為空”,“密碼必須包含至少一個數字”,“請輸入至少 4 個字符”等。—— 但為了簡單起見,每個 TextWatcher 我將只展示如何實現一個簡單的消息。
public abstract class ErrorTextWatcher implements TextWatcher {

  private TextInputLayout mTextInputLayout;
  private String errorMessage;

  protected ErrorTextWatcher(@NonNull final TextInputLayout textInputLayout, @NonNull final String errorMessage) {
    this.mTextInputLayout = textInputLayout;
    this.errorMessage = errorMessage;
  }
我還給這個抽象類增加了一些通用的方法:
public final boolean hasError() {
  return mTextInputLayout.getError() != null;
}

protected String getEditTextValue() {
  return mTextInputLayout.getEditText().getText().toString();
}
我也想要我所有的 ErrorTextWatchers 都實現 validate() 方法,如果如果輸入是正確的就返回 true,這樣能簡單的去顯示或隱藏錯誤:
public abstract boolean validate();

protected void showError(final boolean error) {
  if (!error) {
    mTextInputLayout.setError(null);
    mTextInputLayout.setErrorEnabled(false);
  } else {
    if (!errorMessage.equals(mTextInputLayout.getError())) {
      // Stop the flickering that happens when setting the same error message multiple times
      mTextInputLayout.setError(errorMessage);
    }
    mTextInputLayout.requestFocus();
  }
}
在我的代碼上,這個庫在這裡有另外一個功能:在我看來通過設置錯誤提示的 enabled 為 false,你就應該能隱藏錯誤提示,但是這會讓 EditText 的下劃線仍然顯示不正確的顏色,所以你既需要設置錯誤提示為空,也需要讓下劃線的顏色恢復。同樣,如果你不斷地設置相同的錯誤字符串,這個錯誤提示會隨著動畫不斷的閃爍,所以只有當錯誤提示有新的值時才要去重寫。
最後,當焦點在 TextWatcher 內的 EditText 上時,我有一點點調皮的要求 ——當你看到我是如何驗證輸入表單的,希望你能明白我為什麼這麼做,但是對於你的需求,你可能想要把這段邏輯移到其他地方。
作為一個額外的優化,我發現我可以在 onTextChanged 方法的 TextWatcher 接口內實現我所有的邏輯,所以我給 beforeTextChanged 和 afterTextChanged 的父類增加了兩個空方法。
最小長度驗證
現在,讓我們這個類的一個具體的例子。一個常見的用例是輸入字段需要至少為 x 個的字符。因此,讓我們創建一個 MinimumLengthTextWatcher。它帶有一個最小長度值,當然,在父類中,我還需要 TextInputLayout 和 message。此外,我不想在他們輸入完成之前一直告訴用戶他們需要輸入 x 個字符——這會是一個壞的用戶體驗——所以我們應該在用戶已經超出了最小限制字符的時候來開始顯示錯誤。(譯者注:可以理解為當用戶輸入的長度超過最小限制字符之後,用戶再刪除一部分字符,如果此時少於最小限制字符,就會顯示錯誤了,這樣就能理解了)
public class MinimumLengthTextWatcher extends ErrorTextWatcher {

  private final int mMinLength;
  private boolean mReachedMinLength = false;

  public MinimumLengthTextWatcher(final TextInputLayout textInputLayout, final int minLength) {
    this(textInputLayout, minLength, R.string.error_too_few_characters);
  }

  public MinimumLengthTextWatcher(final TextInputLayout textInputLayout, final int minLength, @StringRes final int errorMessage) {
    super(textInputLayout, String.format(textInputLayout.getContext().getString(errorMessage), minLength));
    this.mMinLength = minLength;
  }
這裡有兩個構造方法:一個是具有默認的消息,還有一個是對於特殊的文本字段你可以創建一個更具體的值。因為我們想要支持當地化,我們采用 Android string 資源文件,而不是硬編碼 String 的值。
我們文本的改變和驗證方法現在已經像下面這樣簡單的實現了:
@Override
public void onTextChanged(final CharSequence text…) {
  if (mReachedMinLength) {
    validate();
  }
  if (text.length() >= mMinLength) {
    mReachedMinLength = true;
  }
}

@Override
public boolean validate() {
  mReachedMinLength = true; // This may not be true but now we want to force the error to be shown
  showError(getEditTextValue().length() < mMinLength);
  return !hasError();
}
你會注意到,一旦驗證方法在 TextWatcher 中被調起的話,它將會顯示錯誤。我想這適用於大多數情況,但是你可能想要引入一個 setter 方法去重置某些情況下的這種行為。
你現在需要去給你的 TextInputLayout 增加 TextWatcher,接著在你的 Activity 或 Fragment 中去創建 views。就像這樣:
mPasswordView = (TextInputLayout) findViewById(R.id.password_text_input_layout);
mValidPasswordTextWatcher = new MinimumLengthTextWatcher(mPasswordView, getResources().getInteger(R.integer.min_length_password));
mPasswordView.getEditText().addTextChangedListener(mValidPasswordTextWatcher);
然後,在你代碼的合適位置,你可以檢查一個字段是否有效:
boolean isValid = mValidPasswordTextWatcher.validate();
如果密碼是無效的,這個 View 會自動的獲得焦點並將屏幕滾動到這裡。
驗證電子郵件地址
另一種常見的驗證用例是檢查電子郵件地址是否是有效的。我可以很容易的寫一整篇都關於用正則表達式來驗證郵件地址的文章,但是因為這常常是有爭議的,我已經從 TextWatcher 本身分開了郵件驗證的邏輯。示例項目包含了可測試的 EmailAddressValidator,你可以用它,或者你也可以用你自己想要的邏輯來實現。
既然我已經把郵件驗證邏輯分離出來了,ValidEmailTextWatcher 是和 MinimumLengthTextWatcher 非常相似的。
public class ValidEmailTextWatcher extends ErrorTextWatcher {

  private final EmailAddressValidator mValidator = new EmailAddressValidator();
  private boolean mValidated = false;


  public ValidEmailTextWatcher(@NonNull final TextInputLayout textInputLayout) {
    this(textInputLayout, R.string.error_invalid_email);
  }

  public ValidEmailTextWatcher(@NonNull final TextInputLayout textInputLayout, @StringRes final int errorMessage) {
    super(textInputLayout, textInputLayout.getContext().getString(errorMessage));
  }

  @Override
  public void onTextChanged(…) {
    if (mValidated) {
      validate();
    }
  }

  @Override
  public boolean validate() {
    showError(!mValidator.isValid(getEditTextValue()));
    mValidated = true;
    return !hasError();
  }
這個 TextWatcher 在我們的 Activity 或 Fragment 內的實現方式是和之前的是非常像的:
mEmailView = (TextInputLayout) findViewById(R.id.email_text_input_layout);
mValidEmailTextWatcher = new ValidEmailTextWatcher(mEmailView);
mEmailView.getEditText().addTextChangedListener(mValidEmailTextWatcher);
把它放在一起
對於表單注冊或登錄,在提交給你的 API 之前,你通常會驗證所有的字段。因為我們要求關注在 TextWatcher 的任何 views 的失敗驗證。我一般在從下往上驗證所有的 view。這樣,應用程序顯示所有需要糾正字段的錯誤,然後跳轉到表單上第一個錯誤輸入的文本。例如:
private boolean allFieldsAreValid() {
  /**
   * Since the text watchers automatically focus on erroneous fields, do them in reverse order so that the first one in the form gets focus
   * &= may not be the easiest construct to decipher but it's a lot more concise. It just means that once it's false it doesn't get set to true
   */
  boolean isValid = mValidPasswordTextWatcher.validate();
  isValid &= mValidEmailTextWatcher.validate();
  return isValid;
}
你可以找到上述所有代碼的例子在 GitHub[1] 上。這是一個在 ClearableEditText 上的分支,我是基於 讓你的 EditText 全部清除[2] 這篇博客上的代碼來進行闡述的,但是把它用在標准的 EditText 上也是一樣的。它還包括了一些更多的技巧和 bug 處理,我沒有時間在這裡提了。
盡管我只顯示了兩個 TextWatcher 的例子,但我希望你能看到這是多麼簡單,你現在能添加其他的 TextWatcher 去給任何文本輸入添加不同的驗證方法,並在你的 APP 中去請求驗證和重用。
帶清除功能的輸入框控件ClearEditText
下面給大家帶來一個很實用的小控件ClearEditText,就是在Android系統的輸入框右邊加入一個小圖標,點擊小圖標可以清除輸入框裡面的內容,IOS上面直接設置某個屬性就可以實現這一功能,但是Android原生EditText不具備此功能,所以要想實現這一功能我們需要重寫EditText,接下來就帶大家來實現這一小小的功能
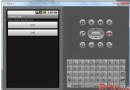
我們知道,我們可以為我們的輸入框在上下左右設置圖片,所以我們可以利用屬性android:drawableRight設置我們的刪除小圖標,如圖

我這裡設置了左邊和右邊的圖片,如果我們能為右邊的圖片設置監聽,點擊右邊的圖片清除輸入框的內容並隱藏刪除圖標,這樣子這個小功能就迎刃而解了,可是Android並沒有給允許我們給右邊小圖標加監聽的功能,這時候你是不是發現這條路走不通呢,其實不是,我們可能模擬點擊事件,用輸入框的的onTouchEvent()方法來模擬,
當我們觸摸抬起(就是ACTION_UP的時候)的范圍 大於輸入框左側到清除圖標左側的距離,小與輸入框左側到清除圖片右側的距離,我們則認為是點擊清除圖片,當然我這裡沒有考慮豎直方向,只要給清除小圖標就上了監聽,其他的就都好處理了,我先把代碼貼上來,在講解下
package com.example.clearedittext;

import android.content.Context;
import android.graphics.drawable.Drawable;
import android.text.Editable;
import android.text.TextWatcher;
import android.util.AttributeSet;
import android.view.MotionEvent;
import android.view.View;
import android.view.View.OnFocusChangeListener;
import android.view.animation.Animation;
import android.view.animation.CycleInterpolator;
import android.view.animation.TranslateAnimation;
import android.widget.EditText;

public class ClearEditText extends EditText implements
    OnFocusChangeListener, TextWatcher {
  /**
   * 刪除按鈕的引用
   */
  private Drawable mClearDrawable;
  /**
   * 控件是否有焦點
   */
  private boolean hasFoucs;

  public ClearEditText(Context context) {
    this(context, null);
  }

  public ClearEditText(Context context, AttributeSet attrs) {
    //這裡構造方法也很重要,不加這個很多屬性不能再XML裡面定義
    this(context, attrs, android.R.attr.editTextStyle);
  }

  public ClearEditText(Context context, AttributeSet attrs, int defStyle) {
    super(context, attrs, defStyle);
    init();
  }


  private void init() {
    //獲取EditText的DrawableRight,假如沒有設置我們就使用默認的圖片
    mClearDrawable = getCompoundDrawables()[2];
    if (mClearDrawable == null) {
//     throw new NullPointerException("You can add drawableRight attribute in XML");
      mClearDrawable = getResources().getDrawable(R.drawable.delete_selector);
    }

    mClearDrawable.setBounds(0, 0, mClearDrawable.getIntrinsicWidth(), mClearDrawable.getIntrinsicHeight());
    //默認設置隱藏圖標
    setClearIconVisible(false);
    //設置焦點改變的監聽
    setOnFocusChangeListener(this);
    //設置輸入框裡面內容發生改變的監聽
    addTextChangedListener(this);
  }


  /**
   * 因為我們不能直接給EditText設置點擊事件,所以我們用記住我們按下的位置來模擬點擊事件
   * 當我們按下的位置 在 EditText的寬度 - 圖標到控件右邊的間距 - 圖標的寬度 和
   * EditText的寬度 - 圖標到控件右邊的間距之間我們就算點擊了圖標,豎直方向就沒有考慮
   */
  @Override
  public boolean onTouchEvent(MotionEvent event) {
    if (event.getAction() == MotionEvent.ACTION_UP) {
      if (getCompoundDrawables()[2] != null) {

        boolean touchable = event.getX() > (getWidth() - getTotalPaddingRight())
            && (event.getX() < ((getWidth() - getPaddingRight())));

        if (touchable) {
          this.setText("");
        }
      }
    }

    return super.onTouchEvent(event);
  }

  /**
   * 當ClearEditText焦點發生變化的時候,判斷裡面字符串長度設置清除圖標的顯示與隱藏
   */
  @Override
  public void onFocusChange(View v, boolean hasFocus) {
    this.hasFoucs = hasFocus;
    if (hasFocus) {
      setClearIconVisible(getText().length() > 0);
    } else {
      setClearIconVisible(false);
    }
  }


  /**
   * 設置清除圖標的顯示與隱藏,調用setCompoundDrawables為EditText繪制上去
   * @param visible
   */
  protected void setClearIconVisible(boolean visible) {
    Drawable right = visible ? mClearDrawable : null;
    setCompoundDrawables(getCompoundDrawables()[0],
        getCompoundDrawables()[1], right, getCompoundDrawables()[3]);
  }


  /**
   * 當輸入框裡面內容發生變化的時候回調的方法
   */
  @Override
  public void onTextChanged(CharSequence s, int start, int count,
      int after) {
        if(hasFoucs){
          setClearIconVisible(s.length() > 0);
        }
  }

  @Override
  public void beforeTextChanged(CharSequence s, int start, int count,
      int after) {

  }

  @Override
  public void afterTextChanged(Editable s) {

  }


  /**
   * 設置晃動動畫
   */
  public void setShakeAnimation(){
    this.setAnimation(shakeAnimation(5));
  }


  /**
   * 晃動動畫
   * @param counts 1秒鐘晃動多少下
   * @return
   */
  public static Animation shakeAnimation(int counts){
    Animation translateAnimation = new TranslateAnimation(0, 10, 0, 0);
    translateAnimation.setInterpolator(new CycleInterpolator(counts));
    translateAnimation.setDuration(1000);
    return translateAnimation;
  }


}
setClearIconVisible()方法,設置隱藏和顯示清除圖標的方法,我們這裡不是調用setVisibility()方法,setVisibility()這個方法是針對View的,我們可以調用setCompoundDrawables(Drawable left, Drawable top, Drawable right, Drawable bottom)來設置上下左右的圖標
setOnFocusChangeListener(this) 為輸入框設置焦點改變監聽,如果輸入框有焦點,我們判斷輸入框的值是否為空,為空就隱藏清除圖標,否則就顯示
addTextChangedListener(this) 為輸入框設置內容改變監聽,其實很簡單呢,當輸入框裡面的內容發生改變的時候,我們需要處理顯示和隱藏清除小圖標,裡面的內容長度不為0我們就顯示,否是就隱藏,但這個需要輸入框有焦點我們才改變顯示或者隱藏,為什麼要需要焦點,比如我們一個登陸界面,我們保存了用戶名和密碼,在登陸界面onCreate()的時候,我們把我們保存的密碼顯示在用戶名輸入框和密碼輸入框裡面,輸入框裡面內容發生改變,導致用戶名輸入框和密碼輸入框裡面的清除小圖標都顯示了,這顯然不是我們想要的效果,所以加了一個是否有焦點的判斷
setShakeAnimation(),這個方法是輸入框左右抖動的方法,之前我在某個應用看到過類似的功能,當用戶名錯誤,輸入框就在哪裡抖動,感覺挺好玩的,其實主要是用到一個移動動畫,然後設置動畫的變化率為正弦曲線
接下來我們來使用它,Activity的布局,兩個我們自定義的輸入框,一個按鈕
<RelativeLayout xmlns:android="http://schemas.android.com/apk/res/android"
  xmlns:tools="http://schemas.android.com/tools"
  android:layout_width="match_parent"
  android:layout_height="match_parent"
  android:background="#95CAE4">


  <com.example.clearedittext.ClearEditText
    android:id="@+id/username"
    android:layout_marginTop="60dp"
    android:layout_width="fill_parent"
    android:background="@drawable/login_edittext_bg"
    android:drawableLeft="@drawable/icon_user"
    android:layout_marginLeft="10dip"
    android:layout_marginRight="10dip"
    android:singleLine="true"
    android:drawableRight="@drawable/delete_selector"
    android:hint="輸入用戶名"
    android:layout_height="wrap_content" >

  </com.example.clearedittext.ClearEditText>

  <com.example.clearedittext.ClearEditText
    android:id="@+id/password"
    android:layout_marginLeft="10dip"
    android:layout_marginRight="10dip"
    android:layout_marginTop="10dip"
    android:drawableLeft="@drawable/account_icon"
    android:hint="輸入密碼"
    android:singleLine="true"
    android:password="true"
    android:drawableRight="@drawable/delete_selector"
    android:layout_width="fill_parent"
    android:layout_height="wrap_content"
    android:layout_below="@id/username"
    android:background="@drawable/login_edittext_bg" >
  </com.example.clearedittext.ClearEditText>

  <Button
    android:id="@+id/login"
    android:layout_width="fill_parent"
    android:layout_height="wrap_content"
    android:layout_marginLeft="10dip"
    android:layout_marginRight="10dip"
    android:background="@drawable/login_button_bg"
    android:textSize="18sp"
    android:textColor="@android:color/white"
    android:layout_below="@+id/password"
    android:layout_marginTop="25dp"
    android:text="登錄" />

</RelativeLayout>
然後就是界面代碼的編寫,主要是測試輸入框左右晃動而已,比較簡單
package com.example.clearedittext;

import android.app.Activity;
import android.os.Bundle;
import android.text.TextUtils;
import android.view.View;
import android.view.View.OnClickListener;
import android.widget.Button;
import android.widget.Toast;

public class MainActivity extends Activity {
  private Toast mToast;

  @Override
  protected void onCreate(Bundle savedInstanceState) {
    super.onCreate(savedInstanceState);
    setContentView(R.layout.activity_main);

    final ClearEditText username = (ClearEditText) findViewById(R.id.username);
    final ClearEditText password = (ClearEditText) findViewById(R.id.password);

    ((Button) findViewById(R.id.login)).setOnClickListener(new OnClickListener() {

      @Override
      public void onClick(View v) {
        if(TextUtils.isEmpty(username.getText())){
          //設置晃動
          username.setShakeAnimation();
          //設置提示
          showToast("用戶名不能為空");
          return;
        }

        if(TextUtils.isEmpty(password.getText())){
          password.setShakeAnimation();
          showToast("密碼不能為空");
          return;
        }
      }
    });
  }

  /**
   * 顯示Toast消息
   * @param msg
   */
  private void showToast(String msg){
    if(mToast == null){
      mToast = Toast.makeText(this, msg, Toast.LENGTH_SHORT);
    }else{
      mToast.setText(msg);
    }
    mToast.show();
  }


}
運行項目,如圖,悲劇,沒有動畫效果,算了就這樣子吧,你是不是也想把它加到你的項目當中去呢,趕緊吧!
 AndroidStudio上面最好用的插件
AndroidStudio上面最好用的插件Android ButterKnife Zelezny在Activity,Fragment,Adapter中選中布局xml自動生
 android fragment+ FragmentTabHost+viewpager 切換狀態不保存的問題
@author dujinyang難得有時間上來寫博客。fragment雖然好用,但個人還是覺得有利有弊。網上大都說切換狀態,有挺多問題,有很多種解決方案。第
 Android自定義View Flyme6的Viewpager指示器
最新更新的Flyme6整體效果不錯,動畫效果增加了很多了,看了看flyme6的Viewpager指示器,覺得有點意思,就模仿寫了一下,整體效果如下: GradleJitP
 android Handler的使用(一)
Handler的使用(一) Handler基本概念: Handler主要用於異步消息的處理:當發出一個消息之後,首先進入一個消息隊