編輯:關於Android編程
通常我們使用Service都要和它通信,當想要與Service通信的時候,那麼Service要處於綁定狀態的。然後客戶端可以拿到一個Binder與服務端進行通信,這個過程是很自然的。
那你真的了解過Service的綁定過程嗎?為什麼可以是Binder和Service通信?
同樣的先看一張圖大致了解一下,灰色背景框起來的是同一個類的方法,如下:
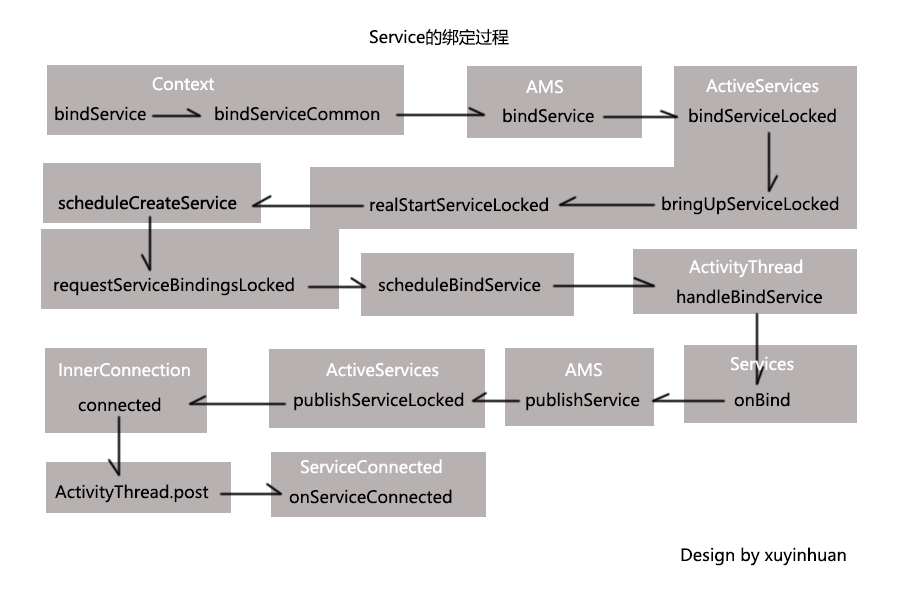
我們知道調用Context的bindService方法即可綁定一個Service,而ContextImpl是Context的實現類。那接下來就從源碼的角度分析Service的綁定過程。
當然是從ContextImpl的bindService方法開始,如下:
@Override
public boolean bindService(Intent service, ServiceConnection conn,
        int flags) {
    warnIfCallingFromSystemProcess();
    return bindServiceCommon(service, conn, flags, mMainThread.getHandler(),
            Process.myUserHandle());
}
在bindService方法中又會轉到bindServiceCommon方法,將Intent,ServiceConnection對象傳進。
那就看看bindServiceCommon方法的實現。
private boolean bindServiceCommon(Intent service, ServiceConnection conn, int flags, Handler
        handler, UserHandle user) {
    IServiceConnection sd;
    if (conn == null) {
        throw new IllegalArgumentException("connection is null");
    }
    if (mPackageInfo != null) {
        sd = mPackageInfo.getServiceDispatcher(conn, getOuterContext(), handler, flags);
    } else {
        throw new RuntimeException("Not supported in system context");
    }
    validateServiceIntent(service);
    try {
        IBinder token = getActivityToken();
        if (token == null && (flags&BIND_AUTO_CREATE) == 0 && mPackageInfo != null
                && mPackageInfo.getApplicationInfo().targetSdkVersion
                < android.os.Build.VERSION_CODES.ICE_CREAM_SANDWICH) {
            flags |= BIND_WAIVE_PRIORITY;
        }
        service.prepareToLeaveProcess(this);
        int res = ActivityManagerNative.getDefault().bindService(
            mMainThread.getApplicationThread(), getActivityToken(), service,
            service.resolveTypeIfNeeded(getContentResolver()),
            sd, flags, getOpPackageName(), user.getIdentifier());
        if (res < 0) {
            throw new SecurityException(
                    "Not allowed to bind to service " + service);
        }
        return res != 0;
    } catch (RemoteException e) {
        throw e.rethrowFromSystemServer();
    }
}
在上述代碼中,調用了mPackageInfo(LoadedApk對象)的getServiceDispatcher方法。從getServiceDispatcher方法的名字可以看出是獲取一個“服務分發者”。其實是根據這個“服務分發者”獲取到一個Binder對象的。
那現在就看到getServiceDispatcher方法的實現。
public final IServiceConnection getServiceDispatcher(ServiceConnection c,
        Context context, Handler handler, int flags) {
    synchronized (mServices) {
        LoadedApk.ServiceDispatcher sd = null;
        ArrayMap map = mServices.get(context);
        if (map != null) {
            sd = map.get(c);
        }
        if (sd == null) {
            sd = new ServiceDispatcher(c, context, handler, flags);
            if (map == null) {
                map = new ArrayMap();
                mServices.put(context, map);
            }
            map.put(c, sd);
        } else {
            sd.validate(context, handler);
        }
        return sd.getIServiceConnection();
    }
}
從getServiceDispatcher方法的實現可以知道,ServiceConnection和ServiceDispatcher構成了映射關系。當存儲集合不為空的時候,根據傳進的key,也就是ServiceConnection,來取出對應的ServiceDispatcher對象。
當取出ServiceDispatcher對象後,最後一行代碼是關鍵,
return sd.getIServiceConnection();
調用了ServiceDispatcher對象的getIServiceConnection方法。這個方法肯定是獲取一個IServiceConnection的。
IServiceConnection getIServiceConnection() {
    return mIServiceConnection;
}
那麼mIServiceConnection是什麼?現在就可以來看下ServiceDispatcher類了。ServiceDispatcher是LoadedApk的內部類,裡面封裝了InnerConnection和ServiceConnection。如下:
static final class ServiceDispatcher {
    private final ServiceDispatcher.InnerConnection mIServiceConnection;
    private final ServiceConnection mConnection;
    private final Context mContext;
    private final Handler mActivityThread;
    private final ServiceConnectionLeaked mLocation;
    private final int mFlags;

    private RuntimeException mUnbindLocation;

    private boolean mForgotten;

    private static class ConnectionInfo {
        IBinder binder;
        IBinder.DeathRecipient deathMonitor;
    }

    private static class InnerConnection extends IServiceConnection.Stub {
        final WeakReference mDispatcher;

        InnerConnection(LoadedApk.ServiceDispatcher sd) {
            mDispatcher = new WeakReference(sd);
        }

        public void connected(ComponentName name, IBinder service) throws RemoteException {
            LoadedApk.ServiceDispatcher sd = mDispatcher.get();
            if (sd != null) {
                sd.connected(name, service);
            }
        }
    }

    private final ArrayMap mActiveConnections
        = new ArrayMap();

    ServiceDispatcher(ServiceConnection conn,
            Context context, Handler activityThread, int flags) {
        mIServiceConnection = new InnerConnection(this);
        mConnection = conn;
        mContext = context;
        mActivityThread = activityThread;
        mLocation = new ServiceConnectionLeaked(null);
        mLocation.fillInStackTrace();
        mFlags = flags;
    }

    //代碼省略

}
先看到ServiceDispatcher的構造方法,一個ServiceDispatcher關聯一個InnerConnection對象。而InnerConnection呢?,它是一個Binder,有一個很重要的connected方法。至於為什麼要用Binder,因為與Service通信可能是跨進程的。
好,到了這裡先總結一下:調用bindService方法綁定服務,會轉到bindServiceCommon方法。
在bindServiceCommon方法中,會調用LoadedApk的getServiceDispatcher方法,並將ServiceConnection傳進, 根據這個ServiceConnection取出與其映射的ServiceDispatcher對象,最後調用這個ServiceDispatcher對象的getIServiceConnection方法獲取與其關聯的InnerConnection對象並返回。簡單點理解就是用ServiceConnection換來了InnerConnection。
現在回到bindServiceCommon方法,可以看到綁定Service的過程會轉到ActivityManagerNative.getDefault()的bindService方法,其實從拋出的異常類型RemoteException也可以知道與Service通信可能是跨進程的,這個是很好理解的。
而ActivityManagerNative.getDefault()是ActivityManagerService,那麼繼續跟進ActivityManagerService的bindService方法即可,如下:
public int bindService(IApplicationThread caller, IBinder token, Intent service,
        String resolvedType, IServiceConnection connection, int flags, String callingPackage,
        int userId) throws TransactionTooLargeException {
    enforceNotIsolatedCaller("bindService");

    // Refuse possible leaked file descriptors
    if (service != null && service.hasFileDescriptors() == true) {
        throw new IllegalArgumentException("File descriptors passed in Intent");
    }

    if (callingPackage == null) {
        throw new IllegalArgumentException("callingPackage cannot be null");
    }

    synchronized(this) {
        return mServices.bindServiceLocked(caller, token, service,
                resolvedType, connection, flags, callingPackage, userId);
    }
}
在上述代碼中,綁定Service的過程轉到ActiveServices的bindServiceLocked方法,那就跟進ActiveServices的bindServiceLocked方法瞧瞧。如下:
int bindServiceLocked(IApplicationThread caller, IBinder token, Intent service,
        String resolvedType, final IServiceConnection connection, int flags,
        String callingPackage, final int userId) throws TransactionTooLargeException {

        //代碼省略

          ConnectionRecord c = new ConnectionRecord(b, activity,
                    connection, flags, clientLabel, clientIntent);

          IBinder binder = connection.asBinder();
          ArrayList clist = s.connections.get(binder);
          if (clist == null) {
              clist = new ArrayList();
              s.connections.put(binder, clist);
          }
          clist.add(c);

         //代碼省略

        if ((flags&Context.BIND_AUTO_CREATE) != 0) {
            s.lastActivity = SystemClock.uptimeMillis();
            if (bringUpServiceLocked(s, service.getFlags(), callerFg, false,
                    permissionsReviewRequired) != null) {
                return 0;
            }
        }

        //代碼省略

    return 1;
}
將connection對象封裝在ConnectionRecord中,這裡的connection就是上面提到的InnerConnection對象。這一步很重要的。
然後調用了bringUpServiceLocked方法,那麼就探探這個bringUpServiceLocked方法,
private String bringUpServiceLocked(ServiceRecord r, int intentFlags, boolean execInFg,
        boolean whileRestarting, boolean permissionsReviewRequired)
        throws TransactionTooLargeException {

        //代碼省略

        if (app != null && app.thread != null) {
            try {
                app.addPackage(r.appInfo.packageName, r.appInfo.versionCode, mAm.mProcessStats);
                realStartServiceLocked(r, app, execInFg);
                return null;
            } catch (TransactionTooLargeException e) {
                throw e;
            } catch (RemoteException e) {
                Slog.w(TAG, "Exception when starting service " + r.shortName, e);
            }

            // If a dead object exception was thrown -- fall through to
            // restart the application.
        }

        //代碼省略

    return null;
}
可以看到調用了realStartServiceLocked方法,真正去啟動Service了。
那麼跟進realStartServiceLocked方法探探,如下:
private final void realStartServiceLocked(ServiceRecord r,
        ProcessRecord app, boolean execInFg) throws RemoteException {

      //代碼省略

     app.thread.scheduleCreateService(r, r.serviceInfo,
              mAm.compatibilityInfoForPackageLocked(r.serviceInfo.applicationInfo),
        app.repProcState);
       r.postNotification();
       created = true;

     //代碼省略

    requestServiceBindingsLocked(r, execInFg);

    updateServiceClientActivitiesLocked(app, null, true);

    // If the service is in the started state, and there are no
    // pending arguments, then fake up one so its onStartCommand() will
    // be called.
    if (r.startRequested && r.callStart && r.pendingStarts.size() == 0) {
        r.pendingStarts.add(new ServiceRecord.StartItem(r, false, r.makeNextStartId(),
                null, null));
    }

    sendServiceArgsLocked(r, execInFg, true);

//代碼省略
}
這裡會調用app.thread的scheduleCreateService方法去創建一個Service,然後會回調Service的生命周期方法,然而綁定Service呢?
在上述代碼中,找到一個requestServiceBindingsLocked方法,從名字看是請求綁定服務的意思,那麼就是它沒錯了。
private final void requestServiceBindingsLocked(ServiceRecord r, boolean execInFg)
        throws TransactionTooLargeException {
    for (int i=r.bindings.size()-1; i>=0; i--) {
        IntentBindRecord ibr = r.bindings.valueAt(i);
        if (!requestServiceBindingLocked(r, ibr, execInFg, false)) {
            break;
        }
    }
}
咦,我再按住Ctrl+鼠標左鍵,點進去requestServiceBindingLocked方法。如下:
private final boolean requestServiceBindingLocked(ServiceRecord r, IntentBindRecord i,
        boolean execInFg, boolean rebind) throws TransactionTooLargeException {
    if (r.app == null || r.app.thread == null) {
        // If service is not currently running, can't yet bind.
        return false;
    }
    if ((!i.requested || rebind) && i.apps.size() > 0) {
        try {
            bumpServiceExecutingLocked(r, execInFg, "bind");
            r.app.forceProcessStateUpTo(ActivityManager.PROCESS_STATE_SERVICE);
            r.app.thread.scheduleBindService(r, i.intent.getIntent(), rebind,
                    r.app.repProcState);
            if (!rebind) {
                i.requested = true;
            }
            i.hasBound = true;
            i.doRebind = false;
        }

    //代碼省略

    return true;
}
r.app.thread調用了scheduleBindService方法來綁定服務,而r.app.thread是ApplicationThread,現在關注到 ApplicationThread即可,scheduleBindService方法如下:
public final void scheduleBindService(IBinder token, Intent intent,
        boolean rebind, int processState) {
    updateProcessState(processState, false);
    BindServiceData s = new BindServiceData();
    s.token = token;
    s.intent = intent;
    s.rebind = rebind;

    if (DEBUG_SERVICE)
        Slog.v(TAG, "scheduleBindService token=" + token + " intent=" + intent + " uid="
                + Binder.getCallingUid() + " pid=" + Binder.getCallingPid());
    sendMessage(H.BIND_SERVICE, s);
}
封裝了待綁定的Service的信息,並發送了一個消息給主線程,
public void handleMessage(Message msg) {
    if (DEBUG_MESSAGES) Slog.v(TAG, ">>> handling: " + codeToString(msg.what));
    switch (msg.what) {

    //代碼省略

        case BIND_SERVICE:
            Trace.traceBegin(Trace.TRACE_TAG_ACTIVITY_MANAGER, "serviceBind");
            handleBindService((BindServiceData)msg.obj);
            Trace.traceEnd(Trace.TRACE_TAG_ACTIVITY_MANAGER);
            break;

    //代碼省略

    }
}
調用了handleBindService方法,即將綁定完成啦。
private void handleBindService(BindServiceData data) {
    Service s = mServices.get(data.token);
    if (DEBUG_SERVICE)
        Slog.v(TAG, "handleBindService s=" + s + " rebind=" + data.rebind);
    if (s != null) {
        try {
            data.intent.setExtrasClassLoader(s.getClassLoader());
            data.intent.prepareToEnterProcess();
            try {
                if (!data.rebind) {
                    IBinder binder = s.onBind(data.intent);
                    ActivityManagerNative.getDefault().publishService(
                            data.token, data.intent, binder);
                } else {
                    s.onRebind(data.intent);
                    ActivityManagerNative.getDefault().serviceDoneExecuting(
                            data.token, SERVICE_DONE_EXECUTING_ANON, 0, 0);
                }
                ensureJitEnabled();
            } catch (RemoteException ex) {
                throw ex.rethrowFromSystemServer();
            }
        } catch (Exception e) {
            if (!mInstrumentation.onException(s, e)) {
                throw new RuntimeException(
                        "Unable to bind to service " + s
                        + " with " + data.intent + ": " + e.toString(), e);
            }
        }
    }
}
根據token獲取到Service,然後Service回調onBind方法。結束了?
可是onBind方法返回了一個binder是用來干嘛的?
我們再看看ActivityManagerNative.getDefault()調用了publishService方法做了什麼工作,此時又回到了ActivityManagerService。
public void publishService(IBinder token, Intent intent, IBinder service) {
    // Refuse possible leaked file descriptors
    if (intent != null && intent.hasFileDescriptors() == true) {
        throw new IllegalArgumentException("File descriptors passed in Intent");
    }

    synchronized(this) {
        if (!(token instanceof ServiceRecord)) {
            throw new IllegalArgumentException("Invalid service token");
        }
        mServices.publishServiceLocked((ServiceRecord)token, intent, service);
    }
}
又會交給ActiveServices處理,轉到了publishServiceLocked方法,那看到ActiveServices的publishServiceLocked方法,
void publishServiceLocked(ServiceRecord r, Intent intent, IBinder service) {
    final long origId = Binder.clearCallingIdentity();
    try {
        if (DEBUG_SERVICE) Slog.v(TAG_SERVICE, "PUBLISHING " + r
                + " " + intent + ": " + service);
        if (r != null) {
            Intent.FilterComparison filter
                    = new Intent.FilterComparison(intent);
            IntentBindRecord b = r.bindings.get(filter);
            if (b != null && !b.received) {
                b.binder = service;
                b.requested = true;
                b.received = true;
                for (int conni=r.connections.size()-1; conni>=0; conni--) {
                    ArrayList<connectionrecord> clist = r.connections.valueAt(conni);
                    for (int i=0; i<clist.size(); i++)="" {="" connectionrecord="" c="clist.get(i);" if="" (!filter.equals(c.binding.intent.intent))="" (debug_service)="" slog.v(="" tag_service,="" "not="" publishing="" to:="" "="" +="" c);="" "bound="" intent:="" c.binding.intent.intent);="" "published="" intent);="" continue;="" }="" slog.v(tag_service,="" "publishing="" try="" c.conn.connected(r.name,="" service);="" 代碼省略="" <p="">
c.conn是什麼? 它是一個InnerConnection對象,對,就是那個那個Binder,上面也貼出了代碼,在ActiveServices的bindServiceLocked方法中,InnerConnection對象被封裝在ConnectionRecord中。那麼現在它調用了connected方法,就很好理解了。InnerConnection的connected方法如下:
public void connected(ComponentName name, IBinder service) throws RemoteException {
    LoadedApk.ServiceDispatcher sd = mDispatcher.get();
    if (sd != null) {
        sd.connected(name, service);
    }
}
會調用ServiceDispatcher 的connected方法,如下
public void connected(ComponentName name, IBinder service) {
    if (mActivityThread != null) {
        mActivityThread.post(new RunConnection(name, service, 0));
    } else {
        doConnected(name, service);
    }
}
從而ActivityThread會投遞一個消息到主線程,此時就解決了跨進程通信。 那麼你應該猜到了RunConnection一定有在主線程回調的onServiceConnected方法,
private final class RunConnection implements Runnable {
    RunConnection(ComponentName name, IBinder service, int command) {
        mName = name;
        mService = service;
        mCommand = command;
    }

    public void run() {
        if (mCommand == 0) {
            doConnected(mName, mService);
        } else if (mCommand == 1) {
            doDeath(mName, mService);
        }
    }

    final ComponentName mName;
    final IBinder mService;
    final int mCommand;
}
咦,還不出現?繼續跟進doConnected方法,
public void doConnected(ComponentName name, IBinder service) {
    ServiceDispatcher.ConnectionInfo old;
    ServiceDispatcher.ConnectionInfo info;

    synchronized (this) {
        if (mForgotten) {
            // We unbound before receiving the connection; ignore
            // any connection received.
            return;
        }
        old = mActiveConnections.get(name);
        if (old != null && old.binder == service) {
            // Huh, already have this one.  Oh well!
            return;
        }

        if (service != null) {
            // A new service is being connected... set it all up.
            info = new ConnectionInfo();
            info.binder = service;
            info.deathMonitor = new DeathMonitor(name, service);
            try {
                service.linkToDeath(info.deathMonitor, 0);
                mActiveConnections.put(name, info);
            } catch (RemoteException e) {
                // This service was dead before we got it...  just
                // don't do anything with it.
                mActiveConnections.remove(name);
                return;
            }

        } else {
            // The named service is being disconnected... clean up.
            mActiveConnections.remove(name);
        }

        if (old != null) {
            old.binder.unlinkToDeath(old.deathMonitor, 0);
        }
    }

    // If there was an old service, it is not disconnected.
    if (old != null) {
        mConnection.onServiceDisconnected(name);
    }
    // If there is a new service, it is now connected.
    if (service != null) {
        mConnection.onServiceConnected(name, service);
    }
}
在最後一個if判斷,終於找到了onServiceConnected方法!
總結一下,當Service回調onBind方法,其實還沒有結束,會轉到ActivityManagerService,然後又會在ActiveServices的publishServiceLocked方法中,從ConnectionRecord中取出InnerConnection對象。有了InnerConnection對象後,就回調了它的connected。在InnerConnection的connected方法中,又會調用ServiceDispatcher的connected方法,在ServiceDispatcher的connected方法向主線程扔了一個消息,切換到了主線程,之後就在主線程中回調了客戶端傳進的ServiceConnected對象的onServiceConnected方法。
至此, Service的綁定過程分析完畢。
 Android實現氣泡布局/彈窗效果 氣泡尖角方向及偏移量可控
Android 自定義布局實現氣泡彈窗,可控制氣泡尖角方向及偏移量。效果圖實現首先自定義一個氣泡布局。/** * 氣泡布局 */public class BubbleRe
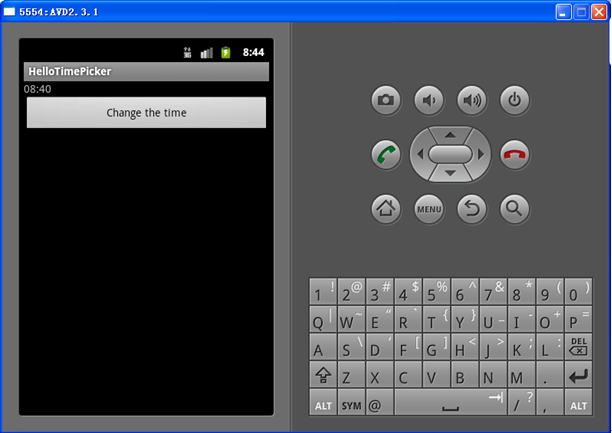 Android開發之TimePicker控件用法實例詳解
本文實例分析了Android開發之TimePicker控件用法。分享給大家供大家參考,具體如下:新建項目:New Android Project->Project
 Android實現在線更新的過程案例
一、更新軟件的准備 在線更新軟件的話需要我們有簽名的應用,我們需要把簽過名之後的軟件放入到服務器中,我的如下: 其中apk是有簽名的更新版本! updateinfo.h
 Android UI- PullToRrefresh自定義下拉刷新動畫
Android UI- PullToRrefresh自定義下拉刷新動畫 如果覺得本文不錯,麻煩投一票,2014年博客之星投票地址:http://vote.blog.csd