編輯:關於Android編程
AutoCompleteTextView是一個具有自動補全功能的EditView,當用戶輸入數據後,AutoCompleteTextView就會將用戶輸入的數據與他自己的adapter中的數據對比,如果用戶數據與adapter中的某條數據的開始部分完全匹配,那麼adapter中的這條數據就會出現在下拉提示框中。
其常用屬性定義如下
<AutoCompleteTextView
  android:id="@+id/mp002_top_place_input"
  android:layout_width="wrap_content"
  android:layout_height="wrap_content"
  android:completionThreshold="1"
  android:layout_marginTop="5dp" >
</AutoCompleteTextView>
其中android:completionThreshold定義了從第幾個字符開始顯示候補列表。
默認值為2。
使用例:
AutoCompleteTextView mPlace = (AutoCompleteTextView)findViewById(R.id.mp002_top_place_input);
ArrayList<String> result = new ArrayList<String>();
result.add("1111111");
result.add("1222222");
mPlace.setAdapter(new ArrayAdapter<String>(
   MP002TopActivity.this,
   android.R.layout.simple_dropdown_item_1line,
   result)
);
局限性是completionThreshold設定的最小值是1,
小於1的情況下,會默認變成1。
所以要在不輸入任何字符的條件下顯示候補列表,
就必須重載AutoCompleteTextView這個控件。
public class MyAutoCompleteTextView extends AutoCompleteTextView{
 public MyAutoCompleteTextView(Context context) {
  super(context);
 }
 public MyAutoCompleteTextView(Context context, AttributeSet attrs) {
  super(context, attrs);
 }
 public MyAutoCompleteTextView(Context context, AttributeSet attrs, int defStyle) {
  super(context, attrs, defStyle);
 }
 @Override
 public boolean enoughToFilter() {
  return true;
 }
 @Override
 protected void onFocusChanged(boolean focused, int direction, Rect previouslyFocusedRect) {
  super.onFocusChanged(focused, direction, previouslyFocusedRect);
  performFiltering(getText(), KeyEvent.KEYCODE_UNKNOWN);
 }
}
enoughToFilter()是判斷輸入文字列長度是否滿足現實候補列表的要求的方法。
onFocusChanged()是當控件獲得焦點時讓其顯示候補列表。
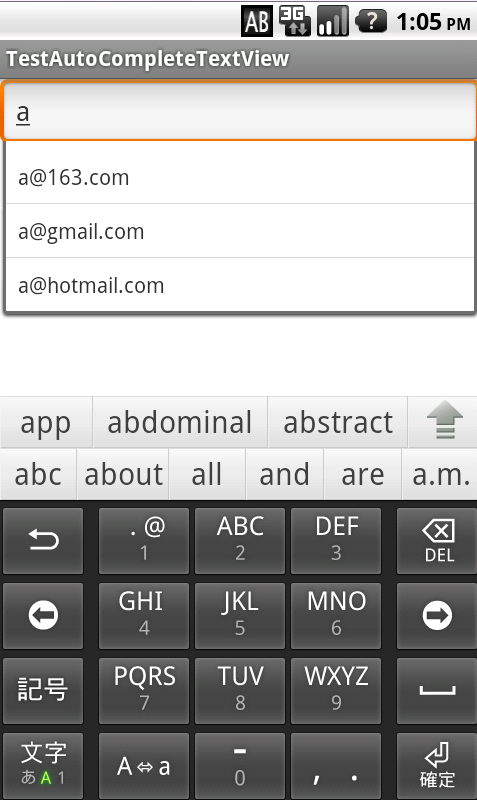
使用AutoCompleteTextView實現郵箱地址補全
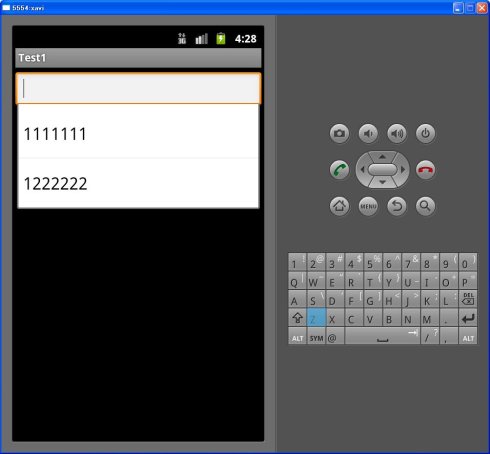
例如:adapter中有3條數據“abc”,“hjk”,“abd”,而用戶輸入“ab”,那麼下拉提示框中將會出現“abc”和“abd”。(AutoCompleteTextView默認在用戶輸入兩個字符之後才提示,可以通過setThreshold(1)來將它設置為用戶輸入1個字符後就開始提示)
AutoCompleteTextView在匹配用戶輸入數據時,會調用performFiltering方法,將用戶數據傳入,並調用adapter的filter來處理。
因為當用戶選中下拉列表中的某一項時,AutoCompleteTextView會使用該項對應的adapter中的數據來填充文本域,這與我們這邊的需求不太相同,因為我們的adapter中只有類似於“@163.com”的email地址後綴,下拉框中的數據是我們將用戶輸入和adapter中的數據拼接而成的。因此我們需要重寫replaceText方法,以使AutoCompleteTextView來在用戶選中某一項時,用我們指定的文本來填充文本域。
然後我們需要為AutoCompleteTextView設置OnFocusChangeListener來在用戶移開焦點後,進行email地址格式檢查,並且在再次獲得焦點後重啟提示功能。
代碼如下:(EmailAutoCompleteTextView.java)
public class EmailAutoCompleteTextView extends AutoCompleteTextView {
private static final String TAG = "EmailAutoCompleteTextView";
private String[] emailSufixs = new String[] { "@163.com",
"@gmail.com", "@hotmail.com" };
public EmailAutoCompleteTextView(Context context) {
super(context);
init(context);
}
public EmailAutoCompleteTextView(Context context, AttributeSet attrs) {
super(context, attrs);
init(context);
}
public EmailAutoCompleteTextView(Context context, AttributeSet attrs,
int defStyle) {
super(context, attrs, defStyle);
init(context);
}
public void setAdapterString(String[] es) {
if(es != null && es.length > 0)
this.emailSufixs = es;
}
private void init(final Context context) {
//adapter中使用默認的emailSufixs中的數據,可以通過setAdapterString來更改
this.setAdapter(new EmailAutoCompleteAdapter(context, R.layout.auto_complete_item, emailSufixs));
//使得在輸入1個字符之後便開啟自動完成
this.setThreshold(1);
this.setOnFocusChangeListener(new OnFocusChangeListener() {
@Override
public void onFocusChange(View v, boolean hasFocus) {
if(hasFocus) {
String text = EmailAutoCompleteTextView.this.getText().toString();
//當該文本域重新獲得焦點後,重啟自動完成
if(!"".equals(text))
performFiltering(text, 0);
} else {
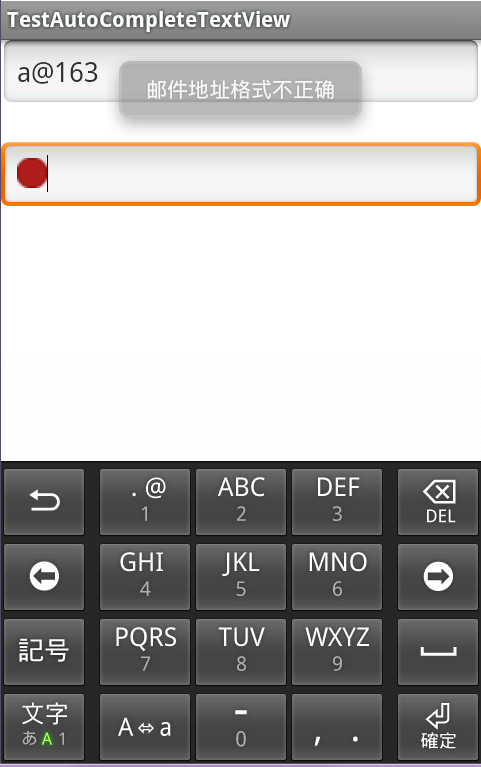
//當文本域丟失焦點後,檢查輸入email地址的格式
EmailAutoCompleteTextView ev = (EmailAutoCompleteTextView) v;
String text = ev.getText().toString();
//這裡正則寫的有點粗暴:)
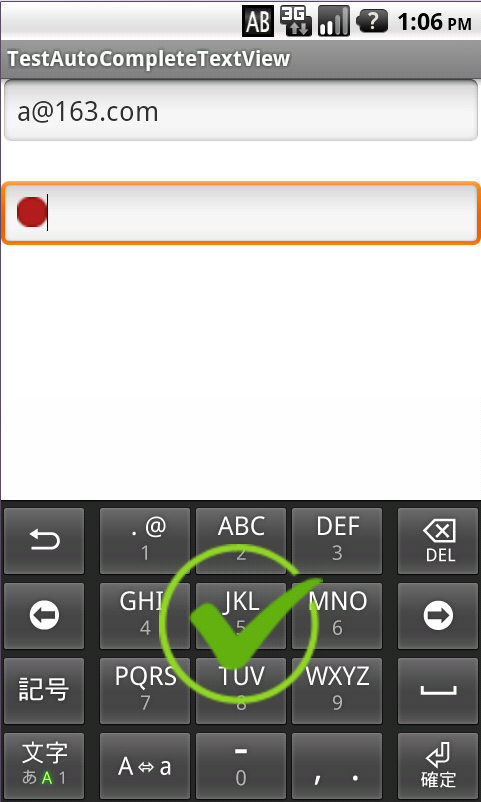
if(text != null && text.matches("^[a-zA-Z0-9_]+@[a-zA-Z0-9]+\\.[a-zA-Z0-9]+$")) {
Toast to = new Toast(context);
ImageView i = new ImageView(context);
i.setBackgroundResource(R.drawable.img_success);
to.setView(i);
to.show();
} else {
Toast toast = Toast.makeText(context, "郵件地址格式不正確", Toast.LENGTH_SHORT);
toast.setGravity(Gravity.TOP, 0, 50);
toast.show();
}
}
}
});
}
@Override
protected void replaceText(CharSequence text) {
//當我們在下拉框中選擇一項時,android會默認使用AutoCompleteTextView中Adapter裡的文本來填充文本域
//因為這裡Adapter中只是存了常用email的後綴
//因此要重新replace邏輯,將用戶輸入的部分與後綴合並
Log.i(TAG + " replaceText", text.toString());
String t = this.getText().toString();
int index = t.indexOf("@");
if(index != -1)
t = t.substring(0, index);
super.replaceText(t + text);
}
@Override
protected void performFiltering(CharSequence text, int keyCode) {
//該方法會在用戶輸入文本之後調用,將已輸入的文本與adapter中的數據對比,若它匹配
//adapter中數據的前半部分,那麼adapter中的這條數據將會在下拉框中出現
Log.i(TAG + " performFiltering", text.toString() + " " + keyCode);
String t = text.toString();
//因為用戶輸入郵箱時,都是以字母,數字開始,而我們的adapter中只會提供以類似於"@163.com"
//的郵箱後綴,因此在調用super.performFiltering時,傳入的一定是以"@"開頭的字符串
int index = t.indexOf("@");
if(index == -1) {
if(t.matches("^[a-zA-Z0-9_]+$")) {
super.performFiltering("@", keyCode);
}
else
this.dismissDropDown();//當用戶中途輸入非法字符時,關閉下拉提示框
} else {
super.performFiltering(t.substring(index), keyCode);
}
}
private class EmailAutoCompleteAdapter extends ArrayAdapter<String> {
public EmailAutoCompleteAdapter(Context context, int textViewResourceId, String[] email_s) {
super(context, textViewResourceId, email_s);
}
@Override
public View getView(int position, View convertView, ViewGroup parent) {
Log.i(TAG, "in GetView");
View v = convertView;
if (v == null)
v = LayoutInflater.from(getContext()).inflate(
R.layout.auto_complete_item, null);
TextView tv = (TextView) v.findViewById(R.id.tv);
String t = EmailAutoCompleteTextView.this.getText().toString();
int index = t.indexOf("@");
if(index != -1)
t = t.substring(0, index);
//將用戶輸入的文本與adapter中的email後綴拼接後,在下拉框中顯示
tv.setText(t + getItem(position));
Log.i(TAG, tv.getText().toString());
return v;
}
}
}
activity的xml文件如下:
<LinearLayout xmlns:android="http://schemas.android.com/apk/res/android"
  android:layout_width="match_parent"
  android:layout_height="match_parent"
  android:orientation="vertical" >

  <com.example.testautocompletetextview.EmailAutoCompleteTextView
    android:id="@+id/act"
    android:layout_width="match_parent"
    android:layout_height="wrap_content"
    android:hint="Email Address"
    android:textColor="@color/black" />

  <!-- 用於測試移開焦點 -->
  <EditText
    android:layout_width="match_parent"
    android:layout_height="wrap_content"
    android:layout_marginTop="20dp"
    android:drawableLeft="@drawable/amount_selected" />

</LinearLayout>
下拉提示框中每一項(TextView)的xml:

<?xml version="1.0" encoding="utf-8"?>
<TextView xmlns:android="http://schemas.android.com/apk/res/android"
  android:id="@+id/tv"
  android:padding="8dp"
  android:layout_width="match_parent"
  android:layout_height="wrap_content" />
提示截圖:
 Android布局之GridLayout網格布局
網格布局標簽是GridLayout。這個布局是android4.0新增的布局。這個布局只有4.0之後的版本才能使用。不過新增了一些東東①跟LinearLayout(線性布
 Android下拉刷新控件PullToRefresh實例解析
Android中很多時候都會用到上下拉刷新,這是一個很常用的功能,Android的v4包中也為我們提供了一種原生的下拉刷新控件--SwipeRefreshLayout,可
 Android 輸入法 微信公眾號搜索定制版
1. 一個簡單的Android 輸入法(1) 使用Android Studio建立一個沒有Activity的項目,對於一個簡單的輸入法而言,MainActivity並不是
 詳解Android中實現ListView左右滑動刪除條目的方法
使用Scroller實現絢麗的ListView左右滑動刪除Item效果這裡來給大家帶來使用Scroller的小例子,同時也能用來幫助初步解除的讀者更加熟悉的掌握Scrol