編輯:關於Android編程
本例子演示如何添加一個簡單的單頁導航,在此基礎上,再演示如何在第2個頁面中顯示第1個頁面中撥打過的所有電話號碼。
(1)通過該例子理解Android App的基本架構。
(2)通過該例子理解實現Android多屏幕導航的基本技術。
本例子只是為了讓我們對Android App開發有一個較全面的感性認識,讀者不必一開始就糾結於代碼中的細節問題,涉及到的相關概念在後面還會分別介紹。
運行截圖
運行截圖(Api19、Api21、Api23的實現代碼都相同):
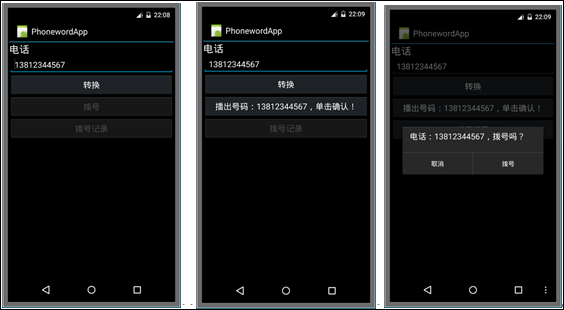
界面操作
單擊“將文本轉換為數字”,觀察結果。
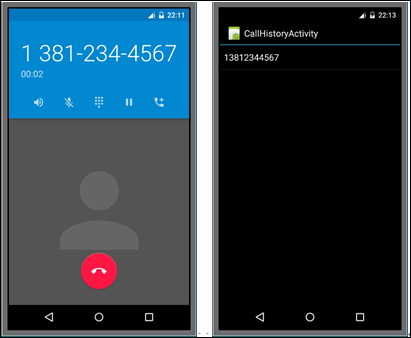
單擊【轉換】按鈕,如果轉換成功,則【撥號】按鈕可用,單擊【撥號】按鈕,觀察彈出的對話框。
如果單擊【撥號】按鈕,就會自動撥號。
下面介紹主要設計步驟。
1、新建項目
選擇模板:Blank App (Android),項目名:PhonewordApp。
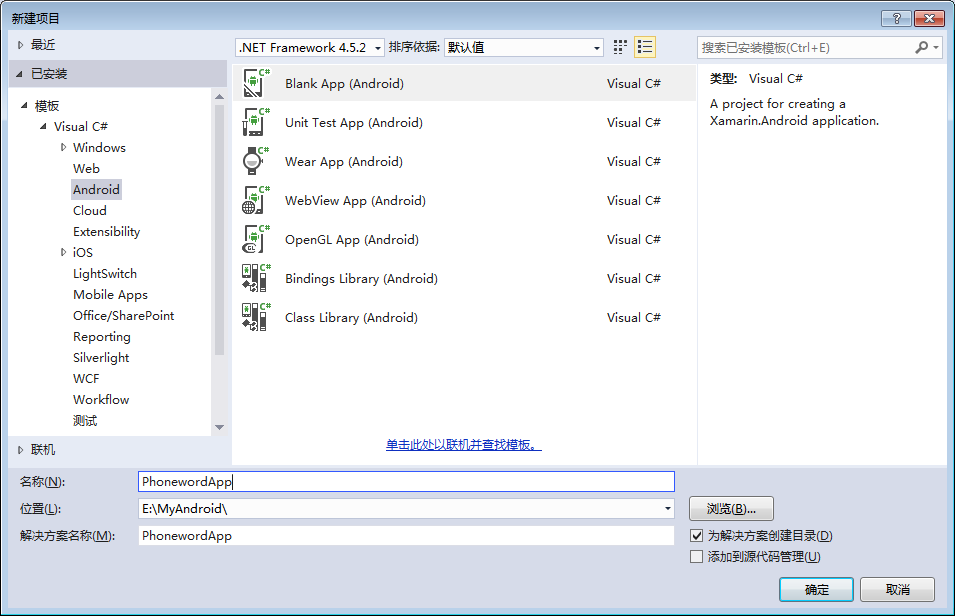
項目創建成功後,刪除GettingStarted.Xamarin(廣告文件)。
2、界面設計
(1)雙擊打開Main.axml,分別觀察設計界面【Design】和源碼【Source】的內容。
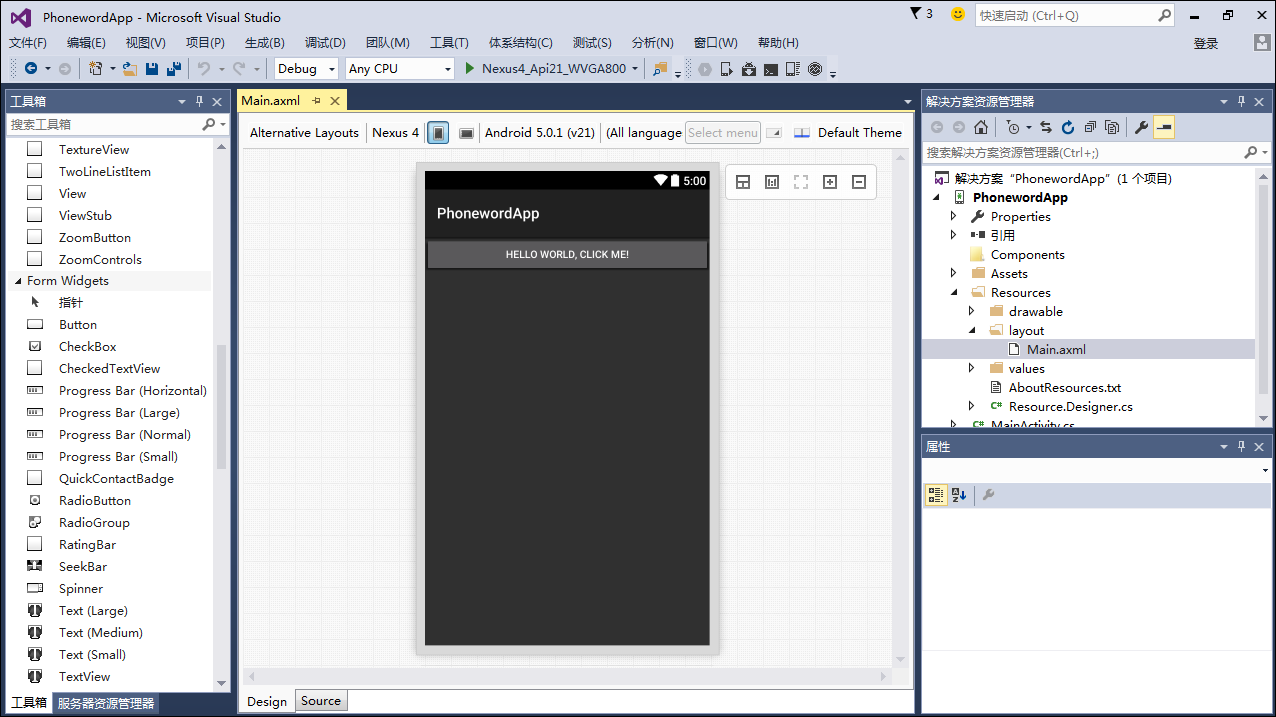
(2)按Delete鍵刪除【Hello World,Click Me】按鈕。
(3)從【工具箱】中拖放一個【Text (Large)】到設計界面,修改下面的屬性:
id:@+id/PhoneText
text:電話
注:此時系統會自動在【Source】中添加對應的代碼(下同)。
(4)從【工具箱】中拖放一個【Plain Text】到設計界面,放到【Text (Large)】的下方,修改下面的屬性:
id:@+id/PhoneNumberText
text:138 4912 2599
(5)從【工具箱】中拖放一個【Button】到設計界面,放到【Plain Text】的下方,修改下面的屬性:
id:@+id/buttonTranslate
text:轉換
(6)從【工具箱】中拖放一個【Button】到設計界面放到上一個按鈕的下方,修改屬性:
id:@+id/buttonCall
text:撥號
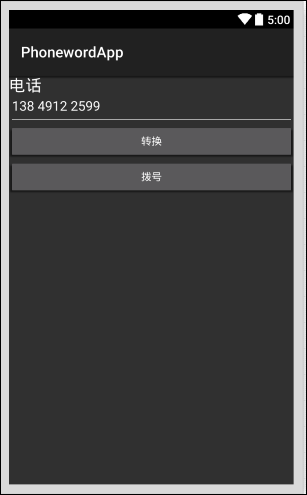
經過以上步驟後,即得到下圖所示的設計界面:
(7)保存文件,並單擊【解決方案資源管理器】上方的【刷新】按鈕。
注意:這一步的目的是為了讓系統能找到設計界面內的資源並自動生成對應的ID,以便在後面鍵入C#代碼時能看到與設計界面資源相關的智能提示。
3、編寫C#代碼
(1)鼠標右擊項目名à添加類,在彈出的窗口中,選擇【Class】模板,名稱:PhoneTranslator.cs,如下圖所示,單擊【添加】按鈕。
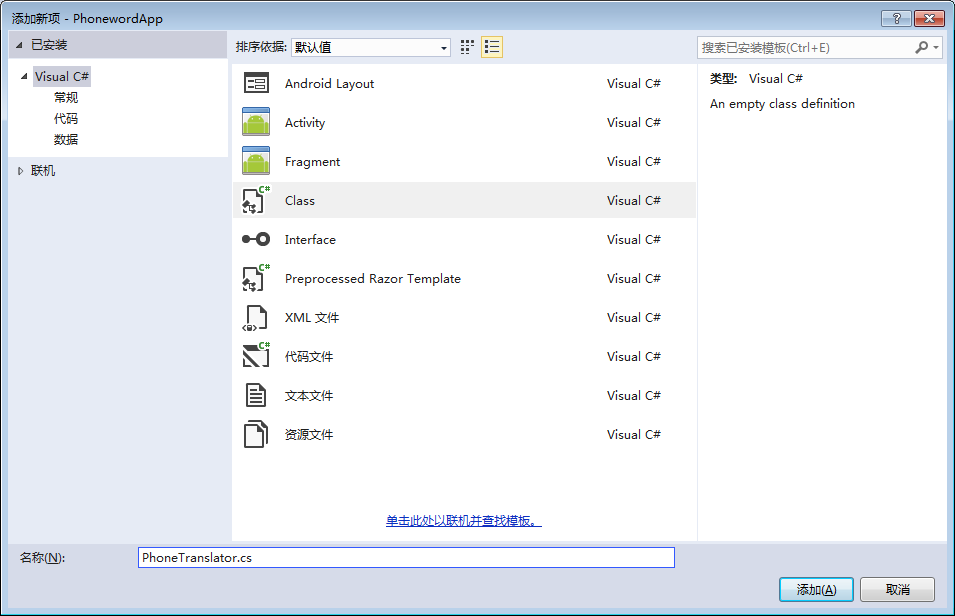
然後將PhoneTranslator.cs改為下面的代碼:
using System.Text;
namespace PhonewordApp
{
  public static class PhonewordTranslator
  {
    public static string ToNumber(string raw)
    {
      if (string.IsNullOrWhiteSpace(raw))
      {
        return "";
      }
      else
      {
        raw = raw.ToUpperInvariant();
      }
      var newNumber = new StringBuilder();
      foreach (var c in raw)
      {
        if ("- 0123456789".Contains(c))
          newNumber.Append(c);
        else
        {
          var result = TranslateToNumber(c);
          if (result != null)
            newNumber.Append(result);
        }
      }
      return newNumber.ToString();
    }

    static bool Contains(this string keyString, char c)
    {
      return keyString.IndexOf(c) >= 0;
    }

    static int? TranslateToNumber(char c)
    {
      if ("ABC".Contains(c))
        return 2;
      else if ("DEF".Contains(c))
        return 3;
      else if ("GHI".Contains(c))
        return 4;
      else if ("JKL".Contains(c))
        return 5;
      else if ("MNO".Contains(c))
        return 6;
      else if ("PQRS".Contains(c))
        return 7;
      else if ("TUV".Contains(c))
        return 8;
      else if ("WXYZ".Contains(c))
        return 9;
      return null;
    }
  }
}
(2)打開MainActivity.cs,將該文件改為下面的代碼:
using System;
using Android.App;
using Android.Content;
using Android.Runtime;
using Android.Views;
using Android.Widget;
using Android.OS;
using System.Collections.Generic;
namespace PhonewordApp
{
  [Activity(Label = "PhonewordApp", MainLauncher = true, Icon = "@drawable/icon")]
  public class MainActivity : Activity
  {
    static readonly List<string> phoneNumbers = new List<string>();

    protected override void OnCreate(Bundle bundle)
    {
      base.OnCreate(bundle);
      SetContentView(Resource.Layout.Main);

      var phoneNumberText = FindViewById<EditText>(Resource.Id.PhoneNumberText);
      var buttonTranslate = FindViewById<Button>(Resource.Id.buttonTranslate);
      var buttonCall = FindViewById<Button>(Resource.Id.buttonCall);
      buttonCall.Enabled = false; //禁用【撥號】按鈕

      string translatedNumber = string.Empty;
      buttonTranslate.Click += (s, e) =>
      {
        translatedNumber = PhonewordTranslator.ToNumber(phoneNumberText.Text);
        if (string.IsNullOrWhiteSpace(translatedNumber))
        {
          buttonCall.Text = "撥號";
          buttonCall.Enabled = false;
        }
        else
        {
          buttonCall.Text = "播出號碼:" + translatedNumber + ",單擊確認!";
          buttonCall.Enabled = true;
        }
      };

      var buttonCallHistory = FindViewById<Button>(Resource.Id.buttonCallHistory);
      buttonCallHistory.Click += (sender, e) =>
      {
        var intent = new Intent(this, typeof(CallHistoryActivity));
        intent.PutStringArrayListExtra("phone_numbers", phoneNumbers);
        StartActivity(intent);
      };

      buttonCall.Click += (s, e) =>
      {
        phoneNumbers.Add(translatedNumber);
        buttonCallHistory.Enabled = true;
        // 當單擊【撥號】時,嘗試撥號
        var callDialog = new AlertDialog.Builder(this);
        callDialog.SetMessage("電話:" + translatedNumber + ",撥號嗎?");
        callDialog.SetNeutralButton("撥號", delegate
        {
          var callIntent = new Intent(Intent.ActionCall);
          callIntent.SetData(Android.Net.Uri.Parse("tel:" + translatedNumber));
          StartActivity(callIntent);
        });
        callDialog.SetNegativeButton("取消", delegate { });
        callDialog.Show();
      };

    }
  }
}
(3)重新生成項目,確保無錯誤。
注:drawable文件夾下的Icon.png是要顯示的圖標,也可將其換為其他圖標文件。
(4)選擇主菜單下該項目的屬性,在彈出的窗口中,勾選【CALL PHONE】權限:
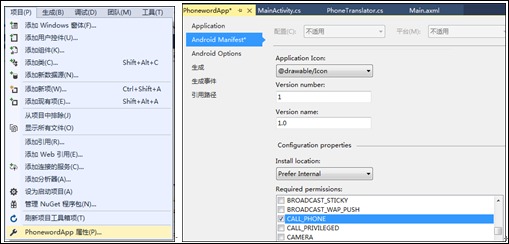
注:
(1)這一步必須做,否則因該App無撥號權限,撥號功能會失敗。
(2)設置後,查看Properties文件夾下AndroidManifest.xml文件中自動添加的代碼,理解權限設置的作用。
4、調試運行及代碼片段解釋
選擇一種模擬器,然後按<F5>鍵調試運行。
注意:如果使用低於API 23的模擬器,必須設置項目屬性(主菜單à項目屬性),使用對應版本的API來編譯應用程序,否則在模擬器上運行時可能會出現應用程序一閃就退出或者顯示“應用程序已停止運行”的情況。
下面解釋前面已經實現的代碼片段的含義:
(1)如何顯示Alert對話框
AlertDialog的詳細用法見【第6章 UI設計(三)--對話框】。
(2)如何撥號
下面的代碼演示了如何調用系統功能實現撥號:
var callIntent = new Intent(Intent.ActionCall);
callIntent.SetData(Android.Net.Uri.Parse("tel:" + translatedNumber));
StartActivity(callIntent);
注意:運行前需要先勾選【CALL PHONE】設置允許撥號權限,否則運行會出現異常:

5、創建第2個屏幕跟蹤歷史記錄
(1)打開values文件夾下的Strings.xml文件,添加下面的代碼:
<?xml version="1.0" encoding="utf-8"?>

<resources>

……

<string name="CallHistory">撥號記錄</string>

</resources>
(2)單擊【解決方案資源管理器】上方的“刷新”按鈕,或者重新生成項目。
注:選擇其中之一即可,目的是為了讓C#代碼能識別它。
(3)打開Main.axml,從【工具箱】中拖放一個【Button】到Main.axml設計界面,將其放到上一個按鈕的下方,修改屬性:
id:@+id/buttonCallHistory
text:@string/CallHistory
enabled:false
注: @string/CallHistory的含義是在values文件夾下的Strings.xml文件中提供該變量的值。
此時,可看到“STRING/CALLHISTORY”會自動變成“撥號記錄”。
說明:這一步設置變量值的做法是實際的Android App項目中建議的做法,這樣做的好處是能提高安卓App運行的效率。而步驟1的做法是一種硬編碼的做法,硬編碼在安卓App中不是建議的做法,步驟1只是為了剛入門時理解更容易。
(4)鼠標右擊項目名,選擇【添加…】à【新建項】,在彈出的窗口中,選擇“Activity”模板,文件名:CallHistoryActivity.cs,單擊【添加】。然後將該文件改為下面的內容(省略了using……):
namespace PhonewordApp

{

[Activity(Label = "CallHistoryActivity")]

public class CallHistoryActivity : ListActivity

{

protected override void OnCreate(Bundle bundle)

{

base.OnCreate(bundle);

var phoneNumbers =

Intent.Extras.GetStringArrayList("phone_numbers") ?? new string[0];

this.ListAdapter = new ArrayAdapter<string>(this,

Android.Resource.Layout.SimpleListItem1, phoneNumbers);

}

}

}
其中,c = a??b; 的含義相當於:if (a != null ){ c = a;} else { c = b;}
(5)修改MainActivity.cs文件,目標是收集第1個屏幕界面運行時撥打過的所有電話號碼,並將其在第2個屏幕上顯示出來。在MainActivity.cs文件中添加下面的代碼:
……

using System.Collections.Generic;

namespace E01PhonewordApp

{

[Activity(Label = "E01PhonewordApp", MainLauncher = true, Icon = "@drawable/icon")]

public class MainActivity : Activity

{

static readonly List<string> phoneNumbers = new List<string>();

protected override void OnCreate(Bundle bundle)

{

……


var buttonCallHistory =

FindViewById<Button>(Resource.Id.buttonCallHistory);

buttonCallHistory.Click += (sender, e) =>

{

var intent = new Intent(this, typeof(CallHistoryActivity));

intent.PutStringArrayListExtra("phone_numbers",

phoneNumbers);

StartActivity(intent);

};


buttonCall.Click += (s, e) =>

{

phoneNumbers.Add(translatedNumber);

buttonCallHistory.Enabled = true;

// 當單擊【撥號】時,嘗試撥號

var callDialog = new AlertDialog.Builder(this);

callDialog.SetMessage("播出號碼:" + translatedNumber +

",撥號嗎?");

callDialog.SetNeutralButton("撥號", delegate

{

// Create intent to dial phone

var callIntent = new Intent(Intent.ActionCall);

callIntent.SetData(Android.Net.Uri.Parse("tel:" +

translatedNumber));

StartActivity(callIntent);

});

callDialog.SetNegativeButton("取消", delegate { });

callDialog.Show();

};

}

}

}
(6)重新生成項目,確保無錯誤。
(7)運行,再撥一個號(例如12345678901),然後查看撥號記錄。下圖是用另一種模擬器查看的運行效果(你可以創建多種不同的模擬器,分別觀察同一個項目的運行效果):

到這裡,我們就完成了用C#編寫的第1個Android應用程序。
以上就是本文的全部內容,希望對大家的學習有所幫助,也希望大家多多支持本站。
 Android 圖片截取人物頭像(仿逗拍)
要求根據給定的頭部模板,截取資源圖。背景圖可支持拖動,縮放,拖動旋轉分析定義剪切浮層,實現背景資源圖的操作view實現繪制剪切浮層/** * 初始化繪制筆
 Android系統開發(4)——Autotools
Autotools工具的構成1、autoscanautoscan是用來掃描源代碼目錄生成configure.san文件的,configure.san包含了系統配置的基本選
 Android-手勢識別(普通手勢識別:上 下 左 右 ;自定義手勢識別:對號,錯號 等)
1.回顧上篇學習了 Android 系統服務的 10個實例 ,當然 還有更多的系統服務沒有使用;留下來的遺憾就是,昨晚沒有將demo下載地址分享出去; &nbs
 [Android] BottomBar+ViewPager+Fragment實現炫酷的底部導航效果
BottomBar BottomBar是Github上的一個開源框架,因為從1.3.3開始不支持fragments了,要自己配置,弄了很久,不管是app的fragm