編輯:關於Android編程
本文是在完成了Android百度地圖應用開發基礎知識的基礎上繼續實現的。
本文實例為大家分享了Android如何顯示地圖,並為後續內容做准備,供大家參考,具體內容如下
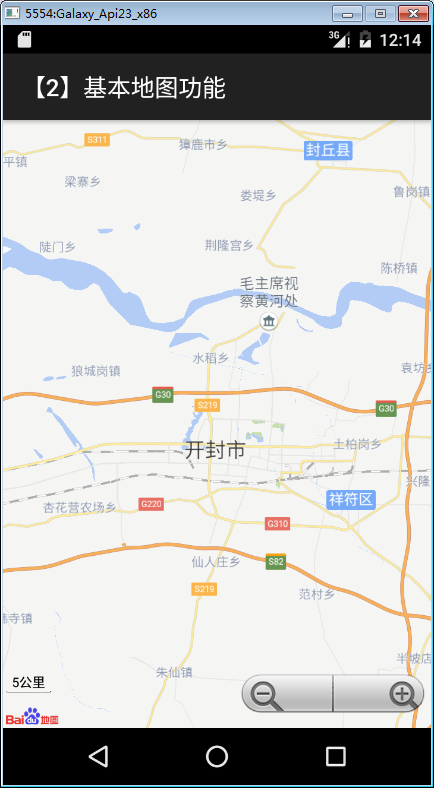
1、運行效果
本章共有25個示例,在x86模擬器中運行的效果如下:
下面介紹主要設計步驟。
2、添加資源
(1)drawable-hdpi
Resources/ drawable-hdpi下的文件:將下載的示例對應文件夾下的文件全部拖放到該文件夾下,並將所有【生成操作】屬性全部設置為“AndroidResource”。
(2)layout
Resources/layout下的文件:該文件夾下的所有文件的【生成操作】屬性全部為“AndroidResource”。後續的各節示例中再逐步向該文件夾下添加文件,這是為了讓你明白每個例子對應的是哪個布局文件。
(3)raw
Resources/raw下的文件:將下載的示例對應文件夾下的文件全部拖放到該文件夾下,並確認【生成操作】屬性設為“AndroidResource”。
(4)values
Resources/values下的文件:將下載的示例對應文件夾下的文件全部拖放到該文件夾下,並將所有【生成操作】屬性全部設為“AndroidResource”。
3、在layout下添加HelloBdMap.axml文件
在layout文件夾下添加該文件,將其改為下面的代碼:
<?xml version="1.0" encoding="utf-8"?>
<LinearLayout xmlns:android="http://schemas.android.com/apk/res/android"
 android:layout_width="fill_parent"
 android:layout_height="fill_parent"
 android:orientation="vertical">
 <com.baidu.mapapi.map.TextureMapView
 android:id="@+id/bmapView"
 android:layout_width="fill_parent"
 android:layout_height="fill_parent"
 android:clickable="true" />
</LinearLayout>
4、在根目錄下添加HelloBaiduMap.cs文件
將該文件改為下面的代碼:
using Android.App;
using Android.Content.PM;
using Android.OS;
using Com.Baidu.Mapapi.Map;

namespace BdMapV371Demos
{
 [Activity(Label = "BdMapV371Demos", MainLauncher = false,
 ConfigurationChanges = ConfigChanges.Orientation,
 ScreenOrientation = ScreenOrientation.Sensor,
 Icon = "@drawable/icon")]
 public class HelloBaiduMap : Activity
 {
 private TextureMapView mMapView;
 protected override void OnCreate(Bundle bundle)
 {
  base.OnCreate(bundle);
  SetContentView(Resource.Layout.HelloBdMap);
  mMapView = FindViewById<TextureMapView>(Resource.Id.bmapView);
 }

 protected override void OnPause()
 {
  base.OnPause();
  mMapView.OnPause();
 }

 protected override void OnResume()
 {
  base.OnResume();
  mMapView.OnResume();
 }

 protected override void OnDestroy()
 {
  base.OnDestroy();
  mMapView.OnDestroy();
 }
 }
}
5、修改Main.axml文件
將該文件改為下面的內容:
<?xml version="1.0" encoding="utf-8"?>
<LinearLayout xmlns:android="http://schemas.android.com/apk/res/android"
 android:layout_width="fill_parent"
 android:layout_height="wrap_content"
 android:orientation="vertical">
 <TextView
 android:id="@+id/text_Info"
 android:layout_width="fill_parent"
 android:layout_height="wrap_content"
 android:textSize="14sp" />
 <View
 android:layout_width="fill_parent"
 android:layout_height="1dip"
 android:background="?android:attr/listDivider" />
 <ListView
 android:id="@+id/listView"
 android:layout_width="fill_parent"
 android:layout_height="wrap_content" />
</LinearLayout>
6、添加DemoApplication.cs文件
在項目的根文件夾下添加該文件。
using System;
using Android.App;
using Android.Runtime;
using Com.Baidu.Mapapi;
namespace BdMapV371Demos
{
 [Application]
 public class DemoApplication : Application
 {
 public DemoApplication(IntPtr javaReference, JniHandleOwnership transfer)
  : base(javaReference, transfer)
 {
 }

 public override void OnCreate()
 {
  base.OnCreate();
  // 在使用 SDK 各組間之前初始化 context 信息,傳入 ApplicationContext
  SDKInitializer.Initialize(ApplicationContext);
 }
 }
}
7、添加SDKReceiver.cs文件
在項目的根文件夾下添加該文件。
using Android.Content;
using Android.Graphics;
using Android.Util;
using Android.Widget;
using Com.Baidu.Mapapi;
namespace BdMapV371Demos
{
 /// <summary>
 /// 廣播監聽類,監聽 SDK key 驗證以及網絡異常廣播
 /// </summary>
 [BroadcastReceiver]
 public class SDKReceiver : BroadcastReceiver
 {
 private static readonly string LTAG = nameof(MainActivity);
 private MainActivity bMapApiDemoMain;

 public SDKReceiver()
 {
 }

 public SDKReceiver(MainActivity bMapApiDemoMain)
  : base()
 {
  this.bMapApiDemoMain = bMapApiDemoMain;
 }

 public override void OnReceive(Context context, Intent intent)
 {
  string s = intent.Action;
  Log.Debug(LTAG, "action: " + s);
  TextView text = bMapApiDemoMain.FindViewById<TextView>(Resource.Id.text_Info);
  text.SetTextColor(Color.Red);
  switch(s)
  {
  case SDKInitializer.SdkBroadtcastActionStringPermissionCheckError:
   text.Text = "key 驗證出錯! 請在 AndroidManifest.xml 文件中檢查 key 設置";
   break;
  case SDKInitializer.SdkBroadtcastActionStringPermissionCheckOk:
   text.Text += ",key驗證成功!";
   text.SetTextColor(Color.Yellow);
   break;
  case SDKInitializer.SdkBroadcastActionStringNetworkError:
   text.Text = "網絡出錯";
   break;
  }
 }
 }
}
8、修改String.xml文件
<?xml version="1.0" encoding="utf-8"?>
<resources>
 <string name="app_name">BdMapV371Demos</string>
 <string name="demo_name_hello">【1】Hello BaiduMap</string>
 <string name="demo_title_hello">Demo01--Hello BaiduMap</string>
 <string name="demo_desc_hello">用TextureMapView渲染地圖</string>

 <string name="demo_name_basemap">【2】基本地圖功能</string>
 <string name="demo_title_basemap">Demo02--基本地圖功能</string>
 <string name="demo_desc_basemap">創建一張百度地圖並管理地圖的生命周期</string>

 <string name="demo_name_map_fragment">【3】基於MapFragment的基本地圖</string>
 <string name="demo_title_map_fragment">Demo03--MapFragment的使用</string>
 <string name="demo_desc_map_fragment">創建一個基於Fragment的地圖框架</string>

 <string name="demo_name_layers">【4】圖層展示</string>
 <string name="demo_title_layers">Demo04--圖層展示</string>
 <string name="demo_desc_layers">展示普通圖、衛星圖、交通流量圖及百度城市熱力圖</string>

 <string name="demo_name_multimap">【5】多地圖展示</string>
 <string name="demo_title_multimap">Demo05--多地圖展示</string>
 <string name="demo_desc_multimap">在一個Activity中創建多個地圖展示</string>

 <string name="demo_name_control">【6】地圖操作功能</string>
 <string name="demo_title_control">Demo06--地圖操作功能</string>
 <string name="demo_desc_control">地圖基本控制方法</string>

 <string name="demo_name_ui">【7】UI控制功能</string>
 <string name="demo_title_ui">Demo07--UI控制功能</string>
 <string name="demo_desc_ui">介紹開關手勢功能和顯示隱藏UI控件</string>

 <string name="demo_name_location">【8】定位圖層展示</string>
 <string name="demo_title_location">Demo08--定位圖層展示</string>
 <string name="demo_desc_location">介紹定位圖層的基本用法</string>

 <string name="demo_name_overlay">【9】覆蓋物功能</string>
 <string name="demo_title_overlay">Demo09--覆蓋物功能</string>
 <string name="demo_desc_overlay">介紹添加覆蓋物並響應點擊功能和彈出pop功能</string>

 <string name="demo_name_heatmap">【10】熱力圖功能</string>
 <string name="demo_title_heatmap">Demo10--熱力圖功能</string>
 <string name="demo_desc_heatmap">介紹如何以熱力圖形式顯示用戶自有數據</string>

 <string name="demo_name_geocode">【11】地理編碼功能</string>
 <string name="demo_title_geocode">Demo11--地理編碼功能</string>
 <string name="demo_desc_geocode">介紹地址信息與坐標之間的相互轉換</string>

 <string name="demo_name_poi">【12】POI搜索功能</string>
 <string name="demo_title_poi">Demo12--POI搜索功能</string>
 <string name="demo_desc_poi">介紹關鍵詞查詢、suggestion查詢和查看餐飲類Place詳情頁功能</string>

 <string name="demo_name_route">【13】路徑規劃功能</string>
 <string name="demo_title_route">Demo13--路徑規劃功能</string>
 <string name="demo_desc_route">介紹公交、駕車和步行三種線路規劃方法和自設路線方法</string>

 <string name="demo_name_bus">【14】公交線路查詢功能</string>
 <string name="demo_title_bus">Demo14--公交線路查詢功能</string>
 <string name="demo_desc_bus">介紹查詢公交線路功能</string>

 <string name="demo_name_share">【15】短串分享</string>
 <string name="demo_title_share">Demo15--短串分享功能</string>
 <string name="demo_desc_share">介紹關鍵詞查詢、suggestion查詢和查看餐飲類Place詳情頁功能</string>
 <string name="share_tip">
 \t\t短串分享是指,用戶搜索查詢後得到的每一個地理位置結果將會對應一條短串(短鏈接),用戶可以通過短信、郵件或第三方分享組件(如微博、微信等)把短串分享給其他用戶從而實現地理位置信息的分享。當其他用戶收到分享的短串後,點擊短串即可打開手機上的百度地圖客戶端或者手機浏覽器進行查看。\n\n
 \t\t例如,用戶搜索“百度大廈”後通過短信使用短串分享功能把該地點分享給好友,好友點擊短信中的短串“http://j.map.baidu.com/XLCrk”後可以調起百度地圖客戶端或者手機浏覽器查看“百度大廈”的地理位置信息。\n\n
 \t\t目前短串分享功能暫時開放了“POI搜索結果分享”和“反向地理編碼結果分享”,日後會開放更多的功能,歡迎廣大開發者使用。
 </string>

 <string name="demo_name_offline">【16】離線地圖功能</string>
 <string name="demo_title_offline">Demo16--離線地圖功能</string>
 <string name="demo_desc_offline">介紹如何下載和使用離線地圖</string>

 <string name="demo_name_radar">【17】周邊雷達功能</string>
 <string name="demo_title_radar">Demo17--周邊雷達功能</string>
 <string name="demo_desc_radar">介紹如何使用周邊雷達功能上傳位置、檢索周邊的人</string>

 <string name="demo_name_geometry">【18】自定義繪制功能</string>
 <string name="demo_title_geometry">Demo18--自定義繪制功能</string>
 <string name="demo_desc_geometry">介紹自定義繪制點、線、多邊形、圓等幾何圖形和文字</string>

 <string name="demo_name_panorama_hello">【19】全景圖 Hello World</string>
 <string name="demo_title_panorama_hello">Demo19--全景圖 Hello World</string>

 <string name="demo_name_panorama">【20】全景圖功能</string>
 <string name="demo_title_panorama">Demo20--全景圖功能</string>
 <string name="demo_desc_panorama">介紹如何通過多種方式獲取百度全景</string>

 <!--<string name="panorama_poi_tips"> 首先根據關鍵詞進行POI檢索,點擊地圖上的POI點,根據POI的UID進入全景</string>
 <string name="panorama_geo_tips">單擊地圖以選取坐標點</string>-->

 <string name="demo_desc_panorama0">【Demo20-1】通過百度全景ID(PID)獲取全景</string>
 <string name="demo_desc_panorama1">【Demo20-2】通過百度經緯度坐標獲取全景</string>
 <string name="demo_desc_panorama2">【Demo20-3】通過百度墨卡托坐標獲取全景</string>
 <string name="demo_desc_panorama3">【Demo20-4】通過百度地圖UID獲取外景</string>
 <string name="demo_desc_panorama4">【Demo20-5】通過百度地圖UID獲取內景</string>
 <string name="demo_desc_panorama5">【Demo20-6】添加自定義標注到全景圖</string>
 <string name="demo_desc_panorama6">【Demo20-7】高德, 騰訊, 谷歌坐標轉換百度坐標</string>
 <string name="demo_desc_panorama7">【Demo20-8】其他全景參數設置</string>

 <!--<string name="title_activity_panorama_activity_main">全景圖功能</string>
 <string name="title_activity_panorama_poi_selector">通過POI進入全景圖</string>
 <string name="title_activity_panorama_geo_selector">通過地理坐標進入全景圖</string>
 <string name="title_activity_panorama_demo">全景圖功能</string>-->

 <string name="demo_name_favorite">【21】興趣點收藏功能</string>
 <string name="demo_title_favorite">Demo21--興趣點收藏功能</string>
 <string name="demo_desc_favorite">介紹如何創建、管理本地點數據</string>

 <string name="demo_name_cloud">【22】LBS雲檢索功能</string>
 <string name="demo_title_cloud">Demo22--LBS雲檢索功能</string>
 <string name="demo_desc_cloud">介紹如何使用LBS雲檢索用戶自有數據</string>
 <string name="title_activity_cloud_search_demo">雲檢索使用介紹</string>
 <string name="cloud_search_tips">
 \t\tLBS雲是百度地圖針對LBS開發者推出的平台級服務。結合已有的地圖API和SDK服務。通過開放服務端存儲和計算能力,提供海量位置數據存儲、檢索、展示一體化解決方案。\n\n
 \t\t該服務對開發者免費開放。測試demo裡寫入了測試的ak。開發者可以使用測試ak查看 LBS.雲檢索的效果。如果開發者要使用自己的數據,請在申請ak後替換demo中的ak。\n\n
 \t\t如有任何關於LBS雲服務的問題,諸如如何申請ak、如何存儲和檢索數據等,請訪問百度地圖官方“LBS開放平台”。地址:http://lbsyun.baidu.com/ \n
 </string>

 <string name="demo_name_tileoverlay">【23】瓦片圖功能</string>
 <string name="demo_title_tileoverlay">Demo23--瓦片圖功能</string>
 <string name="demo_desc_tileoverlay">介紹如何在地圖上添加自定義的瓦片圖</string>

 <string name="demo_name_opengl">【24】OpenGL繪制功能</string>
 <string name="demo_title_opengl">Demo24--OpenGL繪制功能</string>
 <string name="demo_desc_opengl">介紹如何使用OpenGL繪制在地圖中進行繪制</string>

 <string name="demo_title_cluster">Demo22--點聚合功能</string>
 <string name="demo_desc_cluster">點聚合功能--MarkerClusterDemo</string>

 <string name="demo_title_poinearby">POI附近搜索功能</string>
 <string name="demo_desc_poinearbysearch">POI附近檢索功能</string>

 <string name="demo_name_open_baidumap">【25】調啟百度地圖</string>
 <string name="demo_title_open_baidumap">Demo25--調啟百度地圖</string>
 <string name="demo_desc_open_baidumap">介紹如何調啟百度地圖實現自身業務功能</string>

</resources>
9、修改MainActivity.cs文件
將該文件改為下面的代碼:
using Android.App;
using Android.Content;
using Android.Views;
using Android.Widget;
using Android.OS;
using Android.Graphics;
using Android.Content.PM;
using Com.Baidu.Mapapi;
using Com.Baidu.Mapapi.Model;
using BdMapV371Demos.SrcSdkDemos;

namespace BdMapV371Demos
{
 [Activity(Label = "BdMapV371Demos", MainLauncher = true,
 ConfigurationChanges = ConfigChanges.Orientation,
 ScreenOrientation = ScreenOrientation.Sensor,
 Icon = "@drawable/icon")]
 public class MainActivity : Activity
 {
 private SDKReceiver sdkReceiver;

 //百度地圖上河南大學計算機與信息工程學院的經緯度(中心點位置)
 public static readonly LatLng HeNanUniversity = new LatLng(34.824635, 114.315745);

 protected override void OnCreate(Bundle bundle)
 {
  base.OnCreate(bundle);
  SetContentView(Resource.Layout.Main);

  TextView text = FindViewById<TextView>(Resource.Id.text_Info);
  text.SetTextColor(Color.Red);
  text.Text = "百度地圖Android SDK v" + VersionInfo.ApiVersion;

  ListView mListView = FindViewById<ListView>(Resource.Id.listView);
  // 添加ListItem,設置事件響應
  mListView.Adapter = new DemoListAdapter(this);

  // 注冊SDK廣播監聽者
  IntentFilter intentFilter = new IntentFilter();
  intentFilter.AddAction(SDKInitializer.SdkBroadtcastActionStringPermissionCheckOk);
  intentFilter.AddAction(SDKInitializer.SdkBroadtcastActionStringPermissionCheckError);
  intentFilter.AddAction(SDKInitializer.SdkBroadcastActionStringNetworkError);
  sdkReceiver = new SDKReceiver(this);
  RegisterReceiver(sdkReceiver, intentFilter);

  mListView.ItemClick += (sender, args) =>
  {
  int index = args.Position;
  Intent intent = new Intent(this, demos[index].demoClass.GetType());
  StartActivity(intent);
  };
 }

 private static readonly DemoInfo<Activity>[] demos =
 {
  //示例1--HelloBaiduMap
  new DemoInfo<Activity>(Resource.String.demo_title_hello,
  Resource.String.demo_desc_hello,
  new Demo01HelloBaiduMap()),

  //示例2--基本地圖功能
  new DemoInfo<Activity>(Resource.String.demo_title_basemap,
  Resource.String.demo_desc_basemap,
  new Demo02BaseMap()),

  //示例3--MapFragment使用
  new DemoInfo<Activity>(Resource.String.demo_title_map_fragment,
  Resource.String.demo_desc_map_fragment,
  new Demo03MapFragment()),

  //示例4--圖層展示
  new DemoInfo<Activity>(Resource.String.demo_title_layers,
  Resource.String.demo_desc_layers,
  new Demo04Layers()),

  //示例5--多地圖展示
  new DemoInfo<Activity>(Resource.String.demo_title_multimap,
  Resource.String.demo_desc_multimap,
  new Demo05MutiMapView()),

  //示例6--地圖操作功能
  new DemoInfo<Activity>(Resource.String.demo_title_control,
  Resource.String.demo_desc_control,
  new Demo06MapControl()),

  //示例7--UI控制功能
  new DemoInfo<Activity>(Resource.String.demo_title_ui,
  Resource.String.demo_desc_ui,
  new Demo07UISetting()),

  //示例8--定位圖層展示
  new DemoInfo<Activity>(Resource.String.demo_title_location,
  Resource.String.demo_desc_location,
  new Demo08Location()),

  //示例9--覆蓋物功能
  new DemoInfo<Activity>(Resource.String.demo_title_overlay,
  Resource.String.demo_desc_overlay,
  new Demo09Overlay()),

  //示例10--熱力圖功能
  new DemoInfo<Activity>(Resource.String.demo_title_heatmap,
  Resource.String.demo_desc_heatmap,
  new Demo10HeatMap()),

  //示例11--地理編碼功能
  new DemoInfo<Activity>(Resource.String.demo_title_geocode,
  Resource.String.demo_desc_geocode,
  new Demo11GeoCoder()),

  //示例12--POI搜索功能
  new DemoInfo<Activity>(Resource.String.demo_title_poi,
  Resource.String.demo_desc_poi,
  new Demo12PoiSearch()),

  //示例13--路徑規劃功能
  new DemoInfo<Activity>(Resource.String.demo_title_route,
  Resource.String.demo_desc_route,
  new Demo13RoutePlan()),

  //示例14--公交線路查詢功能
  new DemoInfo<Activity>(Resource.String.demo_title_bus,
  Resource.String.demo_desc_bus,
  new Demo14BusLineSearch()),

  //示例15--短串分享功能
  new DemoInfo<Activity>(Resource.String.demo_title_share,
  Resource.String.demo_desc_share,
  new Demo15Share()),

  //示例16--離線地圖功能
  new DemoInfo<Activity>(Resource.String.demo_title_offline,
  Resource.String.demo_desc_offline,
  new Demo16Offline()),

  //示例17--周邊雷達功能
  new DemoInfo<Activity>(Resource.String.demo_title_radar,
  Resource.String.demo_desc_radar,
  new Demo17Radar()),

  //示例18--自定義繪制功能
  new DemoInfo<Activity>(Resource.String.demo_title_geometry,
  Resource.String.demo_desc_geometry,
  new Demo18Geometry()),

  //示例19--全景圖 Hello World
  new DemoInfo<Activity>(Resource.String.demo_title_panorama_hello,
  Resource.String.demo_desc_panorama,
  new Demo19PanoHelloWorld()),

  //示例20--全景圖功能
  new DemoInfo<Activity>(Resource.String.demo_title_panorama,
  Resource.String.demo_desc_panorama,
  new Demo20PanoActivity()),

  //示例21--興趣點收藏功能
  new DemoInfo<Activity>(Resource.String.demo_title_favorite,
  Resource.String.demo_desc_favorite,
  new Demo21Favorite()),

  //示例22--LBS雲檢索功能
  new DemoInfo<Activity>(Resource.String.demo_title_cloud,
  Resource.String.demo_desc_cloud,
  new Demo22CloudSearch()),

  //示例23--瓦片圖功能
  new DemoInfo<Activity>(Resource.String.demo_title_tileoverlay,
  Resource.String.demo_desc_tileoverlay,
  new Demo23TileOverlay()),

  //示例24--OpenGL繪制功能
  new DemoInfo<Activity>(Resource.String.demo_title_opengl, Resource.String.demo_desc_opengl,
  new Demo24OpenGL()),

  //示例25--調啟百度地圖
  new DemoInfo<Activity>(Resource.String.demo_title_open_baidumap, Resource.String.demo_desc_open_baidumap,
  new Demo25OpenBaiduMap()),
 };

 protected override void OnResume()
 {
  base.OnResume();
 }

 protected override void OnDestroy()
 {
  // 取消監聽 SDK 廣播
  UnregisterReceiver(sdkReceiver);
  base.OnDestroy();
 }

 private class DemoListAdapter : BaseAdapter
 {
  MainActivity bMapApiDemoMain;

  public DemoListAdapter(MainActivity bMapApiDemoMain)
  : base()
  {
  this.bMapApiDemoMain = bMapApiDemoMain;
  }

  public override View GetView(int index, View convertView, ViewGroup parent)
  {
  convertView = View.Inflate(bMapApiDemoMain, Resource.Layout.demo_info_item, null);
  TextView title = convertView.FindViewById<TextView>(Resource.Id.title);
  TextView desc = convertView.FindViewById<TextView>(Resource.Id.desc);
  title.SetText(demos[index].title);
  desc.SetText(demos[index].desc);
  //if (index >= 16)
  //{
  // title.SetTextColor(Color.Red);
  //}
  return convertView;
  }

  public override int Count
  {
  get { return demos.Length; }
  }

  public override Java.Lang.Object GetItem(int index)
  {
  return demos[index];
  }

  public override long GetItemId(int id)
  {
  return id;
  }
 }

 private class DemoInfo<T> : Java.Lang.Object where T : Activity
 {
  public readonly int title;
  public readonly int desc;
  public readonly T demoClass;

  public DemoInfo(int title, int desc, T demoClass)
  {
  this.title = title;
  this.desc = desc;
  this.demoClass = demoClass;
  }
 }
 }
}
10、運行
按<F5>調試運行,在主界面中單擊【Hello BaiduMap】,觀察效果。
注意:本章後面介紹的所有例子都是在這一節例子的基礎上繼續修改完成的。這樣做的目的是為了在同一個項目中演示多個示例,而不是一個項目僅包含一個示例,這樣可避免必須申請多個密鑰的麻煩。
要確保該例子在你的模擬器上運行沒問題,才能繼續學習後續的demo。
以上就是本文的全部內容,希望對大家的學習有所幫助,也希望大家多多支持本站。
 miui8怎麼升級 小米MIUI 8系統更新升級教程
你的小米手機准備好迎接MIUI8的到來了嗎?今天小編搶先帶來小米MIUI 8系統更新升級教程,想要升級miui8系統的米粉們快來看看吧!MIUI8升級須知:
 android實現 仿iphoneDialog實現類似於iphone對話框樣式
續: 話說道哥跟發哥在上海柯炫做Android開發,看來跟發哥差距很大。總結了下發哥的技術拿來這裡裝逼用用。 參考這裡: http://blog.csd
 Android listview多視圖嵌套多視圖
首先給大家展示下效果圖:public class HomeEduMoreAdapter extends BaseAdapter {private final String
 NavigationView+DrawerLayout實現側拉抽屜效果
先上效果圖: NavigationView是android-support-design包下的一個控件,在使用NavigationView時需要引入design