編輯:關於Android編程
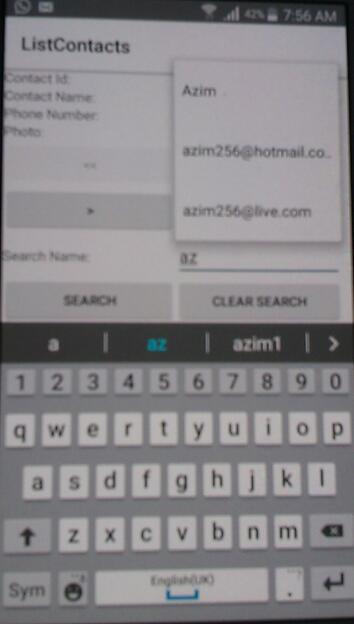
通過這篇文章,我想說明一下如何創建一個可搜索的“聯系人列表”Android應用程序。使用這個應用程序,用戶可以通過使用導航按鈕浏覽所有保存的聯系人和根據聯系人名稱搜索聯系人。該應用程序還可以顯示聯系人的照片(如果可用)。
要浏覽聯系人列表可以使用<<,<,>和>>按鈕。
要搜索聯系人的用戶在“搜索名稱”文本框中鍵入聯系人名稱,然後單擊“搜索”按鈕。點擊“清除搜索”按鈕,清除“搜索名稱”文本框中,並顯示開始搜索前,最後一次查看的聯系人。
由於該應用從設備讀取聯系人,以下條目需要在AndroidManifest.xml文件,以允許權限應用讀取聯系人:
<uses-permission android:name="android.permission.READ_CONTACTS"/>
下面的代碼創建一個表格布局顯示聯系人:
<TableLayout
 xmlns:android="<a href="http://schemas.android.com/apk/res/android"" rel="nofollow" target="_blank">http://schemas.android.com/apk/res/android"</a>
 android:layout_height="match_parent"
 android:layout_width="350dp">
 <TableRow>
 <TextView android:id="@+id/txtId"
 android:width="175dp"
 android:text="Contact Id: "/>
 <TextView android:id="@+id/txtIdVal"
 android:width="175dp"/>
 </TableRow>
 <TableRow>
 <TextView android:id="@+id/txtDisplayName"
 android:width="175dp"
 android:text="Contact Name: "/>
 <TextView android:id="@+id/txtDisplayNameVal"
 android:width="175dp"/>
 </TableRow>
 <TableRow>
 <TextView android:id="@+id/txtPhoneNo"
 android:width="175dp"
 android:text="Phone Number: "/>
 <TextView android:id="@+id/txtPhoneNoVal"
 android:width="175dp"/>
 </TableRow>
 <TableRow>
 <TextView android:id="@+id/txtPhoto"
 android:width="175dp"
 android:text="Photo: "/>
 <ImageView android:id="@+id/imgPhoto"
 android:width="175dp"/>
 </TableRow>
 <TableRow>
 <Button android:id="@+id/btnFirst"
 android:width="175dp"
 android:text="<<"
 android:onClick="first"/>
 <Button android:id="@+id/btnPrevious"
 android:width="175dp"
 android:text="<"
 android:onClick="previous"/>
 </TableRow>
 <TableRow>
 <Button android:id="@+id/btnNext"
 android:width="175dp"
 android:text=">"
 android:onClick="next"/>
 <Button android:id="@+id/btnLast"
 android:width="175dp"
 android:text=">>"
 android:onClick="last"/>
 </TableRow>
 <TableRow>
 <TextView android:id="@+id/txtSearch"
 android:width="175dp"
 android:text="Search Name: "/>
 <AutoCompleteTextView android:id="@+id/txtSearchVal"
 android:width="175dp"/>
 </TableRow>
 <TableRow>
 <Button android:id="@+id/btnSearch"
 android:width="175dp"
 android:text="Search"
 android:onClick="search"/>
 <Button android:id="@+id/btnClearSearch"
 android:width="175dp"
 android:text="Clear Search"
 android:onClick="clearSearch"/>
 </TableRow>

</TableLayout>
檢索圖像的地址,並使用以下命令訪問聯系人:
Uri contacts=ContactsContract.Contacts.CONTENT_URI;
接下來,我們創建一個CursorLoader對象按聯系人姓名的升序加載所有聯系人,如下:
CursorLoader loader=new
CursorLoader(this,contacts,null,null,null,ContactsContract.Contacts.DISPLAY_NAME+" asc");
該CursorLoader構造采用下列參數:
·Context context
·Uri uri
·String projection
·String selection
·String selectionArgs
·String sortOrder
下面的代碼將聯系人名稱填充字符串數組中:
c=loader.loadInBackground();
names=new String<span>[</span>c.getCount()];
int ctr=0;
while(c.moveToNext())

{
 names<span>[</span>ctr]=c.getString(c.getColumnIndex(ContactsContract.Contacts.DISPLAY_NAME));
 ctr++;

}
在上面的代碼中,聯系人被加載到Cursor對象,該對象是一個使用loadInBackground()方法的CursorLoader類。所有聯系人姓名存儲在一個字符串數組中,並使用Cursor類中的MoveToNext()方法浏覽所有聯系人。
此後一個ArrayAdapter被用於將聯系人姓名綁定到AutoCompleteTextView如下:
public void showContact(Cursor c)
{
 String id=c.getString(c.getColumnIndex(ContactsContract.Contacts._ID));
 String displayName=c.getString(c.getColumnIndex(ContactsContract.Contacts.DISPLAY_NAME));
 Bitmap photo;
 InputStream stream=ContactsContract.Contacts.openContactPhotoInputStream
 (getContentResolver(),ContentUris.withAppendedId(ContactsContract.Contacts.CONTENT_URI,Long.parseLong(id)));
 if(stream!=null)
 {
 photo=BitmapFactory.decodeStream(stream);
 imgPhoto.setImageBitmap(photo);
 }
 else
 {
 imgPhoto.setImageBitmap(null);
 }
 Cursor phoneCursor=getContentResolver().query
 (ContactsContract.CommonDataKinds.Phone.CONTENT_URI,null,ContactsContract.CommonDataKinds.Phone.CONTACT_ID+"="+id,null,null);
 String number="";

 if(phoneCursor.getCount()>0)

 {
 phoneCursor.moveToFirst();
 number=phoneCursor.getString(phoneCursor.getColumnIndex(ContactsContract.CommonDataKinds.Phone.NUMBER));
 while(phoneCursor.moveToNext())

 {

 number+=","+phoneCursor.getString(phoneCursor.getColumnIndex(ContactsContract.CommonDataKinds.Phone.NUMBER));

 }

 }

 phoneCursor.close();
 txtIdVal.setText(id);
 txtDisplayNameVal.setText(displayName);
 txtPhoneNoVal.setText(number);
 enableDisableButtons();

}
上面的代碼使用cursor參數獲取聯系人的ID,顯示姓名,照片和電話號碼。它使用openContactPhotoInputStream()方法來為照片返回輸入流和decodeStream()方法來讀取照片。然後,它使用的setImageBitmap()方法在ImageView上顯示聯系人照片。當信息存儲在另一個表時,為了顯示電話號碼我們必須使用另一查詢。
以下代碼啟用和禁用基於所述查詢結果的導航按鈕:
public void enableDisableButtons()

{
 if(c.isFirst()&&c.isLast())
 {

 btnFirst.setEnabled(false);
 btnPrevious.setEnabled(false);
 btnNext.setEnabled(false);
 btnLast.setEnabled(false);

 }

 else if(c.isFirst())

 {
 btnFirst.setEnabled(false);
 btnPrevious.setEnabled(false);
 btnNext.setEnabled(true);
 btnLast.setEnabled(true);

 }

 else if(c.isLast())

 {

 btnFirst.setEnabled(true);
 btnPrevious.setEnabled(true);
 btnNext.setEnabled(false);
 btnLast.setEnabled(false);

 }

 else

 {

 btnFirst.setEnabled(true);
 btnPrevious.setEnabled(true);
 btnNext.setEnabled(true);
 btnLast.setEnabled(true);

 }

}
點擊搜索按鈕允許你基於名稱在搜索文本框中搜索聯系方式,如下:
public void search(View v)

{
 position=c.getPosition();
 if(txtSearchVal.getText().toString().trim().length()>0)
 {

 Uri contacts=ContactsContract.Contacts.CONTENT_URI;
 CursorLoader loader=new CursorLoader
 (this,contacts,null,ContactsContract.Contacts.DISPLAY_NAME+"='"+txtSearchVal.getText().toString()+"'",null,
 ContactsContract.Contacts.DISPLAY_NAME+" asc");
 c=loader.loadInBackground();
 if(c.getCount()>0)

 {

 c.moveToFirst();

 }

 }

 else

 {

 Uri contacts=ContactsContract.Contacts.CONTENT_URI;
 CursorLoader loader=new CursorLoader
 (this,contacts,null,null,null,ContactsContract.Contacts.DISPLAY_NAME+" asc");
 c=loader.loadInBackground();
 c.move(position);
 c.moveToNext();
 }

 if(c.getCount()==0)

 {

 Toast.makeText(this,"No results found for contact "+txtSearchVal.getText().toString(),Toast.LENGTH_SHORT).show();
 showAll();
 return;

 }

 showContact(c);

}
上面的代碼實現了通過聯系人姓名找到聯系方式功能。
點擊清除搜索文本框執行下面的代碼:
public void clearSearch(View View)

{
 showAll();
 txtSearchVal.setText("");

}
showAll()方法顯示所有聯系人,如下:
public void showAll()

{

 Uri contacts=ContactsContract.Contacts.CONTENT_URI;
 CursorLoader loader=new CursorLoader(this,contacts,null,null,null,ContactsContract.Contacts.DISPLAY_NAME+" asc");
 c=loader.loadInBackground();
 c.move(position);
 c.moveToNext();
 showContact(c);

}
下面的代碼可以使用導航按鈕導航:
public void first(View v)

{
 c.moveToFirst();
 showContact(c);

}

public void previous(View v)

{
 c.moveToPrevious();
 showContact(c);

}

public void next(View v)

{
 c.moveToNext();
 showContact(c);
}

public void last(View v)

{
 c.moveToLast();
 showContact(c);

}
效果圖:

以上就是本文的全部內容,希望對大家的學習有所幫助,也希望大家多多支持本站。
 Android新浪微博客戶端(七)——ListView中的圖片異步加載、緩存
我們都知道對每一個Weibo Item都有用戶頭像,而且每一條微博還可能帶有圖片。如果在加載列表的同時加載圖片,這樣有幾個缺點,第一很費事,界面卡住,用戶體
 android MediaPlayer
Playback control of audio/video files and streams is managed as a state machine. The
 android 自定義toast width height 背景圖片
Android 自定義toast 寬高大小 背景圖片 RelativeLayout layout = (RelativeLayout) getLayoutInfl
 [Android]內存洩露排查手記
內存洩露排查手記 Time:2013.09.02 Author:sodino 問題現象: 這裡內存洩露是指已實例化的對象長期被hold住且無法釋放或不能