編輯:關於Android編程
最近公司在項目上要使用到表情與鍵盤的切換輸入,自己實現了一個,還是存在些缺陷,比如說鍵盤與表情切換時出現跳閃問題,這個相當困擾我,不過所幸在Github(其中一個不錯的開源項目,其代碼整體結構很不錯)並且在論壇上找些解決方案,再加上我也是研究了好多個開源項目的代碼,最後才苦逼地整合出比較不錯的實現效果,可以說跟微信基本一樣(嘿嘿,只能說目前還沒發現大Bug,若發現大家一起日後慢慢完善,這裡我也只是給出了實現方案,拓展其他表情我並沒有實現哈,不過代碼中我實現了一個可拓展的fragment模板以便大家實現自己的表情包),我只是實現了一頁表情,代碼我也進行另外的封裝與拓展,大家需要多表情的話只需要實現自己的表情fragment界面,然後根據工廠類獲取即可,廢話不多說先上圖看效果:
效果還不錯吧,哈哈。下面開始介紹:
本篇主要分析的核心類EmotionKeyboard.Java,EmotionComplateFragment.java,EmotionMainFragment.java,FragmentFactory.java,還有一個是工具類裡的EmotionUtils.java和GlobalOnItemClickManagerUtils.java 這幾個類我會重點分析一下,其他的大家自行看源碼哈。下面就開始咯,先來看看本篇主要內容以及大概思路:
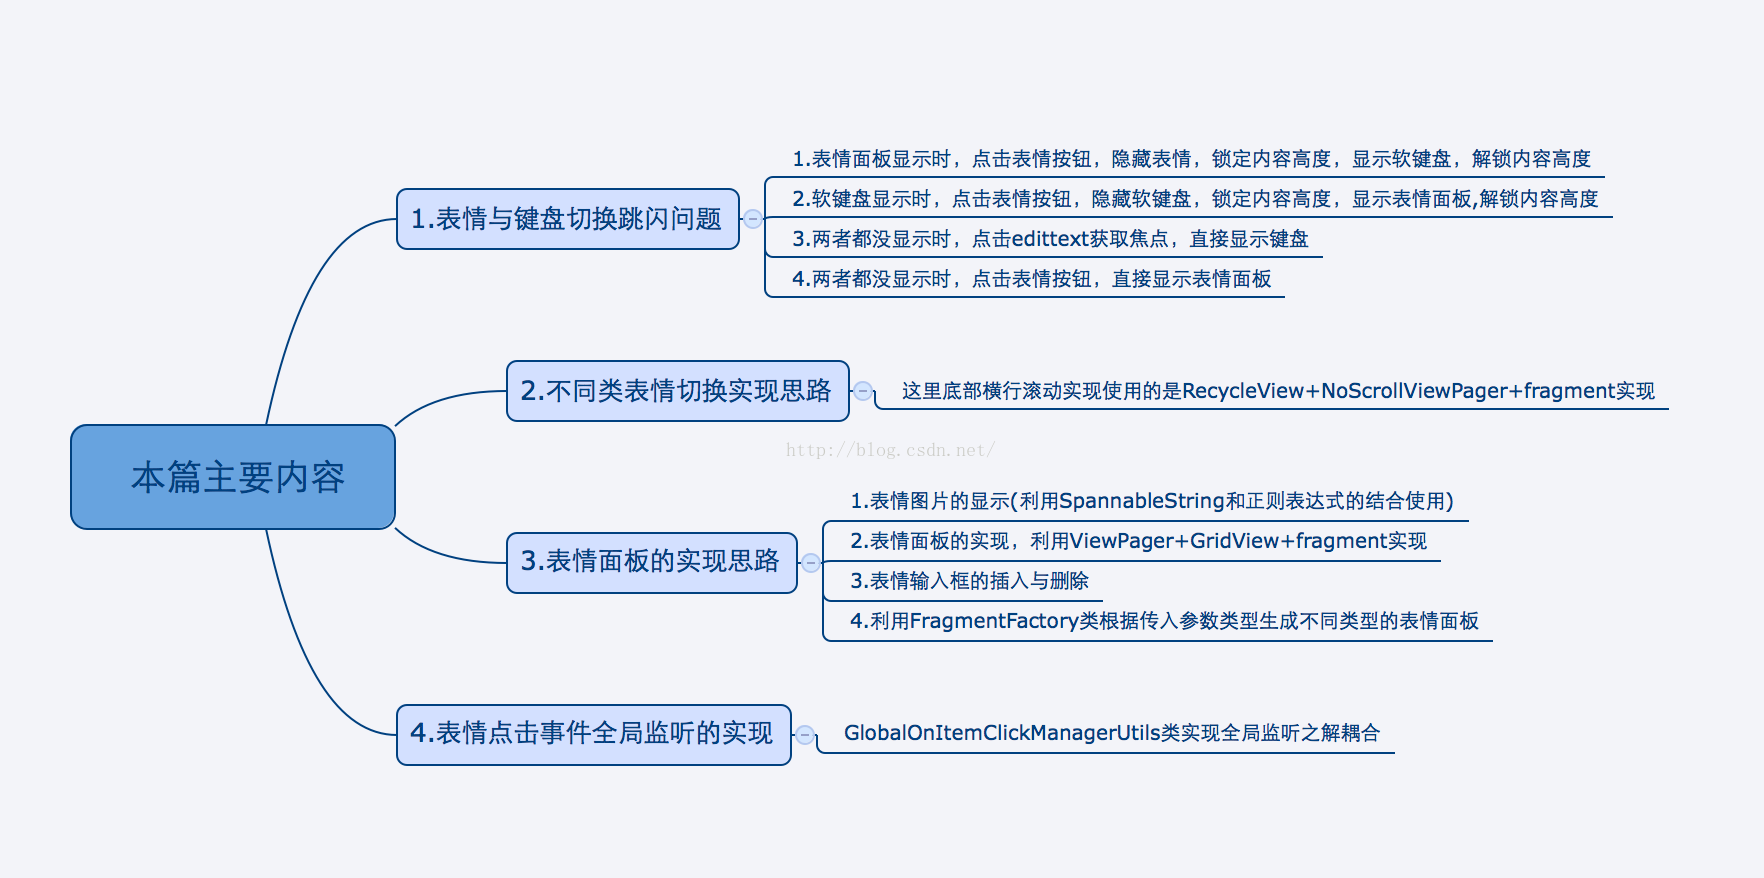
1.解決表情與鍵盤切換跳閃問題
1.1跳閃問題概述
為了讓大家對這個問題有一定了解,我先來個簡單案例,用紅色面板代表表情面板,效果如下:
圖(1-1)
我們先來看圖(1-1),即上圖,通過上圖我們可以看出,當表情顯示時,我們點擊表情按鈕,隱藏表情顯示軟件盤時,內容Bar有一個明顯的先向下後恢復的跳閃現象,這樣用戶體驗相當的差,我們希望的是下圖(1-2)的效果,無論怎麼切換都不會有跳閃現象,這就是我所有說的鍵盤與表情切換的跳閃問題。
圖(1-2)
到這裡,我們對這個問題有了大概了解後,再來深入分析如何實現圖(1-2)的不跳閃效果。這裡我們做個約定,我們把含有表情那個bar統稱為內容Bar。
1.2 解決跳閃問題的思路:
Android系統在彈出軟鍵盤時,會把我們的內容 Bar 頂上去,因此只有表情面板的高度與軟鍵盤彈出時高度一致時,才有可能然切換時高度過渡更自然,所以我們必須計算出軟鍵盤的高度並設置給表情面板。僅僅有這一步跳閃問題還是依舊存在,因此這時我們必須想其他辦法固定內容Bar,因為所有的跳閃都是表情面板隱藏,而軟鍵盤往上托出瞬間,Activity高度變高(為什麼會變高後面會說明),內容Bar往下滑後,又被軟鍵盤頂回原來位置造成的。因此只要固定了內容Bar的位置,閃跳問題就迎刃而解了。那麼如何固定內容Bar的位置呢?我們知道在一個布局中一個控件的位置其實是由它上面所有控件的高度決定的,如果其上面其他控件的高度不變,那麼當前控件的高度自然也不會變化,即使到時Activity的高度發生了變化也也不會影響該控件的位置(整個界面的顯示是掛載在window窗體上的,而非Activity,不了解的可以先研究一下窗體的創建過程),因此我們只要在軟鍵盤彈出前固定內容Bar上面所有控件高度,從而達到固定內容Bar位置(高度)的目的。好了,有思路了,我們接下來一步步按上面思路解決問題。
1.3 解決跳閃問題的套路:
1.3.1 先獲取鍵盤高度,並設置表情面板的高度為軟鍵盤的高度
Android系統在界面上彈出軟鍵盤時會將整個Activity的高度壓縮,此時windowSoftInputMode屬性設置為adjustResize(對windowSoftInputMode不清楚的話,請自行查閱相關資料哈),這個屬性表示Activity的主窗口總是會被調整大小,從而保證軟鍵盤顯示空間。在這種情況下我們可以通過以下方法計算軟鍵盤的高度:
Rect r = new Rect();
/*
* decorView是window中的最頂層view,可以從window中通過getDecorView獲取到decorView。
* 通過decorView獲取到程序顯示的區域,包括標題欄,但不包括狀態欄。
*/
mActivity.getWindow().getDecorView().getWindowVisibleDisplayFrame(r);
//獲取屏幕的高度
int screenHeight = mActivity.getWindow().getDecorView().getRootView().getHeight();
//計算軟件盤的高度
int softInputHeight = screenHeight - r.bottom;
這裡我們隊對r.bottom和mActivity.getWindow().getDecorView().getWindowVisibleDisplayFrame(r)進行簡單解釋,直接上圖吧:
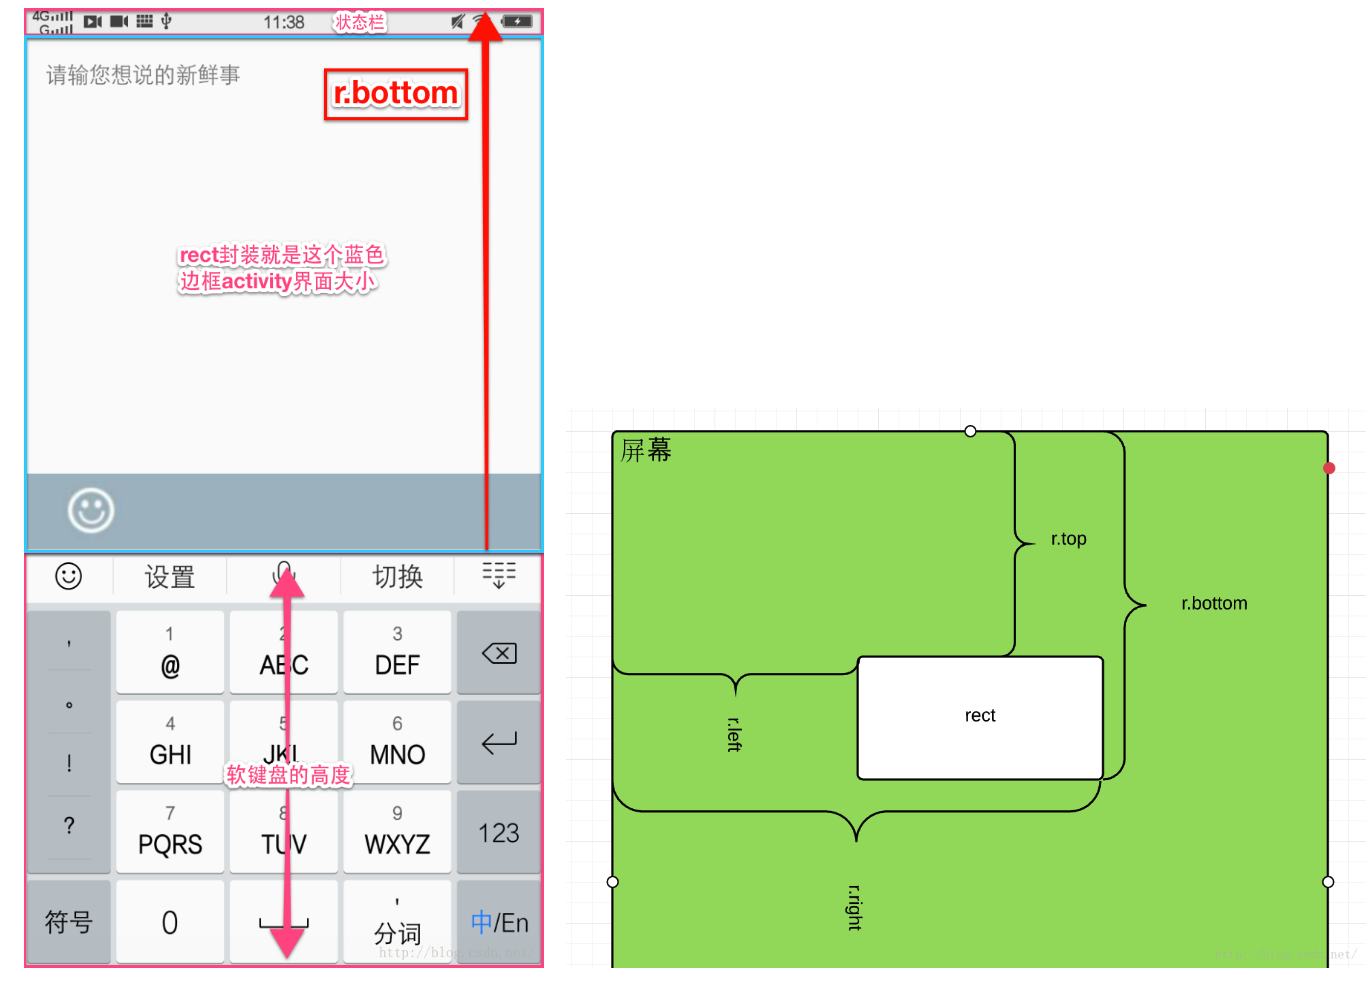
這下就清晰了吧,右邊是Rect參數解析圖,輔助我們對rect的理解。
Rect r = new Rect();
mActivity.getWindow().getDecorView().getWindowVisibleDisplayFrame(r)
這兩句其實將左圖中藍色邊框( 其實也就是actvity的大小)的size大小參數封裝到Rect中,以便我們後續使用。雖然計算出來的區域大小不包含狀態欄,但是r.bottom(紅色箭頭長度)的大小是從屏幕頂部開始計算的所以包含了狀態欄的高度。需要注意的是,區域大小是這樣計算出來的:
區域的高:r.bottom-r.top
區域的寬:r.right-r.left
當然這個跟計算軟鍵盤高度沒關系,只是順帶提一下。因此我們可以通過即可獲取到軟以下方式獲取鍵盤高度:
鍵盤高度=屏幕高度-r.bottom
1.3.2 固定內容Bar的高度,解決閃跳問題
軟鍵盤高度解決後,現在剩下的問題關鍵就在於控制內容Bar的高度了,那麼如何做呢?我們先來看一個布局文件
<?xml version="1.0" encoding="utf-8"?>
<LinearLayout xmlns:android="http://schemas.android.com/apk/res/android"
  android:orientation="vertical" android:layout_width="match_parent"
  android:layout_height="match_parent">
  <ListView
    android:id="@+id/listview"
    android:layout_weight="1"
    android:layout_width="match_parent"
    android:layout_height="0dp"
    />
  <FrameLayout
    android:id="@+id/fl_emotionview_main"
    android:layout_width="match_parent"
    android:layout_height="wrap_content" />
</LinearLayout>
其中ListView的layout_height為0dp、layout_weight為1,這樣這個ListView就會自動充滿整個布局,這裡ListView可以替換成任意控件,FrameLayout則為表情布局(也可認為就是我們前面所說的內容Bar,只不過這裡最終會被替換成整個表情布局),我們的目的就是在彈出軟鍵盤時固定FrameLayout的高度,以便去除跳閃問題。根據我們前面的思路,FrameLayout的高度是由其上面的控件決定的也就是由ListView決定的,也就是說我們只要在軟鍵盤彈出前固定ListView的內容高度即可。因此我們可以通過下面的方法來鎖定ListView的高度,(mContentView就是我們所指的ListView,這些方法都封裝在EmotionKeyboard.java類中)
/**
 * 鎖定內容高度,防止跳閃
 */
 private void lockContentHeight(){
  LinearLayout.LayoutParams params = (LinearLayout.LayoutParams) mContentView.getLayoutParams();
  params.height = mContentView.getHeight();
  params.weight = 0.0F;
 }
將weight置0,然後將height設置為當前的height,在父控件(LinearLayout)的高度變化時它的高度也不再會變化。釋放ListView的高度:
private void unlockContentHeightDelayed() {
  mEditText.postDelayed(new Runnable() {
    @Override
    public void run() {
      ((LinearLayout.LayoutParams) mContentView.getLayoutParams()).weight = 1.0F;
    }
  }, 200L);
}
其中的LinearLayout.LayoutParams.weight = 1.0F;,在代碼裡動態更改LayoutParam的weight,會導致父控件重新onLayout(),也就達到改變控件的高度的目的。到此兩個主要問題都解決了,我們直接上核心類代碼,該類來自github上的開源項目我在使用中直接從該項目中抽取了該類, 並做了細微修改,也添加了代碼注釋。
package com.zejian.emotionkeyboard.emotionkeyboardview;
import android.annotation.TargetApi;
import android.app.Activity;
import android.content.Context;
import android.content.SharedPreferences;
import android.graphics.Rect;
import android.os.Build;
import android.util.DisplayMetrics;
import android.view.MotionEvent;
import android.view.View;
import android.view.WindowManager;
import android.view.inputmethod.InputMethodManager;
import android.widget.EditText;
import android.widget.LinearLayout;
import com.zejian.emotionkeyboard.utils.LogUtils;
/**
 * author : zejian
 * time : 2016年1月5日 上午11:14:27
 * email : [email protected]
 * description :源碼來自開源項目https://github.com/dss886/Android-EmotionInputDetector
 *       本人僅做細微修改以及代碼解析
 */
public class EmotionKeyboard {

    private static final String SHARE_PREFERENCE_NAME = "EmotionKeyboard";
    private static final String SHARE_PREFERENCE_SOFT_INPUT_HEIGHT = "soft_input_height";
    private Activity mActivity;
    private InputMethodManager mInputManager;//軟鍵盤管理類
    private SharedPreferences sp;
    private View mEmotionLayout;//表情布局
    private EditText mEditText;//
    private View mContentView;//內容布局view,即除了表情布局或者軟鍵盤布局以外的布局,用於固定bar的高度,防止跳閃
    private EmotionKeyboard(){
    }

    /**
     * 外部靜態調用
     * @param activity
     * @return
     */
    public static EmotionKeyboard with(Activity activity) {
      EmotionKeyboard emotionInputDetector = new EmotionKeyboard();
      emotionInputDetector.mActivity = activity;
      emotionInputDetector.mInputManager = (InputMethodManager) activity.getSystemService(Context.INPUT_METHOD_SERVICE);
      emotionInputDetector.sp = activity.getSharedPreferences(SHARE_PREFERENCE_NAME, Context.MODE_PRIVATE);
      return emotionInputDetector;
    }

    /**
     * 綁定內容view,此view用於固定bar的高度,防止跳閃
     * @param contentView
     * @return
     */
    public EmotionKeyboard bindToContent(View contentView) {
      mContentView = contentView;
      return this;
    }

    /**
     * 綁定編輯框
     * @param editText
     * @return
     */
    public EmotionKeyboard bindToEditText(EditText editText) {
      mEditText = editText;
      mEditText.requestFocus();
      mEditText.setOnTouchListener(new View.OnTouchListener() {
        @Override
        public boolean onTouch(View v, MotionEvent event) {
          if (event.getAction() == MotionEvent.ACTION_UP && mEmotionLayout.isShown()) {
            lockContentHeight();//顯示軟件盤時,鎖定內容高度,防止跳閃。
            hideEmotionLayout(true);//隱藏表情布局,顯示軟件盤
            //軟件盤顯示後,釋放內容高度
            mEditText.postDelayed(new Runnable() {
              @Override
              public void run() {
                unlockContentHeightDelayed();
              }
            }, 200L);
          }
          return false;
        }
      });
      return this;
    }

    /**
     * 綁定表情按鈕
     * @param emotionButton
     * @return
     */
    public EmotionKeyboard bindToEmotionButton(View emotionButton) {
      emotionButton.setOnClickListener(new View.OnClickListener() {
        @Override
        public void onClick(View v) {
          if (mEmotionLayout.isShown()) {
            lockContentHeight();//顯示軟件盤時,鎖定內容高度,防止跳閃。
            hideEmotionLayout(true);//隱藏表情布局,顯示軟件盤
            unlockContentHeightDelayed();//軟件盤顯示後,釋放內容高度
          } else {
            if (isSoftInputShown()) {//同上
              lockContentHeight();
              showEmotionLayout();
              unlockContentHeightDelayed();
            } else {
              showEmotionLayout();//兩者都沒顯示,直接顯示表情布局
            }
          }
        }
      });
      return this;
    }
    /**
     * 設置表情內容布局
     * @param emotionView
     * @return
     */
    public EmotionKeyboard setEmotionView(View emotionView) {
      mEmotionLayout = emotionView;
      return this;
    }
    public EmotionKeyboard build(){
//設置軟件盤的模式:SOFT_INPUT_ADJUST_RESIZE 這個屬性表示Activity的主窗口總是會被調整大小,從而保證軟鍵盤顯示空間。
    //從而方便我們計算軟件盤的高度
    mActivity.getWindow().setSoftInputMode(WindowManager.LayoutParams.SOFT_INPUT_STATE_ALWAYS_HIDDEN |
          WindowManager.LayoutParams.SOFT_INPUT_ADJUST_RESIZE);
      //隱藏軟件盤
      hideSoftInput();
      return this;
    }
    /**
     * 點擊返回鍵時先隱藏表情布局
     * @return
     */
    public boolean interceptBackPress() {
      if (mEmotionLayout.isShown()) {
        hideEmotionLayout(false);
        return true;
      }
      return false;
    }
    private void showEmotionLayout() {
      int softInputHeight = getSupportSoftInputHeight();
      if (softInputHeight == 0) {
        softInputHeight = sp.getInt(SHARE_PREFERENCE_SOFT_INPUT_HEIGHT, 400);
      }
      hideSoftInput();
      mEmotionLayout.getLayoutParams().height = softInputHeight;
      mEmotionLayout.setVisibility(View.VISIBLE);
    }
    /**
     * 隱藏表情布局
     * @param showSoftInput 是否顯示軟件盤
     */
    private void hideEmotionLayout(boolean showSoftInput) {
      if (mEmotionLayout.isShown()) {
        mEmotionLayout.setVisibility(View.GONE);
        if (showSoftInput) {
          showSoftInput();
        }
      }
    }
    /**
     * 鎖定內容高度,防止跳閃
     */
    private void lockContentHeight() {
      LinearLayout.LayoutParams params = (LinearLayout.LayoutParams) mContentView.getLayoutParams();
      params.height = mContentView.getHeight();
      params.weight = 0.0F;
    }
    /**
     * 釋放被鎖定的內容高度
     */
    private void unlockContentHeightDelayed() {
      mEditText.postDelayed(new Runnable() {
        @Override
        public void run() {
          ((LinearLayout.LayoutParams) mContentView.getLayoutParams()).weight = 1.0F;
        }
      }, 200L);
    }
    /**
     * 編輯框獲取焦點,並顯示軟件盤
     */
    private void showSoftInput() {
      mEditText.requestFocus();
      mEditText.post(new Runnable() {
        @Override
        public void run() {
          mInputManager.showSoftInput(mEditText, 0);
        }
      });
    }
    /**
     * 隱藏軟件盤
     */
    private void hideSoftInput() {
      mInputManager.hideSoftInputFromWindow(mEditText.getWindowToken(), 0);
    }
    /**
     * 是否顯示軟件盤
     * @return
     */
    private boolean isSoftInputShown() {
      return getSupportSoftInputHeight() != 0;
    }
    /**
     * 獲取軟件盤的高度
     * @return
     */
    private int getSupportSoftInputHeight() {
      Rect r = new Rect();
      /**
       * decorView是window中的最頂層view,可以從window中通過getDecorView獲取到decorView。
       * 通過decorView獲取到程序顯示的區域,包括標題欄,但不包括狀態欄。
       */
      mActivity.getWindow().getDecorView().getWindowVisibleDisplayFrame(r);
      //獲取屏幕的高度
      int screenHeight = mActivity.getWindow().getDecorView().getRootView().getHeight();
      //計算軟件盤的高度
      int softInputHeight = screenHeight - r.bottom;
      /**
       * 某些Android版本下,沒有顯示軟鍵盤時減出來的高度總是144,而不是零,
       * 這是因為高度是包括了虛擬按鍵欄的(例如華為系列),所以在API Level高於20時,
       * 我們需要減去底部虛擬按鍵欄的高度(如果有的話)
       */
      if (Build.VERSION.SDK_INT >= 20) {
        // When SDK Level >= 20 (Android L), the softInputHeight will contain the height of softButtonsBar (if has)
        softInputHeight = softInputHeight - getSoftButtonsBarHeight();
      }
      if (softInputHeight < 0) {
        LogUtils.w("EmotionKeyboard--Warning: value of softInputHeight is below zero!");
      }
      //存一份到本地
      if (softInputHeight > 0) {
        sp.edit().putInt(SHARE_PREFERENCE_SOFT_INPUT_HEIGHT, softInputHeight).apply();
      }
      return softInputHeight;
    }
    /**
     * 底部虛擬按鍵欄的高度
     * @return
     */
    @TargetApi(Build.VERSION_CODES.JELLY_BEAN_MR1)
    private int getSoftButtonsBarHeight() {
      DisplayMetrics metrics = new DisplayMetrics();
      //這個方法獲取可能不是真實屏幕的高度
      mActivity.getWindowManager().getDefaultDisplay().getMetrics(metrics);
      int usableHeight = metrics.heightPixels;
      //獲取當前屏幕的真實高度
      mActivity.getWindowManager().getDefaultDisplay().getRealMetrics(metrics);
      int realHeight = metrics.heightPixels;
      if (realHeight > usableHeight) {
        return realHeight - usableHeight;
      } else {
        return 0;
      }
    }
  /**
   * 獲取軟鍵盤高度
   * @return
   */
  public int getKeyBoardHeight(){
    return sp.getInt(SHARE_PREFERENCE_SOFT_INPUT_HEIGHT, 400);
  }
}
EmotionKeyboard類使用的是設計模式中的builder模式來創建對象。其中mEmotionLayout是表情布局,mContentView是內容布局view,即除了表情布局或者軟鍵盤布局以外的布局,用於固定bar的高度,防止跳閃,當然mContentView可以是任意布局。
/**
  * 綁定表情按鈕
  * @param emotionButton
  * @return
  */
  public EmotionKeyboard bindToEmotionButton(View emotionButton) {
    emotionButton.setOnClickListener(new View.OnClickListener() {
      @Override
      public void onClick(View v) {
        if (mEmotionLayout.isShown()) {
          lockContentHeight();//顯示軟件盤時,鎖定內容高度,防止跳閃。
          hideEmotionLayout(true);//隱藏表情布局,顯示軟件盤
          unlockContentHeightDelayed();//軟件盤顯示後,釋放內容高度
        } else {
          if (isSoftInputShown()) {//同上
            lockContentHeight();
            showEmotionLayout();
            unlockContentHeightDelayed();
          } else {
            showEmotionLayout();//兩者都沒顯示,直接顯示表情布局
          }
        }
      }
    });
    return this;
  }
這裡我們主要重點說明一下點擊表情按鈕時,顯示或者隱藏表情布局以及軟鍵盤的邏輯。首先我們通過mEmotionLayout.isShown()去判斷表情是否已經顯示,如果返回true,這時肯定要去切換成軟鍵盤,因此必須先通過lockContentHeight()方法鎖定mContentView內容高度,然後通過hideEmotionLayout(true)方法因此表情布局並顯示軟鍵盤,這裡傳入true表示顯示軟鍵盤,如果傳入false則表示不顯示軟鍵盤,軟鍵盤顯示後通過unlockContentHeightDelayed()方法去解鎖mContentView內容高度。但如果mEmotionLayout.isShown()返回了false,這有兩種情況,第1種是如果此時軟鍵盤已經顯示,則需先鎖定mContentView內容高度,再去隱藏軟鍵盤,然後顯示表情布局,最後再解鎖mContentView內容高度。第2種情況是軟鍵盤和表情都沒顯示,這下就簡單了,直接顯示表情布局即可。好,這個類解析到這,其他直接看源碼哈,注釋槓槓的哈。最後我們來看看在外部使用該類的例子代碼如下:
mEmotionKeyboard = EmotionKeyboard.with(getActivity())
        .setEmotionView(rootView.findViewById(R.id.ll_emotion_layout))//綁定表情面板
        .bindToContent(contentView)//綁定內容view
        .bindToEditText(!isBindToBarEditText ? ((EditText) contentView) : ((EditText) rootView.findViewById(R.id.bar_edit_text)))//判斷綁定那種EditView
        .bindToEmotionButton(rootView.findViewById(R.id.emotion_button))//綁定表情按鈕
        .build();
2.實現表情表情面板切換的思路
這裡我們主要采用NoHorizontalScrollerViewPager+RecyclerView+Fragment實現,思路是這樣的,我們以NoHorizontalScrollerViewPager作為載體,fragment作為展示界面,RecyclerView作為底部滾動條,每當點擊RecyclerView的item時,我們使用viewPager.setCurrentItem(position,false)方法來切換fragment界面即可(這裡傳入false是表示不需要viewPager的切換動畫)。這樣我們就可以實現不同類表情的切換了。(提示一下這裡所指的fragment其實是就工程目錄中的EmotiomComplateFragment.java類)這個比較簡單,就不多啰嗦了。實現代碼稍後會一起提供。下面是不可橫向滑動的ViewPager的實現代碼,非常簡單,不攔截子類事件即可。
package com.zejian.emotionkeyboard.emotionkeyboardview;
import android.content.Context;
import android.support.v4.view.ViewPager;
import android.util.AttributeSet;
import android.view.MotionEvent;
/**
 * Created by zejian
 * Time 16/1/7 上午11:12
 * Email [email protected]
 * Description:不可橫向滑動的ViewPager
 */
public class NoHorizontalScrollerViewPager extends ViewPager{
  public NoHorizontalScrollerViewPager(Context context) {
    super(context);
  }
  public NoHorizontalScrollerViewPager(Context context, AttributeSet attrs) {
    super(context, attrs);
  }
  /**
   * 重寫攔截事件,返回值設置為false,這時便不會橫向滑動了。
   * @param ev
   * @return
   */
  @Override
  public boolean onInterceptTouchEvent(MotionEvent ev) {
    return false;
  }
  /**
   * 重寫攔截事件,返回值設置為false,這時便不會橫向滑動了。
   * @param ev
   * @return
   */
  @Override
  public boolean onTouchEvent(MotionEvent ev) {
    return false;
  }
}
3.單個表情面板的實現思路
3.1 表情圖片的本質與顯示
表情的顯示從直觀上看確實是一個圖片,但實際只是一種特殊的文本(ImageSpan),比如微博裡表情就是”[表情名字]”的接口,可愛的表情就是[可愛]…因此這裡我們也打算利用”[表情名字]”作為key,圖片的R值作為內容進行存取,EmotionUtils類如下
package com.zejian.emotionkeyboard.utils;
import android.support.v4.util.ArrayMap;
import com.zejian.emotionkeyboard.R;
/**
 * @author : zejian
 * @time : 2016年1月5日 上午11:32:33
 * @email : [email protected]
 * @description :表情加載類,可自己添加多種表情,分別建立不同的map存放和不同的標志符即可
 */
public class EmotionUtils {
  /**
   * 表情類型標志符
   */
  public static final int EMOTION_CLASSIC_TYPE=0x0001;//經典表情
  /**
   * key-表情文字;
   * value-表情圖片資源
   */
  public static ArrayMap<String, Integer> EMPTY_MAP;
  public static ArrayMap<String, Integer> EMOTION_CLASSIC_MAP;
  static {
    EMPTY_MAP = new ArrayMap<>();
    EMOTION_CLASSIC_MAP = new ArrayMap<>();
    EMOTION_CLASSIC_MAP.put("[呵呵]", R.drawable.d_hehe);
    EMOTION_CLASSIC_MAP.put("[嘻嘻]", R.drawable.d_xixi);
    EMOTION_CLASSIC_MAP.put("[哈哈]", R.drawable.d_haha);
    EMOTION_CLASSIC_MAP.put("[愛你]", R.drawable.d_aini);
    EMOTION_CLASSIC_MAP.put("[挖鼻屎]", R.drawable.d_wabishi);
    EMOTION_CLASSIC_MAP.put("[吃驚]", R.drawable.d_chijing);
    EMOTION_CLASSIC_MAP.put("[暈]", R.drawable.d_yun);
    EMOTION_CLASSIC_MAP.put("[淚]", R.drawable.d_lei);
    EMOTION_CLASSIC_MAP.put("[饞嘴]", R.drawable.d_chanzui);
    EMOTION_CLASSIC_MAP.put("[抓狂]", R.drawable.d_zhuakuang);
    EMOTION_CLASSIC_MAP.put("[哼]", R.drawable.d_heng);
    EMOTION_CLASSIC_MAP.put("[可愛]", R.drawable.d_keai);
    EMOTION_CLASSIC_MAP.put("[怒]", R.drawable.d_nu);
    EMOTION_CLASSIC_MAP.put("[汗]", R.drawable.d_han);
    EMOTION_CLASSIC_MAP.put("[害羞]", R.drawable.d_haixiu);
    EMOTION_CLASSIC_MAP.put("[睡覺]", R.drawable.d_shuijiao);
    EMOTION_CLASSIC_MAP.put("[錢]", R.drawable.d_qian);
    EMOTION_CLASSIC_MAP.put("[偷笑]", R.drawable.d_touxiao);
    EMOTION_CLASSIC_MAP.put("[笑cry]", R.drawable.d_xiaoku);
    EMOTION_CLASSIC_MAP.put("[doge]", R.drawable.d_doge);
    EMOTION_CLASSIC_MAP.put("[喵喵]", R.drawable.d_miao);
    EMOTION_CLASSIC_MAP.put("[酷]", R.drawable.d_ku);
    EMOTION_CLASSIC_MAP.put("[衰]", R.drawable.d_shuai);
    EMOTION_CLASSIC_MAP.put("[閉嘴]", R.drawable.d_bizui);
    EMOTION_CLASSIC_MAP.put("[鄙視]", R.drawable.d_bishi);
    EMOTION_CLASSIC_MAP.put("[花心]", R.drawable.d_huaxin);
    EMOTION_CLASSIC_MAP.put("[鼓掌]", R.drawable.d_guzhang);
    EMOTION_CLASSIC_MAP.put("[悲傷]", R.drawable.d_beishang);
    EMOTION_CLASSIC_MAP.put("[思考]", R.drawable.d_sikao);
    EMOTION_CLASSIC_MAP.put("[生病]", R.drawable.d_shengbing);
    EMOTION_CLASSIC_MAP.put("[親親]", R.drawable.d_qinqin);
    EMOTION_CLASSIC_MAP.put("[怒罵]", R.drawable.d_numa);
    EMOTION_CLASSIC_MAP.put("[太開心]", R.drawable.d_taikaixin);
    EMOTION_CLASSIC_MAP.put("[懶得理你]", R.drawable.d_landelini);
    EMOTION_CLASSIC_MAP.put("[右哼哼]", R.drawable.d_youhengheng);
    EMOTION_CLASSIC_MAP.put("[左哼哼]", R.drawable.d_zuohengheng);
    EMOTION_CLASSIC_MAP.put("[噓]", R.drawable.d_xu);
    EMOTION_CLASSIC_MAP.put("[委屈]", R.drawable.d_weiqu);
    EMOTION_CLASSIC_MAP.put("[吐]", R.drawable.d_tu);
    EMOTION_CLASSIC_MAP.put("[可憐]", R.drawable.d_kelian);
    EMOTION_CLASSIC_MAP.put("[打哈氣]", R.drawable.d_dahaqi);
    EMOTION_CLASSIC_MAP.put("[擠眼]", R.drawable.d_jiyan);
    EMOTION_CLASSIC_MAP.put("[失望]", R.drawable.d_shiwang);
    EMOTION_CLASSIC_MAP.put("[頂]", R.drawable.d_ding);
    EMOTION_CLASSIC_MAP.put("[疑問]", R.drawable.d_yiwen);
    EMOTION_CLASSIC_MAP.put("[困]", R.drawable.d_kun);
    EMOTION_CLASSIC_MAP.put("[感冒]", R.drawable.d_ganmao);
    EMOTION_CLASSIC_MAP.put("[拜拜]", R.drawable.d_baibai);
    EMOTION_CLASSIC_MAP.put("[黑線]", R.drawable.d_heixian);
    EMOTION_CLASSIC_MAP.put("[陰險]", R.drawable.d_yinxian);
    EMOTION_CLASSIC_MAP.put("[打臉]", R.drawable.d_dalian);
    EMOTION_CLASSIC_MAP.put("[傻眼]", R.drawable.d_shayan);
    EMOTION_CLASSIC_MAP.put("[豬頭]", R.drawable.d_zhutou);
    EMOTION_CLASSIC_MAP.put("[熊貓]", R.drawable.d_xiongmao);
    EMOTION_CLASSIC_MAP.put("[兔子]", R.drawable.d_tuzi);
  }
  /**
   * 根據名稱獲取當前表情圖標R值
   * @param EmotionType 表情類型標志符
   * @param imgName 名稱
   * @return
   */
  public static int getImgByName(int EmotionType,String imgName) {
    Integer integer=null;
    switch (EmotionType){
      case EMOTION_CLASSIC_TYPE:
        integer = EMOTION_CLASSIC_MAP.get(imgName);
        break;
      default:
        LogUtils.e("the emojiMap is null!!");
        break;
    }
    return integer == null ? -1 : integer;
  }
  /**
   * 根據類型獲取表情數據
   * @param EmotionType
   * @return
   */
  public static ArrayMap<String, Integer> getEmojiMap(int EmotionType){
    ArrayMap EmojiMap=null;
    switch (EmotionType){
      case EMOTION_CLASSIC_TYPE:
        EmojiMap=EMOTION_CLASSIC_MAP;
        break;
      default:
        EmojiMap=EMPTY_MAP;
        break;
    }
    return EmojiMap;
  }
}
ArrayMap
/**
* 獲取fragment的方法
* @param emotionType 表情類型,用於判斷使用哪個map集合的表情
*/
public Fragment getFragment(int emotionType){
  Bundle bundle = new Bundle();
  bundle.putInt(FragmentFactory.EMOTION_MAP_TYPE,emotionType);
  EmotiomComplateFragment fragment= EmotiomComplateFragment.newInstance(EmotiomComplateFragment.class,bundle);
  return fragment;
}
調用時,如下:
//創建fragment的工廠類
 FragmentFactory factory=FragmentFactory.getSingleFactoryInstance();
 //創建修改實例
 EmotiomComplateFragment f1= (EmotiomComplateFragment) factory.getFragment(EmotionUtils.EMOTION_CLASSIC_TYPE);
這裡我們通過工廠類getFragment(int emotionType)方法的創建出模版表情類EmotiomComplateFragment,為什麼說是模版呢,因為只要我們創建時傳遞集合標志不同,例如經典表情傳遞的就是EmotionUtils.EMOTION_CLASSIC_TYPE,這時EmotiomComplateFragment類內部就會根據傳遞的集合類型去EmotionUtils類中獲取相對應的集合,這樣也就會創建出我們所需要的表情面板。這裡小結一下:通過上術分析我們可以知道如果我們要添加自己的其他類型表情,只需以下步驟:
步驟1.在EmotionUtils類創建一個表情集合,並賦予這個集合唯一標志
步驟2.在EmotionUtils類中的兩個獲取方法中完善相應的代碼。
步驟3.在創建新的EmotiomComplateFragment模板類時,傳遞相應的集合標志符即可創建相應的表情面板。接下來的問題就是表情如何顯示呢?其實這裡主要用到了SpannableString拓展性字符串相關知識點,SpannableString可以讓一段字符串在顯示的時候,將其中某小段文字附著上其他內容或替換成其他內容,拓展內容可以是圖片或者是文字格式,比如加粗,顯示特殊顏色等。
下面我只對本篇需要用到的SpannableString作簡要介紹:
ImageSpan,這個是可以將指定的特殊字符替換成我們所需要的圖片。也就是我們可以使用”[表情名字]”這個key作為指定的特殊字符,然後在文本中替換成該key所對應的特殊表情即可。
簡單實例如下:
SpannableString spannableString = new SpannableString(source);
int size = (int) tv.getTextSize()*13/10;
Bitmap bitmap = BitmapFactory.decodeResource(res, imgRes);
Bitmap scaleBitmap = Bitmap.createScaledBitmap(bitmap, size, size, true);
ImageSpan span = new ImageSpan(context, scaleBitmap);
spannableString.setSpan(span, start, start + key.length(), Spannable.SPAN_EXCLUSIVE_EXCLUSIVE);
首先將我們要替換的字符串轉換成SpannableString再創建一個ImageSpan並把我們的表情圖片包含在內,最後利用SpannableString的setSpan方法,將span對象設置在對應位置,這樣就完成了特殊字符與文字的轉換。參數解析如下,
start 是需要附著的內容的開始位置
end 是需要附著的內容的開始位置
flag 標志位,這裡是最常用的EXCLUSIVE_EXCLUSIVE的表示span拓展文本不包含前後(這個參數還有其他類型,這裡不過多介紹)
3.2 利用正則表達式找出特殊字符便於轉換成表情
這裡我們利用正則表達式找出特殊字符,根據我們自己的需求編寫特定的正則表達式,如下:
String regex = "\\[[\u4e00-\u9fa5\\w]+\\]";
其中[]是我們特殊需要的字符,因此必須使用“//”進行轉義,\u4e00-\u9fa5表示中文,\w表示下劃線的任意單詞字符,+ 代表一個或者多個。因此這段正則就代表,匹配方括號內有一或多個文字和單詞字符的文本。有了正則表達式,剩下就是找匹配的問題了,這裡我們可以先用matcher.find()獲取到匹配的開始位置,作為setSpan的start值,再使用matcher.group()方法獲取到匹配規則的具體表情文字。對於matcher.find()和matcher.group()這裡簡單介紹一下:
matcher.find(),代表部分匹配,從當前位置開始匹配,找到一個匹配的子串,將移動下次匹配的位置。因此我們可以通過這個方法獲取到匹配的開始位置,作為setSpan的start值(如果字符串中有多個表情就會執行多次匹配)。
matcher.group(),獲取匹配到的具體字符。
下面直接上SpanStringUtils.java類對代碼:
package com.zejian.emotionkeyboard.utils;
import android.content.Context;
import android.content.res.Resources;
import android.graphics.Bitmap;
import android.graphics.BitmapFactory;
import android.text.Spannable;
import android.text.SpannableString;
import android.text.style.ImageSpan;
import android.widget.TextView;
import java.util.regex.Matcher;
import java.util.regex.Pattern;
/**
 * @author : zejian
 * @time : 2016年1月5日 上午11:30:39
 * @email : [email protected]
 * @description :文本中的emojb字符處理為表情圖片
 */
public class SpanStringUtils {

  public static SpannableString getEmotionContent(int emotion_map_type,final Context context, final TextView tv, String source) {
    SpannableString spannableString = new SpannableString(source);
    Resources res = context.getResources();
    String regexEmotion = "\\[([\u4e00-\u9fa5\\w])+\\]";
    Pattern patternEmotion = Pattern.compile(regexEmotion);
    Matcher matcherEmotion = patternEmotion.matcher(spannableString);
    while (matcherEmotion.find()) {
      // 獲取匹配到的具體字符
      String key = matcherEmotion.group();
      // 匹配字符串的開始位置
      int start = matcherEmotion.start();
      // 利用表情名字獲取到對應的圖片
      Integer imgRes = EmotionUtils.getImgByName(emotion_map_type,key);
      if (imgRes != null) {
        // 壓縮表情圖片
        int size = (int) tv.getTextSize()*13/10;
        Bitmap bitmap = BitmapFactory.decodeResource(res, imgRes);
        Bitmap scaleBitmap = Bitmap.createScaledBitmap(bitmap, size, size, true);
ImageSpan span = new ImageSpan(context, scaleBitmap);
        spannableString.setSpan(span, start, start + key.length(), Spannable.SPAN_EXCLUSIVE_EXCLUSIVE);
      }
    }
    return spannableString;
  }
}
代碼相對比較簡單,這裡就不啰嗦啦。
3.3 表情面板的實現(ViewPager+GridView)
這裡的自然就是使用到ViewPager和GridView相結合實現多界面滑動的效果,參考了微信的實現,每頁都是一個GridView顯示20個表情,末尾還有一個刪除按鈕。實現思路入下:
利用ViewPager作為滑動控件,同時結合GridView來布局每個表情,GridView會顯示3行7列,共21個Item,即每頁都是一個GridView顯示20個表情,末尾還有一個刪除按鈕。為了讓Item能大小合適,我們在這裡利用動態計算的方式設置寬高,因為屏幕寬度各有不同。每個item寬度的計算方式,由(屏幕的寬度-左右邊距大小(如果有的話就減去)-每個item間隙距離)/7,最終便得到item的寬度。至於表情面板的高度=(item寬度*3+間隙*6),即可獲取中高度,為什麼間隙*6?這裡並沒有什麼計算原理,純粹是我在調試的過程中試出來的值,這個值相對比較合理,也比較美觀,當然大家也可根據自己需要調整。最後就是有多少頁的問題了,這裡可以通過for循環表情集合的所有元素,把每次循環獲取的元素添加到一個集合中,每次判斷集合是否滿20個元素,每滿20個集合就利用該集合去創建一個GridView的表情面板View,同時再新建一個集合存放新獲取到的元素,以次循環。最後把所有表情生成的一個個GridView放到一個總view集合中,利用ViewPager顯示即可。要注意的是在GridView的適配器和點擊事件中,都利用position判斷,如果是最後一個就進行特殊的顯示(刪除按鈕)和點擊處理。
package com.zejian.emotionkeyboard.fragment;
import android.os.Bundle;
import android.support.v4.view.ViewPager;
import android.view.LayoutInflater;
import android.view.View;
import android.view.ViewGroup;
import android.widget.GridView;
import android.widget.LinearLayout;
import com.zejian.emotionkeyboard.R;
import com.zejian.emotionkeyboard.adapter.EmotionGridViewAdapter;
import com.zejian.emotionkeyboard.adapter.EmotionPagerAdapter;
import com.zejian.emotionkeyboard.emotionkeyboardview.EmojiIndicatorView;
import com.zejian.emotionkeyboard.utils.DisplayUtils;
import com.zejian.emotionkeyboard.utils.EmotionUtils;
import com.zejian.emotionkeyboard.utils.GlobalOnItemClickManagerUtils;
import java.util.ArrayList;
import java.util.List;
/**
 * Created by zejian
 * Time 16/1/5 下午4:32
 * Email [email protected]
 * Description:可替換的模板表情,gridview實現
 */
public class EmotiomComplateFragment extends BaseFragment {
  private EmotionPagerAdapter emotionPagerGvAdapter;
  private ViewPager vp_complate_emotion_layout;
  private EmojiIndicatorView ll_point_group;//表情面板對應的點列表
  private int emotion_map_type;
  /**
   * 創建與Fragment對象關聯的View視圖時調用
   * @param inflater
   * @param container
   * @param savedInstanceState
   * @return
   */
  @Override
  public View onCreateView(LayoutInflater inflater, ViewGroup container, Bundle savedInstanceState) {
    View rootView = inflater.inflate(R.layout.fragment_complate_emotion, container, false);
    initView(rootView);
    initListener();
    return rootView;
  }
  /**
   * 初始化view控件
   */
  protected void initView(View rootView){
    vp_complate_emotion_layout = (ViewPager) rootView.findViewById(R.id.vp_complate_emotion_layout);
    ll_point_group= (EmojiIndicatorView) rootView.findViewById(R.id.ll_point_group);
    //獲取map的類型
    emotion_map_type=args.getInt(FragmentFactory.EMOTION_MAP_TYPE);
    initEmotion();
  }
  /**
   * 初始化監聽器
   */
  protected void initListener(){
    vp_complate_emotion_layout.addOnPageChangeListener(new ViewPager.OnPageChangeListener() {
      int oldPagerPos=0;
      @Override
      public void onPageScrolled(int position, float positionOffset, int positionOffsetPixels) {
      }
      @Override
      public void onPageSelected(int position) {
        ll_point_group.playByStartPointToNext(oldPagerPos,position);
        oldPagerPos=position;
      }
      @Override
      public void onPageScrollStateChanged(int state) {
      }
    });
  }
  /**
   * 初始化表情面板
   * 思路:獲取表情的總數,按每行存放7個表情,動態計算出每個表情所占的寬度大小(包含間距),
   *   而每個表情的高與寬應該是相等的,這裡我們約定只存放3行
   *   每個面板最多存放7*3=21個表情,再減去一個刪除鍵,即每個面板包含20個表情
   *   根據表情總數,循環創建多個容量為20的List,存放表情,對於大小不滿20進行特殊
   *   處理即可。
   */
  private void initEmotion() {
    // 獲取屏幕寬度
    int screenWidth = DisplayUtils.getScreenWidthPixels(getActivity());
    // item的間距
    int spacing = DisplayUtils.dp2px(getActivity(), 12);
    // 動態計算item的寬度和高度
    int itemWidth = (screenWidth - spacing * 8) / 7;
    //動態計算gridview的總高度
    int gvHeight = itemWidth * 3 + spacing * 6;
    List<GridView> emotionViews = new ArrayList<>();
    List<String> emotionNames = new ArrayList<>();
    // 遍歷所有的表情的key
    for (String emojiName : EmotionUtils.getEmojiMap(emotion_map_type).keySet()) {
      emotionNames.add(emojiName);
      // 每20個表情作為一組,同時添加到ViewPager對應的view集合中
      if (emotionNames.size() == 20) {
        GridView gv = createEmotionGridView(emotionNames, screenWidth, spacing, itemWidth, gvHeight);
        emotionViews.add(gv);
        // 添加完一組表情,重新創建一個表情名字集合
        emotionNames = new ArrayList<>();
      }
    }
    // 判斷最後是否有不足20個表情的剩余情況
    if (emotionNames.size() > 0) {
      GridView gv = createEmotionGridView(emotionNames, screenWidth, spacing, itemWidth, gvHeight);
      emotionViews.add(gv);
    }
    //初始化指示器
    ll_point_group.initIndicator(emotionViews.size());
    // 將多個GridView添加顯示到ViewPager中
    emotionPagerGvAdapter = new EmotionPagerAdapter(emotionViews);
    vp_complate_emotion_layout.setAdapter(emotionPagerGvAdapter);
    LinearLayout.LayoutParams params = new LinearLayout.LayoutParams(screenWidth, gvHeight);
    vp_complate_emotion_layout.setLayoutParams(params);
  }
  /**
   * 創建顯示表情的GridView
   */
  private GridView createEmotionGridView(List<String> emotionNames, int gvWidth, int padding, int itemWidth, int gvHeight) {
    // 創建GridView
    GridView gv = new GridView(getActivity());
    //設置點擊背景透明
    gv.setSelector(android.R.color.transparent);
    //設置7列
    gv.setNumColumns(7);
    gv.setPadding(padding, padding, padding, padding);
    gv.setHorizontalSpacing(padding);
    gv.setVerticalSpacing(padding * 2);
    //設置GridView的寬高
    ViewGroup.LayoutParams params = new ViewGroup.LayoutParams(gvWidth, gvHeight);
    gv.setLayoutParams(params);
    // 給GridView設置表情圖片
    EmotionGridViewAdapter adapter = new EmotionGridViewAdapter(getActivity(), emotionNames, itemWidth,emotion_map_type);
    gv.setAdapter(adapter);
    //設置全局點擊事件
    gv.setOnItemClickListener(GlobalOnItemClickManagerUtils.getInstance(getActivity()).getOnItemClickListener(emotion_map_type));
    return gv;
  }
}
注釋非常清晰哈。我就不啰嗦了。但這有個要注意的是在for循環時是通過EmotionUtils的getEmojiMap(emotion_map_type).keySet()獲取集合,這也印證前面我們所說的EmotiomComplateFragment內部是通過集合標志判斷集合類型,最終獲取到所需的集合數據,也就生成了不同表情類型的面板。
3.4 表情的輸入框插入和刪除
思路:在表情框輸入一個表情實際上是在當前光標位置插入一個表情,添加完表情後再把當前光標移動到表情之後,所以我們首先要獲取到光標到首位置,這個可以利用EditText.setSelectionStart()方法,添加完表情後要設置光標的位置到表情之後,這個可以使用EditText.setSelection(position)方法。當然如果點擊的是刪除按鈕,那麼直接調用系統的 Delete 按鈕事件即可。下面直接上代碼:
// 點擊的是表情
EmotionGridViewAdapter emotionGvAdapter = (EmotionGridViewAdapter) itemAdapter;
if (position == emotionGvAdapter.getCount() - 1) {
  // 如果點擊了最後一個回退按鈕,則調用刪除鍵事件
  mEditText.dispatchKeyEvent(new KeyEvent(
      KeyEvent.ACTION_DOWN, KeyEvent.KEYCODE_DEL));
} else {
  // 如果點擊了表情,則添加到輸入框中
  String emotionName = emotionGvAdapter.getItem(position);
  // 獲取當前光標位置,在指定位置上添加表情圖片文本
  int curPosition = mEditText.getSelectionStart();
  StringBuilder sb = new StringBuilder(mEditText.getText().toString());
  sb.insert(curPosition, emotionName);
  // 特殊文字處理,將表情等轉換一下
  mEditText.setText(SpanStringUtils.getEmotionContent(emotion_map_type,
      mContext, mEditText, sb.toString()));
  // 將光標設置到新增完表情的右側
  mEditText.setSelection(curPosition + emotionName.length());
}
這裡要理解一點就是讓控件調用系統事件的方法為EditText.displatchKeyEvent(new KeyEvent(action, code));其中action就是動作,用ACTION_DOWN按下動作就可以了而code為按鈕事件碼,刪除對應的就是KEYCODE_DEL。
4.表情點擊事件全局監聽的實現
上面弄明白了表情的輸入與刪除操作後,我們就要考慮一個問題了,那就是在哪裡設置監聽?直接在創建GridView時,這個確實行得通,不過我們還要再考慮一個問題,那就是如果我們存在多個GridView呢?多復制幾遍咯。但我們是高級工程師對吧,這樣重復代碼顯然是不可出現在我們眼前的,因此這裡我們決定使用全局監聽來設置點擊事件,當然這個並非我想到的,這個是在github開源項目我在閱讀源碼時,發現的,這種方式挺不錯,我就拿來用咯。直接上代碼:
package com.zejian.emotionkeyboard.utils;
import android.content.Context;
import android.view.KeyEvent;
import android.view.View;
import android.widget.AdapterView;
import android.widget.EditText;
import com.zejian.emotionkeyboard.adapter.EmotionGridViewAdapter;
/**
 * Created by zejian
 * Time 16/1/8 下午5:05
 * Email [email protected]
 * Description:點擊表情的全局監聽管理類
 */
public class GlobalOnItemClickManagerUtils {
  private static GlobalOnItemClickManagerUtils instance;
  private EditText mEditText;//輸入框
  private static Context mContext;
  public static GlobalOnItemClickManagerUtils getInstance(Context context) {
    mContext=context;
    if (instance == null) {
      synchronized (GlobalOnItemClickManagerUtils.class) {
        if(instance == null) {
          instance = new GlobalOnItemClickManagerUtils();
        }
      }
    }
    return instance;
  }
  public void attachToEditText(EditText editText) {
    mEditText = editText;
  }
  public AdapterView.OnItemClickListener getOnItemClickListener(final int emotion_map_type) {
    return new AdapterView.OnItemClickListener() {
      @Override
      public void onItemClick(AdapterView<?> parent, View view, int position, long id) {
        Object itemAdapter = parent.getAdapter();
        if (itemAdapter instanceof EmotionGridViewAdapter) {
          // 點擊的是表情
          EmotionGridViewAdapter emotionGvAdapter = (EmotionGridViewAdapter) itemAdapter;
          if (position == emotionGvAdapter.getCount() - 1) {
            // 如果點擊了最後一個回退按鈕,則調用刪除鍵事件
            mEditText.dispatchKeyEvent(new KeyEvent(
                KeyEvent.ACTION_DOWN, KeyEvent.KEYCODE_DEL));
          } else {
            // 如果點擊了表情,則添加到輸入框中
            String emotionName = emotionGvAdapter.getItem(position);
            // 獲取當前光標位置,在指定位置上添加表情圖片文本
            int curPosition = mEditText.getSelectionStart();
            StringBuilder sb = new StringBuilder(mEditText.getText().toString());
            sb.insert(curPosition, emotionName);
            // 特殊文字處理,將表情等轉換一下
            mEditText.setText(SpanStringUtils.getEmotionContent(emotion_map_type,
                mContext, mEditText, sb.toString()));
            // 將光標設置到新增完表情的右側
            mEditText.setSelection(curPosition + emotionName.length());
          }
        }
      }
    };
  }
}
代碼相當簡單,就是創建一個AdapterView.OnItemClickListener的全局監聽器,然後在裡面實現表情的輸入與刪除操作即可。那麼怎麼使用呢?我們在EmotionMainFragment類中使用創建GlobalOnItemClickManagerUtils,並綁定編輯框,部分代碼如下:
//創建全局監聽
GlobalOnItemClickManagerUtils globalOnItemClickManager= GlobalOnItemClickManagerUtils.getInstance(getActivity());
if(isBindToBarEditText){
 //綁定當前Bar的編輯框
 globalOnItemClickManager.attachToEditText(bar_edit_text);
}else{
 // false,則表示綁定contentView, 此時外部提供的contentView必定也是EditText
 globalOnItemClickManager.attachToEditText((EditText) contentView);
 mEmotionKeyboard.bindToEditText((EditText)contentView);
}
綁定的編輯框可能有兩種情況,可能是Bar上的編輯框,但也可能是contentView,此時外部提供的contentView是EditText(可以直接理解為是把之前所說的listview替換成了edittext)。最後別忘記在EmotiomComplateFragment類種創建GridView時注冊該監聽器,
//設置全局點擊事件
gv.setOnItemClickListener(GlobalOnItemClickManagerUtils.getInstance(getActivity()).getOnItemClickListener(emotion_map_type));
好了,到此本篇也完結了,下面給出源碼下載方式:
Github項目源碼下載地址
以上就是對Android 高仿微信表情的示例,希望能幫助需要開發此功能的朋友,謝謝大家對本站的支持!
 Android-廣播機制的注冊及作用
Android的廣播接收器注冊方式分為兩種: 1.動態注冊:(即代碼注冊,該注冊經常伴隨著組件的生命周期或者對象的生命周期同生共死),如下: /** * @autho
 Android 中的 Service 全面總結
1、Service的種類 按運行地點分類: 類別 區別 優點 缺點 應用 本地服務(Local) 該服務依附在主進程上, 服務依附在主進程上而不是獨立的進
 Android ActivityManagerService(AMS)的進程管理
Android中的AMS的職責是比較多的,其中一個比較重要的職責就是app進程的管理,比如我們調用startActivity方法啟動一個activity的時候,可能對應的
 Android網絡(3):HttpClient作客戶端,Tomcat Servlet作服務器的交互示例
前面相繼介紹了Android網絡編程裡的Socket傳輸圖片、HttpURLConnection,今天看HttpClient.第一部分:JavaEE版的Eclipse配置