編輯:關於Android編程
注解是我們經常接觸的技術,Java有注解,Android也有注解,本文將試圖介紹Android中的注解,以及ButterKnife和Otto這些基於注解的庫的一些工作原理.
歸納而言,Android中的注解大概有以下好處
准備工作
默認情況下,Android中的注解包並沒有包括在framework中,它獨立成一個單獨的包,通常我們需要引入這個包.
dependencies {
  compile 'com.android.support:support-annotations:22.2.0'
}
但是如果我們已經引入了appcompat則沒有必要再次引用support-annotations,因為appcompat默認包含了對其引用.
替代枚舉
在最早的時候,當我們想要做一些值得限定實現枚舉的效果,通常是
1.定義幾個常量用於限定
2.從上面的常量選取值進行使用
一個比較描述上面問題的示例代碼如下
public static final int COLOR_RED = 0;
public static final int COLOR_GREEN = 1;
public static final int COLOR_YELLOW = 2;

public void setColor(int color) {
  //some code here
}
//調用
setColor(COLOR_RED)
然而上面的還是有不盡完美的地方
setColor(COLOR_RED)與setColor(0)效果一樣,而後者可讀性很差,但卻可以正常運行
setColor方法可以接受枚舉之外的值,比如setColor(3),這種情況下程序可能出問題
一個相對較優的解決方法就是使用Java中的Enum.使用枚舉實現的效果如下
// ColorEnum.java
public enum ColorEmun {
  RED,
  GREEN,
  YELLOW
}

public void setColorEnum(ColorEmun colorEnum) {
  //some code here
}

setColorEnum(ColorEmun.GREEN);
然而Enum也並非最佳,Enum因為其相比方案一的常量來說,占用內存相對大很多而受到曾經被Google列為不建議使用,為此Google特意引入了一些相關的注解來替代枚舉.
Android中新引入的替代枚舉的注解有IntDef和StringDef,這裡以IntDef做例子說明一下.
public class Colors {
  @IntDef({RED, GREEN, YELLOW})
  @Retention(RetentionPolicy.SOURCE)
  public @interface LightColors{}

  public static final int RED = 0;
  public static final int GREEN = 1;
  public static final int YELLOW = 2;
}
Null相關的注解
和Null相關的注解有兩個
@Nullable 注解的元素可以是Null
@NonNull 注解的元素不能是Null
上面的兩個可以修飾如下的元素
成員屬性
方法參數
方法的返回值
@Nullable
private String obtainReferrerFromIntent(@NonNull Intent intent) {
  return intent.getStringExtra("apps_referrer");
}
NonNull檢測生效的條件
顯式傳入null
在調用方法之前已經判斷了參數為null時
setReferrer(null);//提示警告

//不提示警告
String referrer = getIntent().getStringExtra("apps_referrer");
setReferrer(referrer);

//提示警告
String referrer = getIntent().getStringExtra("apps_referrer");
if (referrer == null) {
  setReferrer(referrer);
}

private void setReferrer(@NonNull String referrer) {
  //some code here
}
區間范圍注解
Android中的IntRange和FloatRange是兩個用來限定區間范圍的注解,
float currentProgress;

public void setCurrentProgress(@FloatRange(from=0.0f, to=1.0f) float progress) {
  currentProgress = progress;
}
如果我們傳入非法的值,如下所示
setCurrentProgress(11);
就會得到這樣的錯誤
Value must be >=0.0 and <= 1.0(was 11)
長度以及數組大小限制
限制字符串的長度
private void setKey(@Size(6) String key) {
}
限定數組集合的大小
private void setData(@Size(max = 1) String[] data) {
}
setData(new String[]{"b", "a"});//error occurs
限定特殊的數組長度,比如3的倍數
private void setItemData(@Size(multiple = 3) String[] data) {
}
權限相關
在Android中,有很多場景都需要使用權限,無論是Marshmallow之前還是之後的動態權限管理.都需要在manifest中進行聲明,如果忘記了,則會導致程序崩潰. 好在有一個注解能輔助我們避免這個問題.使用RequiresPermission注解即可.
@RequiresPermission(Manifest.permission.SET_WALLPAPER)
  public void changeWallpaper(Bitmap bitmap) throws IOException {
}
資源注解
在Android中幾乎所有的資源都可以有對應的資源id.比如獲取定義的字符串,我們可以通過下面的方法
public String getStringById(int stringResId) {
  return getResources().getString(stringResId);
}
使用這個方法,我們可以很容易的獲取到定義的字符串,但是這樣的寫法也存在著風險.
getStringById(R.mipmap.ic_launcher)
如果我們在不知情或者疏忽情況下,傳入這樣的值,就會出現問題. 但是如果我們使用資源相關的注解修飾了參數,就能很大程度上避免錯誤的情況.
public String getStringById(@StringRes int stringResId) {
  return getResources().getString(stringResId);
}
在Android中資源注解如下所示
Color值限定
上面部分提到了ColorRes,用來限定顏色資源id,這裡我們將使用ColorInt,一個用來限定Color值的注解. 在較早的TextView的setTextColor是這樣實現的.
public void setTextColor(int color) {
  mTextColor = ColorStateList.valueOf(color);
  updateTextColors();
}
然而上面的方法在調用時常常會出現這種情況
myTextView.setTextColor(R.color.colorAccent);
如上,如果傳遞過去的參數為color的資源id就會出現顏色取錯誤的問題,這個問題在過去還是比較嚴重的.好在ColorInt出現了,改變了這一問題.
public void setTextColor(@ColorInt int color) {
  mTextColor = ColorStateList.valueOf(color);
  updateTextColors();
}
當我們再次傳入Color資源值時,就會得到錯誤的提示.
CheckResult
這是一個關於返回結果的注解,用來注解方法,如果一個方法得到了結果,卻沒有使用這個結果,就會有錯誤出現,一旦出現這種錯誤,就說明你沒有正確使用該方法。
@CheckResult
public String trim(String s) {
  return s.trim();
}
線程相關
Android中提供了四個與線程相關的注解
一些示例
new AsyncTask<Void, Void, Void>() {
    //doInBackground is already annotated with @WorkerThread
    @Override
    protected Void doInBackground(Void... params) {
      return null;
      updateViews();//error
    }
  };

@UiThread
public void updateViews() {
  Log.i(LOGTAG, "updateViews ThreadInfo=" + Thread.currentThread());
}
注意,這種情況下不會出現錯誤提示
new Thread(){
  @Override
  public void run() {
    super.run();
    updateViews();
  }
}.start();
雖然updateViews會在一個新的工作者線程中執行,但是在compile時沒有錯誤提示.
因為它的判斷依據是,如果updateView的線程注解(這裡為@UiThread)和run(沒有線程注解)不一致才會錯誤提示.如果run方法沒有線程注解,則不提示.
CallSuper
重寫的方法必須要調用super方法
使用這個注解,我們可以強制方法在重寫時必須調用父類的方法 比如Application的onCreate,onConfigurationChanged等.
Keep
在Android編譯生成APK的環節,我們通常需要設置minifyEnabled為true實現下面的兩個效果
混淆代碼
刪除沒有用的代碼
但是出於某一些目的,我們需要不混淆某部分代碼或者不刪除某處代碼,除了配置復雜的Proguard文件之外,我們還可以使用@Keep注解 .
@Keep
public static int getBitmapWidth(Bitmap bitmap) {
  return bitmap.getWidth();
}
ButterKnife
ButterKnife是一個用來綁定View,資源和回調的提高效率的工具.作者為Jake Wharton. ButterKnife的好處
一個摘自GIthub 的示例
class ExampleActivity extends Activity {
 @BindView(R.id.user) EditText username;
 @BindView(R.id.pass) EditText password;

 @BindString(R.string.login_error) String loginErrorMessage;

 @OnClick(R.id.submit) void submit() {
  // TODO call server...
 }

 @Override public void onCreate(Bundle savedInstanceState) {
  super.onCreate(savedInstanceState);
  setContentView(R.layout.simple_activity);
  ButterKnife.bind(this);
  // TODO Use fields...
 }
}
ButterKnife工作原理
以BindView注解使用為例,示例代碼為
public class MainActivity extends AppCompatActivity {
  @BindView(R.id.myTextView)
  TextView myTextView;

  @Override
  protected void onCreate(Bundle savedInstanceState) {
    super.onCreate(savedInstanceState);
    setContentView(R.layout.activity_main);
    ButterKnife.bind(this);
  }
}
1.程序在compile時,會根據注解自動生成兩個類,這裡為MainActivity_ViewBinder.class和MainActivity_ViewBinding.class
2.當我們調用ButterKnife.bind(this);時,會查找當前類對應的ViewBinder類,並調用bind方法,這裡會調用到MainActiivty_ViewBinder.bind方法.
3.MainActiivty_ViewBinder.bind方法實際上是調用了findViewById然後在進行類型轉換,賦值給MainActivity的myTextView屬性
ButterKnife的bind方法
public static Unbinder bind(@NonNull Activity target) {
  return getViewBinder(target).bind(Finder.ACTIVITY, target, target);
}
ButterKnife的getViewBinder和findViewBinderForClass
@NonNull @CheckResult @UiThread
 static ViewBinder<Object> getViewBinder(@NonNull Object target) {
  Class<?> targetClass = target.getClass();
  if (debug) Log.d(TAG, "Looking up view binder for " + targetClass.getName());
  return findViewBinderForClass(targetClass);
 }

 @NonNull @CheckResult @UiThread
 private static ViewBinder<Object> findViewBinderForClass(Class<?> cls) {
  //如果內存集合BINDERS中包含,則不再查找
  ViewBinder<Object> viewBinder = BINDERS.get(cls);
  if (viewBinder != null) {
   if (debug) Log.d(TAG, "HIT: Cached in view binder map.");
   return viewBinder;
  }
  String clsName = cls.getName();
  if (clsName.startsWith("android.") || clsName.startsWith("java.")) {
   if (debug) Log.d(TAG, "MISS: Reached framework class. Abandoning search.");
   return NOP_VIEW_BINDER;
  }
  //noinspection TryWithIdenticalCatches Resolves to API 19+ only type.
  try {
   //使用反射創建實例
   Class<?> viewBindingClass = Class.forName(clsName + "_ViewBinder");
   //noinspection unchecked
   viewBinder = (ViewBinder<Object>) viewBindingClass.newInstance();
   if (debug) Log.d(TAG, "HIT: Loaded view binder class.");
  } catch (ClassNotFoundException e) {
    //如果沒有找到,對父類進行查找
   if (debug) Log.d(TAG, "Not found. Trying superclass " + cls.getSuperclass().getName());
   viewBinder = findViewBinderForClass(cls.getSuperclass());
  } catch (InstantiationException e) {
   throw new RuntimeException("Unable to create view binder for " + clsName, e);
  } catch (IllegalAccessException e) {
   throw new RuntimeException("Unable to create view binder for " + clsName, e);
  }
  //加入內存集合,便於後續的查找
  BINDERS.put(cls, viewBinder);
  return viewBinder;
 }
MainActivity_ViewBinder的反編譯源碼
➜ androidannotationsample javap -c MainActivity_ViewBinder
Warning: Binary file MainActivity_ViewBinder contains com.example.admin.androidannotationsample.MainActivity_ViewBinder
Compiled from "MainActivity_ViewBinder.java"
public final class com.example.admin.androidannotationsample.MainActivity_ViewBinder implements butterknife.internal.ViewBinder<com.example.admin.androidannotationsample.MainActivity> {
 public com.example.admin.androidannotationsample.MainActivity_ViewBinder();
  Code:
    0: aload_0
    1: invokespecial #1         // Method java/lang/Object."<init>":()V
    4: return

 public butterknife.Unbinder bind(butterknife.internal.Finder, com.example.admin.androidannotationsample.MainActivity, java.lang.Object);
  Code:
    0: new      #2         // class com/example/admin/androidannotationsample/MainActivity_ViewBinding
    3: dup
    4: aload_2
    5: aload_1
    6: aload_3              // 創建ViewBinding實例
    7: invokespecial #3         // Method com/example/admin/androidannotationsample/MainActivity_ViewBinding."<init>":(Lcom/example/admin/androidannotationsample/MainActivity;Lbutterknife/internal/Finder;Ljava/lang/Object;)V
   10: areturn

 public butterknife.Unbinder bind(butterknife.internal.Finder, java.lang.Object, java.lang.Object);
  Code:
    0: aload_0
    1: aload_1
    2: aload_2
    3: checkcast   #4         // class com/example/admin/androidannotationsample/MainActivity
    6: aload_3              //調用上面的重載方法
    7: invokevirtual #5         // Method bind:(Lbutterknife/internal/Finder;Lcom/example/admin/androidannotationsample/MainActivity;Ljava/lang/Object;)Lbutterknife/Unbinder;
   10: areturn
}
MainActivity_ViewBinding的反編譯源碼
➜ androidannotationsample javap -c MainActivity_ViewBinding
Warning: Binary file MainActivity_ViewBinding contains com.example.admin.androidannotationsample.MainActivity_ViewBinding
Compiled from "MainActivity_ViewBinding.java"
public class com.example.admin.androidannotationsample.MainActivity_ViewBinding<T extends com.example.admin.androidannotationsample.MainActivity> implements butterknife.Unbinder {
 protected T target;

 public com.example.admin.androidannotationsample.MainActivity_ViewBinding(T, butterknife.internal.Finder, java.lang.Object);
  Code:
    0: aload_0
    1: invokespecial #1         // Method java/lang/Object."<init>":()V
    4: aload_0
    5: aload_1
    6: putfield   #2         // Field target:Lcom/example/admin/androidannotationsample/MainActivity;
    9: aload_1
   10: aload_2
   11: aload_3              //調用Finder.findRequireViewAsType找到View,並進行類型轉換,並復制給MainActivity中對一個的變量
   12: ldc      #4         // int 2131427412
   14: ldc      #5         // String field 'myTextView'
   16: ldc      #6         // class android/widget/TextView
                      // 內部實際調用了findViewById
   18: invokevirtual #7         // Method butterknife/internal/Finder.findRequiredViewAsType:(Ljava/lang/Object;ILjava/lang/String;Ljava/lang/Class;)Ljava/lang/Object;
   21: checkcast   #6         // class android/widget/TextView
   24: putfield   #8         // Field com/example/admin/androidannotationsample/MainActivity.myTextView:Landroid/widget/TextView;
   27: return

 public void unbind();
  Code:
    0: aload_0
    1: getfield   #2         // Field target:Lcom/example/admin/androidannotationsample/MainActivity;
    4: astore_1
    5: aload_1
    6: ifnonnull   19
    9: new      #9         // class java/lang/IllegalStateException
   12: dup
   13: ldc      #10         // String Bindings already cleared.
   15: invokespecial #11         // Method java/lang/IllegalStateException."<init>":(Ljava/lang/String;)V
   18: athrow
   19: aload_1
   20: aconst_null            // 解除綁定,設置對應的變量為null
   21: putfield   #8         // Field com/example/admin/androidannotationsample/MainActivity.myTextView:Landroid/widget/TextView;
   24: aload_0
   25: aconst_null
   26: putfield   #2         // Field target:Lcom/example/admin/androidannotationsample/MainActivity;
   29: return
}
Finder的源碼
package butterknife.internal;

import android.app.Activity;
import android.app.Dialog;
import android.content.Context;
import android.support.annotation.IdRes;
import android.view.View;

@SuppressWarnings("UnusedDeclaration") // Used by generated code.
public enum Finder {
 VIEW {
  @Override public View findOptionalView(Object source, @IdRes int id) {
   return ((View) source).findViewById(id);
  }

  @Override public Context getContext(Object source) {
   return ((View) source).getContext();
  }

  @Override protected String getResourceEntryName(Object source, @IdRes int id) {
   final View view = (View) source;
   // In edit mode, getResourceEntryName() is unsupported due to use of BridgeResources
   if (view.isInEditMode()) {
    return "<unavailable while editing>";
   }
   return super.getResourceEntryName(source, id);
  }
 },
 ACTIVITY {
  @Override public View findOptionalView(Object source, @IdRes int id) {
   return ((Activity) source).findViewById(id);
  }

  @Override public Context getContext(Object source) {
   return (Activity) source;
  }
 },
 DIALOG {
  @Override public View findOptionalView(Object source, @IdRes int id) {
   return ((Dialog) source).findViewById(id);
  }

  @Override public Context getContext(Object source) {
   return ((Dialog) source).getContext();
  }
 };

 //查找對應的Finder,如上面的ACTIVITY, DIALOG, VIEW
 public abstract View findOptionalView(Object source, @IdRes int id);


 public final <T> T findOptionalViewAsType(Object source, @IdRes int id, String who,
   Class<T> cls) {
  View view = findOptionalView(source, id);
  return castView(view, id, who, cls);
 }

 public final View findRequiredView(Object source, @IdRes int id, String who) {
  View view = findOptionalView(source, id);
  if (view != null) {
   return view;
  }
  String name = getResourceEntryName(source, id);
  throw new IllegalStateException("Required view '"
    + name
    + "' with ID "
    + id
    + " for "
    + who
    + " was not found. If this view is optional add '@Nullable' (fields) or '@Optional'"
    + " (methods) annotation.");
 }

 //來自ViewBinding的調用
 public final <T> T findRequiredViewAsType(Object source, @IdRes int id, String who,
   Class<T> cls) {
  View view = findRequiredView(source, id, who);
  return castView(view, id, who, cls);
 }

 public final <T> T castView(View view, @IdRes int id, String who, Class<T> cls) {
  try {
   return cls.cast(view);
  } catch (ClassCastException e) {
   String name = getResourceEntryName(view, id);
   throw new IllegalStateException("View '"
     + name
     + "' with ID "
     + id
     + " for "
     + who
     + " was of the wrong type. See cause for more info.", e);
  }
 }

 @SuppressWarnings("unchecked") // That's the point.
 public final <T> T castParam(Object value, String from, int fromPos, String to, int toPos) {
  try {
   return (T) value;
  } catch (ClassCastException e) {
   throw new IllegalStateException("Parameter #"
     + (fromPos + 1)
     + " of method '"
     + from
     + "' was of the wrong type for parameter #"
     + (toPos + 1)
     + " of method '"
     + to
     + "'. See cause for more info.", e);
  }
 }

 protected String getResourceEntryName(Object source, @IdRes int id) {
  return getContext(source).getResources().getResourceEntryName(id);
 }

 public abstract Context getContext(Object source);
}
Otto
Otto Bus 是一個專為Android改裝的Event Bus,在很多項目中都有應用.由Square開源共享.
public class EventBusTest {
  private static final String LOGTAG = "EventBusTest";
  Bus mBus = new Bus();

  public void test() {
    mBus.register(this);
  }

  class NetworkChangedEvent {

  }

  @Produce
  public NetworkChangedEvent sendNetworkChangedEvent() {
    return new NetworkChangedEvent();
  }


  @Subscribe
  public void onNetworkChanged(NetworkChangedEvent event) {
    Log.i(LOGTAG, "onNetworkChanged event=" + event);
  }
}
Otto 的工作原理
如下為對Otto如何利用注解的分析
register的源碼
public void register(Object object) {
  if (object == null) {
   throw new NullPointerException("Object to register must not be null.");
  }
  enforcer.enforce(this);
  //查找object中的Subscriber
  Map<Class<?>, Set<EventHandler>> foundHandlersMap = handlerFinder.findAllSubscribers(object);
  for (Class<?> type : foundHandlersMap.keySet()) {
   Set<EventHandler> handlers = handlersByType.get(type);
   if (handlers == null) {
    //concurrent put if absent
    Set<EventHandler> handlersCreation = new CopyOnWriteArraySet<EventHandler>();
    handlers = handlersByType.putIfAbsent(type, handlersCreation);
    if (handlers == null) {
      handlers = handlersCreation;
    }
   }
   final Set<EventHandler> foundHandlers = foundHandlersMap.get(type);
   if (!handlers.addAll(foundHandlers)) {
    throw new IllegalArgumentException("Object already registered.");
   }
  }

  for (Map.Entry<Class<?>, Set<EventHandler>> entry : foundHandlersMap.entrySet()) {
   Class<?> type = entry.getKey();
   EventProducer producer = producersByType.get(type);
   if (producer != null && producer.isValid()) {
    Set<EventHandler> foundHandlers = entry.getValue();
    for (EventHandler foundHandler : foundHandlers) {
     if (!producer.isValid()) {
      break;
     }
     if (foundHandler.isValid()) {
      dispatchProducerResultToHandler(foundHandler, producer);
     }
    }
   }
  }
 }
HandlerFinder源碼
interface HandlerFinder {

 Map<Class<?>, EventProducer> findAllProducers(Object listener);

 Map<Class<?>, Set<EventHandler>> findAllSubscribers(Object listener);

 //Otto注解查找器
 HandlerFinder ANNOTATED = new HandlerFinder() {
  @Override
  public Map<Class<?>, EventProducer> findAllProducers(Object listener) {
   return AnnotatedHandlerFinder.findAllProducers(listener);
  }

  @Override
  public Map<Class<?>, Set<EventHandler>> findAllSubscribers(Object listener) {
   return AnnotatedHandlerFinder.findAllSubscribers(listener);
  }
 };
具體查找實現
/** This implementation finds all methods marked with a {@link Subscribe} annotation. */
 static Map<Class<?>, Set<EventHandler>> findAllSubscribers(Object listener) {
  Class<?> listenerClass = listener.getClass();
  Map<Class<?>, Set<EventHandler>> handlersInMethod = new HashMap<Class<?>, Set<EventHandler>>();

  Map<Class<?>, Set<Method>> methods = SUBSCRIBERS_CACHE.get(listenerClass);
  if (null == methods) {
   methods = new HashMap<Class<?>, Set<Method>>();
   loadAnnotatedSubscriberMethods(listenerClass, methods);
  }
  if (!methods.isEmpty()) {
   for (Map.Entry<Class<?>, Set<Method>> e : methods.entrySet()) {
    Set<EventHandler> handlers = new HashSet<EventHandler>();
    for (Method m : e.getValue()) {
     handlers.add(new EventHandler(listener, m));
    }
    handlersInMethod.put(e.getKey(), handlers);
   }
  }

  return handlersInMethod;
 }
以上就是關於Android中注解的一些總結,文章部分內容參考自 Support Annotations ,希望能幫助大家對注解有基礎的認識,並運用到實際的日常開發之中.
以上就對Android 注解資料的整理,後續繼續補充,謝謝大家對本站的支持!
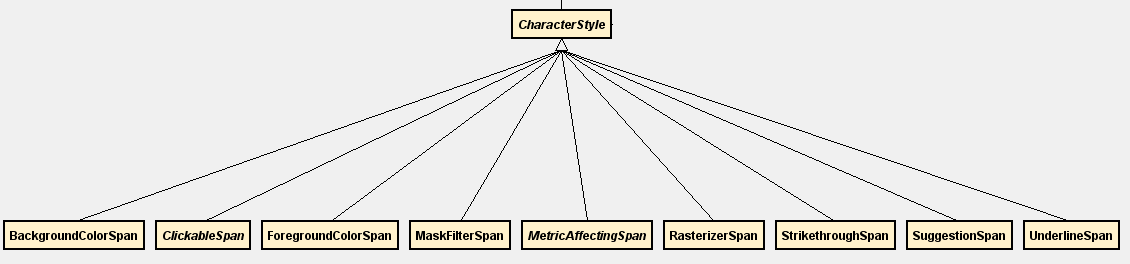
 Android實現捕獲TextView超鏈接的方法
本文實例講述了Android實現捕獲TextView超鏈接的方法。分享給大家供大家參考,具體如下:這裡分享一篇捕獲TextView超鏈接的文章,希望對大家有所幫助,我終於
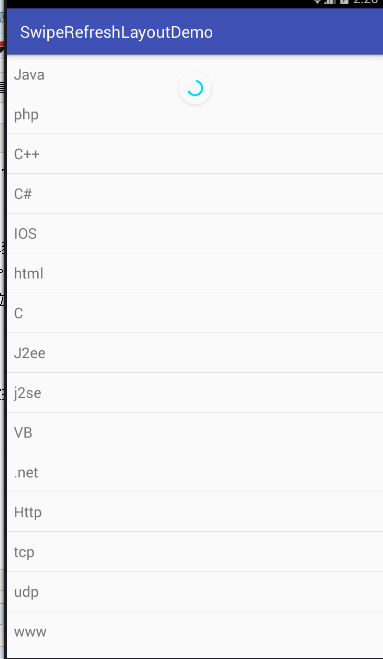 Android官方下拉刷新控件SwipeRefreshLayout使用詳解
可能開發安卓的人大多數都用過很多下拉刷新的開源組件,但是今天用了官方v4支持包的SwipeRefreshLayout覺得效果也蠻不錯的,特拿出來分享。簡介:SwipeRe
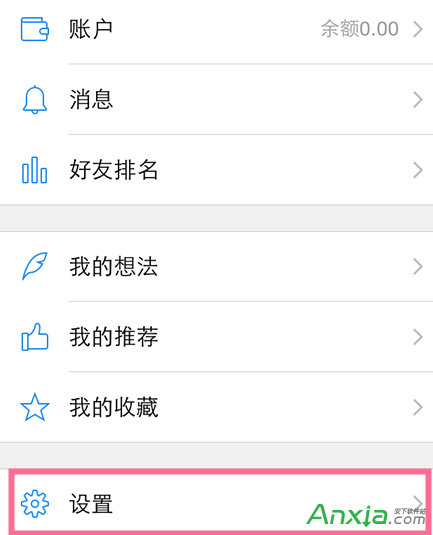 微信讀書APP關閉自動鎖屏方法
在常用的手機閱讀軟件中,我們已經習慣了閱讀時不會鎖屏,那麼在最新出來的手機閱讀APP-微信讀書中怎麼實現APP運行時自動鎖屏關閉的呢?1、打開微信讀書進入應
 android 音樂播放器總結
學習從模仿開始一個星期完成的音樂播放器基本功能,具有下一首,上一首,暫停和隨機、順序和單曲等播放,以及保存上一次播放的狀態,缺少了歌詞顯示功能。使用了andbase框架的