編輯:關於Android編程
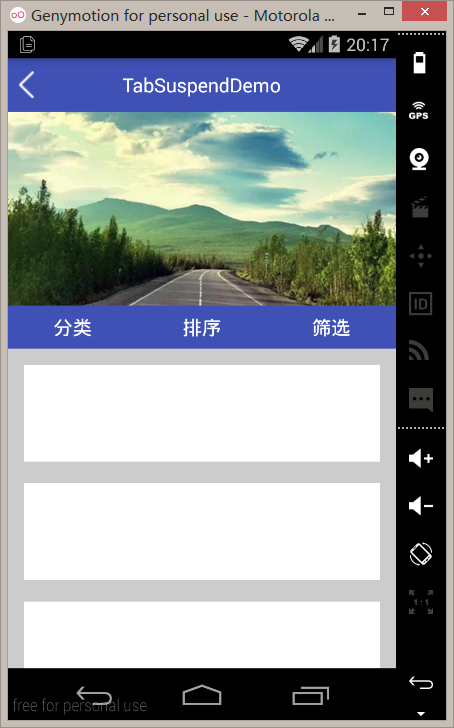
首先是“餓了麼”導航Tab欄懸浮的效果圖。
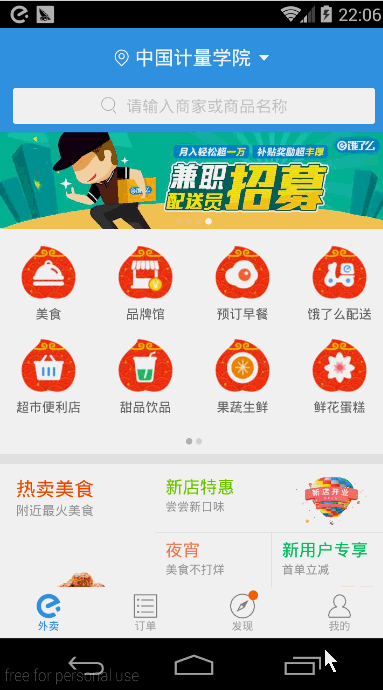
大家可以看到上圖中的“分類”、“排序”、“篩選”會懸浮在app的頂部,狀態隨著ScrollView(也可能不是ScrollView,在這裡姑且把這滑動的UI控件當作ScrollView吧)的滾動而變化。像這種導航Tab欄懸浮的作用相信大家都能體會到,Tab欄不會隨著ScrollView等的滾動而被滑出屏幕外,增加了與用戶之間的交互性和方便性。
看到上面的效果,相信大家都躍躍欲試了,那就讓我們開始吧。
首先大家要明白一點:Tab欄的狀態變化是要監聽ScrollView滑動距離的。至於如何得到ScrollView的滑動距離?可以看看另一篇: 《Android中ScrollView實現滑動距離監聽器的方法》 ,這裡就不過多敘述了。
好了,根據上面的就得到了對ScrollView滑動的監聽了。接下來要思考的問題就是如何讓Tab欄實現懸浮的效果呢?這裡給出的方法有兩種,第一種就是使用WindowManager來動態地添加一個View懸浮在頂部;第二種就是隨著ScrollView的滑動不斷重新設置Tab欄的布局位置。
我們先來看看第一種實現方法,首先是xml布局了。
Activity的布局,activity_main.xml:
<?xml version="1.0" encoding="utf-8"?>
<LinearLayout xmlns:android="http://schemas.android.com/apk/res/android"
  android:layout_width="match_parent"
  android:layout_height="match_parent"
  android:orientation="vertical">

  <RelativeLayout
    android:id="@+id/rl_title"
    android:layout_width="match_parent"
    android:layout_height="50dp"
    android:background="@color/colorPrimary">

    <ImageView
      android:id="@+id/iv_back"
      android:layout_width="wrap_content"
      android:layout_height="wrap_content"
      android:layout_centerVertical="true"
      android:layout_marginLeft="10dp"
      android:src="@drawable/new_img_back" />

    <TextView
      android:layout_width="wrap_content"
      android:layout_height="wrap_content"
      android:layout_centerInParent="true"
      android:text="@string/app_name"
      android:textColor="@android:color/white"
      android:textSize="18sp" />

  </RelativeLayout>

  <com.yuqirong.tabsuspenddemo.view.MyScrollView
    android:id="@+id/mScrollView"
    android:layout_width="match_parent"
    android:layout_height="match_parent">

    <LinearLayout
      android:layout_width="match_parent"
      android:layout_height="wrap_content"
      android:background="#cccccc"
      android:orientation="vertical">

      <ImageView
        android:id="@+id/iv_pic"
        android:layout_width="match_parent"
        android:layout_height="180dp"
        android:scaleType="centerCrop"
        android:src="@drawable/ic_bg_personal_page" />

      <include layout="@layout/tab_layout" />

      <LinearLayout
        android:layout_width="match_parent"
        android:layout_height="90dp"
        android:layout_marginBottom="5dp"
        android:layout_marginLeft="15dp"
        android:layout_marginRight="15dp"
        android:layout_marginTop="15dp"
        android:background="@android:color/white"
        android:orientation="horizontal">

      </LinearLayout>

    </LinearLayout>
  </com.yuqirong.tabsuspenddemo.view.MyScrollView>
</LinearLayout>
Tab欄的布局,tab_layout.xml:
<?xml version="1.0" encoding="utf-8"?>
<LinearLayout xmlns:android="http://schemas.android.com/apk/res/android"
  android:id="@+id/ll_tab"
  android:layout_width="match_parent"
  android:layout_height="40dp"
  android:background="@color/colorPrimary"
  android:orientation="horizontal">

  <TextView
    android:layout_width="0dp"
    android:layout_height="match_parent"
    android:layout_weight="1"
    android:gravity="center"
    android:text="分類"
    android:textColor="@android:color/white"
    android:textSize="18sp" />

  <TextView
    android:layout_width="0dp"
    android:layout_height="match_parent"
    android:layout_weight="1"
    android:gravity="center"
    android:text="排序"
    android:textColor="@android:color/white"
    android:textSize="18sp" />

  <TextView
    android:layout_width="0dp"
    android:layout_height="match_parent"
    android:layout_weight="1"
    android:gravity="center"
    android:text="篩選"
    android:textColor="@android:color/white"
    android:textSize="18sp" />

</LinearLayout>
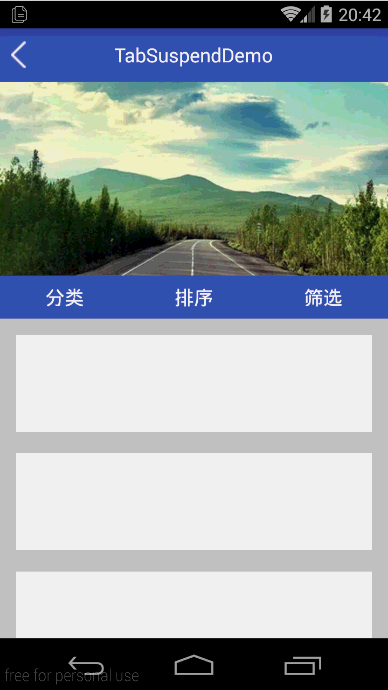
上面布局中的很多空白LinearLayout主要是拉長ScrollView,效果圖就是這樣的:
然後我們來看看onCreate(Bundle savedInstanceState):
@Override
protected void onCreate(Bundle savedInstanceState) {
  super.onCreate(savedInstanceState);
  getSupportActionBar().hide();
  setContentView(R.layout.activity_main);
  mScrollView = (MyScrollView) findViewById(R.id.mScrollView);
  mScrollView.setOnScrollListener(this);
  ll_tab = (LinearLayout) findViewById(R.id.ll_tab);
  windowManager = (WindowManager) getSystemService(Context.WINDOW_SERVICE);
}
我們先在onCreate(Bundle savedInstanceState)中給ScrollView添加了滑動距離監聽器以及得到了一個windowManager的對象。還有一點需要注意的是:我們調用了getSupportActionBar().hide();去掉了標題欄(MainActivity繼承了AppCompatActivity)。這是因為標題欄的存在導致了在計算懸浮窗y軸的值時要額外加上標題欄的高度(當然你也可以保留標題欄,然後計算時再加上標題欄的高度^_^!)。
然後在onWindowFocusChanged(boolean hasFocus)得到Tab欄的高度、getTop()值等,以便下面備用。
@Override
public void onWindowFocusChanged(boolean hasFocus) {
  super.onWindowFocusChanged(hasFocus);
  if (hasFocus) {
    tabHeight = ll_tab.getHeight();
    tabTop = ll_tab.getTop();
    scrollTop = mScrollView.getTop();
  }
}
之後在滑動監聽器的回調方法onScroll(int scrollY)中來控制顯示還是隱藏懸浮窗。
@Override
public void onScroll(int scrollY) {
  Log.i(TAG, "scrollY = " + scrollY + ", tabTop = " + tabTop);
  if (scrollY > tabTop) {
 // 如果沒顯示
    if (!isShowWindow) {
      showWindow();
    }
  } else {
 // 如果顯示了
    if (isShowWindow) {
      removeWindow();
    }
  }
}
上面的代碼比較簡單,不用我過多敘述了。下面是removeWindow() 、showWindow()兩個方法:
// 顯示window
private void removeWindow() {
  if (ll_tab_temp != null)
    windowManager.removeView(ll_tab_temp);
  isShowWindow = false;
}

// 移除window
private void showWindow() {
  if (ll_tab_temp == null) {
    ll_tab_temp = LayoutInflater.from(this).inflate(R.layout.tab_layout, null);
  }
  if (layoutParams == null) {
    layoutParams = new WindowManager.LayoutParams();
    layoutParams.type = WindowManager.LayoutParams.TYPE_PHONE; //懸浮窗的類型,一般設為2002,表示在所有應用程序之上,但在狀態欄之下
    layoutParams.format = PixelFormat.RGBA_8888;
    layoutParams.flags = WindowManager.LayoutParams.FLAG_NOT_TOUCH_MODAL
        | WindowManager.LayoutParams.FLAG_NOT_FOCUSABLE; //懸浮窗的行為,比如說不可聚焦,非模態對話框等等
    layoutParams.gravity = Gravity.TOP; //懸浮窗的對齊方式
    layoutParams.width = WindowManager.LayoutParams.MATCH_PARENT;
    layoutParams.height = tabHeight;
    layoutParams.x = 0; //懸浮窗X的位置
    layoutParams.y = scrollTop; //懸浮窗Y的位置
  }
  windowManager.addView(ll_tab_temp, layoutParams);
  isShowWindow = true;
}
這兩個方法也很簡單,而且有注釋,相信大家可以看懂。
最後,不要忘了在AndroidManifest.xml裡申請顯示懸浮窗的權限:
<uses-permission android:name="android.permission.SYSTEM_ALERT_WINDOW" />
到這裡,整體的代碼就這些了。一起來看看效果吧:
值得注意的是:如果用這種方法來實現Tab欄懸浮功能有一個缺點,那就是如果該app沒有被賦予顯示懸浮窗的權限,那麼該功能就變成雞肋了。
總結
以上就是這篇文章的全部內容了,希望本文的內容對各位Android開發者們的學習或者工作能有所幫助,如果有疑問大家可以留言交流。
 修改Android Studio的Android SDK Path
為什麼要修改路徑呢……因為我之前裝過Eclipse,也裝過Android SDK,但是昨天裝Android Studio的時候不小心又裝了一個
 Android 探索Bottom sheets的使用
在Android Support Library 23.2版本推出之後,我們可以看到一些新的特性,例如AppCompat DayNight主題,BottomSheet等,
 另外兩種Android沉浸式狀態欄實現思路
關於沉浸式狀態欄相信大家都不陌生,IOS系統很早就有,android5.0及以後版本都支持給狀態欄著色,而目前android主流版本還是4.4,網上通用實現4.4(API
 Android開發技巧之在a標簽或TextView控件中單擊鏈接彈出Activity(自定義動作)
在5.2.1節和5.2.2節介紹了<a>標簽以及TextView自動識別的特殊文本(網址、電話號、Email等),這些都可以通過單擊來觸發不同的動作。雖然這些