編輯:關於Android編程
看了Android版QQ的自定義頭像功能,決定自己實現,隨便熟悉下android繪制和圖片處理這一塊的知識。
先看看效果:
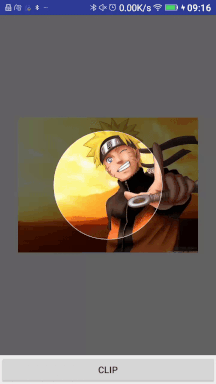
思路分析:
這個效果可以用兩個View來完成,上層View是一個遮蓋物,繪制半透明的顏色,中間挖了一個圓;下層的View用來顯示圖片,具備移動和縮放的功能,並且能截取某區域內的圖片。
涉及到的知識點:
1.Matrix,圖片的移動和縮放
2.Paint的setXfermode方法
3.圖片放大移動後,截取一部分
編碼實現:
自定義三個View:
1.下層View:ClipPhotoView
2.上層遮蓋View:ClipPhotoCircleView
3.布局文件:ClipPhotoLayout,實現兩層View的布局,且作為整個功能的facade
ClipPhotoCircleView代碼:
@Override
protected void onDraw(Canvas canvas) {
super.onDraw(canvas);
drawMask(canvas);
}
/**
* 繪制蒙版
*/
private void drawMask(Canvas canvas) {
//畫背景顏色
Bitmap bitmap = Bitmap.createBitmap(getWidth(), getHeight(), Bitmap.Config.ARGB_8888);
Canvas c1 = new Canvas(bitmap);
c1.drawARGB(150, 0, 0, 0);
Paint strokePaint = new Paint();
strokePaint.setAntiAlias(true);
strokePaint.setColor(Color.WHITE);
strokePaint.setStyle(Paint.Style.STROKE);
strokePaint.setStrokeWidth(STROKE_WIDTH);
c1.drawCircle(getWidth() / 2, getHeight() / 2, getRadius(), strokePaint);
//畫圓
Bitmap circleBitmap = Bitmap.createBitmap(getWidth(), getHeight(), Bitmap.Config.ARGB_8888);
Canvas c2 = new Canvas(circleBitmap);
Paint circlePaint = new Paint();
circlePaint.setStyle(Paint.Style.FILL);
circlePaint.setColor(Color.RED);
circlePaint.setAntiAlias(true);
c2.drawCircle(getWidth() / 2, getHeight() / 2, getRadius(), circlePaint);
//兩個圖層合成
Paint paint = new Paint();
paint.setXfermode(new PorterDuffXfermode(PorterDuff.Mode.DST_OUT));
c1.drawBitmap(circleBitmap, 0, 0, paint);
paint.setXfermode(null);
canvas.drawBitmap(bitmap, 0, 0, null);
}
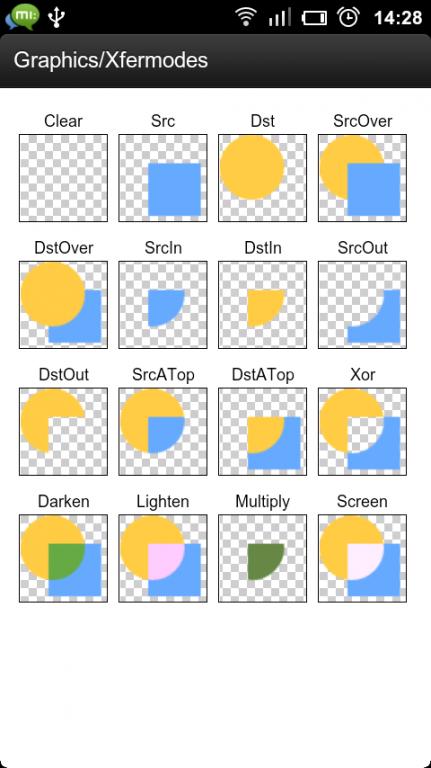
使用了setXfermode,Mode為DST_OUT,如下圖:
ClipPhotoView代碼:
/**
* Created by caocong on 10/9/16.
* 顯示圖片的view,可以托動和縮放
*/
public class ClipPhotoView extends ImageView implements View.OnTouchListener,
ScaleGestureDetector.OnScaleGestureListener {
private static final String TAG = ClipPhotoView.class.getSimpleName();
//最大縮放比例
private static final float MAX_SCALE = 4.0f;
//最小縮放比例
private static float MIN_SCALE = 1.0f;
//matrix array
private static final float MATRIX_ARR[] = new float[9];
/**
* 狀態
*/
private static final class Mode {
// 初始狀態
private static final int NONE = 0;
//托動
private static final int DRAG = 1;
//縮放
private static final int ZOOM = 2;
}
//當前狀態
private int mMode = Mode.NONE;
//縮放手勢
private ScaleGestureDetector mScaleDetector;
//矩陣
private Matrix mMatrix = new Matrix();
//托動時手指按下的點
private PointF mPrevPointF = new PointF();
//截取的圓框的半徑
private int mRadius;
//第一次
private boolean firstTime = true;
public ClipPhotoView(Context context) {
this(context, null);
}
public ClipPhotoView(Context context, AttributeSet attrs) {
this(context, attrs, 0);
}
public ClipPhotoView(Context context, AttributeSet attrs, int defStyleAttr) {
super(context, attrs, defStyleAttr);
mScaleDetector = new ScaleGestureDetector(context, this);
mRadius = Util.getRadius(getContext());
// 必須設置才能觸發
setOnTouchListener(this);
setScaleType(ScaleType.MATRIX);
}
/**
* 初始化
*/
private void init() {
Drawable drawable = getDrawable();
if (drawable == null) {
//throw new IllegalArgumentException("drawable can not be null");
return;
}
initPosAndScale();
}
/**
* 初始化縮放比例
*/
private void initPosAndScale() {
if (firstTime) {
Drawable drawable = getDrawable();
int width = getWidth();
int height = getHeight();
//初始化
int dw = drawable.getIntrinsicWidth();
int dh = drawable.getIntrinsicHeight();
float scaleX = 1.0f;
float scaleY = 1.0f;
//是否已經做過縮放處理
boolean isScaled = false;
if (width < getDiameter()) {
scaleX = getDiameter() * 1.0f / width;
isScaled = true;
}
if (height < getDiameter()) {
scaleY = getDiameter() * 1.0f / height;
isScaled = true;
}
float scale = Math.max(scaleX, scaleY);
if (isScaled) {
MIN_SCALE = scale;
} else {
MIN_SCALE = Math.max((getDiameter() * 1.0f) / dw, getDiameter() * 1.0f / dh) + 0.01f;
}
Log.d(TAG, "scale=" + scale);
mMatrix.postScale(scale, scale, getWidth() / 2, getHeight() / 2);
mMatrix.postTranslate((width - dw) / 2, (height - dh) / 2);
setImageMatrix(mMatrix);
firstTime = false;
}
}
@Override
public boolean onScale(ScaleGestureDetector detector) {
float scale = getScale();
float scaleFactor = detector.getScaleFactor();
if ((scale >= MIN_SCALE && scaleFactor > 1.0f) ||
(scale <= MAX_SCALE && scaleFactor < 1.0f)) {
if (scale * scaleFactor <= MIN_SCALE) {
scaleFactor = MIN_SCALE / scale;
} else if (scale * scaleFactor >= MAX_SCALE) {
scaleFactor = MAX_SCALE / scale;
}
mMatrix.postScale(scaleFactor, scaleFactor, detector.getFocusX(), detector.getFocusY());
checkTrans();
setImageMatrix(mMatrix);
}
return true;
}
@Override
public boolean onScaleBegin(ScaleGestureDetector detector) {
mMode = Mode.ZOOM;
return true;
}
@Override
public void onScaleEnd(ScaleGestureDetector detector) {
mMode = Mode.NONE;
}
@Override
public boolean onTouch(View v, MotionEvent event) {
if (getDrawable() == null) {
return false;
}
mScaleDetector.onTouchEvent(event);
switch (event.getAction() & MotionEvent.ACTION_MASK) {
case MotionEvent.ACTION_DOWN:
mMode = Mode.DRAG;
mPrevPointF.set(event.getX(), event.getY());
break;
case MotionEvent.ACTION_UP:
mMode = Mode.NONE;
break;
case MotionEvent.ACTION_MOVE:
if (mMode == Mode.DRAG && event.getPointerCount() == 1) {
float x = event.getX();
float y = event.getY();
float dx = event.getX() - mPrevPointF.x;
float dy = event.getY() - mPrevPointF.y;
RectF rectF = getMatrixRectF();
// 如果寬度小於屏幕寬度,則禁止左右移動
if (rectF.width() <= getDiameter()) {
dx = 0;
}
// 如果高度小雨屏幕高度,則禁止上下移動
if (rectF.height() <= getDiameter()) {
dy = 0;
}
mMatrix.postTranslate(dx, dy);
checkTrans();
//邊界判斷
setImageMatrix(mMatrix);
mPrevPointF.set(x, y);
}
break;
}
return true;
}
/**
* 移動邊界檢查
*/
private void checkTrans() {
RectF rect = getMatrixRectF();
float deltaX = 0;
float deltaY = 0;
int width = getWidth();
int height = getHeight();
int horizontalPadding = (width - getDiameter()) / 2;
int verticalPadding = (height - getDiameter()) / 2;
// 如果寬或高大於屏幕,則控制范圍 ; 這裡的0.001是因為精度丟失會產生問題
if (rect.width() + 0.01 >= getDiameter()) {
if (rect.left > horizontalPadding) {
deltaX = -rect.left + horizontalPadding;
}
if (rect.right < width - horizontalPadding) {
deltaX = width - horizontalPadding - rect.right;
}
}
if (rect.height() + 0.01 >= getDiameter()) {
if (rect.top > verticalPadding) {
deltaY = -rect.top + verticalPadding;
}
if (rect.bottom < height - verticalPadding) {
deltaY = height - verticalPadding - rect.bottom;
}
}
mMatrix.postTranslate(deltaX, deltaY);
}
/**
* 得到直徑
*/
public int getDiameter() {
return mRadius * 2;
}
/**
* 獲得縮放值
*
* @return
*/
private float getScale() {
return getMatrixValue(Matrix.MSCALE_X);
}
private float getMatrixValue(int index) {
mMatrix.getValues(MATRIX_ARR);
return MATRIX_ARR[index];
}
/**
* 獲得Matrix的RectF
*/
private RectF getMatrixRectF() {
Matrix matrix = mMatrix;
RectF rect = new RectF();
Drawable d = getDrawable();
if (null != d) {
rect.set(0, 0, d.getIntrinsicWidth(), d.getIntrinsicHeight());
matrix.mapRect(rect);
}
return rect;
}
@Override
protected void onDraw(Canvas canvas) {
super.onDraw(canvas);
init();
}
/**
* 截取圖片
*
* @return
*/
Bitmap clip() {
Bitmap bitmap = Bitmap.createBitmap(getWidth(), getHeight(), Bitmap.Config.ARGB_8888);
Canvas canvas = new Canvas(bitmap);
draw(canvas);
int x = (getWidth() - getDiameter()) / 2;
int y = (getHeight() - getDiameter()) / 2;
return Bitmap.createBitmap(bitmap, x, y, getDiameter(), getDiameter());
}
}
縮放和移動使用了Matrix的方法postScale()和postTranslate,要注意控制邊界。
截圖的代碼在clip()方法中,原理:新建一個空白Bitmap,和屏幕一樣大的尺寸,然後將當前View繪制的內容復制到到這個Bitmap中,然後截取該Bitmap的一部分。
ClipPhotoLayout代碼:
public class ClipPhotoLayout extends FrameLayout {
private ClipPhotoCircleView mCircleView;
private ClipPhotoView mPhotoView;
public ClipPhotoLayout(Context context) {
this(context, null);
}
public ClipPhotoLayout(Context context, AttributeSet attrs) {
this(context, attrs, 0);
}
public ClipPhotoLayout(Context context, AttributeSet attrs, int defStyleAttr) {
super(context, attrs, defStyleAttr);
init();
}
private void init() {
mCircleView = new ClipPhotoCircleView(getContext());
mPhotoView = new ClipPhotoView(getContext());
android.view.ViewGroup.LayoutParams lp = new LinearLayout.LayoutParams(
android.view.ViewGroup.LayoutParams.MATCH_PARENT,
android.view.ViewGroup.LayoutParams.MATCH_PARENT);
addView(mPhotoView, lp);
addView(mCircleView, lp);
}
public void setImageDrawable(Drawable drawable) {
mPhotoView.setImageDrawable(drawable);
}
public void setImageDrawable(int resId) {
setImageDrawable(getContext().getDrawable(resId));
}
public Bitmap clipBitmap() {
return mPhotoView.clip();
}
}
測試MainActivity:
public class MainActivity extends Activity {
private ClipPhotoLayout mClipPhotoLayout;
private int[] pictures = {R.drawable.mingren, R.drawable.cute, R.drawable.tuxi};
@Override
protected void onCreate(Bundle savedInstanceState) {
super.onCreate(savedInstanceState);
setContentView(R.layout.scale);
setTitle("移動和縮放");
mClipPhotoLayout = (ClipPhotoLayout) findViewById(R.id.clip_layout);
mClipPhotoLayout.setImageDrawable(pictures[0]);
}
public void doClick(View view) {
Bitmap bitmap = mClipPhotoLayout.clipBitmap();
Intent intent = new Intent(this, ResultActivity.class);
intent.putExtra("photo", bitmap);
startActivity(intent);
}
}
MainActivity的布局文件:
<LinearLayout xmlns:android="http://schemas.android.com/apk/res/android"
android:layout_width="match_parent"
android:layout_height="match_parent"
android:orientation="vertical">
<com.caocong.image.widget.ClipPhotoLayout
android:id="@+id/clip_layout"
android:layout_width="match_parent"
android:layout_height="0dp"
android:layout_weight="1.0"/>
<Button
android:layout_width="match_parent"
android:layout_height="wrap_content"
android:onClick="doClick"
android:text="clip" />
</LinearLayout>
以上所述是小編給大家介紹的Android 仿QQ頭像自定義截取功能,希望對大家有所幫助,如果大家有任何疑問請給我留言,小編會及時回復大家的。在此也非常感謝大家對本站網站的支持!
 Android 多媒體播放API簡單實例
本文調用android的媒體播放器實現一些音樂播放操作項目布局:<LinearLayout xmlns:android=http://schemas.android
 Android中TabLayout結合ViewPager實現頁面切換效果
先看看效果,如圖:1.因為TabLayout是Android Design Support Library官方庫的一個控件,所以使用TabLayout時候需要先添加對該庫
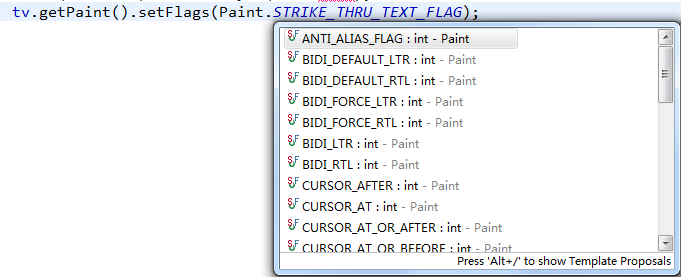 Android 添加TextView刪除線(代碼簡單)
在做商城的項目中,有這麼個需求,就是一個產品下有兩個價格,一個是市場價,一個是銷售價,這時要把市場價添加個刪除線;剛開始遇到這個時,在網上找了半天的資料,看到最多的就是用
 Android實現自動提取短信驗證碼功能
本文實例講解了Android自動提取短信驗證碼解決方案,分享給大家供大家參考,具體內容如下主要功能及優點1.收到驗證碼短信後,自動提取短信中的驗證碼填寫到相應輸入框 2.