編輯:關於Android編程
在Android開發中,經常需要通過點擊某個按鈕彈出對話框或者選擇框,通過Dialog或者PopupMenu、PopupWindow都能實現。
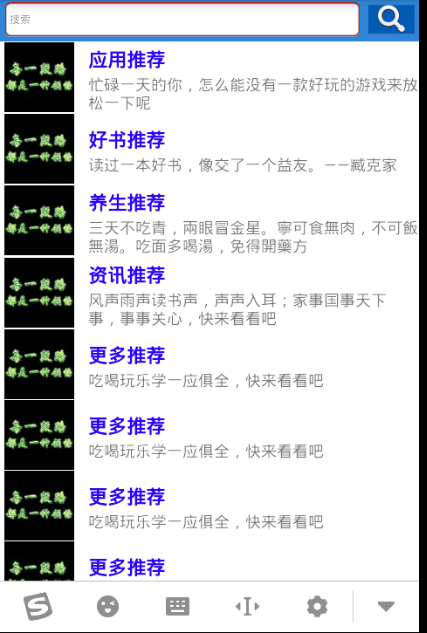
這裡主要介紹後兩者:PopupMenu、PopupWindow的實現。 先看兩個效果圖上邊PopupMenu,下邊PopupWindow:
PopupMenu PopupWindow

一、PopupMenu實現:
PopupMenu實現起來比較簡單,主要用來實現根據按鈕附近彈出的對話框。
首先定義一個menu文件\res\menu\headmenu.xml:
<menu xmlns:android="http://schemas.android.com/apk/res/android"
 xmlns:app="http://schemas.android.com/apk/res-auto"
 xmlns:tools="http://schemas.android.com/tools" tools:context="com.arbo.hero.LoginActivity">
 <item
 android:id="@+id/camera"
 android:title="拍照"
 android:orderInCategory="100"
 app:showAsAction="never" />
 <item
 android:id="@+id/gallery"
 android:title="從相冊中選取"
 android:orderInCategory="100"
 app:showAsAction="never" />
 <item
 android:id="@+id/cancel"
 android:title="取消"
 android:orderInCategory="100"
 app:showAsAction="never" />

</menu>
創建一個PopupMenu並添加點擊事件:
private void showPopmenu(View view){
 popupMenu = new PopupMenu(this,view);
 popupMenu.getMenuInflater().inflate(R.menu.headmenu,popupMenu.getMenu());
 popupMenu.setOnMenuItemClickListener(new PopupMenu.OnMenuItemClickListener() {
  @Override
  public boolean onMenuItemClick(MenuItem item) {
  switch(item.getItemId()){
   case R.id.camera:
   Toast.makeText(HeadPortrait.this,"Click camera",Toast.LENGTH_SHORT).show();
   break;
   case R.id.gallery:
   Toast.makeText(HeadPortrait.this,"Click gallery",Toast.LENGTH_SHORT).show();
   break;
   case R.id.cancel:
   Toast.makeText(HeadPortrait.this,"Click cancel",Toast.LENGTH_SHORT).show();
   break;
  }
  return false;
  }
 });
 popupMenu.show();
 }
MainActivity很簡單,點擊按鈕調用showPopmenu()方法即可:
public class MainActivity extends Activity{
 @Override
 protected void onCreate(Bundle savedInstanceState) {
 super.onCreate(savedInstanceState);
 //main.xml頁面主布局只有一個按鈕,這裡就不貼代碼了
 setContentView(R.layout.main);
 Button button = (Button) findViewById(R.id.button);
 button.setOnClickListener(new View.OnClickListener() {
  @Override
  public void onClick(View view) {
  //點擊按鈕就創建並顯示一個popupMenu
  showPopmenu(btnmenu);
  }
 }
 }
}
以上,就實現了利用PopupMenu在按鈕附近彈出一個選擇框。
PopupMenu的優點:簡單;根據菜單大小自適應位置,在按鈕附近彈出;適合某些情景。
缺點:形式比較單一,效果一般。
二、PopupWindow實現:
相比之下,PopupWindow的實現復雜一些,但是自定義性更強,它可以將任意界面設置為PopupWindow。
先看彈出window布局window_popup.xml:
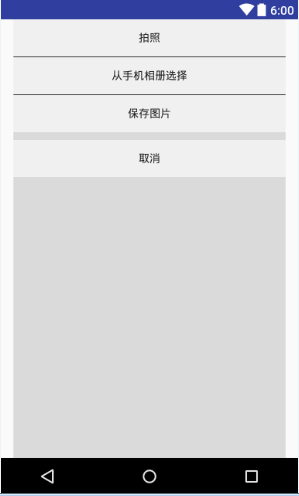
<?xml version="1.0" encoding="utf-8"?>
<LinearLayout
 xmlns:android="http://schemas.android.com/apk/res/android"
 android:layout_width="match_parent"
 android:layout_height="match_parent"
 android:layout_marginLeft="@dimen/activity_horizontal_margin"
 android:layout_marginRight="@dimen/activity_horizontal_margin"
 android:background="#dadada"
 android:orientation="vertical">
 <LinearLayout
 android:layout_width="match_parent"
 android:layout_height="wrap_content"
 android:orientation="vertical">
 <Button
  android:id="@+id/camera"
  android:layout_width="match_parent"
  android:layout_height="wrap_content"
  android:text="拍照"
  android:background="#f0f0f0"
  />
 <TextView
  android:layout_width="match_parent"
  android:layout_height="1dp"
  android:background="#2d2c2c"
  />
 <Button
  android:background="#f0f0f0"
  android:id="@+id/gallery"
  android:layout_width="match_parent"
  android:layout_height="wrap_content"
  android:text="從手機相冊選擇"/>
 <TextView
  android:layout_width="match_parent"
  android:layout_height="1dp"
  android:background="#2d2c2c"
  />
 <Button
  android:background="#f0f0f0"
  android:id="@+id/savepicture"
  android:layout_width="match_parent"
  android:layout_height="wrap_content"
  android:text="保存圖片"/>

 </LinearLayout>

 <LinearLayout
 android:layout_width="match_parent"
 android:layout_height="wrap_content"
 android:layout_marginTop="10dp"
 android:orientation="vertical">

 <Button
  android:background="#f0f0f0"
  android:id="@+id/cancel"
  android:layout_width="match_parent"
  android:layout_height="wrap_content"
  android:text="取消"
  />
 </LinearLayout>
</LinearLayout>
布局的效果圖:
創建popupWindow並為其添加點擊事件:
void bottomwindow(View view) {
 if (popupWindow != null && popupWindow.isShowing()) {
  return;
 }
 LinearLayout layout = (LinearLayout) getLayoutInflater().inflate(R.layout.window_popup, null);
 popupWindow = new PopupWindow(layout,
  ViewGroup.LayoutParams.MATCH_PARENT,
  ViewGroup.LayoutParams.WRAP_CONTENT);
 //點擊空白處時,隱藏掉pop窗口
 popupWindow.setFocusable(true);
 popupWindow.setBackgroundDrawable(new BitmapDrawable());
 //添加彈出、彈入的動畫
 popupWindow.setAnimationStyle(R.style.Popupwindow);
 int[] location = new int[2];
 view.getLocationOnScreen(location);
 popupWindow.showAtLocation(view, Gravity.LEFT | Gravity.BOTTOM, 0, -location[1]);
 //添加按鍵事件監聽
 setButtonListeners(layout);
 //添加pop窗口關閉事件,主要是實現關閉時改變背景的透明度
 popupWindow.setOnDismissListener(new poponDismissListener());
 backgroundAlpha(1f);
 }
事件監聽的函數setButtonListeners() :
private void setButtonListeners(LinearLayout layout) {
 Button camera = (Button) layout.findViewById(R.id.camera);
 Button gallery = (Button) layout.findViewById(R.id.gallery);
 Button savepicture = (Button) layout.findViewById(R.id.savepicture);
 Button cancel = (Button) layout.findViewById(R.id.cancel);

 camera.setOnClickListener(new View.OnClickListener() {
  @Override
  public void onClick(View view) {
  if (popupWindow != null && popupWindow.isShowing()) {
   //在此處添加你的按鍵處理 xxx
   popupWindow.dismiss();
  }
  }
 });
 gallery.setOnClickListener(new View.OnClickListener() {
  @Override
  public void onClick(View view) {
  if (popupWindow != null && popupWindow.isShowing()) {
   //在此處添加你的按鍵處理 xxx
   popupWindow.dismiss();
  }
  }
 });
 savepicture.setOnClickListener(new View.OnClickListener() {
  @Override
  public void onClick(View view) {
  if (popupWindow != null && popupWindow.isShowing()) {
   //在此處添加你的按鍵處理 xxx
   popupWindow.dismiss();
  }
  }
 });
 cancel.setOnClickListener(new View.OnClickListener() {
  @Override
  public void onClick(View view) {
  if (popupWindow != null && popupWindow.isShowing()) {
   popupWindow.dismiss();
  }
  }
 });
 }
彈出、收回的動畫:
若res文件夾下沒有anim目錄,則自己添加一個:new–>Android resource directory 名字填anim。然後新建兩個tranlate文件:
彈出 window_out.xml :
<?xml version="1.0" encoding="utf-8"?>
<translate xmlns:android="http://schemas.android.com/apk/res/android"
 android:interpolator="@android:anim/decelerate_interpolator"
 android:fromYDelta="100%" android:toYDelta="0"
 android:duration="300"/>
收回 window_back.xml:
<?xml version="1.0" encoding="utf-8"?>
<translate xmlns:android="http://schemas.android.com/apk/res/android"
 android:interpolator="@android:anim/accelerate_interpolator"
 android:fromYDelta="0" android:toYDelta="100%"
 android:duration="200"/>
然後在style.xml中添加我們的這兩個動畫:
<style name="Popupwindow">
 <item name="android:windowEnterAnimation">@anim/window_out</item>
 <item name="android:windowExitAnimation">@anim/window_back</item>
 </style>
還是上面的同一個MainActivity,把按鈕點擊事件的處理函數換成popupwindow的即可:
btnmenu.setOnClickListener(new View.OnClickListener() {
  @Override
  public void onClick(View view) {
  bottomwindow(btnmenu);
  }
 }
以上,就可以實現這樣的點擊按鈕從屏幕底部彈出window窗口的效果,如下:

底部彈出
但是,這樣的效果並不好,我們希望彈出windows的時候,其他背景可以變成半透明,這樣可以突出重點。網上的方法是通過這段代碼來改變背景的透明度的:
/**
 * 設置添加屏幕的背景透明度
 * @param bgAlpha
 */
 public void backgroundAlpha(float bgAlpha)
 {
 WindowManager.LayoutParams lp = getWindow().getAttributes();
 lp.alpha = bgAlpha; //0.0-1.0
 getWindow().setAttributes(lp);  getWindow().addFlags(WindowManager.LayoutParams.FLAG_DIM_BEHIND);
 }
然後在彈出的時候將背景設為半透明:
bottomwindow(btnmenu);
backgroundAlpha(0.5f);
在返回的時候設置回來:
backgroundAlpha(1f);
這的確是可以實現效果,但是點擊的時候突然變暗和變亮,效果不太好!如下:

我希望是彈出的過程中,慢慢變暗。是有一個過程的,而不是一下子就暗下來了。這裡利用延時和Handler來動態地改變背景的透明度。
//在調用彈出的方法後,開啟一個子線程
  @Override
  public void onClick(View view) {
  bottomwindow(btnmenu);
  new Thread(new Runnable(){
   @Override
   public void run() {
   while(alpha>0.5f){
    try {
    //4是根據彈出動畫時間和減少的透明度計算
    Thread.sleep(4);
    } catch (InterruptedException e) {
    e.printStackTrace();
    }
    Message msg =mHandler.obtainMessage();
    msg.what = 1;
    //每次減少0.01,精度越高,變暗的效果越流暢
    alpha-=0.01f;
    msg.obj =alpha ;
    mHandler.sendMessage(msg);
   }
   }

  }).start();
  }
同理,返回的時候把透明度跳回來:
/**
 * 返回或者點擊空白位置的時候將背景透明度改回來
 */
 class poponDismissListener implements PopupWindow.OnDismissListener{

 @Override
 public void onDismiss() {
  // TODO Auto-generated method stub
  new Thread(new Runnable(){
  @Override
  public void run() {
   //此處while的條件alpha不能<= 否則會出現黑屏
   while(alpha<1f){
   try {
    Thread.sleep(4);
   } catch (InterruptedException e) {
    e.printStackTrace();
   }
   Log.d("HeadPortrait","alpha:"+alpha);
   Message msg =mHandler.obtainMessage();
   msg.what = 1;
   alpha+=0.01f;
   msg.obj =alpha ;
   mHandler.sendMessage(msg);
   }
  }

  }).start();
 }

 }
在Handler裡面我們調用改變背景透明的方法即可:
Handler mHandler = new Handler(){
 @Override
 public void handleMessage(Message msg) {
  switch (msg.what){
  case 1:
   backgroundAlpha((float)msg.obj);
   break;
  }
 }
 };
這樣修改以後,效果是這樣的:
以上,基本達到了逐漸變暗、變量的目的。
以上就是本文的全部內容,希望對大家的學習有所幫助,也希望大家多多支持本站。
 優步電話加密服務什麼時候上線 隱號通話方案如何
優步(UBER)-全球即時用車軟件,現已覆蓋全球68個國家,444個城市。Uber旨在為大家帶來更安全、更舒適的出行方式,為了保證雙方的安全和隱私,優步(U
 Android利用ViewPager實現用戶引導界面效果的方法
本文實例講述了Android利用ViewPager實現用戶引導界面效果。分享給大家供大家參考,具體如下:我相信有很多朋友在裝完軟件首次打開時,有很多軟件都有一個軟件功能介
 Android實現ListView過濾功能之繼承BaseAdapter進階版
實現ListView過濾功能最方便的便是使用ArrayAdapter,裡面自帶的getFilter()方法能很方便的實現此功能但是在實際的開發中,ArrayAdapte
 從源碼角度剖析Handler機制
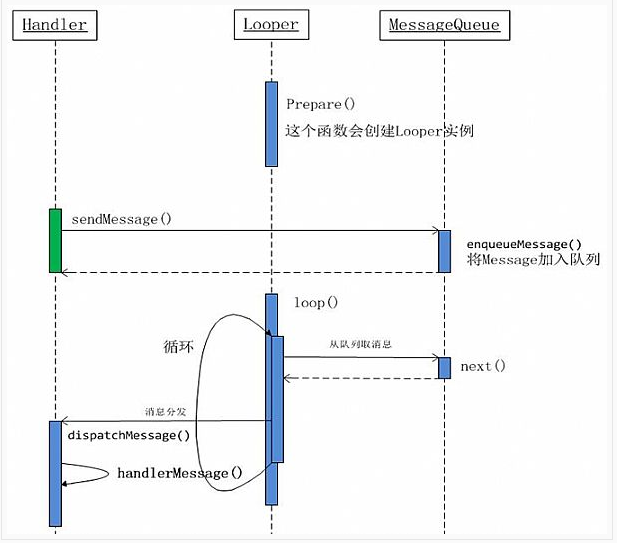
android中,在進行耗時操作更新UI用到最多的方法就是Handler了,一般在子線程中進行耗時操作(訪問網絡等),然後發送消息到UI線程(主線程),使得界面得以更新。