編輯:關於Android編程
近期做項目需要添加上傳短視頻功能,功能設置為類似於微信,點擊開始拍攝,設置最長拍攝時間,經過研究最終實現了這個功能,下面就和大家分享一下,希望對你有幫助。
1.視頻錄制自定義控件:
/**
 * 視頻播放控件
 */
public class MovieRecorderView extends LinearLayout implements OnErrorListener {
 private SurfaceView mSurfaceView;
 private SurfaceHolder mSurfaceHolder;
 private ProgressBar mProgressBar;
 private MediaRecorder mMediaRecorder;
 private Camera mCamera;
 private Timer mTimer;// 計時器
 private OnRecordFinishListener mOnRecordFinishListener;// 錄制完成回調接口
 private int mWidth;// 視頻分辨率寬度
 private int mHeight;// 視頻分辨率高度
 private boolean isOpenCamera;// 是否一開始就打開攝像頭
 private int mRecordMaxTime;// 一次拍攝最長時間
 private int mTimeCount;// 時間計數
 private File mVecordFile = null;// 文件
 public MovieRecorderView(Context context) {
 this(context, null);
 }
 public MovieRecorderView(Context context, AttributeSet attrs) {
 this(context, attrs, 0);
 }
 @SuppressLint("NewApi")
 public MovieRecorderView(Context context, AttributeSet attrs, int defStyle) {
 super(context, attrs, defStyle);
 TypedArray a = context.obtainStyledAttributes(attrs,
 R.styleable.MovieRecorderView, defStyle, 0);
 mWidth = a.getInteger(R.styleable.MovieRecorderView_width, 320);// 默認320
 mHeight = a.getInteger(R.styleable.MovieRecorderView_height, 240);// 默認240
 isOpenCamera = a.getBoolean(
 R.styleable.MovieRecorderView_is_open_camera, true);// 默認打開
 mRecordMaxTime = a.getInteger(
 R.styleable.MovieRecorderView_record_max_time, 10);// 默認為10
 LayoutInflater.from(context)
 .inflate(R.layout.movie_recorder_view, this);
 mSurfaceView = (SurfaceView) findViewById(R.id.surfaceview);
 mProgressBar = (ProgressBar) findViewById(R.id.progressBar);
 mProgressBar.setMax(mRecordMaxTime);// 設置進度條最大量
 mSurfaceHolder = mSurfaceView.getHolder();
 mSurfaceHolder.addCallback(new CustomCallBack());
 mSurfaceHolder.setType(SurfaceHolder.SURFACE_TYPE_PUSH_BUFFERS);
 a.recycle();
 }
 /**
 *
 */
 private class CustomCallBack implements Callback {
 @Override
 public void surfaceCreated(SurfaceHolder holder) {
 if (!isOpenCamera)
 return;
 try {
 initCamera();
 } catch (IOException e) {
 e.printStackTrace();
 }
 }
 @Override
 public void surfaceChanged(SurfaceHolder holder, int format, int width,
 int height) {
 }
 @Override
 public void surfaceDestroyed(SurfaceHolder holder) {
 if (!isOpenCamera)
 return;
 freeCameraResource();
 }
 }
 /**
 * 初始化攝像頭
 */
 private void initCamera() throws IOException {
 if (mCamera != null) {
 freeCameraResource();
 }
 try {
 mCamera = Camera.open();
 } catch (Exception e) {
 e.printStackTrace();
 freeCameraResource();
 }
 if (mCamera == null)
 return;
 setCameraParams();
 mCamera.setDisplayOrientation(90);
 mCamera.setPreviewDisplay(mSurfaceHolder);
 mCamera.startPreview();
 mCamera.unlock();
 }
 /**
 * 設置攝像頭為豎屏
 */
 private void setCameraParams() {
 if (mCamera != null) {
 Parameters params = mCamera.getParameters();
 params.set("orientation", "portrait");
 mCamera.setParameters(params);
 }
 }
 /**
 * 釋放攝像頭資源
 */
 private void freeCameraResource() {
 if (mCamera != null) {
 mCamera.setPreviewCallback(null);
 mCamera.stopPreview();
 mCamera.lock();
 mCamera.release();
 mCamera = null;
 }
 }
 private void createRecordDir() {
 //錄制的視頻保存文件夾
 File sampleDir = new File(Environment.getExternalStorageDirectory()
 + File.separator + "ysb/video/");//錄制視頻的保存地址
 if (!sampleDir.exists()) {
 sampleDir.mkdirs();
 }
 File vecordDir = sampleDir;
 // 創建文件
 try {
 mVecordFile = File.createTempFile("recording", ".mp4", vecordDir);// mp4格式的錄制的視頻文件
 } catch (IOException e) {
 e.printStackTrace();
 }
 }
 /**
 * 初始化
 * @throws IOException
 */
 @SuppressLint("NewApi")
 private void initRecord() throws IOException {
 mMediaRecorder = new MediaRecorder();
 mMediaRecorder.reset();
 if (mCamera != null)
 mMediaRecorder.setCamera(mCamera);
 mMediaRecorder.setOnErrorListener(this);
 mMediaRecorder.setPreviewDisplay(mSurfaceHolder.getSurface());
 mMediaRecorder.setVideoSource(VideoSource.CAMERA);// 視頻源
 mMediaRecorder.setAudioSource(AudioSource.MIC);// 音頻源
 mMediaRecorder.setOutputFormat(OutputFormat.MPEG_4);// 視頻輸出格式
 mMediaRecorder.setAudioEncoder(AudioEncoder.AMR_NB);// 音頻格式
 mMediaRecorder.setVideoSize(mWidth, mHeight);// 設置分辨率:
 // mMediaRecorder.setVideoFrameRate(16);// 這個我把它去掉了,感覺沒什麼用
 mMediaRecorder.setVideoEncodingBitRate(1 * 1024 * 1024 * 100);// 設置幀頻率,然後就清晰了
 mMediaRecorder.setOrientationHint(90);// 輸出旋轉90度,保持豎屏錄制
 mMediaRecorder.setVideoEncoder(VideoEncoder.MPEG_4_SP);// 視頻錄制格式
 // mediaRecorder.setMaxDuration(Constant.MAXVEDIOTIME * 1000);
 mMediaRecorder.setOutputFile(mVecordFile.getAbsolutePath());
 mMediaRecorder.prepare();
 try {
 mMediaRecorder.start();
 } catch (IllegalStateException e) {
 e.printStackTrace();
 } catch (RuntimeException e) {
 e.printStackTrace();
 } catch (Exception e) {
 e.printStackTrace();
 }
 }
 /**
 * 開始錄制視頻
 * @param fileName
 * 視頻儲存位置
 * @param onRecordFinishListener
 * 達到指定時間之後回調接口
 */
 public void record(final OnRecordFinishListener onRecordFinishListener) {
 this.mOnRecordFinishListener = onRecordFinishListener;
 createRecordDir();
 try {
 if (!isOpenCamera)// 如果未打開攝像頭,則打開
 initCamera();
 initRecord();
 mTimeCount = 0;// 時間計數器重新賦值
 mTimer = new Timer();
 mTimer.schedule(new TimerTask() {
 @Override
 public void run() {
  mTimeCount++;
  mProgressBar.setProgress(mTimeCount);// 設置進度條
  if (mTimeCount == mRecordMaxTime) {// 達到指定時間,停止拍攝
  stop();
  if (mOnRecordFinishListener != null)  mOnRecordFinishListener.onRecordFinish();
  }
 }
 }, 0, 1000);
 } catch (IOException e) {
 e.printStackTrace();
 }
 }
 /**
 * 停止拍攝
 */
 public void stop() {
 stopRecord();
 releaseRecord();
 freeCameraResource();
 }
 /**
 * 停止錄制
 */
 public void stopRecord() {
 mProgressBar.setProgress(0);
 if (mTimer != null)
 mTimer.cancel();
 if (mMediaRecorder != null) {
 // 設置後不會崩
 mMediaRecorder.setOnErrorListener(null);
 mMediaRecorder.setPreviewDisplay(null);
 try {
 mMediaRecorder.stop();
 } catch (IllegalStateException e) {
 e.printStackTrace();
 } catch (RuntimeException e) {
 e.printStackTrace();
 } catch (Exception e) {
 e.printStackTrace();
 }
 }
 }
 /**
 * 釋放資源
 */
 private void releaseRecord() {
 if (mMediaRecorder != null) {
 mMediaRecorder.setOnErrorListener(null);
 try {
 mMediaRecorder.release();
 } catch (IllegalStateException e) {
 e.printStackTrace();
 } catch (Exception e) {
 e.printStackTrace();
 }
 }
 mMediaRecorder = null;
 }
 public int getTimeCount() {
 return mTimeCount;
 }
 //返回錄制的視頻文件
 public File getmVecordFile() {
 return mVecordFile;
 }
 /**
 * 錄制完成回調接口
 */
 public interface OnRecordFinishListener {
 public void onRecordFinish();
 }
 @Override
 public void onError(MediaRecorder mr, int what, int extra) {
 try {
 if (mr != null)
 mr.reset();
 } catch (IllegalStateException e) {
 e.printStackTrace();
 } catch (Exception e) {
 e.printStackTrace();
 }
 }
}
2.視頻錄制界面文件movie_recorder_view.xml:
<?xml version="1.0" encoding="utf-8"?>
<LinearLayout xmlns:android="http://schemas.android.com/apk/res/android"
 xmlns:tools="http://schemas.android.com/tools"
 android:layout_width="match_parent"
 android:layout_height="match_parent"
android:background="@android:color/background_dark"
 android:orientation="vertical">
 <SurfaceView
 android:id="@+id/surfaceview"
 android:layout_width="fill_parent"
 android:layout_height="0dp"
 android:layout_weight="1"
 />
 <ProgressBar
 android:id="@+id/progressBar"

 android:layout_width="match_parent"
 android:layout_height="2dp"
 />
</LinearLayout>
做好這些准備工作,下面我們就可以開始設計我們的視頻錄制功能了。PS:以上代碼取至網上,在此向大牛致敬。
3.拍攝主界面,拍攝界面有兩部分組成,上面是視頻拍攝控件顯示,下面是用戶點擊拍攝按鈕,配置文件:activity_main.xml。
<?xml version="1.0" encoding="utf-8"?>
<LinearLayout xmlns:android="http://schemas.android.com/apk/res/android"
 xmlns:tools="http://schemas.android.com/tools"
 android:layout_width="match_parent"
 android:layout_height="match_parent"
 android:background="@android:color/white"
 android:orientation="vertical">
<com.example.wechatvideorecorddemo.MovieRecorderView
 android:id="@+id/movieRecorderView"
 android:layout_width="match_parent"
 android:layout_height="0dp"
 android:layout_weight="1"
 android:layout_margin="3dp" />
 <Button
 android:id="@+id/shoot_button"
 android:layout_width="wrap_content"
 android:layout_height="wrap_content"
 android:layout_gravity="center" android:background="@drawable/bg_movie_add_shoot"
 android:text="按住拍"
 android:textColor="#20b6ff"/>
</LinearLayout>
4.有了主界面的視圖,下面我們就開始書寫我們的Activity文件MainActivity.java:
public class MainActivity extends Activity {
 private MovieRecorderView mRecorderView;//視頻錄制控件
 private Button mShootBtn;//視頻開始錄制按鈕
 private boolean isFinish = true;
 private boolean success = false;//防止錄制完成後出現多次跳轉事件
 @Override
 protected void onCreate(Bundle savedInstanceState) {
 super.onCreate(savedInstanceState);
 setContentView(R.layout.activity_main);
 mRecorderView = (MovieRecorderView) findViewById(R.id.movieRecorderView);
 mShootBtn = (Button) findViewById(R.id.shoot_button);
 //用戶長按事件監聽
 mShootBtn.setOnTouchListener(new OnTouchListener() {
 @Override
 public boolean onTouch(View v, MotionEvent event) {
 if (event.getAction() == MotionEvent.ACTION_DOWN) {//用戶按下拍攝按鈕
  mShootBtn.setBackgroundResource(R.drawable.bg_movie_add_shoot_select);
  mRecorderView.record(new OnRecordFinishListener() {
  @Override
  public void onRecordFinish() {
  if(!success&&mRecorderView.getTimeCount()<10){//判斷用戶按下時間是否大於10秒
  success = true;
  handler.sendEmptyMessage(1);
  }
  }
  });
 } else if (event.getAction() == MotionEvent.ACTION_UP) {//用戶抬起拍攝按鈕
  mShootBtn.setBackgroundResource(R.drawable.bg_movie_add_shoot);
  if (mRecorderView.getTimeCount() > 3){//判斷用戶按下時間是否大於3秒
  if(!success){
  success = true;
  handler.sendEmptyMessage(1);
  }
  } else {
  success = false;
  if (mRecorderView.getmVecordFile() != null)
 mRecorderView.getmVecordFile().delete();//刪除錄制的過短視頻
  mRecorderView.stop();//停止錄制
  Toast.makeText(MainActivity.this, "視頻錄制時間太短", Toast.LENGTH_SHORT).show();
  }
 }
 return true;
 }
 });
 }
 @Override
 public void onResume() {
 super.onResume();
 isFinish = true;
 if (mRecorderView.getmVecordFile() != null)
 mRecorderView.getmVecordFile().delete();//視頻使用後刪除
 }
 @Override
 public void onSaveInstanceState(Bundle outState) {
 super.onSaveInstanceState(outState);
 isFinish = false;
 success = false;
 mRecorderView.stop();//停止錄制
 }
 @Override
 public void onPause() {
 super.onPause();
 }
 @Override
 public void onDestroy() {
 super.onDestroy();
 }
 private Handler handler = new Handler() {
 @Override
 public void handleMessage(Message msg) {
 if(success){
 finishActivity();
 }
 }
 };
 //視頻錄制結束後,跳轉的函數
 private void finishActivity() {
 if (isFinish) {
 mRecorderView.stop();
 Intent intent = new Intent(this, SuccessActivity.class);
 Bundle bundle = new Bundle();
 bundle.putString("text", mRecorderView.getmVecordFile().toString());
 intent.putExtras(bundle);
 startActivity(intent);
 }
 success = false;
 }
 /**
 * 錄制完成回調
 */
 public interface OnShootCompletionListener {
 public void OnShootSuccess(String path, int second);
 public void OnShootFailure();
 }
}
到這裡我們仿微信的短視頻拍攝就已經大功告成,那麼下面我們檢驗一下,我們錄制的效果如何,下面我以Android提供的視頻播放控件(VideoView)為大家介紹一下如何播放錄制的短視頻。
5.播放視頻的配置文件activity_success.xml:
<?xml version="1.0" encoding="utf-8"?>
<LinearLayout xmlns:android="http://schemas.android.com/apk/res/android"
 xmlns:tools="http://schemas.android.com/tools"
 android:layout_width="match_parent"
 android:layout_height="match_parent"
 android:background="@android:color/white"
 android:orientation="vertical">
 <TextView
 android:id="@+id/text"
 android:layout_width="wrap_content"
 android:layout_height="wrap_content"
 android:layout_gravity="center"
 android:text="@string/app_name" />
 <LinearLayout
 android:layout_width="match_parent"
 android:layout_height="wrap_content"
 android:orientation="horizontal"
 >
 <Button
 android:id="@+id/button1"
 android:layout_width="match_parent"
 android:layout_height="wrap_content"
 android:layout_weight="1"
 android:gravity="center"
 android:padding="5dp"
 android:text="播放"
 />
 <Button
 android:id="@+id/button2"
 android:layout_width="match_parent"
 android:layout_height="wrap_content"
 android:layout_weight="1"
 android:gravity="center"
 android:padding="5dp"
 android:text="暫停"
 />
 <Button
 android:id="@+id/button3"
 android:layout_width="match_parent"
 android:layout_height="wrap_content"
 android:layout_weight="1"
 android:gravity="center"
 android:padding="5dp"
 android:text="重播"
 />
 <Button
 android:id="@+id/button4"
 android:layout_width="match_parent"
 android:layout_height="wrap_content"
 android:layout_weight="1"
 android:gravity="center"
 android:padding="5dp"
 android:text="視頻長度"
 />
 </LinearLayout>
 <VideoView
 android:id="@+id/videoView1"
 android:layout_width="wrap_content"
 android:layout_height="500dp" />
</LinearLayout>
6.視頻播放的控制代碼SuccessActivity.java:
public class SuccessActivity extends Activity implements OnClickListener{
 private TextView text;//視頻保存的路徑
 private Button button1;//播放開關
 private Button button2;//暫停開關
 private Button button3;//重新播放開關
 private Button button4;//視頻大小開關
 private VideoView videoView1;//視頻播放控件
 private String file;//視頻路徑
 @Override
 protected void onCreate(Bundle savedInstanceState) {
 super.onCreate(savedInstanceState);
 setContentView(R.layout.activity_success);
 Bundle bundle = getIntent().getExtras();
 file = bundle.getString("text");//獲得拍攝的短視頻保存地址
 init();
 setValue();
 }
 //初始化
 private void init() {
 text = (TextView) findViewById(R.id.text);
 button1 = (Button) findViewById(R.id.button1);
 button2 = (Button) findViewById(R.id.button2);
 button3 = (Button) findViewById(R.id.button3);
 button4 = (Button) findViewById(R.id.button4);
 videoView1 = (VideoView) findViewById(R.id.videoView1);
 }
 //設置
 private void setValue() {
 text.setText(file);
 button1.setOnClickListener(this);
 button2.setOnClickListener(this);
 button3.setOnClickListener(this);
 button4.setOnClickListener(this);
 videoView1.setVideoPath(file);
 }
 @Override
 public void onClick(View v) {
 switch (v.getId()) {
 case R.id.button1:
 videoView1.start();
 break;
 case R.id.button2:
 videoView1.pause();
 break;
 case R.id.button3:
 videoView1.resume();
 videoView1.start();
 break;
 case R.id.button4:
 Toast.makeText(this, "視頻長度:"+(videoView1.getDuration()/1024)+"M", Toast.LENGTH_SHORT).show();
 break;
 default:
 break;
 }
 }
}
7.添加權限:
<!-- 視頻錄制的權限star -->
<!-- 攝像頭 -->
<uses-permission android:name="android.permission.CAMERA" />
<!-- 音頻即聲音 -->
<uses-permission android:name="android.permission.RECORD_AUDIO" />
<!-- sd卡寫入權限 -->
<uses-permission android:name="android.permission.MOUNT_UNMOUNT_FILESYSTEMS" />
<uses-permission android:name="android.permission.WRITE_EXTERNAL_STORAGE" />
<!-- 硬件支持 -->
<uses-feature android:name="android.hardware.camera" />
<uses-feature android:name="android.hardware.camera.autofocus" />
<!-- 視頻錄制的權限end -->
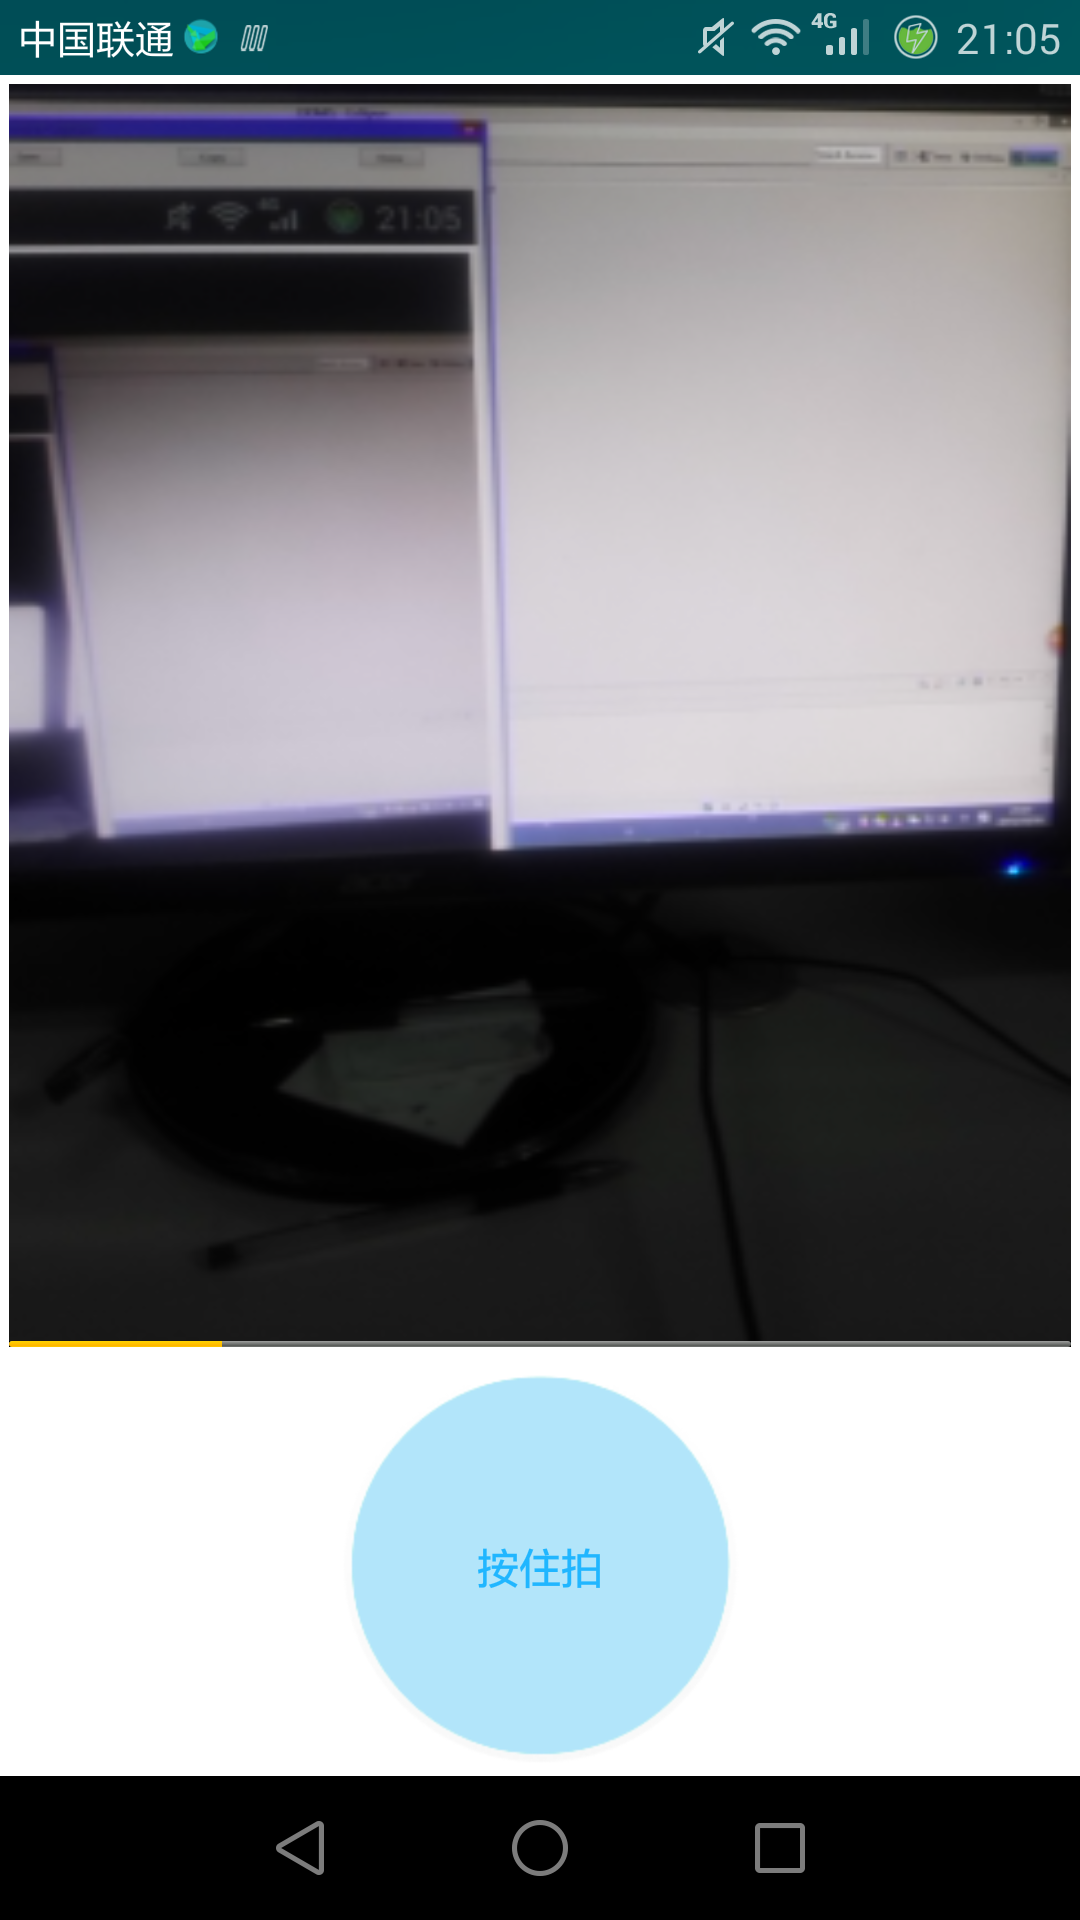
功能界面截圖:

好了,到這裡關於拍攝短視頻的知識就和大家分享完畢,具體的實現很簡單,相信大家看到這裡已經已經學會了,當然如果你還有什麼疑問,可以留言討論。最後給大家分享一個demo的下載地址,方便大家下載學習,下載地址:http://xiazai.jb51.net/201612/yuanma/WeChatVideoRecordDemo_jb51.rar
以上就是本文的全部內容,希望本文的內容對大家的學習或者工作能帶來一定的幫助,同時也希望多多支持本站!
 用Android Studio 運行ndk 程序
最近准備研究一下android雙進程守護,由於此前用eclipse 寫jni習慣了,現在主要用as 工具。在此也試著寫個demo 然後在對雙進程守護進行研究1、所需工具
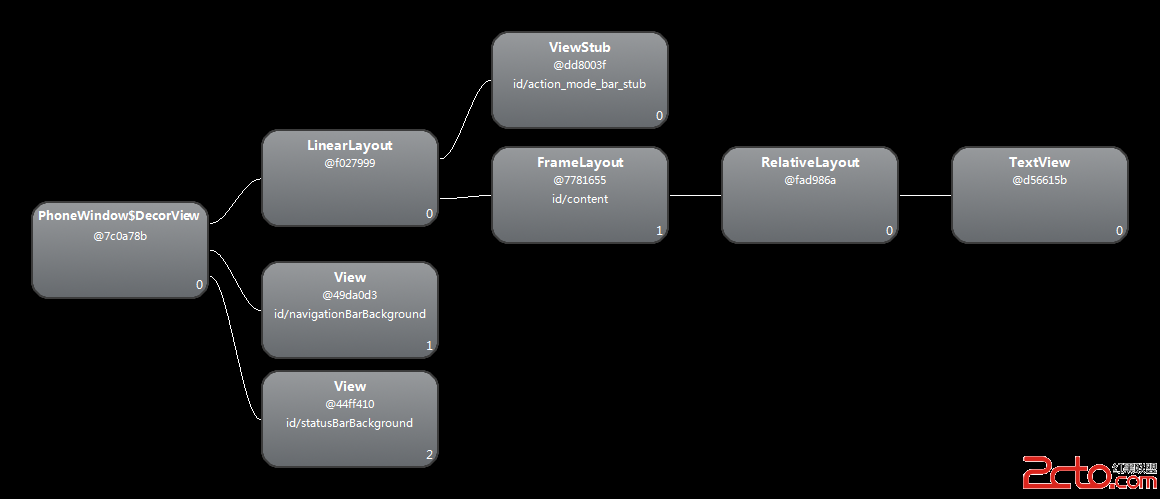 Android中View的布局及繪圖機制
為了研究Android中View的布局及繪圖機制,我創建了一個非常簡單的App,該App只有一個Activity,該Activity對應的layout如下所示: 該
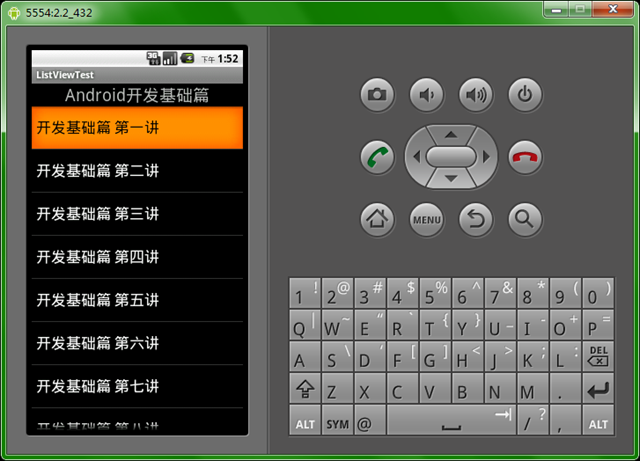 Android ListView組件詳解及示例代碼
Android 列表組件 ListView列表組件是開發中經常用到組件,使用該組件在使用時需要為它提供適配器,由適配器提供來確定顯示樣式和顯示數據。下面看一個例子:新建一
 Android 生成正式簽名的APK文件
應用已經開發出來了,下一步我們需要思考推廣方面的工作。那麼如何才能讓更多的用戶知道並使用我們的應用程序呢?在手機領域,最常見的做法