編輯:關於Android編程
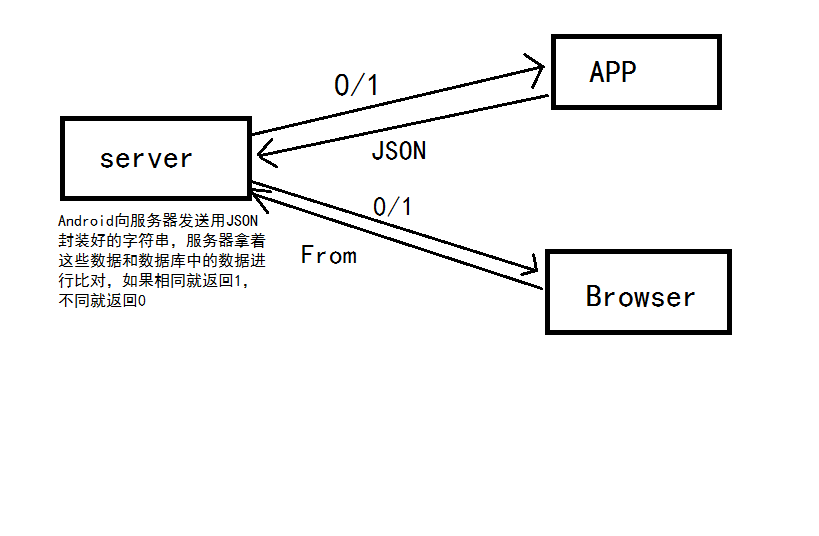
Android客戶端和PHP、MySQL搭建的服務器之間的簡單交互,實現登錄功能 。
實現原理圖:
Handler消息機制原理:
Handler機制主要包括4個關鍵對象,分別是Message、Handler、MessageQueue、Looper。
下面對這4個關鍵對象進行簡單的介紹。
1.Message
Message是線程之間傳遞的消息,它可以在內部攜帶少量的信息,用於在不同線程之間交換數據。Message的what字段可以用來攜帶一些整型數據,obj字段可以攜帶一個Object對象。
2.Handler
Handler就是處理者的意思,它主要用於發送消息和處理消息。一般使用Handler對象的sendMessage()方法發送消息,發出的消息經過一系列的輾轉處理後,最終會傳遞到Handler對象的HandlerMessage()方法中。
3.MessageQueue
MessageQueue是消息隊列的意思,它主要用來存放通過Handler發送的消息。通過Handler發送的消息會存在MessageQueue中等待處理。每個線程中只會有一個MessageQueue對象。
4.Looper
Looper是每個線程中的MessageQueue的管家。調用Looper的loop()方法後,就會進入一個無限循環中。然後,每當發現MessageQueue中存在一條消息,就會將它取出,並傳遞到Handler的HandlerMessage()方法中。此外,每個線程也只會有一個Looper對象。在主線程中創建Handler對象時,系統已經創建了Looper鍍鋅,所以不用手動創建Looper對象,而在子線程中的Handler對象,需要調用Looper.loop()方法開啟消息循環。
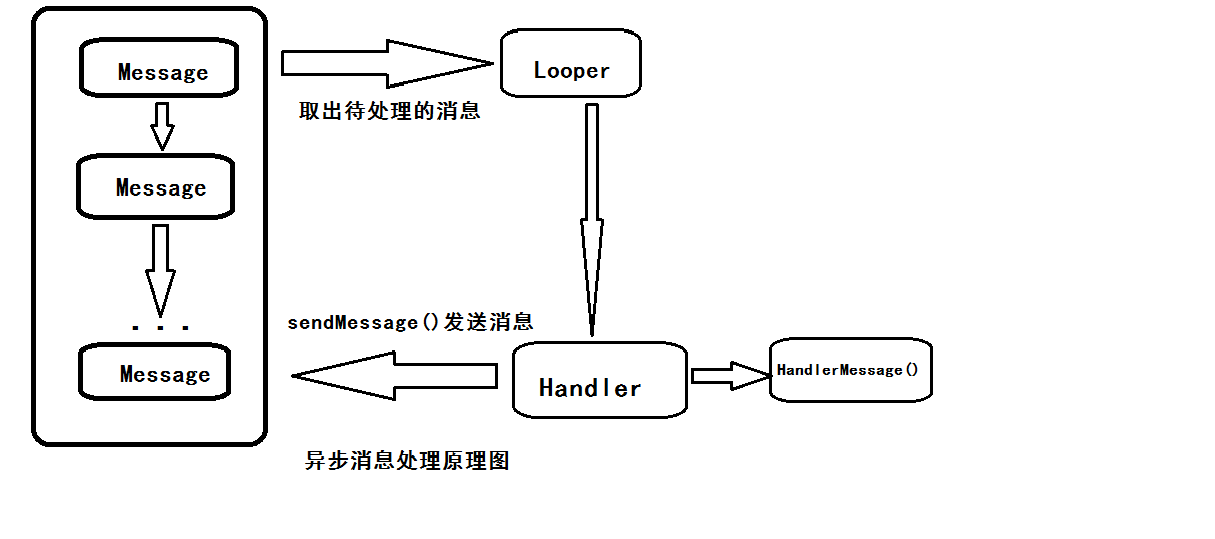
圖中可以清晰的看到整個Handler消息機制處理流程。Handler消息處理首先需要在UI線程創建一個Handler對象,然後在子線程中調用了sendMessage()方法,接著這個消息會存放在UI線程的MessageQueue中,通過Looper對象取出MessageQueue中的消息,最後分發回Handler的HandMessage()方法中。
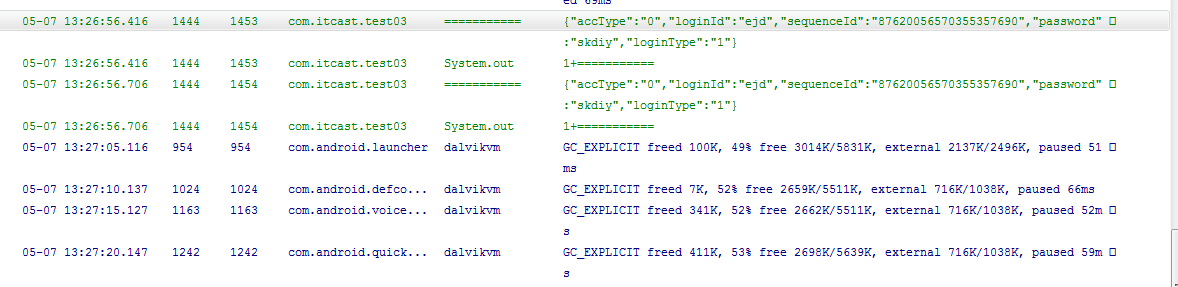
下面是我寫的代碼以及本程序的logcat的運行結果。
本次任務中遇到的難題:
無法連接到PHP服務器。實現了把自己輸入的用戶名和密碼封裝成了JSON但是無法發送到PHP進行與數 據庫的比對。
package com.itcast.test03;

import android.app.Activity;
import android.os.Bundle;
import android.os.Handler;
import android.os.Message;
import android.util.Log;
import android.view.View;
import android.view.inputmethod.InputMethodManager;
import android.widget.Button;
import android.widget.CheckBox;
import android.widget.EditText;
import android.widget.Toast;


public class MainActivity extends Activity {
 private EditText et_username;
 private EditText et_userPsd;
 private Button login;
 private Button signUp;
 private CheckBox save;
 private String user,pass;
 @Override
 protected void onCreate(Bundle savedInstanceState) {
  super.onCreate(savedInstanceState);
  setContentView(R.layout.activity_main);
  et_username = (EditText)findViewById(R.id.et_number);
  et_userPsd = (EditText)findViewById(R.id.et_password);
  login=(Button)findViewById(R.id.login);
  signUp=(Button)findViewById(R.id.signUp);
  save = (CheckBox)findViewById(R.id.save);
  //登錄按鈕的點擊事件
  login.setOnClickListener(new View.OnClickListener() {

    @Override
    public void onClick(View v) {
    // TODO Auto-generated method stub

     //將輸入的用戶名和密碼轉換成字符串
    String name =et_username.getText().toString();
    String pwd = et_userPsd.getText().toString();
     //調用login方法
    login(name, pwd);
    }
    });
    }

    private void login(final String name, final String pwd){
     //創建Handler對象
    final Handler handler = new Handler() {

    public void handleMessage(Message msg) {
    if(msg.what == 1){
     Toast.makeText(MainActivity.this, "登錄成功", Toast.LENGTH_SHORT).show();
     //提示登陸成功
     finish();
    }else if(msg.what == 0){
     Log.i(name, msg.toString());
    }else if(msg.what == -1){
     Log.i("==============",msg.toString());
    }
    }
    };
    new Thread(){
    public void run() {
     //創建Message對象
    Message msg =new Message();
    try {
     Post po = new Post();
     String infoo = po.logina(name, pwd);
        if(infoo != null){
        msg.what = 1;//成功
        msg.obj = infoo;
        }else{
        msg.what = 0;//失敗
        msg.obj = "2";
        }
       } catch (Exception e) {
       e.printStackTrace();
     msg.what = -1;
     msg.obj = e;
       }
    handler.sendMessage(msg);
    }
    }.start();
    }
 }
package com.itcast.test03;
import java.io.IOException;

import org.apache.http.HttpResponse;
import org.apache.http.ParseException;
import org.apache.http.client.HttpClient;
import org.apache.http.client.methods.HttpPost;
import org.apache.http.entity.StringEntity;
import org.apache.http.impl.client.DefaultHttpClient;
import org.apache.http.util.EntityUtils;
import org.json.JSONException;
import org.json.JSONObject;

import android.util.Log;

public class Post {

 public String logina(String name, String pwd)throws ParseException, IOException, JSONException{
   //獲取到HttpClient對象
   HttpClient httpClient = new DefaultHttpClient();
   String strurl = "http://10.6.78.213:2016/xampp/sse/index.php/home/Index/server_info";
   HttpPost request = new HttpPost(strurl);
   request.addHeader("Accept","application/json");
   request.addHeader("Content-Type","application/json");//還可以自定義增加header
   JSONObject param = new JSONObject();//定義json對象
   param.put("sequenceId", "87620056570355357690");
   param.put("accType", "0");
   param.put("loginId", name);
   param.put("password", pwd);
   //param.put("thirdpartyAppId", "");
   //param.put("thirdpartyAccessToken", "");
   param.put("loginType", "1");
   Log.i("===========", param.toString());
   System.out.println("1+===========");
   StringEntity se = new StringEntity(param.toString());
   request.setEntity(se);//發送數據
   HttpResponse httpResponse = httpClient.execute(request);//獲得相應
   System.out.println("2+===========");//進行一行一行的調試時無法打印此語句。原因就是無法成功連接到                        網絡
   int code = httpResponse.getStatusLine().getStatusCode();
   System.out.print(code);
   String result = EntityUtils.toString(httpResponse.getEntity());
   JSONObject result1 = new JSONObject(result);
   String info = (String) result1.get("retInfo");
   Log.i("=============", info);
   return info;
   }

}
以上就是本文的全部內容,希望對大家的學習有所幫助,也希望大家多多支持本站。
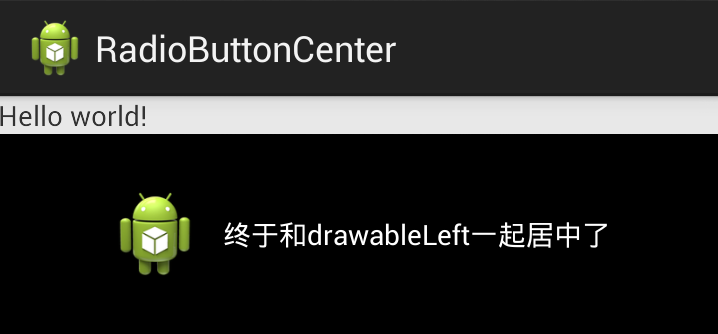 Android 讓自定義TextView的drawableLeft與文本一起居中
前言 TextView的drawableLeft、drawableRight和drawableTop是一個常用、好用的屬性,可以在文本的上下左右放置一個圖片,
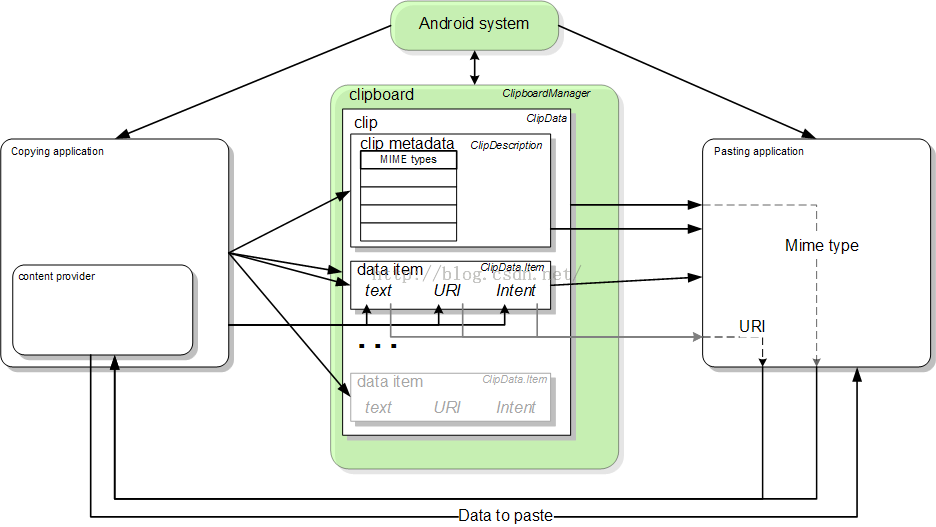 Android API Guides---Text and Input
文本和輸入 使用文字服務添加便利功能,例如復制/粘貼和拼寫檢查到您的應用程序。您也可以開發自己的文字服務,提供自定義的輸入法,字典和拼寫檢查,你可以分發給用戶為應用程序。
 Android自定義時間軸的實現過程
本文講述Android自定義時間軸的實現過程,供大家參考,具體內容如下 相關視頻鏈接: Android自定義控件系列 http://edu.csdn.net/course
 Android Loader 技術的簡單實用
從Android3.0開始,Android SDK提供了Loader技術,使用Loader技術可以很容易進行數據的異步加載。Loader技術為我們提供的核心類有: