編輯:關於Android編程
本文實例講述了Android編程實現支持拖動改變位置的圖片中疊加文字功能。分享給大家供大家參考,具體如下:
之所以做了這麼一個Demo,是因為最近項目中有一個奇葩的需求:用戶拍攝照片後,分享到微信的同時添加備注,想獲取用戶在微信的彈出框輸入的內容,保存在自己的服務器上。而事實上,這個內容程序是無法獲取的,因此采取了一個折衷方案,將文字直接寫在圖片上。
首先上Demo效果圖:

功能:
1.用戶自由輸入內容,可手動換行,並且行滿也會自動換行。
2.可拖動改變圖片中文本位置(文字不會超出圖片區域)。
3.點擊“生成圖片”按鈕之後,生成一張帶有文字的圖片文件。
代碼不多,直接全部貼上了:
Activity:
/**
 * 將文字寫在圖片中(截圖方式),支持拖動文字。<br/>
 * 說明:很明顯,截圖方式會降低圖片的質量。如果需要保持圖片質量可以使用canvas的方式,將文字直接繪制在圖片之上(不過,使用此方式要實現文字拖動較為復雜)。
 */
public class MainActivity extends AppCompatActivity {
  //圖片組件
  private ImageView imageView;
  //位於圖片中的文本組件
  private TextView tvInImage;
  //圖片和文本的父組件
  private View containerView;
  //父組件的尺寸
  private float imageWidth, imageHeight, imagePositionX, imagePositionY;
  @Override
  protected void onCreate(Bundle savedInstanceState) {
    super.onCreate(savedInstanceState);
    setContentView(R.layout.image_with_text);
    imageView = (ImageView) findViewById(R.id.writeText_img);
    EditText editText = (EditText) findViewById(R.id.writeText_et);
    tvInImage = (TextView) findViewById(R.id.writeText_image_tv);
    containerView = findViewById(R.id.writeText_img_rl);
    imageView.getViewTreeObserver().addOnGlobalLayoutListener(new ViewTreeObserver.OnGlobalLayoutListener() {
      @Override
      public void onGlobalLayout() {
        imageView.getViewTreeObserver().removeOnGlobalLayoutListener(this);
        imagePositionX = imageView.getX();
        imagePositionY = imageView.getY();
        imageWidth = imageView.getWidth();
        imageHeight = imageView.getHeight();
        //設置文本大小
        tvInImage.setMaxWidth((int) imageWidth);
      }
    });
    imageView.setImageBitmap(getScaledBitmap(R.mipmap.test_img));
    //輸入框
    editText.addTextChangedListener(new TextWatcher() {
      @Override
      public void beforeTextChanged(CharSequence s, int start, int count, int after) {
      }
      @Override
      public void onTextChanged(CharSequence s, int start, int before, int count) {
        if (s.toString().equals("")) {
          tvInImage.setVisibility(View.INVISIBLE);
        } else {
          tvInImage.setVisibility(View.VISIBLE);
          tvInImage.setText(s);
        }
      }
      @Override
      public void afterTextChanged(Editable s) {
      }
    });
    final GestureDetector gestureDetector = new GestureDetector(this, new SimpleGestureListenerImpl());
    //移動
    tvInImage.setOnTouchListener(new View.OnTouchListener() {
      @Override
      public boolean onTouch(View v, MotionEvent event) {
        gestureDetector.onTouchEvent(event);
        return true;
      }
    });
  }
  //確認,生成圖片
  public void confirm(View view) {
    Bitmap bm = loadBitmapFromView(containerView);
    String filePath = Environment.getExternalStorageDirectory() + File.separator + "image_with_text.jpg";
    try {
      bm.compress(Bitmap.CompressFormat.JPEG, 100, new FileOutputStream(filePath));
      Toast.makeText(this, "圖片已保存至:SD卡根目錄/image_with_text.jpg", Toast.LENGTH_LONG).show();
    } catch (FileNotFoundException e) {
      e.printStackTrace();
    }
  }
  //以圖片形式獲取View顯示的內容(類似於截圖)
  public static Bitmap loadBitmapFromView(View view) {
    Bitmap bitmap = Bitmap.createBitmap(view.getWidth(), view.getHeight(), Bitmap.Config.ARGB_8888);
    Canvas canvas = new Canvas(bitmap);
    view.draw(canvas);
    return bitmap;
  }
  private int count = 0;
  //tvInImage的x方向和y方向移動量
  private float mDx, mDy;
  //移動
  private class SimpleGestureListenerImpl extends GestureDetector.SimpleOnGestureListener {
    @Override
    public boolean onScroll(MotionEvent e1, MotionEvent e2, float distanceX, float distanceY) {
      //向右移動時,distanceX為負;向左移動時,distanceX為正
      //向下移動時,distanceY為負;向上移動時,distanceY為正
      count++;
      mDx -= distanceX;
      mDy -= distanceY;
      //邊界檢查
      mDx = calPosition(imagePositionX - tvInImage.getX(), imagePositionX + imageWidth - (tvInImage.getX() + tvInImage.getWidth()), mDx);
      mDy = calPosition(imagePositionY - tvInImage.getY(), imagePositionY + imageHeight - (tvInImage.getY() + tvInImage.getHeight()), mDy);
      //控制刷新頻率
      if (count % 5 == 0) {
        tvInImage.setX(tvInImage.getX() + mDx);
        tvInImage.setY(tvInImage.getY() + mDy);
      }
      return true;
    }
  }
  //計算正確的顯示位置(不能超出邊界)
  private float calPosition(float min, float max, float current) {
    if (current < min) {
      return min;
    }
    if (current > max) {
      return max;
    }
    return current;
  }
  //獲取壓縮後的bitmap
  private Bitmap getScaledBitmap(int resId) {
    BitmapFactory.Options opt = new BitmapFactory.Options();
    opt.inJustDecodeBounds = true;
    BitmapFactory.decodeResource(getResources(), resId, opt);
    opt.inSampleSize = Utility.calculateInSampleSize(opt, 600, 800);
    opt.inJustDecodeBounds = false;
    return BitmapFactory.decodeResource(getResources(), resId, opt);
  }
}
一個工具類:
public class Utility {
  //計算 inSampleSize 值,壓縮圖片
  public static int calculateInSampleSize(BitmapFactory.Options options, int reqWidth, int reqHeight) {
    // Raw height and width of image
    final int height = options.outHeight;
    final int width = options.outWidth;
    int inSampleSize = 1;
    if (height > reqHeight || width > reqWidth) {
      final int halfHeight = height / 2;
      final int halfWidth = width / 2;
      // Calculate the largest inSampleSize value that is a power of 2 and keeps both
      // height and width larger than the requested height and width.
      while ((halfHeight / inSampleSize) > reqHeight && (halfWidth / inSampleSize) > reqWidth) {
        inSampleSize *= 2;
      }
    }
    return inSampleSize;
  }
}
布局文件:
<?xml version="1.0" encoding="utf-8"?>
<LinearLayout xmlns:android="http://schemas.android.com/apk/res/android"
  android:layout_width="match_parent"
  android:layout_height="match_parent"
  android:orientation="vertical"
  android:padding="10dp">
  <RelativeLayout
    android:id="@+id/writeText_img_rl"
    android:layout_width="wrap_content"
    android:layout_height="wrap_content"
    android:layout_gravity="center_horizontal">
    <ImageView
      android:id="@+id/writeText_img"
      android:layout_width="wrap_content"
      android:layout_height="wrap_content"
      android:maxHeight="360dp"
      android:adjustViewBounds="true"
      android:contentDescription="@null"/>
    <TextView
      android:id="@+id/writeText_image_tv"
      android:layout_width="wrap_content"
      android:layout_height="wrap_content"
      android:visibility="invisible"
      android:layout_centerInParent="true"
      android:background="#79652a"
      android:clickable="true"
      android:padding="4dp"
      android:textColor="@android:color/white"
      android:textSize="15sp" />
  </RelativeLayout>
  <EditText
    android:id="@+id/writeText_et"
    android:layout_width="match_parent"
    android:layout_height="wrap_content"
    android:layout_marginTop="8dp"
    android:hint="添加備注" />
  <Button
    android:layout_width="wrap_content"
    android:layout_height="wrap_content"
    android:onClick="confirm"
    android:text="生成圖片" />
</LinearLayout>
更多關於Android相關內容感興趣的讀者可查看本站專題:《Android圖形與圖像處理技巧總結》、《Android開發入門與進階教程》、《Android調試技巧與常見問題解決方法匯總》、《Android基本組件用法總結》、《Android視圖View技巧總結》、《Android布局layout技巧總結》及《Android控件用法總結》
希望本文所述對大家Android程序設計有所幫助。
 小米手環怎麼設置來電震動 小米手環來電震動設置教程
小米手環怎麼設置來電震動?小米手環上市開始就受到廣大用戶的青睐,不僅功能使用,價格還很公道,下面小編為大家帶來小米手環來電震動設置方法。小米手環設置來電震動
 Android應用中實現選擇本地文件與目錄的實例分享
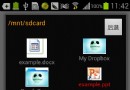
文件選擇器今天給大家分享下文件選擇器的作用 , 具體就是獲取用戶在在SD卡選中的文件/文件夾路徑 ,類似於C#中OpenFileDialog控件(對C#的一站式開發還是念
 Android的ExpandableListView-android學習之旅(二十八)
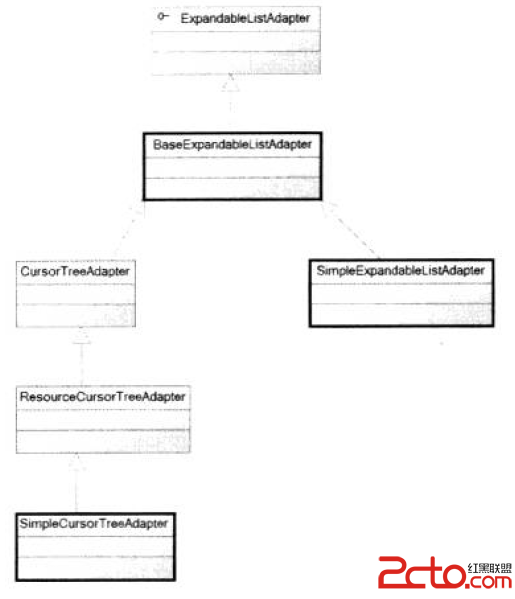
ExpandableListView簡介ExpandableListView是ListView的子類,用法和ListView類似,ExpandableListView可以
 android nfc常用標簽讀取總結
有幾天沒有更新博客了,不過本篇卻准備了許久,希望能帶給每一位開發者最簡單高效的學習方式。廢話到此為止,下面開始正文。 NFC(Near Field Communicati