編輯:Android資訊
在自定義控件的時候,如果我們想額外的添加一些屬性,就會用到TypedArray這個類,那麼這個類是怎麼得到的,以及怎麼使用的,這篇講會詳細講解,下面是我以前自定義控件的一段代碼
TypedArray typedArray = context.obtainStyledAttributes(attrs,R.styleable.myaccount_item_style);
我們看到TypedArray是通過Context的方法得到的,但要記住完成之後一定要調用recycle()方法進行回收,我們點進去找到最終實現
public TypedArray obtainStyledAttributes(AttributeSet set,
        int[] attrs, int defStyleAttr, int defStyleRes) {
    final int len = attrs.length;
    final TypedArray array = TypedArray.obtain(Resources.this, len);

    // XXX note that for now we only work with compiled XML files.
    // To support generic XML files we will need to manually parse
    // out the attributes from the XML file (applying type information
    // contained in the resources and such).
    final XmlBlock.Parser parser = (XmlBlock.Parser)set;
    AssetManager.applyStyle(mTheme, defStyleAttr, defStyleRes,
            parser != null ? parser.mParseState : 0, attrs, array.mData, array.mIndices);

    array.mTheme = this;
    array.mXml = parser;

……………
    return array;
}
我們先看下面AssetManager的applyStyle方法是native方法,也就是用C++實現的,他會提取自定義控件屬性的的值保存TypedArray中的mData數組中,這個數組的大小是由你定義控件屬性的個數決定的,是他的6倍,上面的attrs其實就是你自定義屬性的個數,我們來看一下
static TypedArray obtain(Resources res, int len) {
    final TypedArray attrs = res.mTypedArrayPool.acquire();
    if (attrs != null) {
        attrs.mLength = len;
        attrs.mRecycled = false;

        final int fullLen = len * AssetManager.STYLE_NUM_ENTRIES;
        if (attrs.mData.length >= fullLen) {
            return attrs;
        }

        attrs.mData = new int[fullLen];
        attrs.mIndices = new int[1 + len];
        return attrs;
    }

    return new TypedArray(res,
            new int[len*AssetManager.STYLE_NUM_ENTRIES],
            new int[1+len], len);
}
他首先會從TypedArray池中獲取,如果有就取出,mDate的大小不能小於屬性個數的6倍,因為STYLE_NUM_ENTRIES的值為6,如果沒有就new一個然後返回,把屬性的值提取出來之後我們就可以來操作了,我們先來看一下View類初始化中的一段代碼
final int N = a.getIndexCount();
for (int i = 0; i < N; i++) {
    int attr = a.getIndex(i);
    switch (attr) {
        case com.android.internal.R.styleable.View_background:
            background = a.getDrawable(attr);
            break;
…………………
    }
}
他會把TypedArray中的數據提取出來對View的屬性賦值,我們來看一下TypedArray類的構造方法
/*package*/ TypedArray(Resources resources, int[] data, int[] indices, int len) {
    mResources = resources;
    mMetrics = mResources.mMetrics;
    mAssets = mResources.mAssets;
    mData = data;
    mIndices = indices;
    mLength = len;
}
代碼很簡單,其中mData就是就是從xml文件中提取到的數據,mData的大小是自定義屬性個數的6倍,所以這裡是每6個作為一組,我們可以看一下上面的obtain方法中data數組的大小是乘以6(STYLE_NUM_ENTRIES)的,這6種類型如下,定義在AssetManager類中,下面的第一個表示每組6個
/*package*/ static final int STYLE_NUM_ENTRIES = 6;
/*package*/ static final int STYLE_TYPE = 0;
/*package*/ static final int STYLE_DATA = 1;
/*package*/ static final int STYLE_ASSET_COOKIE = 2;
/*package*/ static final int STYLE_RESOURCE_ID = 3;
/*package*/ static final int STYLE_CHANGING_CONFIGURATIONS = 4;
/*package*/ static final int STYLE_DENSITY = 5;
對應著TypedValue類中的這7中類型,其中string是根據type得到的
/** The type held by this value, as defined by the constants here.
 *  This tells you how to interpret the other fields in the object. */
public int type;

/** If the value holds a string, this is it. */
public CharSequence string;

/** Basic data in the value, interpreted according to {@link #type} */
public int data;

/** Additional information about where the value came from; only
 *  set for strings. */
public int assetCookie;

/** If Value came from a resource, this holds the corresponding resource id. */
public int resourceId;

/** If Value came from a resource, these are the configurations for which
 *  its contents can change. */
public int changingConfigurations = -1;

/**
 * If the Value came from a resource, this holds the corresponding pixel density.
 * */
public int density;
如果我們認真看的時候就會發現obtain方法中對mIndices數組初始化的時候是加1的,因為mIndices數組的第一個保存的是我們所使用屬性的個數,記住是使用不是定義,我們來看一下其中的一些代碼
/**
 * Return the number of values in this array.
 */
public int length() {
    if (mRecycled) {
        throw new RuntimeException("Cannot make calls to a recycled instance!");
    }

    return mLength;
}

/**
 * Return the number of indices in the array that actually have data.
 */
public int getIndexCount() {
    if (mRecycled) {
        throw new RuntimeException("Cannot make calls to a recycled instance!");
    }

    return mIndices[0];
}
第一個length返回的是我們所定義屬性的個數,因為這個參數是在構造函數中賦值的,傳遞的是int[] attrs的長度,而這個sttrs就是我們在attrs文件中自定義屬性的時候在R文件中自動生成的一個數組。而下面的getIndexCount()方法返回的是我們所使用的屬性個數,因為mIndices的數據是從xml文件中提取的,第一個位置保存的是我們使用屬性的個數,後面的位置就是我們使用的自定義屬性在R文件中生成的id,在看一個方法,也是自定義的時候常用到的
public int getIndex(int at) {
    if (mRecycled) {
        throw new RuntimeException("Cannot make calls to a recycled instance!");
    }

    return mIndices[1+at];
}
這個得到的就是自定義屬性在R文件中生成的id,剩下的一些方法就是從TypedArray中提取值了,主要有以下幾種類型
<declare-styleable name="CustomTheme">
    <attr name="textView1" format="string" />
    <attr name="textView2" format="boolean" />
    <attr name="textView3" format="integer" />
    <attr name="textView4" format="float" />
    <attr name="textView5" format="color" />
    <attr name="textView6" format="dimension" />
    <attr name="textView7" format="fraction" />
    <attr name="textView8" format="reference" />
    <attr name="textView9" format="enum" />
    <attr name="textView10" format="flags" />
</declare-styleable>
TypedArray方法比較多,這裡就撿常用的幾個來分析一下,在分析之前先看一下下面這個方法
private CharSequence loadStringValueAt(int index) {
    final int[] data = mData;
    final int cookie = data[index+AssetManager.STYLE_ASSET_COOKIE];
    if (cookie < 0) {
        if (mXml != null) {
            return mXml.getPooledString(
                data[index+AssetManager.STYLE_DATA]);
        }
        return null;
    }
    return mAssets.getPooledStringForCookie(cookie, data[index+AssetManager.STYLE_DATA]);
}
上面所說的每6個一組,其中每組下標為STYLE_ASSET_COOKIE(2)的是用來標記緩存的,並且是只對String類型的,我們來看一下
private boolean getValueAt(int index, TypedValue outValue) {
    final int[] data = mData;
    final int type = data[index+AssetManager.STYLE_TYPE];
    if (type == TypedValue.TYPE_NULL) {
        return false;
    }
    outValue.type = type;
    outValue.data = data[index+AssetManager.STYLE_DATA];
    outValue.assetCookie = data[index+AssetManager.STYLE_ASSET_COOKIE];
    outValue.resourceId = data[index+AssetManager.STYLE_RESOURCE_ID];
    outValue.changingConfigurations = data[index+AssetManager.STYLE_CHANGING_CONFIGURATIONS];
    outValue.density = data[index+AssetManager.STYLE_DENSITY];
    outValue.string = (type == TypedValue.TYPE_STRING) ? loadStringValueAt(index) : null;
    return true;
}
上面這個方法是把mData指定范圍的6個數據提取到outValue中,其中string值通過type類型得到的,我們再來看一下assetCookie的注釋
/** Additional information about where the value came from; only
 *  set for strings. */
public int assetCookie;
所以他只針對String類型,我們再來看一下String類型的注釋
/** The <var>string</var> field holds string data.  In addition, if
 *  <var>data</var> is non-zero then it is the string block
 *  index of the string and <var>assetCookie</var> is the set of
 *  assets the string came from. */
public static final int TYPE_STRING = 0x03;
所以他只針對string類型的數據進行提取,比如text,String,color等,color可以是string類型也可以是int類型,還看上面的loadStringValueAt方法,如果cookie小於0,說明沒有緩存,就會從xml中解析,否則就從緩存中取
/*package*/ final CharSequence getPooledStringForCookie(int cookie, int id) {
    // Cookies map to string blocks starting at 1.
    return mStringBlocks[cookie - 1].get(id);
我們來看一下是怎麼從xml中解析的,看到上面的obtainStyledAttributes方法,會發現這樣一段代碼 array.mXml = parser;其中parser就是View及其子類在初始化的時候傳遞的AttributeSet,我們在前面的《Android LayoutInflater源碼分析及使用(二)》中講到,View及其子類創建的時候是通過反射來初始化的,我們來回顧一下
public final View createView(String name, String prefix, AttributeSet attrs)
         throws ClassNotFoundException, InflateException {
     Constructor<? extends View> constructor = sConstructorMap.get(name);
     Class<? extends View> clazz = null;

     try {
    …………………………
             constructor = clazz.getConstructor(mConstructorSignature);
    …………………………

         Object[] args = mConstructorArgs;
         args[1] = attrs;

         constructor.setAccessible(true);
         final View view = constructor.newInstance(args);
…………………………
         return view;

     } catch (NoSuchMethodException e) {
        …………………………
     } finally {
         Trace.traceEnd(Trace.TRACE_TAG_VIEW);
     }
 }
其中attrs是通過Resource的loadXmlResourceParser方法加載的,我們看一下
/*package*/ XmlResourceParser loadXmlResourceParser(int id, String type)
        throws NotFoundException {
    synchronized (mAccessLock) {
        TypedValue value = mTmpValue;
        if (value == null) {
            mTmpValue = value = new TypedValue();
        }
        getValue(id, value, true);
        if (value.type == TypedValue.TYPE_STRING) {
            return loadXmlResourceParser(value.string.toString(), id,
                    value.assetCookie, type);
        }
        throw new NotFoundException(
                "Resource ID #0x" + Integer.toHexString(id) + " type #0x"
                + Integer.toHexString(value.type) + " is not valid");
    }
}
剩下的就是涉及到Xml的解析,這裡就不在作深入探討,言歸正傳,還回到剛才的loadStringValueAt方法,如果緩存中存在就從緩存中去,如果不存在就通過xml解析獲取。下面在看一下一些常用的方法,其中getText(int index)和getString(int index)差不多,我們就來看一下getString(int index)方法
public String getString(int index) {
    if (mRecycled) {
        throw new RuntimeException("Cannot make calls to a recycled instance!");
    }

    index *= AssetManager.STYLE_NUM_ENTRIES;
    final int[] data = mData;
    final int type = data[index+AssetManager.STYLE_TYPE];
    if (type == TypedValue.TYPE_NULL) {
        return null;
    } else if (type == TypedValue.TYPE_STRING) {
        return loadStringValueAt(index).toString();
    }

    TypedValue v = mValue;
    if (getValueAt(index, v)) {
        Log.w(Resources.TAG, "Converting to string: " + v);
        CharSequence cs = v.coerceToString();
        return cs != null ? cs.toString() : null;
    }
    Log.w(Resources.TAG, "getString of bad type: 0x"
          + Integer.toHexString(type));
    return null;
}
上面的index要乘以6(STYLE_NUM_ENTRIES),因為是每6個一組的,如果type為null就返回空,如果為String類型就會調用loadStringValueAt方法獲取我們設置的值。有一點要注意,如果我們在attrs中設置的format類型和我們自定義設置的參數不符的話,當運行的時候是會報錯的,必須要設置相符並clean才能解決。否則就執行下面的方法,強制轉換為字符串,代碼比較簡單,這裡就不再貼出。在來看下一個bool類型和int類型的,由於這兩個差不多,就隨便挑一個
public int getInt(int index, int defValue) {
    index *= AssetManager.STYLE_NUM_ENTRIES;
    final int[] data = mData;
    final int type = data[index+AssetManager.STYLE_TYPE];
    if (type == TypedValue.TYPE_NULL) {
        return defValue;
    } else if (type >= TypedValue.TYPE_FIRST_INT
        && type <= TypedValue.TYPE_LAST_INT) {
        return data[index+AssetManager.STYLE_DATA];
    }

    TypedValue v = mValue;
    if (getValueAt(index, v)) {
        Log.w(Resources.TAG, "Converting to int: " + v);
        return XmlUtils.convertValueToInt(
            v.coerceToString(), defValue);
    }
    Log.w(Resources.TAG, "getInt of bad type: 0x"
          + Integer.toHexString(type));
    return defValue;
}
上面的類型如果大於TYPE_FIRST_INT並且小於TYPE_LAST_INT的時候就從mDate中提取值,這個不知道為什麼要這樣寫,不過從他的范圍來看也就int,Boolean,color三種是這樣取值的
/** Identifies the start of integer values that were specified as
 *  color constants (starting with '#'). */
public static final int TYPE_FIRST_COLOR_INT = 0x1c;

/** The <var>data</var> field holds a color that was originally
 *  specified as #aarrggbb. */
public static final int TYPE_INT_COLOR_ARGB8 = 0x1c;
/** The <var>data</var> field holds a color that was originally
 *  specified as #rrggbb. */
public static final int TYPE_INT_COLOR_RGB8 = 0x1d;
/** The <var>data</var> field holds a color that was originally
 *  specified as #argb. */
public static final int TYPE_INT_COLOR_ARGB4 = 0x1e;
/** The <var>data</var> field holds a color that was originally
 *  specified as #rgb. */
public static final int TYPE_INT_COLOR_RGB4 = 0x1f;

/** Identifies the end of integer values that were specified as color
 *  constants. */
public static final int TYPE_LAST_COLOR_INT = 0x1f;

/** Identifies the end of plain integer values. */
public static final int TYPE_LAST_INT = 0x1f;
如果范圍不在TYPE_FIRST_INT和TYPE_LAST_INT之間,就會把mData指定位置上的值提取到TypedValue中,然後在強制轉化,如果沒有提取到就會返回一個默認值,因為如果在attrs中定義但沒有用到,就會返回一個默認值。我們來看一下是怎麼轉化的
public static final int
convertValueToInt(CharSequence charSeq, int defaultValue)
{
    if (null == charSeq)
        return defaultValue;

    String nm = charSeq.toString();

    // XXX This code is copied from Integer.decode() so we don't
    // have to instantiate an Integer!

    int value;
    int sign = 1;
    int index = 0;
    int len = nm.length();
    int base = 10;

    if ('-' == nm.charAt(0)) {
        sign = -1;
        index++;
    }

    if ('0' == nm.charAt(index)) {
        //  Quick check for a zero by itself
        if (index == (len - 1))
            return 0;

        char    c = nm.charAt(index + 1);

        if ('x' == c || 'X' == c) {
            index += 2;
            base = 16;
        } else {
            index++;
            base = 8;
        }
    }
    else if ('#' == nm.charAt(index))
    {
        index++;
        base = 16;
    }

    return Integer.parseInt(nm.substring(index), base) * sign;
}
這個很好理解,轉化為int類型有0開頭的8進制,0x開頭的16進制,還有#開頭的color值,如果轉化之前是負數,轉化之後還要乘以-1(sign)。再來看一個
public int getColor(int index, int defValue) {
    index *= AssetManager.STYLE_NUM_ENTRIES;
    final int[] data = mData;
    final int type = data[index+AssetManager.STYLE_TYPE];
    if (type == TypedValue.TYPE_NULL) {
        return defValue;
    } else if (type >= TypedValue.TYPE_FIRST_INT
        && type <= TypedValue.TYPE_LAST_INT) {
        return data[index+AssetManager.STYLE_DATA];
    } else if (type == TypedValue.TYPE_STRING) {
        final TypedValue value = mValue;
        if (getValueAt(index, value)) {
            ColorStateList csl = mResources.loadColorStateList(
                    value, value.resourceId);
            return csl.getDefaultColor();
        }
        return defValue;
    }

    throw new UnsupportedOperationException("Can't convert to color: type=0x"
            + Integer.toHexString(type));
}
這個就不用多說了,因為color有String和int兩種類型,如果是String類型就會返回ColorStateList的默認值,因為ColorStateList可能有好幾種類型,但必須都是false的才是默認的,下面隨便看一個,下面這些提取之後默認的就是green,因為只有他的所有狀態都是false。
<?xml version="1.0" encoding="utf-8"?>
<selector xmlns:android="http://schemas.android.com/apk/res/android">

    <item android:state_pressed="true" android:color="@color/blue"/>
    <item android:state_pressed="false" android:state_selected="true" android:color="@color/yellow"/>
    <item android:state_pressed="false" android:state_selected="false" android:color="@color/green"/>

</selector>
下面在看最後一個方法
public int getLayoutDimension(int index, String name) {
    index *= AssetManager.STYLE_NUM_ENTRIES;
    final int[] data = mData;
    final int type = data[index+AssetManager.STYLE_TYPE];
    if (type >= TypedValue.TYPE_FIRST_INT
            && type <= TypedValue.TYPE_LAST_INT) {
        return data[index+AssetManager.STYLE_DATA];
    } else if (type == TypedValue.TYPE_DIMENSION) {
        return TypedValue.complexToDimensionPixelSize(
            data[index+AssetManager.STYLE_DATA], mResources.mMetrics);
    }

    throw new RuntimeException(getPositionDescription()
            + ": You must supply a " + name + " attribute.");
}
看方法名大概就知道是獲取layout的尺寸的,大致看一下,在ViewGroup中
protected void setBaseAttributes(TypedArray a, int widthAttr, int heightAttr) {
    width = a.getLayoutDimension(widthAttr, "layout_width");
    height = a.getLayoutDimension(heightAttr, "layout_height");
}
其中獲取到的值有3種,一種是精確的我們給的大於0的,一種是-1(MATCH_PARENT),另一種是-2(WRAP_CONTENT),記得在講到《Android LayoutInflater源碼分析及使用(二)》的時候說到,xml的屬性除了寬和高以外在初始化的時候基本上都能提取到,但寬和高是不行的,因為他是最終計算出來的,如果大家自定義View繼承View的時候,要必須重寫onMeasure方法,重新計算他的寬和高,如果我們不計算,當我們使用MATCH_PARENT或WRAP_CONTENT屬性的時候,結果是完全一樣的,尺寸都是填滿剩下的屏幕,如果不重寫onMeasure方法,在xml文件中把他的寬和高都寫死也行,但這樣不夠靈活,我們來看一下為什麼要重寫
public static int getDefaultSize(int size, int measureSpec) {
    int result = size;
    int specMode = MeasureSpec.getMode(measureSpec);
    int specSize = MeasureSpec.getSize(measureSpec);

    switch (specMode) {
    case MeasureSpec.UNSPECIFIED:
        result = size;
        break;
    case MeasureSpec.AT_MOST:
    case MeasureSpec.EXACTLY:
        result = specSize;
        break;
    }
    return result;
}
我們看到View中的getDefaultSize方法,AT_MOST和EXACTLY返回的結果都是一樣的,如果想看建議看一下ViewGroup的getChildMeasureSpec方法,這個就不在貼出,可以自己去看。OK,TypedArray中剩下的方法基本上也都非常相似,這裡就不在一一講述。
 8 個最優秀的 Android Studio 插件
本文由碼農網 – 王國峰原創翻譯,轉載請看清文末的轉載要求,歡迎參與我們的付費投稿計劃! Android Studio是目前Google官方設計的用於原生
 Jenkins+Gradle 實現 Android 自動化構建
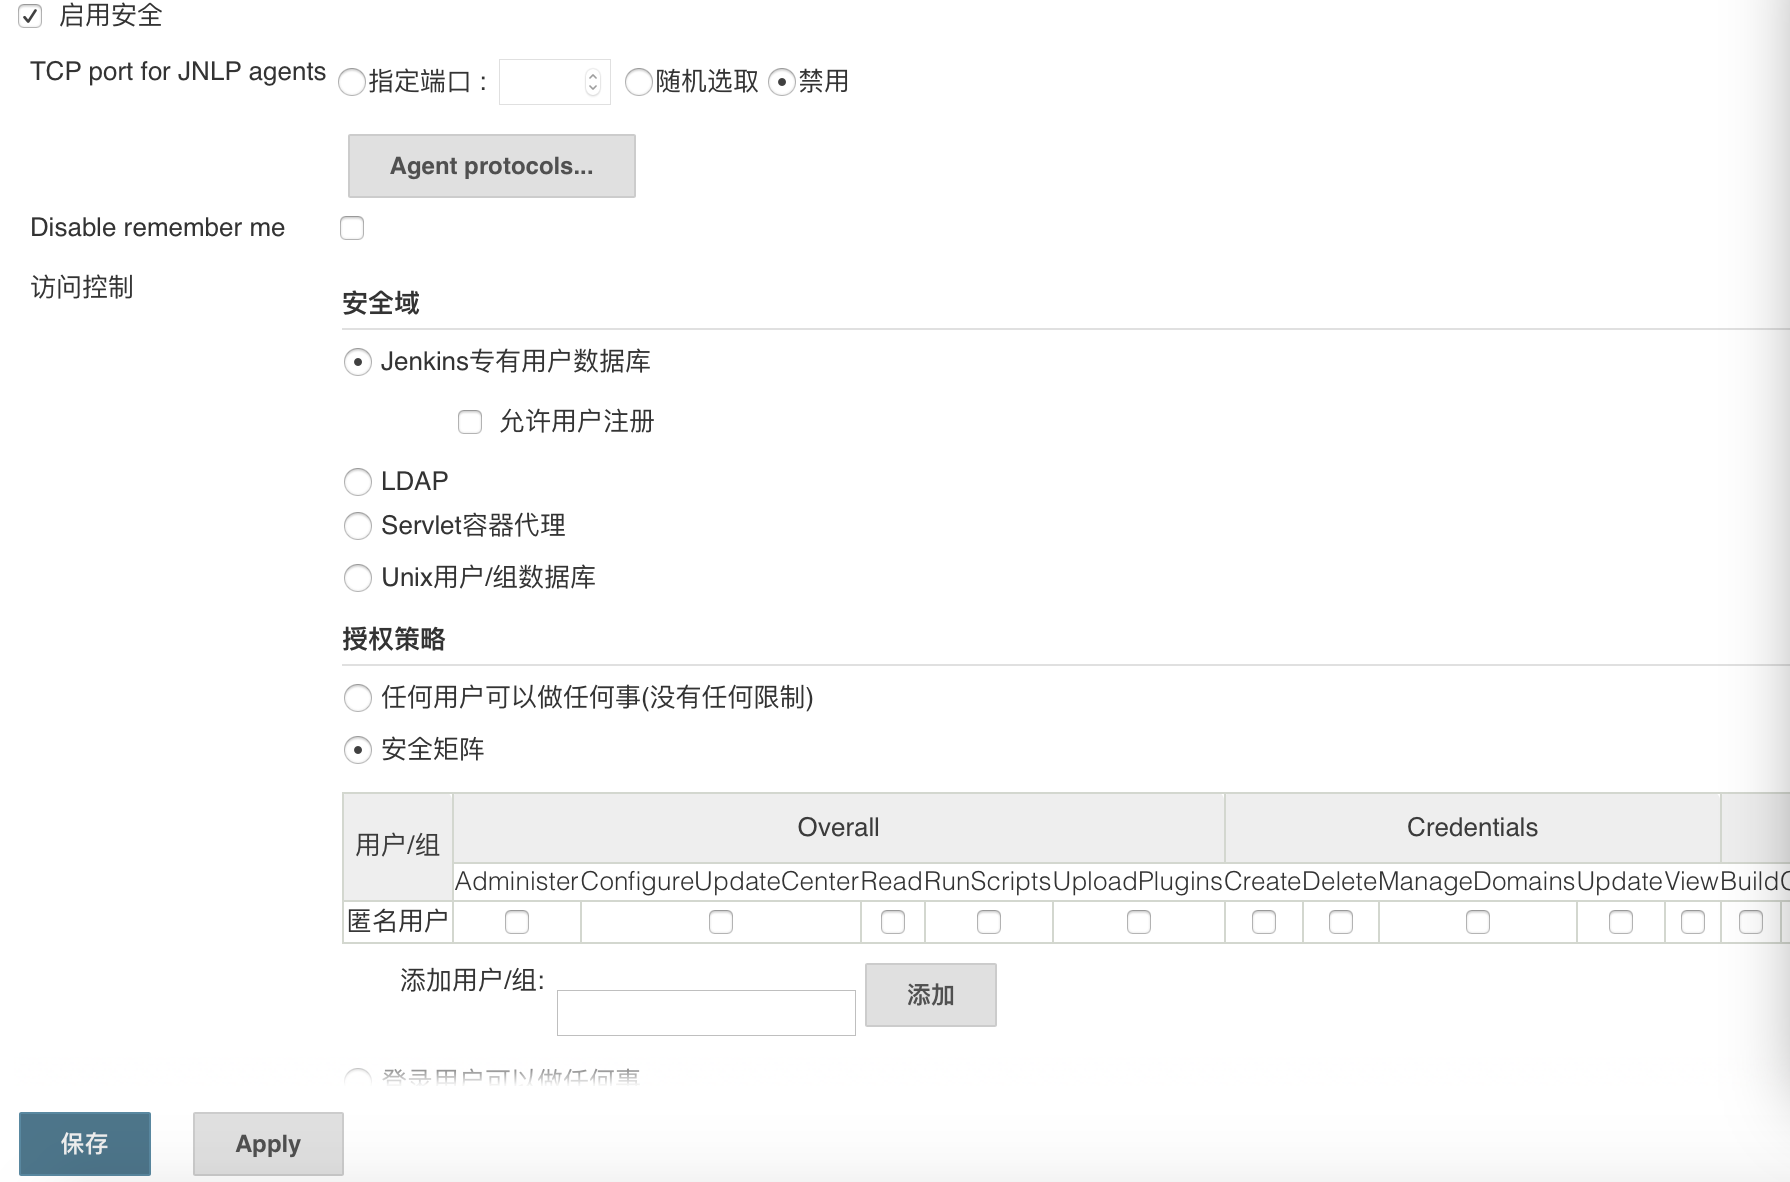
Jenkins簡介 Jenkins是一個開源軟件項目,旨在提供一個開放易用的軟件平台,使軟件的持續集成變成可能。目前大部分公司都在使用Jenkins來持續構建。
 Android UI控件系列:RadioButton(單選按鈕)
單選按鈕RadioButton在Android平台上也應用的非常多,比如一些選擇項的時候,會用到單選按鈕,實現單選按鈕由兩部分組成,也就是RadioButton和
 Gradle for Android 第二篇( Build.gradle入門 )
新年新氣象,奮斗的一年,在這一章,我們將學習以下內容: 理解Gradle文件 編寫簡單的構建任務 自制構建腳本 Gradle for Android 第一篇(