編輯:Android開發實例
常用控件說了不少,現在說說手機開發中也常用到的畫圖。要掌握Android的畫圖,首先就要了解一下,基本用到的圖形接口:
1.Bitmap,可以來自資源/文件,也可以在程序中創建,實際上的功能相當於圖片的存儲空間;
2.Canvas,緊密與Bitmap聯系,把Bitmap比喻內容的話,那麼Canvas就是提供了眾多方法操作Bitamp的平台;
3.Paint,與Canvas緊密聯系,是"畫板"上的筆刷工具,也用於設置View控件上的樣式;
4.Drawable,如果說前三者是看不見地在內存中畫圖,那麼Drawable就是把前三者繪圖結果表現出來的接口。Drawable多個子類,例如:位圖(BitmapDrawable)、圖形(ShapeDrawable)、圖層(LayerDrawable)等。
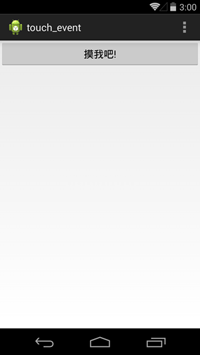
本文主要講解如何在ImageView畫圖,以及如何直接在Button(繼承View的控件)上面繪制自定義圖像。
直接把資源圖片畫出來
在ImageView上畫圖以及繪字
直接在控件背景上畫圖
main.xml的源碼:
- <?xml version="1.0" encoding="utf-8"?>
- <LinearLayout xmlns:android="http://schemas.android.com/apk/res/android"
- android:orientation="vertical"
- android:layout_width="fill_parent"
- android:layout_height="fill_parent"
- >
- <Button android:id="@+id/Button01" android:layout_width="fill_parent" android:layout_height="44px" android:text="顯示資源圖片"></Button>
- <Button android:id="@+id/Button02" android:layout_width="fill_parent" android:layout_height="44px" android:text="顯示並繪畫資源圖片"></Button>
- <Button android:id="@+id/Button03" android:layout_height="44px" android:layout_width="fill_parent" android:text="在控件上繪圖"></Button>
- <ImageView android:id="@+id/ImageView01" android:layout_width="wrap_content" android:layout_height="wrap_content"></ImageView>
- </LinearLayout>
程序的源碼:
- package com.testDraw;
- import android.app.Activity;
- import android.content.res.Resources;
- import android.graphics.Bitmap;
- import android.graphics.Bitmap.Config;
- import android.graphics.BitmapFactory;
- import android.graphics.Canvas;
- import android.graphics.Color;
- import android.graphics.Paint;
- import android.graphics.Typeface;
- import android.graphics.drawable.BitmapDrawable;
- import android.graphics.drawable.Drawable;
- import android.os.Bundle;
- import android.view.View;
- import android.widget.Button;
- import android.widget.ImageView;
- public class testDraw extends Activity {
- ImageView iv;
- Button btn1,btn2,btn3,btn4;
- Resources r;
- @Override
- public void onCreate(Bundle savedInstanceState) {
- super.onCreate(savedInstanceState);
- setContentView(R.layout.main);
- iv=(ImageView)this.findViewById(R.id.ImageView01);
- btn1=(Button)this.findViewById(R.id.Button01);
- btn2=(Button)this.findViewById(R.id.Button02);
- btn3=(Button)this.findViewById(R.id.Button03);
- btn1.setOnClickListener(new ClickEvent());
- btn2.setOnClickListener(new ClickEvent());
- btn3.setOnClickListener(new ClickEvent());
- r = this.getResources();
- }
- class ClickEvent implements View.OnClickListener {
- public void onClick(View v) {
- if(v==btn1)//顯示資源圖片
- {//功能等效
- //iv.setBackgroundResource(R.drawable.icon);//打開資源圖片
- Bitmap bmp=BitmapFactory.decodeResource(r, R.drawable.icon);//打開資源圖片
- iv.setImageBitmap(bmp);
- }
- else if(v==btn2)//顯示並繪畫資源圖片
- {
- Bitmap bmp=BitmapFactory.decodeResource(r, R.drawable.icon);//只讀,不能直接在bmp上畫
- Bitmap newb = Bitmap.createBitmap( 300, 300, Config.ARGB_8888 );
- Canvas canvasTemp = new Canvas( newb );
- canvasTemp.drawColor(Color.TRANSPARENT);
- Paint p = new Paint();
- String familyName ="宋體";
- Typeface font = Typeface.create(familyName,Typeface.BOLD);
- p.setColor(Color.RED);
- p.setTypeface(font);
- p.setTextSize(22);
- canvasTemp.drawText("寫字。。。",50,50,p);
- canvasTemp.drawBitmap(bmp, 50, 50, p);//畫圖
- iv.setImageBitmap(newb);
- }
- else if(v==btn3)//直接在Button上繪圖
- {
- Bitmap newb = Bitmap.createBitmap( btn3.getWidth(), btn3.getHeight(), Config.ARGB_8888 );
- Canvas canvasTemp = new Canvas( newb );
- canvasTemp.drawColor(Color.WHITE);
- Paint p = new Paint();
- String familyName = "宋體";
- Typeface font = Typeface.create(familyName, Typeface.BOLD);
- p.setColor(Color.RED);
- p.setTypeface(font);
- p.setTextSize(20);
- canvasTemp.drawText("寫字。。。", 30, 30, p);
- Drawable drawable = new BitmapDrawable(newb);
- btn3.setBackgroundDrawable(drawable);
- }
- }
- }
- }
 Java4Android開發教程(一)JDK安裝與配置
1、JDK:Java Development Kit,java開發工具包。http://www.oracle.com/technetwork/java/javas
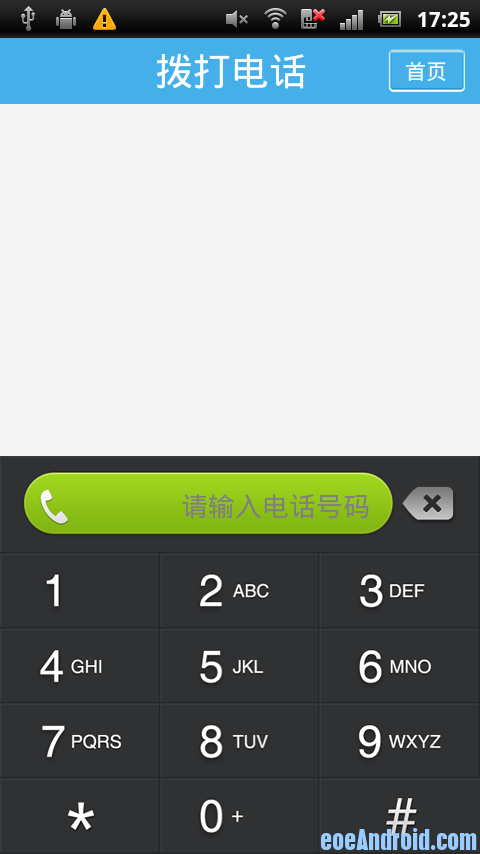 Android撥號盤 支持T9搜索和號碼搜索等撥號盤案例
之前做通訊錄軟件,其中在做撥號盤的時候一直為怎麼實現T9輸入煩惱,上網找了很多帖子,都沒有滿意的答案。不過最後終於是實現了,看社區內好像也有不少朋友需要,在此分享
 Android本地化
Android應用程序可以在許多不同地區的許多設備上運行。為了使應用程序更具交互性,應用程序應該處理以適合應用程序將要使用的語言環境方面的文字,數字,文件等。在本章中,我
 android圖像繪制(四)自定義一個SurfaceView控件
自定義控件(類似按鈕等)的使用,自定義一個SurfaceView。 如某一塊的動態圖(自定義相應),或者類似UC浏覽器下面的工具欄。 如下圖示例: 自