編輯:Android開發實例
一、java socket編程的介紹http://www.fengfly.com/plus/view-202476-1.html
二、URL、UrlConnection網絡編程介紹
三、HTTP網絡編程介紹
http協議-簡介 http協議-C#獲取網頁源代碼 http協議-多線程文件傳輸
四、 Web Service網絡編程介紹
五、 android WebView網絡編程介紹
實例代碼-----------------------------------------------
服務器端模擬
MyServer.java
package com.amaker.socket;

import java.io.IOException;
import java.io.OutputStream;
import java.net.ServerSocket;
import java.net.Socket;
/**
 *
 * Socket 服務器,向客戶端寫Hello Android!
 */
public class MyServer {
    public static void main(String[] args) {
        try {
            ServerSocket server = new ServerSocket(8888);
            while(true){
                Socket client = server.accept();
                OutputStream out = client.getOutputStream();
                String msg = "Hello Android!";
                out.write(msg.getBytes());
                client.close();
            }
        } catch (IOException e) {
            e.printStackTrace();
        }
    }
}
LoginServlet.java
package com.amaker.http;

import java.io.IOException;
import java.io.PrintWriter;

import javax.servlet.ServletException;
import javax.servlet.http.HttpServlet;
import javax.servlet.http.HttpServletRequest;
import javax.servlet.http.HttpServletResponse;

/**
 *
 * 響應登錄Servlet
 */
public class LoginServlet extends HttpServlet {

    public void doGet(HttpServletRequest request, HttpServletResponse response)
            throws ServletException, IOException {

        String username = request.getParameter("username");
        String password = request.getParameter("password");
        System.out.println(username+":"+password);
        response.setContentType("text/html");
        response.setCharacterEncoding("utf-8");
        PrintWriter out = response.getWriter();
        String msg = null;
        if(username!=null&&username.equals("admin")&&password!=null&&password.equals("1")){
            msg = "登錄成功!";
        }else{
            msg = "登錄失敗!";
        }
        out.print(msg);
        out.flush();
        out.close();
    }

    public void doPost(HttpServletRequest request, HttpServletResponse response)
            throws ServletException, IOException {
        doGet(request,response);
    }

}
web.xml
<?xml version="1.0" encoding="UTF-8"?>
<web-app version="2.4"
xmlns="http://java.sun.com/xml/ns/j2ee"
xmlns:xsi="http://www.w3.org/2001/XMLSchema-instance"
xsi:schemaLocation="http://java.sun.com/xml/ns/j2ee
http://java.sun.com/xml/ns/j2ee/web-app_2_4.xsd">
<servlet>
<servlet-name>LoginServlet</servlet-name>
<servlet-class>com.amaker.http.LoginServlet</servlet-class>
</servlet>
<servlet-mapping>
<servlet-name>LoginServlet</servlet-name>
<url-pattern>/servlet/LoginServlet</url-pattern>
</servlet-mapping>
</web-app>
android客戶端
MainActivity.java
package com.amaker.ch13;

import android.app.ListActivity;
import android.content.Intent;
import android.os.Bundle;
import android.view.View;
import android.widget.ArrayAdapter;
import android.widget.ListView;

import com.amaker.ch13.http.LoginActivity;
import com.amaker.ch13.socket.TestSocketActivity;
import com.amaker.ch13.url.TestURLActivity;
import com.amaker.ch13.webservice.TestWebServiceActivity;
import com.amaker.ch13.webservice.WeatherActivity;
import com.amaker.ch13.webview.TestWebViewActivity;

public class MainActivity extends ListActivity {
    @Override
    public void onCreate(Bundle savedInstanceState) {
        super.onCreate(savedInstanceState);
        // 菜單項數組
        String[] items = {"測試 Socket","測試URL、UrlConnection","測試 HTTP","測試 Web Service","天氣預報","Test WebView"};
        // 將菜單項數組設置為ListView的列表項展示
        setListAdapter(new ArrayAdapter<String>(this,
                android.R.layout.simple_list_item_1, items));
        getListView().setTextFilterEnabled(true);
    }

    // 響應菜單項的單擊事件
    protected void onListItemClick(ListView l, View v, int position, long id) {
        Intent intent = null;
        switch (position) {
        case 0:
            intent = new Intent(MainActivity.this,TestSocketActivity.class);
            startActivity(intent);
            break;
        case 1:
            intent = new Intent(MainActivity.this,TestURLActivity.class);
            startActivity(intent);
            break;
        case 2:
            intent = new Intent(MainActivity.this,LoginActivity.class);
            startActivity(intent);
            break;
        case 3:
            intent = new Intent(MainActivity.this,TestWebServiceActivity.class);
            startActivity(intent);
            break;
        case 4:
            intent = new Intent(MainActivity.this,WeatherActivity.class);
            startActivity(intent);
            break;
        case 5:
            intent = new Intent(MainActivity.this,TestWebViewActivity.class);
            startActivity(intent);
            break;
        }
    }
}
AndroidManifest.xml
<?xml version="1.0" encoding="utf-8"?>
<manifest xmlns:android="http://schemas.android.com/apk/res/android"
      package="com.amaker.ch13"
      android:versionCode="1"
      android:versionName="1.0">
    <application android:icon="@drawable/icon" android:label="@string/app_name">
        <activity android:name=".MainActivity"
                  android:label="@string/app_name">
            <intent-filter>
                <action android:name="android.intent.action.MAIN" />
                <category android:name="android.intent.category.LAUNCHER" />
            </intent-filter>
        </activity>

        <activity android:name="com.amaker.ch13.http.LoginActivity"/>

        <activity android:name="com.amaker.ch13.socket.TestSocketActivity"/>

        <activity android:name="com.amaker.ch13.url.TestURLActivity"/>

        <activity android:name="com.amaker.ch13.webservice.TestWebServiceActivity"/>

        <activity android:name="com.amaker.ch13.webservice.WeatherActivity"/>

        <activity android:name="com.amaker.ch13.webview.TestWebViewActivity"/>

    </application>
    <uses-sdk android:minSdkVersion="3" />

<uses-permission android:name="android.permission.ACCESS_NETWORK_STATE"></uses-permission>
<uses-permission android:name="android.permission.INTERNET"></uses-permission>
</manifest>
一、socket編程
TestSocketActivity.java
package com.amaker.ch13.socket;

import java.io.IOException;
import java.io.InputStream;
import java.net.Socket;
import java.net.UnknownHostException;

import android.app.Activity;
import android.os.Bundle;
import android.widget.TextView;
import com.amaker.ch13.R;
/**
 *
 * Android Socket 客戶端接收服務器信息
 */
public class TestSocketActivity extends Activity {
    private TextView myTextView;
    @Override
    public void onCreate(Bundle savedInstanceState) {
        super.onCreate(savedInstanceState);
        setContentView(R.layout.socket);
        myTextView = (TextView)findViewById(R.id.msgTextView01);
        try {
            Socket socket = new Socket("192.168.1.101",8888);
            InputStream in = socket.getInputStream();
            byte[] buffer = new byte[in.available()];
            in.read(buffer);
            String msg = new String(buffer);
            myTextView.setText(msg);
        } catch (UnknownHostException e) {
            e.printStackTrace();
        } catch (IOException e) {
            e.printStackTrace();
        }
    }
}
socket.xml
<?xml version="1.0" encoding="utf-8"?>
<LinearLayout xmlns:android="http://schemas.android.com/apk/res/android"
    android:orientation="vertical"
    android:layout_width="fill_parent"
    android:layout_height="fill_parent"
    >

    <TextView
    android:text="等待接收服務器信息..."
    android:id="@+id/msgTextView01"
    android:layout_width="wrap_content"
    android:layout_height="wrap_content"></TextView>

</LinearLayout>
二、URL、UrlConnection編程
TestURLActivity.java
package com.amaker.ch13.url;

import java.io.InputStream;
import java.net.URL;
import java.net.URLConnection;

import android.app.Activity;
import android.graphics.Bitmap;
import android.graphics.BitmapFactory;
import android.os.Bundle;
import android.widget.ImageView;

import com.amaker.ch13.R;
/**
 * 通過URL進行網絡連接
 */
public class TestURLActivity extends Activity {
    private ImageView imageView;
    @Override
    public void onCreate(Bundle savedInstanceState) {
        super.onCreate(savedInstanceState);
        setContentView(R.layout.test_url);
        imageView = (ImageView)findViewById(R.id.ImageView01);

        String urlStr = "http://192.168.1.101:8080/Chapter_13_Networking_server/upload/zs.jpg";

        try {
            URL url = new URL(urlStr);
            // 1. 直接使用URL獲得輸入流
            //InputStream in = url.openStream();

            // 2. 獲得URLconnection
            URLConnection conn = url.openConnection();
            InputStream in = conn.getInputStream();

            // 3. 如果是HTTP協議可以使用HttpURLConnection
            //HttpURLConnection httpConn = (HttpsURLConnection)conn;
            //in = httpConn.getInputStream();

            Bitmap bm = BitmapFactory.decodeStream(in);

            imageView.setImageBitmap(bm);

        } catch (Exception e) {
            e.printStackTrace();
        }
    }
}
test_url.xml
<?xml version="1.0" encoding="utf-8"?>
<LinearLayout xmlns:android="http://schemas.android.com/apk/res/android"
    android:orientation="vertical"
    android:layout_width="fill_parent"
    android:layout_height="fill_parent"
    >

    <ImageView
        android:id="@+id/ImageView01"
        android:layout_width="wrap_content"
        android:layout_height="wrap_content"></ImageView>

</LinearLayout>
三、 HTTP編程
LoginActivity.java
package com.amaker.ch13.http;

import java.io.UnsupportedEncodingException;
import java.util.ArrayList;
import java.util.List;

import org.apache.http.HttpResponse;
import org.apache.http.NameValuePair;
import org.apache.http.client.entity.UrlEncodedFormEntity;
import org.apache.http.client.methods.HttpPost;
import org.apache.http.impl.client.DefaultHttpClient;
import org.apache.http.message.BasicNameValuePair;
import org.apache.http.protocol.HTTP;
import org.apache.http.util.EntityUtils;

import android.app.Activity;
import android.app.AlertDialog;
import android.content.DialogInterface;
import android.os.Bundle;
import android.view.View;
import android.view.View.OnClickListener;
import android.widget.Button;
import android.widget.EditText;

import com.amaker.ch13.R;
public class LoginActivity extends Activity {
    /*
     * 聲明使用到的Button和EditText視圖組件
     */
    private Button cancelBtn,loginBtn;
    private EditText userEditText,pwdEditText;

    @Override
    public void onCreate(Bundle savedInstanceState) {
        super.onCreate(savedInstanceState);
        setContentView(R.layout.http1);
        /*
         * 實例化視圖組件
         */
        cancelBtn = (Button)findViewById(R.id.cancelButton);
        loginBtn = (Button)findViewById(R.id.loginButton);

        userEditText = (EditText)findViewById(R.id.userEditText);
        pwdEditText = (EditText)findViewById(R.id.pwdEditText);

        /*
         * 設置登錄監聽器
         */
        loginBtn.setOnClickListener(new OnClickListener() {
            @Override
            public void onClick(View v) {
                    String username = userEditText.getText().toString();
                    String pwd = pwdEditText.getText().toString();
                    login(username,pwd);
            }
        });

        /*
         * 設置取消監聽器
         */
        cancelBtn.setOnClickListener(new OnClickListener() {
            @Override
            public void onClick(View v) {
                finish();
            }
        });


    }

    /*
     * 定義一個顯示提示信息的對話框
     */
    private void showDialog(String msg){
        AlertDialog.Builder builder = new AlertDialog.Builder(this);
        builder.setMessage(msg)
               .setCancelable(false)
               .setPositiveButton("確定", new DialogInterface.OnClickListener() {
                   public void onClick(DialogInterface dialog, int id) {
                   }
               });
        AlertDialog alert = builder.create();
        alert.show();
    }
    /*
     * 通過用戶名稱和密碼進行查詢,發送Post請求,獲得響應結果。
     */
    private void login(String username,String password){
        // 1. 使用 HttpURLConnection 實現
        /*String urlStr = "http://192.168.1.101:8080/Chapter_13_Networking_server/servlet/LoginServlet?";
        String queryString = "username="+username+"&password="+password;
        urlStr+=queryString;
        try {
            URL url = new URL(urlStr);
            HttpURLConnection conn = (HttpURLConnection)url.openConnection();

            if(conn.getResponseCode()==HttpURLConnection.HTTP_OK){
                InputStream in = conn.getInputStream();
                byte[] b = new byte[in.available()];
                in.read(b);
                String msg = new String(b);
                showDialog(msg);
                in.close();
            }
            conn.disconnect();
        } catch (Exception e) {
            showDialog(e.getMessage());
        }*/
        // 2. 使用 Apache HTTP 客戶端實現
        String urlStr = "http://192.168.1.101:8080/Chapter_13_Networking_server/servlet/LoginServlet";
        HttpPost request = new HttpPost(urlStr);
        // 如果傳遞參數個數比較多的話,我們可以對傳遞的參數進行封裝
        List<NameValuePair> params = new ArrayList<NameValuePair>();
        params.add(new BasicNameValuePair("username", username));
        params.add(new BasicNameValuePair("password", password));
        try {
            request.setEntity( new UrlEncodedFormEntity(params,HTTP.UTF_8));
            HttpResponse response = new DefaultHttpClient().execute(request);
            if(response.getStatusLine().getStatusCode()==200){
                String msg = EntityUtils.toString(response.getEntity());
                showDialog(msg);
            }
        } catch (Exception e) {
            e.printStackTrace();
        }
    }
}
http1.xml
<?xml version="1.0" encoding="utf-8"?>
<LinearLayout xmlns:android="http://schemas.android.com/apk/res/android"
    android:orientation="vertical" android:layout_width="fill_parent"
    android:layout_height="fill_parent">

    <TableLayout
    android:layout_width="fill_parent"
    android:layout_height="fill_parent"
    android:stretchColumns="1">
        <TableRow>
            <TextView
                android:text="用戶名稱:"
                android:id="@+id/TextView"
                android:layout_width="wrap_content"
                android:layout_height="wrap_content"
                ></TextView>

            <EditText
                android:text=""
                android:id="@+id/userEditText"
                android:layout_width="fill_parent"
                android:layout_height="wrap_content"></EditText>
        </TableRow>


        <TableRow>
            <TextView
                android:text="用戶密碼:"
                android:id="@+id/TextView"
                android:layout_width="wrap_content"
                android:layout_height="wrap_content"
                ></TextView>

            <EditText
                android:text=""
                android:id="@+id/pwdEditText"
                android:layout_width="fill_parent"
                android:layout_height="wrap_content"
                android:password="true"></EditText>
        </TableRow>

        <TableRow android:gravity="right">
            <Button
                android:text="取消"
                android:id="@+id/cancelButton"
                android:layout_width="wrap_content"
                android:layout_height="wrap_content"></Button>

            <Button
                android:text="登陸"
                android:id="@+id/loginButton"
                android:layout_width="wrap_content"
                android:layout_height="wrap_content"></Button>
        </TableRow>

    </TableLayout>

</LinearLayout>
四、Web Service編程
TestWebServiceActivity.java
package com.amaker.ch13.webservice;

import java.io.IOException;

import org.ksoap2.SoapEnvelope;
import org.ksoap2.serialization.MarshalBase64;
import org.ksoap2.serialization.PropertyInfo;
import org.ksoap2.serialization.SoapObject;
import org.ksoap2.serialization.SoapSerializationEnvelope;
import org.ksoap2.transport.AndroidHttpTransport;
import org.xmlpull.v1.XmlPullParserException;

import android.app.Activity;
import android.os.Bundle;

public class TestWebServiceActivity extends Activity {

    @Override
    public void onCreate(Bundle savedInstanceState) {
        super.onCreate(savedInstanceState);
        String serviceNamespace = "http://tempuri.org/";
        String serviceURL = "http://www.ayandy.com/Service.asmx";
        String methodName = "getWeatherbyCityName";

        SoapObject request = new SoapObject(serviceNamespace, methodName);

        PropertyInfo info = new PropertyInfo();
        info.setName("theCityName");
        info.setValue("北京");

        PropertyInfo info2 = new PropertyInfo();
        info2.setName("theDayFlag");
        info2.setValue("1");

        request.addProperty(info);
        request.addProperty(info2);

        SoapSerializationEnvelope envelope = new SoapSerializationEnvelope(SoapEnvelope.VER11);
        envelope.bodyOut = request;
        (new MarshalBase64()).register(envelope);

        AndroidHttpTransport ht = new AndroidHttpTransport(serviceURL);

        ht.debug = true;

        try {
            ht.call("http://tempuri.org/getWeatherbyCityName", envelope);
            if(envelope.getResponse()!=null){
                System.out.println(envelope.getResult());
            }
        } catch (IOException e) {
            // TODO Auto-generated catch block
            e.printStackTrace();
        } catch (XmlPullParserException e) {
            // TODO Auto-generated catch block
            e.printStackTrace();
        }


    }
}
WeatherActivity.java
package com.amaker.ch13.webservice;

import java.util.List;

import android.app.Activity;
import android.os.Bundle;
import android.view.View;
import android.widget.AdapterView;
import android.widget.ArrayAdapter;
import android.widget.Spinner;
import android.widget.TextView;
import android.widget.AdapterView.OnItemSelectedListener;
import com.amaker.ch13.R;

/**
 *
 * 顯示天氣預報
 */
public class WeatherActivity extends Activity {
    // 聲明視圖組件
    private TextView displayTextView;
    private Spinner spinner;
    @Override
    public void onCreate(Bundle savedInstanceState) {
        super.onCreate(savedInstanceState);

        setContentView(R.layout.weather);
        // 實例化視圖組件
        displayTextView = (TextView) findViewById(R.id.displayTextView03);
        spinner = (Spinner) findViewById(R.id.citySpinner01);

        List<String> citys = WebServiceUtil.getCityList();
        ArrayAdapter a = new ArrayAdapter(this,
                android.R.layout.simple_spinner_dropdown_item, citys);
        spinner.setAdapter(a);

        spinner.setOnItemSelectedListener(new OnItemSelectedListener() {

            @Override
            public void onItemSelected(AdapterView<?> arg0, View arg1,
                    int arg2, long arg3) {
                String msg = WebServiceUtil.getWeatherMsgByCity(spinner.getSelectedItem().toString());
                displayTextView.setText(msg);
            }
            @Override
            public void onNothingSelected(AdapterView<?> arg0) {

            }
        });


    }
}
WebServiceUtil.java
package com.amaker.ch13.webservice;

import java.io.IOException;
import java.io.InputStream;
import java.util.ArrayList;
import java.util.List;

import javax.xml.parsers.DocumentBuilder;
import javax.xml.parsers.DocumentBuilderFactory;

import org.apache.http.HttpResponse;
import org.apache.http.NameValuePair;
import org.apache.http.client.entity.UrlEncodedFormEntity;
import org.apache.http.client.methods.HttpPost;
import org.apache.http.impl.client.DefaultHttpClient;
import org.apache.http.message.BasicNameValuePair;
import org.apache.http.protocol.HTTP;
import org.apache.http.util.EntityUtils;
import org.ksoap2.SoapEnvelope;
import org.ksoap2.serialization.MarshalBase64;
import org.ksoap2.serialization.SoapObject;
import org.ksoap2.serialization.SoapSerializationEnvelope;
import org.ksoap2.transport.AndroidHttpTransport;
import org.w3c.dom.Document;
import org.w3c.dom.Element;
import org.w3c.dom.Node;
import org.w3c.dom.NodeList;
import org.xmlpull.v1.XmlPullParserException;

/**
 *
 * 天氣預報工具類
 */
public class WebServiceUtil {

    /*
     * 通過傳遞城市名稱獲得天氣信息
     */
    public static String getWeatherMsgByCity(String cityName) {
        String url = "http://webservice.webxml.com.cn/WebServices/WeatherWS.asmx/getWeather";
        HttpPost request = new HttpPost(url);
        List<NameValuePair> params = new ArrayList<NameValuePair>();
        params.add(new BasicNameValuePair("theCityCode", cityName));
        params.add(new BasicNameValuePair("theUserID", ""));
        String result = null;
        try {
            UrlEncodedFormEntity entity = new UrlEncodedFormEntity(params,
                    HTTP.UTF_8);
            request.setEntity(entity);
            HttpResponse response = new DefaultHttpClient().execute(request);
            if (response.getStatusLine().getStatusCode() == 200) {
                result = EntityUtils.toString(response.getEntity());
                return parse2(result);
            }
        } catch (Exception e) {
            e.printStackTrace();
        }
        return null;
    }

    /*
     * 使用ksoap,獲得城市列表
     */
    public static List<String> getCityList() {
        // 命名空間
        String serviceNamespace = "http://WebXml.com.cn/";
        // 請求URL
        String serviceURL = "http://webservice.webxml.com.cn/WebServices/WeatherWS.asmx";
        // 調用的方法
        String methodName = "getRegionProvince";
        // 實例化SoapObject對象
        SoapObject request = new SoapObject(serviceNamespace, methodName);
        // 獲得序列化的Envelope
        SoapSerializationEnvelope envelope = new SoapSerializationEnvelope(
                SoapEnvelope.VER11);
        envelope.bodyOut = request;
        (new MarshalBase64()).register(envelope);

        // Android傳輸對象
        AndroidHttpTransport ht = new AndroidHttpTransport(serviceURL);
        ht.debug = true;

        try {
            // 調用
            ht.call("http://WebXml.com.cn/getRegionProvince", envelope);
            if (envelope.getResponse() != null) {
                return parse(envelope.bodyIn.toString());
            }
        } catch (IOException e) {
            e.printStackTrace();
        } catch (XmlPullParserException e) {
            e.printStackTrace();
        }

        return null;
    }

    /*
     * 對天氣信息XML文件進行解析
     */
    private static String parse2(String str){
        String temp;
        String[] temps;
        List list = new ArrayList();
        StringBuilder sb = new StringBuilder("");
        if(str!=null&&str.length()>0){
            temp = str.substring(str.indexOf("<string>"));
            temps = temp.split("</string>");
            for (int i = 0; i < temps.length; i++) {
                sb.append(temps[i].substring(12));
                sb.append("\n");
            }
        }
        return sb.toString();
    }

    /*
     * 對得到的城市XML信息進行解析
     */
    private static List<String> parse(String str) {
        String temp;
        List<String> list = new ArrayList<String>();
        if (str != null && str.length() > 0) {
            int start = str.indexOf("string");
            int end = str.lastIndexOf(";");
            temp = str.substring(start, end - 3);
            String[] test = temp.split(";");
            for (int i = 0; i < test.length; i++) {
                if (i == 0) {
                    temp = test[i].substring(7);
                } else {
                    temp = test[i].substring(8);
                }
                int index = temp.indexOf(",");
                list.add(temp.substring(0, index));
            }
        }
        return list;
    }

}
weather.xml
<?xml version="1.0" encoding="utf-8"?>
<LinearLayout xmlns:android="http://schemas.android.com/apk/res/android"
    android:orientation="vertical" android:layout_width="fill_parent"
    android:layout_height="fill_parent">

    <TextView
        android:text="天氣預報"
        android:id="@+id/titleTextView01"
        android:layout_width="wrap_content"
        android:layout_height="wrap_content"></TextView>

    <LinearLayout
        android:orientation="horizontal"
        android:layout_width="fill_parent"
        android:layout_height="wrap_content">

        <TextView
            android:text="請選擇城市:"
            android:id="@+id/cityTextView02"
            android:layout_width="wrap_content"
            android:layout_height="wrap_content"></TextView>

        <Spinner
            android:id="@+id/citySpinner01"
            android:layout_width="fill_parent"
            android:layout_height="wrap_content"></Spinner>
    </LinearLayout>

    <ScrollView
        android:id="@+id/ScrollView01"
        android:layout_width="wrap_content"
        android:layout_height="wrap_content">

        <TextView
        android:text="@+id/displayTextView03"
        android:id="@+id/displayTextView03"
        android:layout_width="fill_parent"
        android:layout_height="fill_parent"></TextView>

    </ScrollView>
</LinearLayout>
五、WebView編程
TestWebViewActivity.java
package com.amaker.ch13.webview;

import android.app.Activity;
import android.os.Bundle;
import android.webkit.WebView;

import com.amaker.ch13.R;
/**
 * 通過WebView浏覽網絡
 */
public class TestWebViewActivity extends Activity {
    private WebView webView;
    @Override
    public void onCreate(Bundle savedInstanceState) {
        super.onCreate(savedInstanceState);
        setContentView(R.layout.test_webview);
        webView = (WebView)findViewById(R.id.mywebview);
       /* String url = "http://www.google.com";
        webView.loadUrl(url);*/

        String html = "";
        html+="<html>";
            html+="<body>";
                html+="<a href=http://www.google.com>Google Home</a>";
            html+="</body>";
        html+="</html>";

        webView.loadData(html, "text/html", "utf-8");


    }
}
test_webview.xml
<?xml version="1.0" encoding="utf-8"?>
<LinearLayout xmlns:android="http://schemas.android.com/apk/res/android"
    android:orientation="vertical"
    android:layout_width="fill_parent"
    android:layout_height="fill_parent"
    >
     <WebView
        android:id="@+id/mywebview"
        android:layout_width="fill_parent"
        android:layout_height="fill_parent"
    />
</LinearLayout>
 Android如何通過手機獲取驗證碼來完成注冊功能
注冊很多app或者網絡賬戶的時候,經常需要手機獲取驗證碼,來完成注冊,那時年少,只是覺得手機獲取驗證碼這件事兒很好玩,並沒有關心太多,她是如何實現的,以及她背後的
 Android中搜索SD卡文件的開發實例
我們在進行Android開發時往往需要訪問SD卡的內容,而且因為文件很多,希望
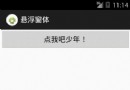 android編程實現懸浮窗體的方法
本文實例講述了android編程實現懸浮窗體的方法。分享給大家供大家參考,具體如下: 突然對懸浮窗體感興趣,查資料做了個小Demo,效果是點擊按鈕後,關閉當前Ac
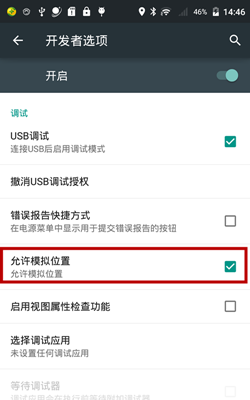 Android系統模擬位置的使用方法
本文為大家分享了Android模擬位置的使用方法,支持Android6.0,供大家參考,具體內容如下 1、開啟系統設置中的模擬位置 Android 6.0 以下: