編輯:Android開發實例
前言
在很多場景中,都需要用到攝像頭去拍攝照片或視頻,在照片或視頻的基礎之上進行處理。但是Android系統源碼是開源的,很多設備廠商均可使用,並且定制比較混亂。一般而言,在需要用到攝像頭拍照或攝像的時候,均會直接調用系統現有的相機應用,去進行拍照或攝像,我們只取它拍攝的結果進行處理,這樣避免了不同設備的攝像頭的一些細節問題。本文將介紹在Android應用中,如何調用系統現有的相機應用去拍攝照片與短片,並對其進行處理,最後均會以一個簡單的Demo來演示效果。
本文的主要內容如下:
系統現有相機應用的調用
對於如何調用系統現有應用,之前就有講解,這裡簡單再說一下。在開發的應用中調用系統現有應用,需要使用Intent指定開啟的應用的Action和Category,然後通過startActivity(Intent)或者startActivityForResult(Intent,int)開啟指定的Activity,如果使用startActivityForResult()方法開啟並需要返回值,再重寫onActivityResult(int,int,Intent)即可。
先來看看系統現有相機應用的AndroidManifest.xml清單文件定義的Activity:
- <activity
- android:name="com.android.camera.Camera"
- android:clearTaskOnLaunch="true"
- android:configChanges="orientation|keyboardHidden"
- android:screenOrientation="landscape"
- android:taskAffinity="android.task.camera"
- android:theme="@android:style/Theme.Black.NoTitleBar.Fullscreen" >
- <intent-filter>
- <action android:name="android.intent.action.MAIN" />
- <categroy android:name="android.intent.category.DEFAULT" />
- <categroy android:name="android.intent.category.LAUNCHER" />
- </intent-filter>
- <intent-filter>
- <action android:name="android.media.action.IMAGE_CAPTURE" />
- <categroy android:name="android.intent.category.DEFAULT" />
- </intent-filter>
- <intent-filter>
- <action android:name="android.media.action.STILL_IMAGE_CAMERA" />
- <categroy android:name="android.intent.category.DEFAULT" />
- </intent-filter>
- </activity>
- <activity
- android:name="com.android.camera.VideoCamera"
- android:clearTaskOnLaunch="true"
- android:configChanges="origientation|keyboardHidden"
- android:label="@string/video_camera_label"
- android:screenOrientation="landscape"
- android:taskAffinity="android.task.camcorder"
- android:theme="@android:style/theme.Black.NoTitleBar.Fullscreen" >
- <intent-filter>
- <action android:name="android.media.action.VIDEO_CAMERA" />
- <categroy android:name="android.intent.category.DEFAULT" />
- </intent-filter>
- <intent-filter>
- <action android:name="android.media.action.VIDEO_CAPTURE" />
- <categroy android:name="android.intent.category.DEFAULT" />
- </intent-filter>
- </activity>
它定義了兩個Activity,com.android.camera.Camera表示照相機,com.android.camera.VideoCamera表示攝像機。從字面意思可以看出,為了捕獲系統相機返回的數據,一般需要使用一下兩個Action即可開啟照相機與攝像機:
上面兩個參數,均在MediaStore類中以靜態常量的形式定義好了,分別是:MediaStore.ACTION_IMAGE_CAPTURE(相機)和MediaStore.ACTION_VIDEO_CAPTURE(攝像機)。
系統現有相機拍攝照片
上面介紹到,開啟系統現有相機應用拍攝照片,需要用的MediaStore.ACTION_IMAGE_CAPTURE作為Intent的action開啟Activity即可。但是在使用系統現有相機用用的時候,默認會把圖片保存到系統圖庫的目錄下,如果需要指定圖片文件的保存路徑,需要額外在Intent中設置。
設置系統現有相機應用的拍攝照片的保存路徑,需要用Intent.putExtra()方法通過MediaStore.EXTRA_OUTPUT去設置Intent的額外數據,這裡傳遞的是一個Uri參數,可以是一個文件路徑的Uri。
- Intent intent=new Intent();
- // 指定開啟系統相機的Action
- intent.setAction(MediaStore.ACTION_IMAGE_CAPTURE);
- intent.addCategory(Intent.CATEGORY_DEFAULT);
- // 根據文件地址創建文件
- File file=new File(FILE_PATH);
- // 把文件地址轉換成Uri格式
- Uri uri=Uri.fromFile(file);
- // 設置系統相機拍攝照片完成後圖片文件的存放地址
- intent.putExtra(MediaStore.EXTRA_OUTPUT, uri);
獲取系統現有相機拍攝的圖片
在新開啟的Activity中,如果需要獲取它的返回值,則需要使用startActivityForResult(Intent,int)方法開啟Activity,並重寫onActivityResult(int,int,Intent)獲取系統相機的返回數據,那麼我們只需要在onActivityResult()中獲取到返回值即可。
系統相機拍攝的照片,如果不指定路徑,會保存在系統默認文件夾下,可以使用Intent.getExtra()方法得到,得到的是一個Uri地址,表示了一個內容提供者的地址。如果通過MediaStore.EXTRA_OUTPUT指定了保存路徑,那麼通過Intent.getExtra()得到的將是一個空地址,但是既然是我們指定的地址,那麼也不愁找不到它了。
系統現有相機拍攝圖片Demo
上面講解了如何在開發的應用中使用系統相機拍攝照片並獲得它所涉及到的內容,下面通過一個簡單的Demo演示一下。在Demo中,有兩個Button分別以指定路徑的方式和不指定路徑的方式啟動系統相機,並獲取返回值顯示到ImageView中,Demo中注釋比較詳細,這裡不再累述了。
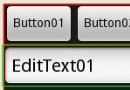
布局代碼:activity_syscamera.xml
- <?xml version="1.0" encoding="utf-8"?>
- <LinearLayout xmlns:android="http://schemas.android.com/apk/res/android"
- android:layout_width="match_parent"
- android:layout_height="match_parent"
- android:orientation="vertical" >
- <Button
- android:id="@+id/btn_StartCamera"
- android:layout_width="wrap_content"
- android:layout_height="wrap_content"
- android:text="系統相機拍照--指定路徑到SD卡" />
- <Button
- android:id="@+id/btn_StartCameraInGallery"
- android:layout_width="wrap_content"
- android:layout_height="wrap_content"
- android:text="系統相機拍照--默認圖庫" />
- <ImageView
- android:id="@+id/iv_CameraImg"
- android:layout_width="match_parent"
- android:layout_height="match_parent" />
- </LinearLayout>
實現代碼:SysCameraActivity.java
- package cn.bgxt.callsystemcamera;
- import java.io.File;
- import android.app.Activity;
- import android.content.Intent;
- import android.graphics.Bitmap;
- import android.graphics.BitmapFactory;
- import android.net.Uri;
- import android.os.Bundle;
- import android.provider.MediaStore;
- import android.util.Log;
- import android.view.View;
- import android.widget.Button;
- import android.widget.ImageView;
- public class SysCameraActivity extends Activity {
- private Button btn_StartCamera, btn_StartCameraInGallery;
- private ImageView iv_CameraImg;
- private static final String TAG = "main";
- private static final String FILE_PATH = "/sdcard/syscamera.jpg";
- @Override
- protected void onCreate(Bundle savedInstanceState) {
- super.onCreate(savedInstanceState);
- setContentView(R.layout.activity_syscamera);
- btn_StartCamera = (Button) findViewById(R.id.btn_StartCamera);
- btn_StartCameraInGallery = (Button) findViewById(R.id.btn_StartCameraInGallery);
- iv_CameraImg = (ImageView) findViewById(R.id.iv_CameraImg);
- btn_StartCamera.setOnClickListener(click);
- btn_StartCameraInGallery.setOnClickListener(click);
- }
- private View.OnClickListener click = new View.OnClickListener() {
- @Override
- public void onClick(View v) {
- Intent intent = null;
- switch (v.getId()) {
- // 指定相機拍攝照片保存地址
- case R.id.btn_StartCamera:
- intent = new Intent();
- // 指定開啟系統相機的Action
- intent.setAction(MediaStore.ACTION_IMAGE_CAPTURE);
- intent.addCategory(Intent.CATEGORY_DEFAULT);
- // 根據文件地址創建文件
- File file = new File(FILE_PATH);
- if (file.exists()) {
- file.delete();
- }
- // 把文件地址轉換成Uri格式
- Uri uri = Uri.fromFile(file);
- // 設置系統相機拍攝照片完成後圖片文件的存放地址
- intent.putExtra(MediaStore.EXTRA_OUTPUT, uri);
- startActivityForResult(intent, 0);
- break;
- // 不指定相機拍攝照片保存地址
- case R.id.btn_StartCameraInGallery:
- intent = new Intent();
- // 指定開啟系統相機的Action
- intent.setAction(MediaStore.ACTION_IMAGE_CAPTURE);
- intent.addCategory(Intent.CATEGORY_DEFAULT);
- startActivityForResult(intent, 1);
- break;
- default:
- break;
- }
- }
- };
- @Override
- protected void onActivityResult(int requestCode, int resultCode, Intent data) {
- Log.i(TAG, "系統相機拍照完成,resultCode="+resultCode);
- if (requestCode == 0) {
- File file = new File(FILE_PATH);
- Uri uri = Uri.fromFile(file);
- iv_CameraImg.setImageURI(uri);
- } else if (requestCode == 1) {
- Log.i(TAG, "默認content地址:"+data.getData());
- iv_CameraImg.setImageURI(data.getData());
- }
- }
- }
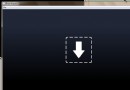
效果展示:
這裡只是簡單的演示了如何調用系統現有的相機應用獲取拍攝的圖片,沒有做圖片資源的回收,所以可能會有內存溢出的錯誤,重新啟動應用即可。
系統現有相機拍攝視頻
從系統現有的相機應用中獲取拍攝的視頻,與獲取拍攝的圖片過程大致相同,但是它除了可以通過putExtra()設置MediaStore.EXTRA_OUTPUT輸出路徑外,還可以設置其它值,這裡簡單介紹一下:
系統現有相機拍攝視頻Demo
既然和拍攝照片的流程一樣,這裡就不再累述了,直接上Demo。在Demo中通過一個Button啟動一個系統現有相機拍攝視頻,最後保存在SD卡上。
實現代碼:
- package cn.bgxt.callsystemcamera;
- import java.io.File;
- import android.app.Activity;
- import android.content.Intent;
- import android.net.Uri;
- import android.os.Bundle;
- import android.provider.MediaStore;
- import android.util.Log;
- import android.view.View;
- import android.widget.Button;
- public class SysVideoCameraActivity extends Activity {
- private Button btn_StartVideoCamera;
- private static final String FILE_PATH = "/sdcard/sysvideocamera.3gp";
- private static final String TAG="main";
- @Override
- protected void onCreate(Bundle savedInstanceState) {
- super.onCreate(savedInstanceState);
- setContentView(R.layout.activity_sysvideocamera);
- btn_StartVideoCamera = (Button) findViewById(R.id.btn_StartVideoCamera);
- btn_StartVideoCamera.setOnClickListener(click);
- }
- private View.OnClickListener click = new View.OnClickListener() {
- @Override
- public void onClick(View v) {
- Intent intent = new Intent();
- intent.setAction("android.media.action.VIDEO_CAPTURE");
- intent.addCategory("android.intent.category.DEFAULT");
- File file = new File(FILE_PATH);
- if(file.exists()){
- file.delete();
- }
- Uri uri = Uri.fromFile(file);
- intent.putExtra(MediaStore.EXTRA_OUTPUT, uri);
- startActivityForResult(intent, 0);
- }
- };
- @Override
- protected void onActivityResult(int requestCode, int resultCode, Intent data) {
- Log.i(TAG, "拍攝完成,resultCode="+requestCode);
- }
- }
效果展示:
源碼下載
總結
到此就把如何使用系統現有相機應用拍攝照片與視頻都講解清楚了,在非相機相關的項目中,如果需要拍照的話,一般都是調用系統現有的相機應用,而不會直接調用Camera硬件去獲取圖像。
 android 9PNG圖片制作過程(圖文介紹)
在android開發的過程中我們經常因為沒有好的美工圖片失真,這樣使界面看起來要遜色很多,有的時候可能我們會想在drawable-hdpi,ldpi,mdpi下放
 Android JSON解析器
JSON代表JavaScript對象符號。它是一個獨立的數據交換格式,是XML的最佳替代品。本章介紹了如何解析JSON文件,並從中提取所需的信息。Android提供了四個
 Android JSON解析器
JSON代表JavaScript對象符號。它是一個獨立的數據交換格式,是XML的最佳替代品。本章介紹了如何解析JSON文件,並從中提取所需的信息。Android提供了四個
 Android提高之MediaPlayer播放網絡視頻的實現方法
前面講解了MediaPlayer播放網絡音頻,主要介紹了MediaPlayer關於網絡音頻的緩沖和進度條控制的方法,本文再來講解一下MediaPlayer播放網絡